


Delegate access lets another person send email and manage your calendar on your behalf; set it in Outlook via File > Account Settings > Delegate Access.
Outlook’s Delegate Access feature puts you back in control by letting you securely delegate calendar and email management to trusted colleagues, and this comprehensive guide will show you exactly how to make it work for your organization.
Managing a busy schedule and overflowing inbox can be a real challenge. Outlook’s Delegate Access feature offers a powerful solution by allowing you to grant another person, known as a delegate, permission to manage your email and calendar. This means they can schedule appointments, respond to meeting requests, and even send emails on your behalf. Particularly useful in corporate settings, delegation empowers assistants, team members, and colleagues to efficiently manage schedules and book meetings for executives and other team members, streamlining workflows and boosting productivity.
This comprehensive guide will answer all your questions about Outlook Calendar Delegate Access. We’ll cover the basics of what it is, delve into the step-by-step process of setting it up, and explain how to manage different permission levels for your delegates. While Delegate Access grants significant control, it’s important to distinguish it from calendar sharing, which offers a different approach to collaborative scheduling. Calendar sharing allows you to share your calendar’s availability with others without granting them control over managing it. For a deeper dive into the differences and benefits of calendar sharing, please refer to our detailed article Share Your Outlook Calendar in Easy Steps.
Beyond the built-in Outlook features, this guide will also explore how the Virto Calendar App for SharePoint Online & Microsoft 365 can further enhance your delegation and calendar management capabilities, providing even greater flexibility and control.
What Is Delegate Access in Outlook?
Delegating access to your Outlook calendar and email is a fundamental feature for efficient workplace collaboration. In this section, we’ll explore what delegation means in practice, examine the different permission levels available, and look at common scenarios where delegate access proves invaluable.
Understanding delegation: What does delegate access mean in Outlook?
Delegate access in Outlook is a comprehensive permission system that enables users to grant others the authority to manage their email, calendar, and tasks. Unlike basic calendar sharing, which only allows viewing of schedules, delegation provides deeper access and management capabilities. When you assign someone as your delegate, they can act on your behalf—sending emails, scheduling meetings, and responding to invitations as if they were you.
The key distinction between delegation and simple calendar sharing lies in the level of control. While shared calendars let colleagues view your schedule and, in some cases, add events, delegation extends these permissions to include managing responses, sending invitations, and even accessing your inbox when necessary. This makes delegation a more powerful tool for scenarios requiring active calendar management rather than just schedule visibility.
👉 What does delegate mean in Outlook calendar? In Outlook, a delegate is someone you authorize to manage your calendar and, optionally, your email on your behalf. Delegates can perform tasks such as scheduling meetings, responding to meeting requests, and editing or creating calendar events, depending on the level of access you grant them.
What does delegate access do in Outlook?: Key delegation capabilities
Outlook offers three primary delegate roles, each with distinct permissions:
Editor delegates have the most comprehensive access, allowing them to create, modify, and delete items in your calendar. They can schedule meetings, respond to invitations, and manage your calendar with the same authority as you would. Editors can also organize and categorize items, making them ideal for executive assistants who need full management capabilities.
Author delegates can create new items and respond to meeting requests but cannot modify or delete existing entries. This level suits team members who need to schedule meetings on your behalf while maintaining some restrictions on existing calendar items.
Reviewer delegates have read-only access, allowing them to view your calendar without making changes. This role is perfect for team members who need to check your availability but shouldn’t modify your schedule.
When working as a delegate, users can:
- Create and manage meetings on behalf of the calendar owner
- Send meeting requests using the owner’s name
- Respond to meeting invitations
- Access and manage the owner’s inbox (if granted permission)
- Organize and categorize calendar items
Outlook delegate calendar use cases
Delegate access proves particularly valuable in several professional scenarios:
- Executive-assistant relationships: Perhaps the most common use case, where assistants manage complex schedules for executives, coordinating meetings, handling responses, and ensuring efficient time management.
- Team management: Department heads can delegate calendar management to team leads, enabling better coordination of departmental meetings and events.
- Temporary coverage: When employees are on leave or traveling, delegates can manage urgent calendar matters and ensure no important meetings are missed.
- Project coordination: Project managers can delegate calendar access to coordinators who need to schedule multiple team meetings and manage resource availability.
- Cross-department scheduling: In organizations where multiple departments need to coordinate frequently, designated schedulers can manage calendars across teams to streamline meeting planning.
By implementing delegate access in these scenarios, organizations can maintain smooth operations and ensure efficient time management across all levels of the business hierarchy.
How to Grant Delegate Access in Outlook: A Step-by-Step Guide
Setting up delegate access in Outlook needs to be done carefully to ensure the right people have appropriate permissions while maintaining security. This section walks through the complete process of granting delegate access, from basic setup to fine-tuning specific permissions and managing security considerations.
Setting up delegate calendar Outlook: How do I give someone else access to my Outlook calendar?
Outlook offers flexible options for granting delegate access to both individuals and groups within your organization. Whether you need to give access to a single assistant or an entire team, the process is straightforward. Let’s start with setting up access for individual users, then we’ll cover how to manage group delegation.
For individual users
Adding a delegate in Outlook is straightforward, with slight variations between the desktop application and the web version:
Outlook Desktop App:
Access Delegate Settings:
- Open Outlook (Desktop App).
- Go to File > Account Settings > Delegate Access.
Add a delegate:
- In the Delegates window, click Add.
- A new window will appear, allowing you to search for users within your organization.
- Select the desired delegate(s) from the list and click OK.
Set permissions:
- After selecting a delegate, a permissions dialog will appear.
- Choose the appropriate permission level for the delegate(s) for your Calendar, Tasks, Inbox, and other folders.
- Permissions can range from Reviewer (read-only access) to Editor (read/write access) or Delegate (full access, including the ability to send emails on your behalf).
- (Refer to Section 2.2 for a detailed explanation of permission levels.)
- Once permissions are set, click OK to save changes.
Outlook for the Web:
- Access settings: Click the Settings gear icon (usually in the top right corner).
- Calendar settings: In the Settings window, select Calendar in the left-hand menu.
- Shared calendars: Choose Shared calendars.
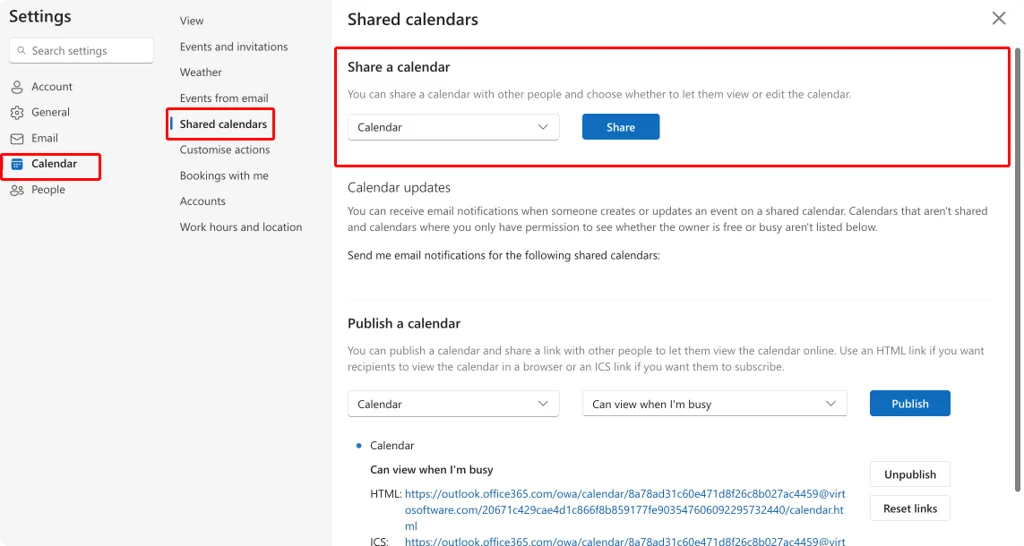
Pic. 1. Navigating to the “Shared calendars” option in OWA.
- Share a calendar: Under the Share a calendar section, choose a calendar to share and click Share.
- Add a delegate: Enter the email address of the person you want to grant delegate access to.
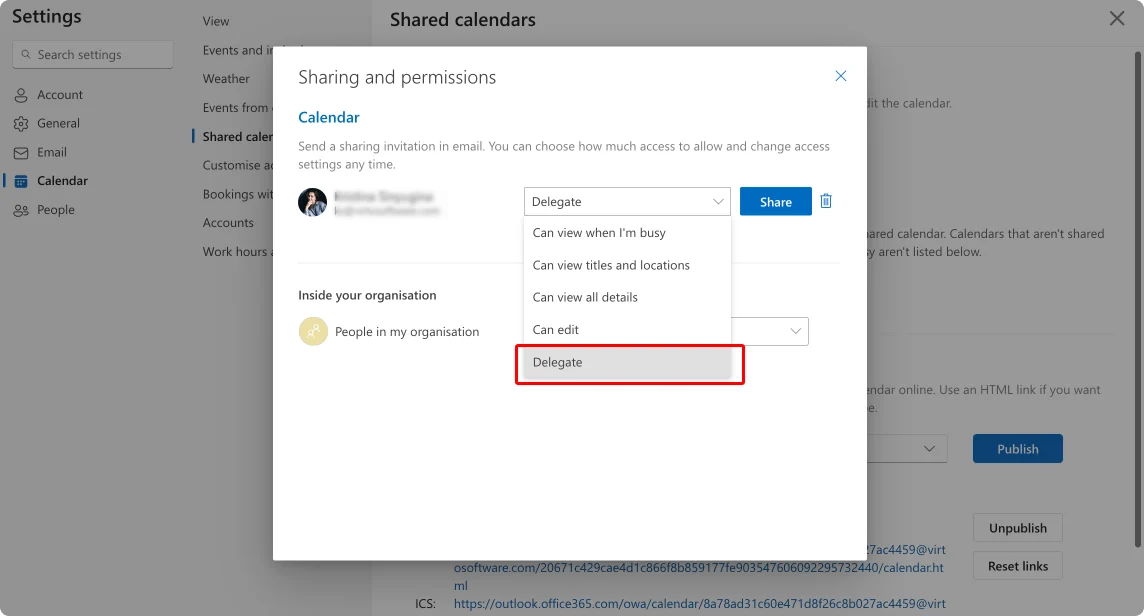
Pic. 2. Choosing someone as a delegate in OWA.
- Set permissions: Select the desired permission level (Can view when I’m busy, Can edit, or Delegate) from the dropdown menu. Check Let delegate view private events if appropriate. Click Add.
For groups
Delegate access cannot be granted to an entire group directly. Instead, you must add individual members of the group as delegates one by one and assign permissions to each user.
External users
Adding external users requires additional steps and security considerations:
- Limitations for external users: Outlook delegate access is primarily designed for users within the same organization (using the same Microsoft Exchange environment). Granting access to external users (e.g., contractors or partners) depends on your organization’s configuration and whether your email system is hosted on-premises (Exchange Server) or in the cloud (Microsoft 365).
- Additional configuration may be required: In most cases, granting delegate access to external users requires adjustments by your IT administrator, such as enabling external sharing for calendars in Microsoft 365.
- For Exchange Server On-Premises: Consult your IT admin for setup instructions, as external sharing settings may not be enabled by default.
- For Microsoft 365: If external sharing is allowed, you can share your calendar with an external user by providing them with view-only or limited editing permissions, but full delegate access may not be possible without IT intervention.
- Recommendation: Check your organization’s IT documentation or contact your IT support team for specific instructions on enabling delegate or calendar sharing for external users.
👉 What is the delegate access option? The delegate access option in Outlook lets you grant another person permission to manage your email and calendar. This designated individual, called a delegate, can perform tasks like scheduling appointments, accepting or declining meeting invitations, and sending emails on your behalf. You control the extent of their access, ranging from simply viewing your availability to full management control. This feature is particularly useful for administrative support, team collaboration, and covering for colleagues during absences. It streamlines workflows and ensures efficient communication.
Outlook delegate access levels and how to set them
When delegating access to your Outlook calendar or other resources, it’s essential to understand the different permission levels and how to configure them properly. This ensures the delegate has the right access for their responsibilities without compromising security or control over your account.
Types of permissions in Outlook
Outlook allows you to assign different levels of access to delegates, depending on the tasks they need to perform. Here are the primary permission levels:
Reviewer (read-only access):
- Delegates can view your calendar, tasks, or other folders but cannot make changes.
- Suitable for users who only need to stay informed of your schedule.
Author (create and edit access):
- Delegates can view your calendar, create new items, and modify their own created items.
- They cannot edit or delete items you’ve created.
- Ideal for assistants or team members who schedule events but do not need complete control.
Editor (full access):
- Delegates can view, create, edit, and delete items, including those you’ve created.
- They can also respond to meeting requests on your behalf.
- Best for trusted individuals who manage your calendar entirely.
Delegate (advanced access):
- Delegates with this role can act almost entirely on your behalf.
- In addition to editor-level access, they can send emails and meeting requests as you.
- This role should only be given to individuals with significant responsibility, such as executive assistants.
How to select and set the right access level
Outlook for Desktop:
Open Delegate Access settings:
- Go to File > Account Settings > Delegate Access.
Add a delegate or modify permissions:
- Click Add to select a new delegate or select an existing delegate and click Permissions.
Set permissions for specific tasks: A permissions window will appear, allowing you to configure access levels for:
- Calendar: View or manage meetings, appointments, and schedules.
- Inbox: Read, respond to, or manage emails.
- Tasks, Contacts, and Notes: Assign tasks or manage other shared items.
- Choose Reviewer, Author, or Editor depending on the delegate’s responsibilities.
Save changes:
- Click OK to finalize the settings.
Outlook for the Web:
Access calendar settings:
- Open Outlook on the web and navigate to the Calendar view.
- Click the Settings gear icon > Calendar > Shared Calendars.
Share your calendar:
- Under Share a calendar, select a calendar, and click Share.
Set permissions:
- Enter the delegate’s email address and select their permission level:
- Can view when I’m busy: Basic visibility of free/busy time.
- Can view titles and locations: Adds event titles and locations.
- Can view all details: Full calendar visibility without editing.
- Can edit: Allows the delegate to make changes to events.
- Delegate: Gives full calendar access for third-party management.
- Grant permissions based on their role.
- Enter the delegate’s email address and select their permission level:
Save and Notify:
- Click Share to send an invitation to the delegate.
How to set up specific access rights for a delegate
When assigning permissions, it’s important to consider the delegate’s role and responsibilities. You can tailor access rights to expand or restrict their abilities:
Restricting access:
- Assign Reviewer access for users who only need to view your calendar or tasks without editing or creating new items.
- Avoid granting Inbox or Task permissions unless necessary.
Expanding access:
- Grant Editor or Delegate access to individuals responsible for managing your schedule entirely, including responding to meeting invites or sending emails on your behalf.
- Enable them to create, edit, and delete events to streamline workflows.
Customizing permissions by folder:
- In Outlook Desktop, specific permissions can be applied to individual folders (e.g., Calendar, Inbox, Tasks) rather than granting blanket access to all resources.
👉 So, how to delegate access in Outlook? To delegate access in Outlook, start by navigating to File > Account Settings > Delegate Access (in the desktop app). Add the person you want to delegate by typing their name or selecting them from your organization’s address book. Once added, assign specific permissions—such as Reviewer (view-only), Author (create and edit their own items), or Editor (full control, including modifying your items)—to your Calendar, Inbox, or other folders. You can also choose whether the delegate can view private items or handle meeting requests on your behalf. After saving the changes, the delegate will receive an email notification granting them access.
Security considerations when delegating access
When setting up delegate access, it’s critical to prioritize security to protect your account and sensitive information:
Protect passwords:
- Never share your Outlook password with a delegate. Use the delegate access feature to grant permissions securely.
Limit access to sensitive information:
- Avoid granting full access (e.g., Inbox permissions) unless absolutely necessary, particularly if your email contains confidential or sensitive data.
Regularly review delegates:
- Periodically review the list of delegates and their permissions to ensure that only authorized individuals have access.
Revoke access when necessary:
- If a delegate no longer needs access or leaves your organization, immediately remove their permissions.
- For Desktop: Go to File > Account Settings > Delegate Access and remove the delegate.
- For Web: Navigate to Settings > Calendar > Shared Calendars and revoke their sharing permissions.
Audit delegate actions:
- For critical operations, monitor changes made by delegates to ensure they align with your expectations.
By understanding the different permission levels and configuring them appropriately, you can ensure your Outlook account is managed efficiently and securely.
Delegate Outlook Calendar Management: Managing and Configuring Delegates in Outlook
Managing and configuring delegates in Outlook is essential for maintaining control over who can access and manage your calendar, emails, and other resources. This section will guide you through adding yourself as a delegate, removing or managing delegates, and fine-tuning permissions for large teams or specific folders. You’ll also learn how to track delegate activity and revoke access when necessary.
How do I add myself as a delegate in Outlook?: Instructions on how to add yourself as a delegate
If you have been granted delegate rights by another user, you can add yourself as a delegate in Outlook. This step is necessary to start managing the other person’s calendar, email, or tasks on their behalf.
Outlook for Desktop:
Ensure permissions are granted:
- Before proceeding, confirm with the account owner that they have added you as a delegate and granted the necessary permissions.
Access shared information:
- Open Outlook and navigate to File > Open & Export > Other User’s Folder.
- In the dialog box, type the name of the person who granted you delegate access.
Select the folder to access:
- Choose the type of folder you’ve been granted access to (e.g., Calendar, Inbox, or Tasks).
- Click OK to open the shared folder.
Start managing resources:
- Once added, you can view and manage the shared folder according to your permissions.
Outlook for the Web:
Check permissions:
- Confirm the account owner has shared their calendar or mailbox with you and granted delegate permissions.
Access the shared calendar or mailbox:
- In Outlook Web, navigate to Calendar or Mail.
- In Calendar, click Add Calendar > Add from directory.
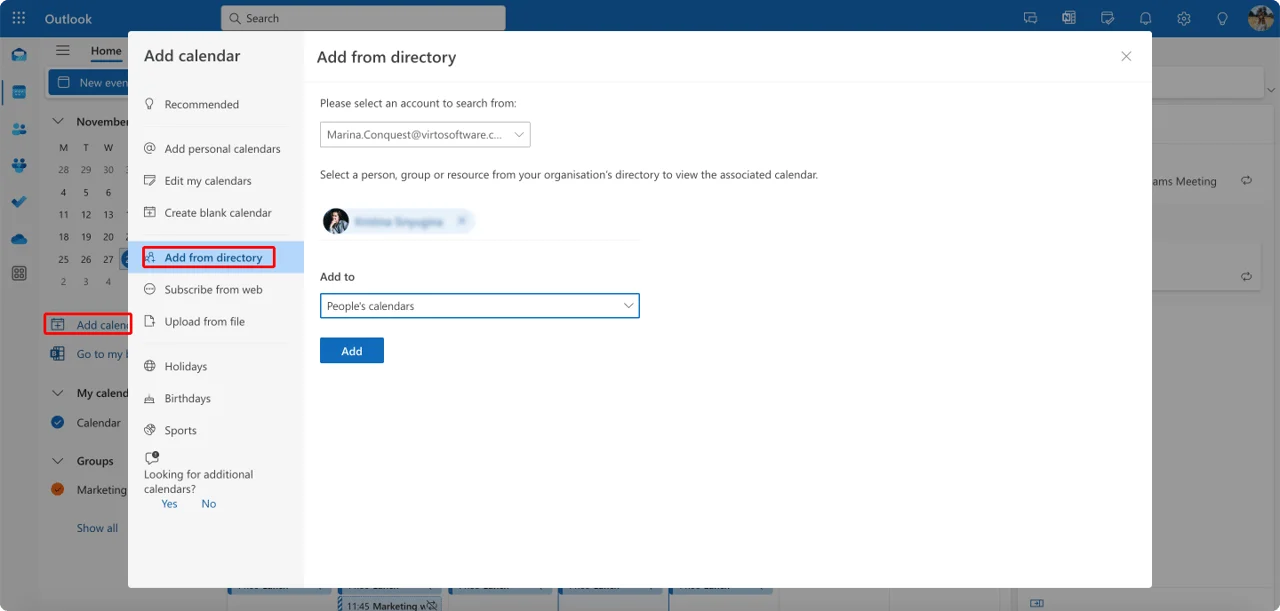
Pic. 3. Adding a calendar from directory in OWA.
- Search for the name of the person who granted you access, then select their calendar or mailbox.
- Accept the delegate role:
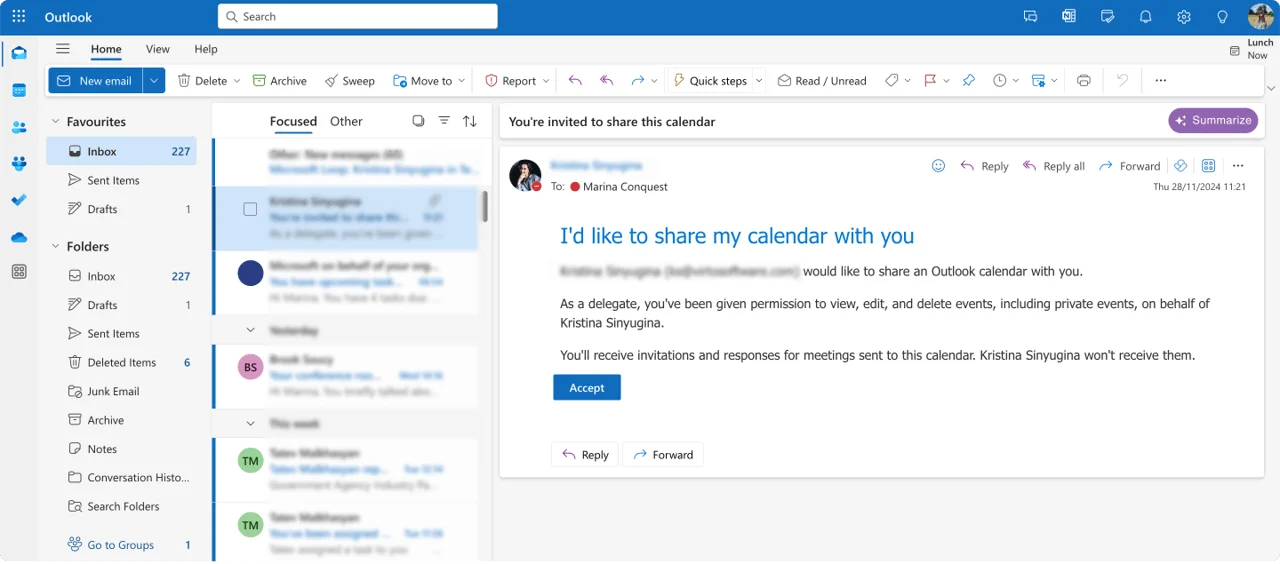
Pic. 4. An invitation to become someone’s delegate.
- Once you’ve added the shared resource, it will appear in the left-hand navigation pane under Shared Calendars or Shared Mailboxes.
- Start managing as per your assigned permissions.
How to remove and manage delegate access Outlook
Maintaining control over delegate access is important, especially in large teams or for accounts with sensitive information. Here’s how to manage and remove delegates effectively.
Removing or changing Outlook calendar delegate rights
Outlook for Desktop:
Open Delegate Access settings:
- Go to File > Account Settings > Delegate Access.
Select a delegate:
- In the Delegates window, select the person whose permissions you want to modify or remove.
Modify permissions:
- Click Permissions to change their access levels (e.g., downgrade from Editor to Reviewer).
Remove the delegate:
- To remove a delegate entirely, select their name and click Remove.
Save changes:
- Click OK to confirm and save changes.
Outlook for the Web:
Access Shared Calendar settings:
- Navigate to Settings > Calendar > Shared Calendars.
Manage delegate permissions:
- Under the section for shared calendars, locate the delegate’s name.
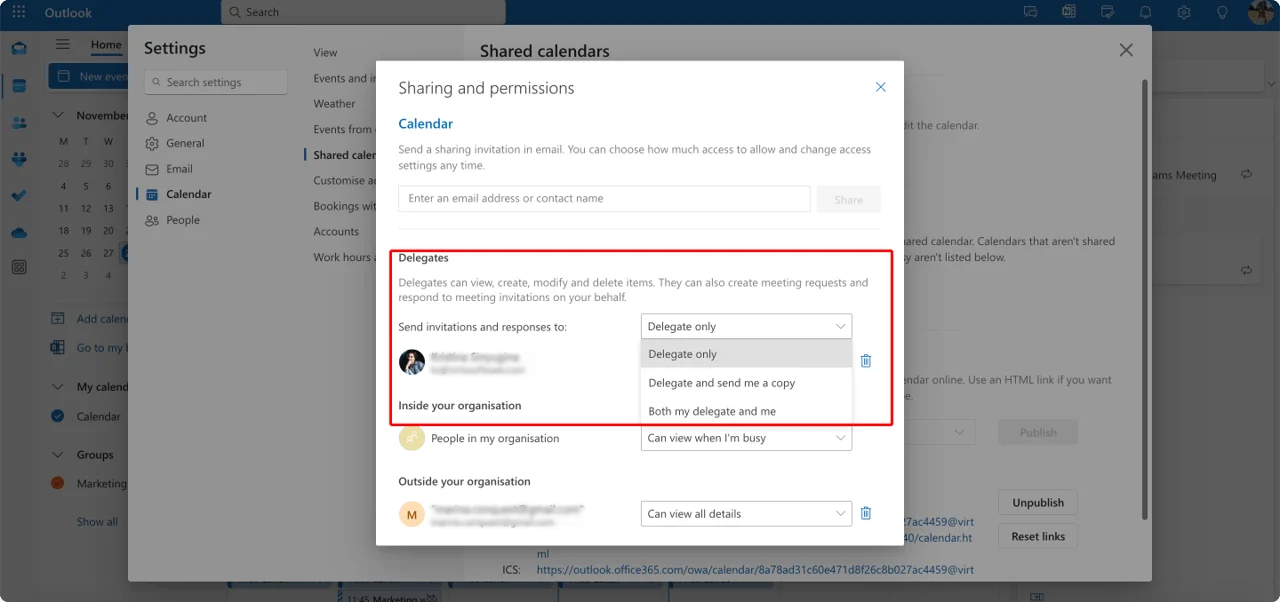
Pic. 5. Managing delegate permissions in OWA.
- Adjust their permission level or revoke access entirely by removing their entry.
- Save updates:
- Click Save to confirm changes.
Managing access for multiple delegates
For large teams, managing multiple delegates efficiently is critical. Here’s how to handle this scenario:
Assign roles thoughtfully:
- Use different permission levels (Reviewer, Author, Editor) depending on the responsibilities of each delegate. This prevents unnecessary access to sensitive information.
Group delegates by folder access:
- If multiple delegates are required, assign them access to only specific folders (e.g., Calendar for scheduling, Inbox for email responses).
Document access levels:
- Maintain a record of which team members have access to which resources for accountability and quick adjustments.
Granting delegate access to specific folders
You can limit a delegate’s access to only certain folders in your mailbox to ensure they only interact with relevant resources.
Outlook for Desktop:
- Right-click the folder you want to share (e.g., Calendar, Inbox, or a subfolder).
- Select Properties > Permissions.
- Add the delegate’s name and choose their permission level (Reviewer, Author, or Editor).
Outlook for the Web:
- Folder-specific sharing is limited in the web version. However, you can share calendars or grant access to shared mailboxes following the steps outlined above.
Revoking delegate rights
To revoke access completely:
Outlook for Desktop:
- Go to File > Account Settings > Delegate Access.
- Select the delegate and click Remove.
Outlook for the Web:
- Navigate to Settings > Calendar > Shared Calendars.
- Locate the delegate and remove their permissions.
Notify the user:
- Inform the delegate that their access has been revoked to avoid confusion.
Tracking delegate activity and reports
Tracking delegate activity ensures accountability and helps monitor how shared resources are being used.
Enable notifications for delegate actions:
- In Outlook Desktop, go to File > Options > Mail.
- Under Send messages, check the box for Automatically send a message when a delegate responds to a meeting request on your behalf.
Audit log reports (Microsoft 365 Users):
- Admins in Microsoft 365 can enable audit logging to track delegate activity, such as calendar updates or email responses.
- Go to the Microsoft 365 Security & Compliance Center to generate reports on delegate actions.
Regularly review calendar changes:
- Check your calendar and inbox regularly for changes made by delegates to ensure no unauthorized actions have occurred.
Key takeaways in managing delegate access
- Adding yourself as a delegate requires prior permission and proper configuration in both Outlook Desktop and Web.
- Removing and managing delegates is straightforward, but it’s crucial to tailor permissions based on responsibilities and limit access to sensitive folders.
- Security considerations, such as tracking delegate activities and revoking access when necessary, are vital for protecting your account.
By thoughtfully managing delegate access, you can ensure seamless collaboration while maintaining control and security over your Outlook resources.
Managing Delegate Calendars and Emails on Behalf of Another Person
Delegates play a crucial role in managing calendars and emails for others, especially in professional environments where assistants or team members need to handle scheduling and correspondence. This section covers how to schedule meetings and send emails on behalf of another person in both Outlook for Desktop and Outlook for the Web, along with key considerations and limitations.
How do I schedule a meeting as a delegate in Outlook?: Instructions on how to schedule meetings on behalf of another user
If you’ve been granted delegate access to someone’s calendar, you can schedule meetings or appointments on their behalf. Follow these steps to manage events efficiently.
Outlook for Desktop:
Open the shared calendar:
- Navigate to the Calendar view in Outlook.
- Under Shared Calendars in the left-hand pane, select the calendar of the person who has granted you delegate access.
Create a new meeting or appointment:
- Click New Meeting (or New Appointment if no attendees are needed).
- Ensure that the calendar you are managing is selected in the From field at the top of the meeting window.
Add event details:
- Enter the meeting title, location, start and end times, and any other relevant information.
- Use the Scheduling Assistant to check availability for attendees.
Invite attendees:
- Add the email addresses of attendees in the To field.
- Include a message in the body of the invitation if needed.
Send the invitation:
- Click Send to send the meeting request on behalf of the calendar owner.
- The invitation will indicate that it was sent by you on behalf of the calendar owner.
Outlook for the Web:
Access the shared calendar:
- Navigate to Calendar in Outlook Web.
- Under Shared Calendars, select the calendar of the person you are managing.
Create a new meeting:
- Click New Event in the top-left corner.
- In the Organizer field, ensure the calendar owner’s name is selected.
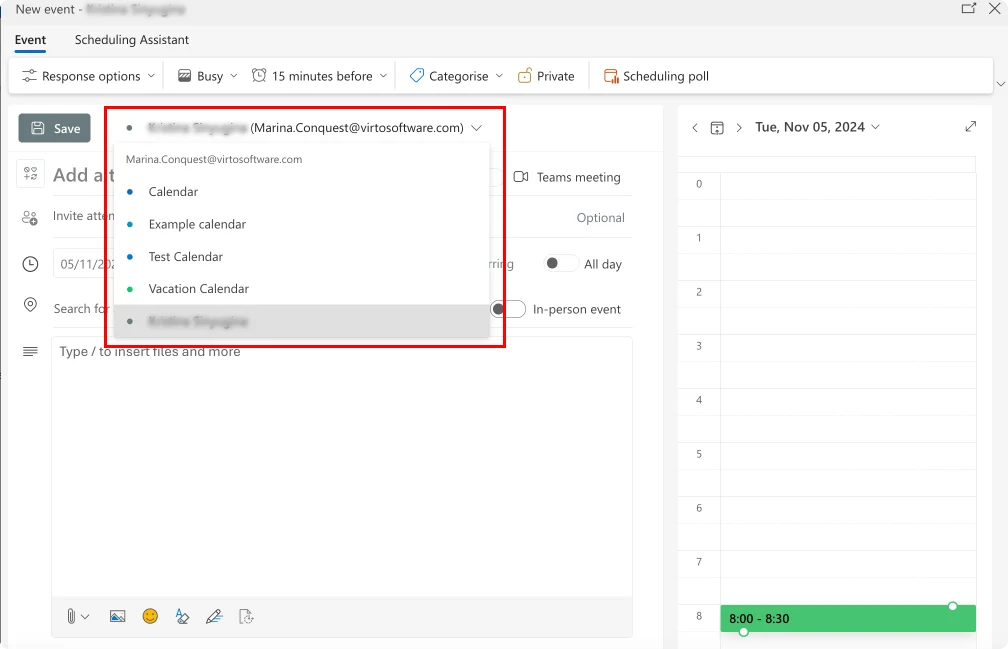
Pic. 6. Setting a meeting as a delegate on someone else’s behalf.
Add event details:
- Fill in the meeting title, location, date, time, and other relevant information.
- Use the Scheduling Assistant to avoid conflicts.
Invite attendees:
- Add attendee email addresses in the Invite Attendees field.
- Include additional details in the event description if needed.
Send the invitation:
- Click Send to finalize the meeting invitation.
- The invitation will indicate that it was sent by you on behalf of the calendar owner.
Limitations of scheduling as a delegate
- Meeting ownership: Delegates cannot transfer ownership of a meeting. The calendar owner remains the meeting organizer even if the delegate creates the event.
- Notifications: Any responses (acceptances, declines, etc.) from invitees will typically go to the calendar owner unless otherwise configured.
- Access restrictions: If your permissions are limited (e.g., Reviewer), you may not be able to create or edit events.
Sending email on behalf of another user in Outlook
Delegates with appropriate permissions can send or reply to emails on behalf of the account owner. This is particularly useful for managing correspondence in professional settings.
Outlook for Desktop:
Compose a new email:
- Click New Email in the Mail view.
- In the new email window, click the From field. If the From field is not visible, go to Options > From to enable it.
Select the account owner’s name:
- Click the From dropdown and select the account owner’s name. If it’s not listed, click Other E-mail Address and manually enter their email address.
Write the email:
- Add the recipient(s), subject, and body of the email.
Send the email:
- Click Send. The email will appear as being sent “on behalf of” the account owner (e.g., “John Doe on behalf of Jane Smith”).
Reply to emails:
- To reply to an email on behalf of the account owner, open the email, click Reply, and ensure the From field shows the account owner’s name.
Outlook for the Web:
- Compose a new email:
- Click New Message in the Mail view.
- Click the … (More Options) icon next to the From field and select Other email address.
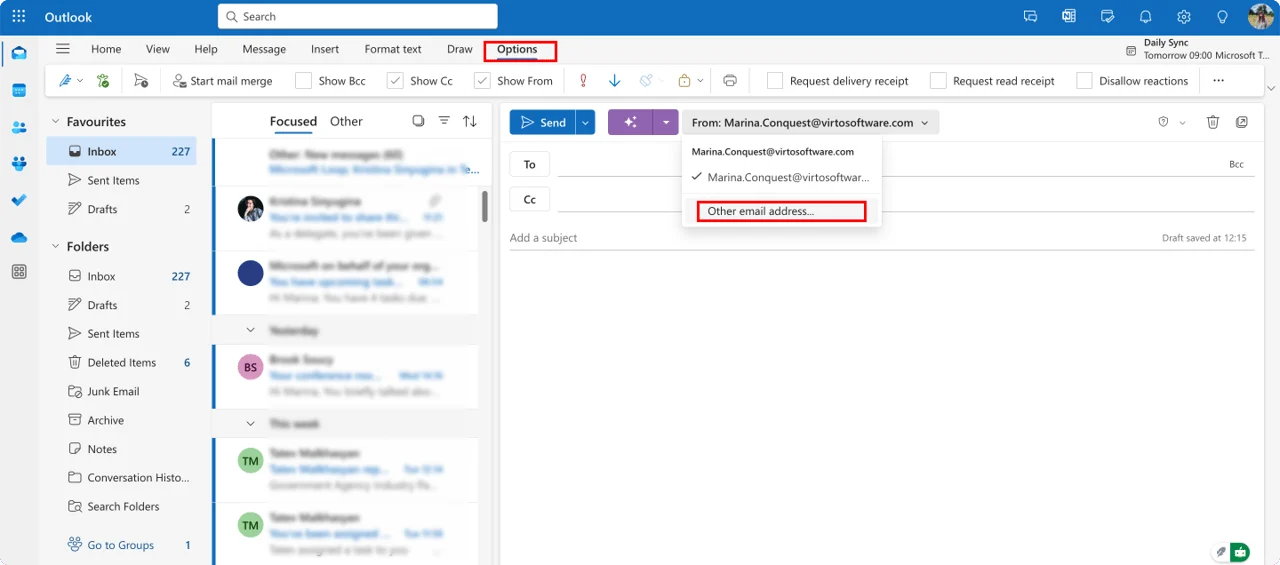
Pic. 7. Sending an email as a delegate on someone else’s behalf.
Select the account owner’s address:
- Enter the account owner’s email address. If you’ve been granted delegate access, the name will auto-complete.
Write and send the email:
- Add the recipient(s), subject, and email body.
- Click Send, and the email will appear as being sent “on behalf of” the account owner.
Reply to emails:
- Open the email you want to reply to, click Reply, and ensure the From field shows the account owner’s name.
Limitations and security considerations
Permission requirements:
- Delegates need Send on Behalf or Send As permissions to send emails on behalf of the account owner. These permissions must be granted by the account owner or an IT administrator.
“Send As” vs. “Send on Behalf”:
- Send As: The email appears as if it was sent directly by the account owner, with no mention of the delegate.
- Send on Behalf: The email explicitly states it was sent “on behalf of” the account owner.
Security considerations:
- Never share your password or the account owner’s password. Delegation should be configured securely through Outlook’s permission settings.
- Ensure the delegate’s access levels are appropriate for their role to avoid unauthorized access to sensitive information.
Tracking delegate activity:
- Account owners can track delegate activity by enabling notifications for sent emails or meeting invites. This can be configured in File > Options > Mail (Desktop) or Settings > Mail > Automatic Replies (Web).
Key takeaways on acting as a delegate
- Delegates can efficiently manage scheduling and correspondence on behalf of another user using the tools provided by Outlook for Desktop and Outlook for the Web.
- Understanding the differences between “Send As” and “Send on Behalf” permissions, as well as setting appropriate security configurations, ensures proper delegation while maintaining account security.
- Regularly review delegate access and permissions to ensure they align with the delegate’s responsibilities and organizational policies.
By mastering these features, delegates can streamline workflows and keep operations running smoothly for the account owner.
Security Considerations When Delegating Access: What You Should Know
Delegating access in Outlook provides trusted individuals with control over your calendar, email, or other resources, enabling seamless management of tasks. However, because this level of access can involve sensitive data and critical permissions, it’s vital to follow best practices to ensure security. This section explores key security considerations, including limiting access rights, monitoring delegate activity, and managing access responsibly.
Security considerations when delegating access
Delegating access gives a trusted individual significant control over your Outlook resources, and with that comes the potential for misuse if not managed properly. Here’s what you need to know:
Delegate access = Extensive control
- Delegates often have the ability to view, edit, and even send emails or schedule meetings on your behalf. This means they could potentially access sensitive information or make changes that impact you or your organization.
Choose delegates responsibly
- Only assign delegate permissions to individuals who genuinely require it, such as executive assistants or team members with specific responsibilities.
Regularly review delegate rights
- Permissions should not remain static. Review and update delegate rights periodically to ensure they align with current needs. This minimizes the risk of unauthorized or unnecessary access, especially when roles or responsibilities change.
Limiting rights and minimizing access
To maintain security, it’s critical to follow the principle of least privilege—granting only the minimum access necessary for the delegate to perform their tasks.
Restrict access to specific tasks:
- For example, if a delegate only needs to view your schedule, assign them Reviewer permissions for your calendar.
- Avoid granting “Send on Behalf” or “Send As” permissions unless absolutely necessary.
Limit folder access:
- If the delegate doesn’t need access to your inbox, restrict their permissions to the calendar or specific subfolders.
- For example, you can grant access to a single project folder instead of your entire mailbox.
Avoid blanket permissions:
- Avoid granting Editor or Delegate permissions unnecessarily, as these roles allow the delegate to make extensive changes, including deleting emails or modifying events.
Monitoring delegate activity
Monitoring delegate activity helps ensure that access rights are being used responsibly and helps identify any potential misuse.
Enable activity notifications:
- In Outlook, you can enable notifications so that you’re alerted when a delegate sends an email or responds to a meeting request on your behalf.
- For Desktop: Go to File > Options > Mail, and under Send Messages, check the box for Automatically send a message when a delegate responds to a meeting request on your behalf.
Audit delegate activity (Microsoft 365 Users):
- If your organization uses Microsoft 365, admins can enable audit logging to track delegate activity, such as changes to your calendar or emails sent on your behalf.
- Logs can be reviewed in the Microsoft 365 Security & Compliance Center.
Review calendar changes:
- Regularly check your calendar for unexpected changes or additions made by delegates.
Investigate suspicious activity:
- If you notice unusual behavior, such as emails sent that you didn’t authorize, review delegate actions immediately and adjust their permissions if needed.
Recommendations for setting up and protecting data
Proper setup and adherence to security measures are essential for safeguarding your Outlook data when delegating access.
Enable two-factor authentication (2FA):
- Ensure that both your account and the delegate’s account have 2FA enabled. This adds an extra layer of protection against unauthorized access, even if credentials are compromised.
Avoid sharing credentials:
- Delegates should never share their credentials with others, as this creates a significant security risk. Access should always be granted through Outlook’s delegation features, not by sharing passwords.
Use strong passwords:
- Encourage all delegates to use strong, unique passwords for their Outlook accounts, and ensure passwords are updated regularly.
Follow organizational policies:
- Adhere to your organization’s IT security policies when setting up delegation, particularly if sensitive or confidential data is involved.
Managing access and removing delegates when responsibilities change
As roles and responsibilities evolve, it’s essential to manage delegate access proactively.
Remove delegates when no longer needed:
- If a delegate no longer performs their assigned tasks (e.g., due to a role change or departure), remove their permissions immediately.
- For Desktop: Go to File > Account Settings > Delegate Access, select the delegate, and click Remove.
- For Web: Navigate to Settings > Calendar > Shared Calendars, find the delegate, and revoke access.
Adjust permissions for changing roles:
- If a delegate’s responsibilities change, ensure their permissions are updated to reflect their new role. For example, downgrade from Editor to Reviewer if they no longer need editing capabilities.
Regularly review delegate lists:
- Schedule periodic reviews of your delegate list to ensure all permissions are current and still necessary. Remove outdated delegates and adjust permissions as needed.
Protect confidential data:
- Restrict access to sensitive folders and emails to only the most trusted individuals. Consider creating a separate folder for confidential information and limiting access to it.
Document delegate permissions:
- Keep a record of who has access to your account and what permissions they have. This is especially useful in large organizations or when multiple delegates are involved.
Key takeaways in security when delegating access
- Delegating access in Outlook is a powerful tool, but it comes with significant responsibilities. Always assign permissions thoughtfully and limit access to what’s necessary for the delegate’s role.
- Regularly review and update delegate rights to protect your account from unauthorized access.
- Utilize monitoring tools and security measures, such as 2FA, to ensure data integrity and accountability.
- When roles change, promptly adjust or revoke delegate rights to maintain control over your account and safeguard sensitive information.
By implementing these best practices, you can ensure that delegation remains secure, efficient, and aligned with your needs.
Setting Up and Managing Delegated Access Using Virto Calendar App for SharePoint Online & Microsoft 365
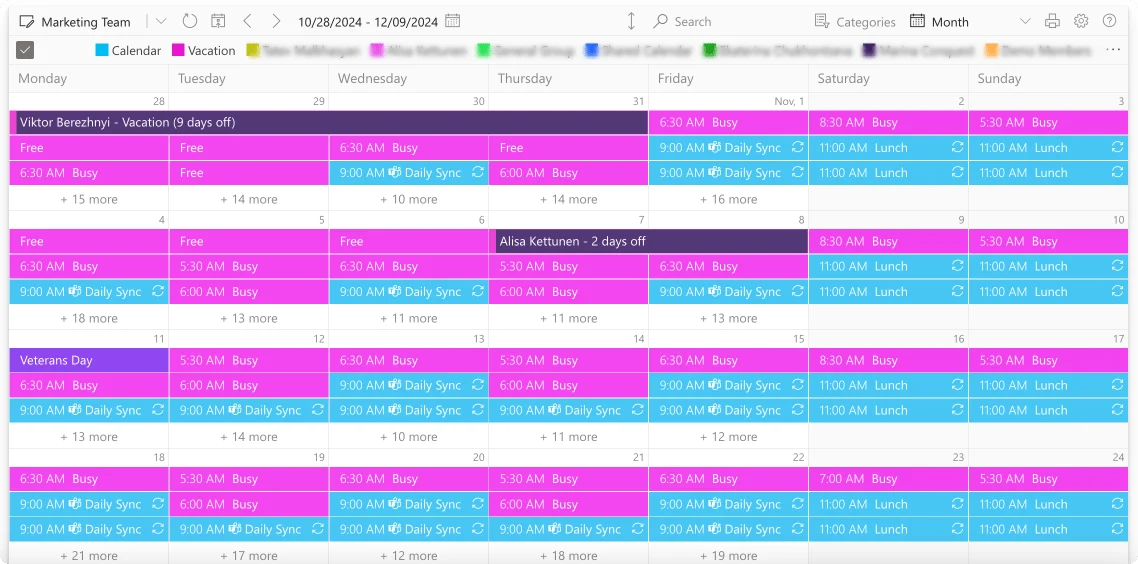
Pic. 8. A sample monthly Virto Calendar overlaid view.
Efficient management of calendars and delegation is essential for teams working in enterprise environments. The Virto Calendar App for SharePoint Online and Microsoft 365 provides advanced features that extend beyond the standard Outlook tools, offering flexible access rights, cross-platform integration, and improved workflow capabilities. This section explains the benefits of using the Virto Calendar App for delegated access, highlights its key features, and provides examples of how it solves common delegation challenges.
Benefits of using the Virto Calendar App for delegation
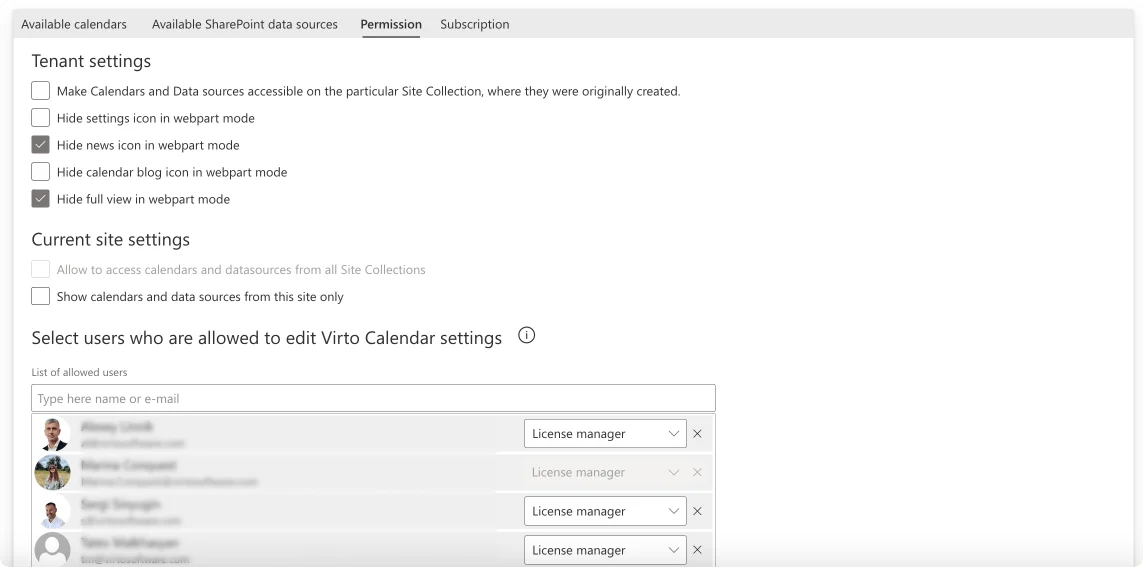
Pic. 9. A sample Virto Calendar permissions overview.
The Virto Calendar App enhances calendar management and delegation with features specifically designed for enterprise-level collaboration. Below are the primary advantages:
Flexible access rights configuration
- The app allows you to configure permissions at various levels, such as granting access to specific calendars or events on different devices.
- Permissions can be customized for adding, editing, deleting, or viewing calendar events, making it easy to tailor rights based on user responsibilities.
Advanced calendar sharing features
- Delegates can access shared events without restrictions, ensuring seamless collaboration.
- Events from various sources—SharePoint lists, Outlook calendars, meeting rooms, or external services like Google Calendar—can be combined into a single, unified view for easy management.
Support for large teams and enterprise workflows
- Ideal for organizations that rely on Microsoft 365, the Virto Calendar App integrates smoothly with SharePoint and other Microsoft tools to support large-scale collaboration.
- Cross-platform integration ensures that all users, regardless of their device or platform, can access and manage shared calendars effectively.
Examples of how the Virto Calendar App solves common delegation problems
- Simplified permission management for large teams
Managing permissions for multiple users in large teams can be cumbersome with standard calendar tools. The Virto Calendar App solves this by:
- Allowing administrators to customize permissions for specific SharePoint lists and calendar overlays.
- Enabling group-based permissions, where user groups can be assigned access levels such as “View Only” or “Edit.”
For example:
- A project manager can grant edit permissions to team members responsible for scheduling while restricting others to view-only access.
- Permissions are inherited from SharePoint site settings, ensuring consistency across all data sources.
- Collaborative scheduling across platforms
The app allows users to overlay calendars from multiple sources, including:
- Exchange Online calendars for managing personal and shared schedules.
- Meeting rooms to streamline the booking process.
- Microsoft Planner tasks to ensure task deadlines are visible alongside calendar events.
- External calendars (via iCal links) for integrating services like Google Calendar.
For example:
- A marketing team can overlay SharePoint task lists with meeting room bookings and Outlook schedules to get a comprehensive view of all project-related activity in one place.
- Cross-platform accessibility
By integrating calendars from different sources into a single, unified view, the Virto Calendar App ensures:
- Teams can access and manage events on any device or platform, including SharePoint Online and external services.
- Users can color-code and categorize events for clarity, making it easier to prioritize tasks and manage schedules.
For example:
- An HR team managing recruitment can combine interview schedules from Outlook, SharePoint task lists for candidate progress, and external calendars for industry events, all in one shared view.
Key features of the Virto Calendar App for delegated access
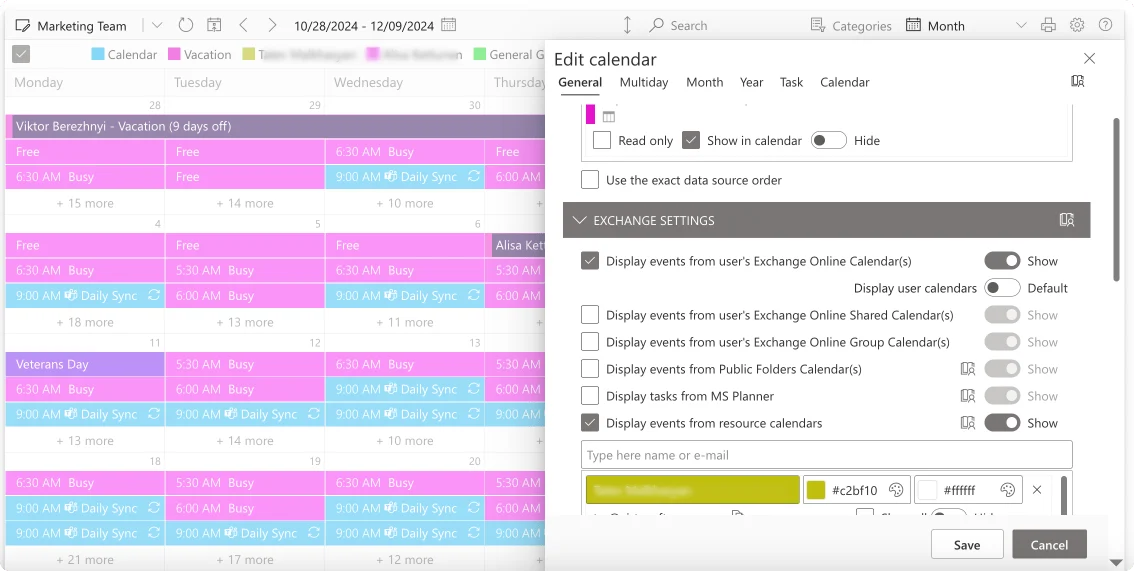
Pic. 10. Sample Virto Calendar Exchange settings.
- Overlay multiple calendars in a single view
- Combine Exchange Online calendars, SharePoint lists, meeting room bookings, public folders, Planner tasks, and external calendars into one organized view.
- Switch between day, week, month, and year views or group events by tasks and categories for better visibility.
- Advanced permission settings
Permissions in the Virto Calendar App are managed at two levels:
First Level: SharePoint Permissions — Permissions for each SharePoint list or event list are inherited by the Virto Calendar App. These permissions allow for:
- View Items: Delegates can only see events.
- Add Items: Delegates can create new events.
- Edit Items: Delegates can modify existing events.
- Delete Items: Delegates can remove events.
Example: A site administrator can grant “View Only” permissions to a team member for a sensitive calendar while assigning “Edit” permissions to a lead manager.
Second Level: Virto Calendar Overlay Permissions — Administrators can assign specific roles within the app:
- Calendar Manager: Can modify calendar settings and data sources.
- License Manager: Can assign calendar managers and manage licenses.
Example: A calendar manager might have permission to edit task deadlines and meeting schedules, while team members only view the finalized calendar.
- Integration with external calendars
- Import calendars from external sources using iCal links (e.g., Google Calendar, Apple Calendar).
- Synchronize events from multiple platforms into a centralized SharePoint calendar.
- Visual customization options
- Use color-coding to distinguish between events or assign categories for better organization.
- Incorporate a mini-calendar for a quick overview of all events.
👉 For more information on Virto Calendar’s various use cases and benefits tailored to specific industries, please explore our dedicated section and use case examples:
- Explore scenarios & use cases with VirtoSoftware
- Team and Project Calendar
- Employee Vacation Tracker
- Rooms & Equipment Calendar
- Remote Team Collaboration
- Cross-Departmental Event Coordination
Setting up and managing permissions in the Virto Calendar App
Configuring permissions:
- SharePoint permissions:
- Navigate to the SharePoint site and go to the Permissions for this list settings.
- Customize permissions for users or groups by selecting options such as Add, Edit, Delete, or View Items.
- These permissions are inherited by the Virto Calendar App.
👉 To learn more about setting up permissions in the Virto Calendar App, please refer to the VirtoSoftware Learning Center’s article on User Permissions.
- Virto Calendar App permissions:
- Click the Settings cog in the upper-right corner of the Virto Calendar App and select Permissions.
- Assign roles such as Calendar Manager or License Manager by typing the user’s name or email and clicking +.
- Adjust permissions for specific site collections or tenant-wide visibility as needed.
Recommendations for managing delegated access with the Virto Calendar App
Regularly review permissions:
- Periodically audit permissions to ensure that only authorized users have access to calendars and sensitive data.
Use role-based access:
- Assign roles such as Calendar Manager or License Manager based on responsibilities to prevent unnecessary access.
Integrate across platforms:
- Leverage the app’s ability to overlay calendars from different sources to maintain a unified schedule.
Enhance workflow with custom views:
- Use the app’s customization features like color-coding and mini-calendars to improve clarity and streamline task management.
The Virto Calendar App for SharePoint Online and Microsoft 365 is a robust tool for managing delegated access and enhancing calendar workflows. Its advanced features, such as flexible permissions, cross-platform integration, and visual customization, make it ideal for enterprises handling complex schedules and large teams. By leveraging the Virto Calendar App, organizations can ensure efficient collaboration, secure delegation, and seamless calendar management.
Conclusion on Outlook Delegate Access
Delegate access in Outlook is an essential tool for managing calendars and email in an enterprise environment. It enables seamless collaboration and efficient scheduling by allowing trusted individuals to manage critical tasks, such as responding to meeting requests and organizing events, on behalf of account owners.
However, while Outlook provides solid functionality for delegation, its built-in tools may not always meet the needs of users with more complex requirements. This is where the Virto Calendar App for SharePoint Online & Microsoft 365 comes into play. By enhancing Outlook’s standard features, the app offers more flexible delegation capabilities, advanced permission management, and a unified calendar view across multiple data sources. It’s a powerful, secure, and scalable solution for organizations seeking to optimize their calendar and access management processes.
We encourage you to explore Virto Calendar’s advanced features by scheduling a quick demo call or installing a free 30-day trial version of the app.
To learn more about delegation, calendar sharing, and advanced calendar management, explore the following resources for detailed guidance:
Official Microsoft resources:
- About Delegates: Allow Someone to Manage Your Mail and Calendar
- Share and Access a Calendar with Edit or Delegate Permissions in Outlook
- Access as a Delegate: Microsoft Community Discussion