Quick answer: to add PTO in Outlook, create an all-day event marked Free or Out of Office, add it to a shared or team calendar so colleagues can see it, and set an automatic reply for the same dates.
Time off only works when the rest of the company knows about it. PTO that lives in your head, or in an HR portal nobody opens, is how a client call ends up booked on the second day of your holiday.
Outlook handles this well, but the pieces are spread out. The calendar event, the free/busy status, the shared team calendar and the automatic reply are four separate settings in four different places, and each one does something the others do not. Set only one of them and something falls through.
This guide covers all four across the versions of Outlook in use in 2026: new Outlook for Windows and Mac, classic Outlook for Windows, Outlook on the web (OWA) and Outlook mobile. You will also find auto-reply templates you can paste straight in, a workable request-and-approval routine, and a look at what to do once a handful of shared calendars stops being enough.
How to add PTO to Outlook calendar: the short version
If you only have two minutes before you leave, do this:
- Open Calendar in Outlook and select New event.
- Give it a clear title. “PTO — Maria Sanchez” reads better on a shared calendar than “Vacation”.
- Toggle All day on and set the first and last day of your leave.
- Open the Busy or Show as dropdown and choose Out of office. Set the reminder to None.
- Save. Then invite your team to a Free copy of the event, or add it to your shared team calendar.
- Set an automatic reply covering the same date range.
Steps 1 to 4 look after your own calendar. Steps 5 and 6 are the ones people skip, and they are the reason colleagues keep booking meetings over your leave.
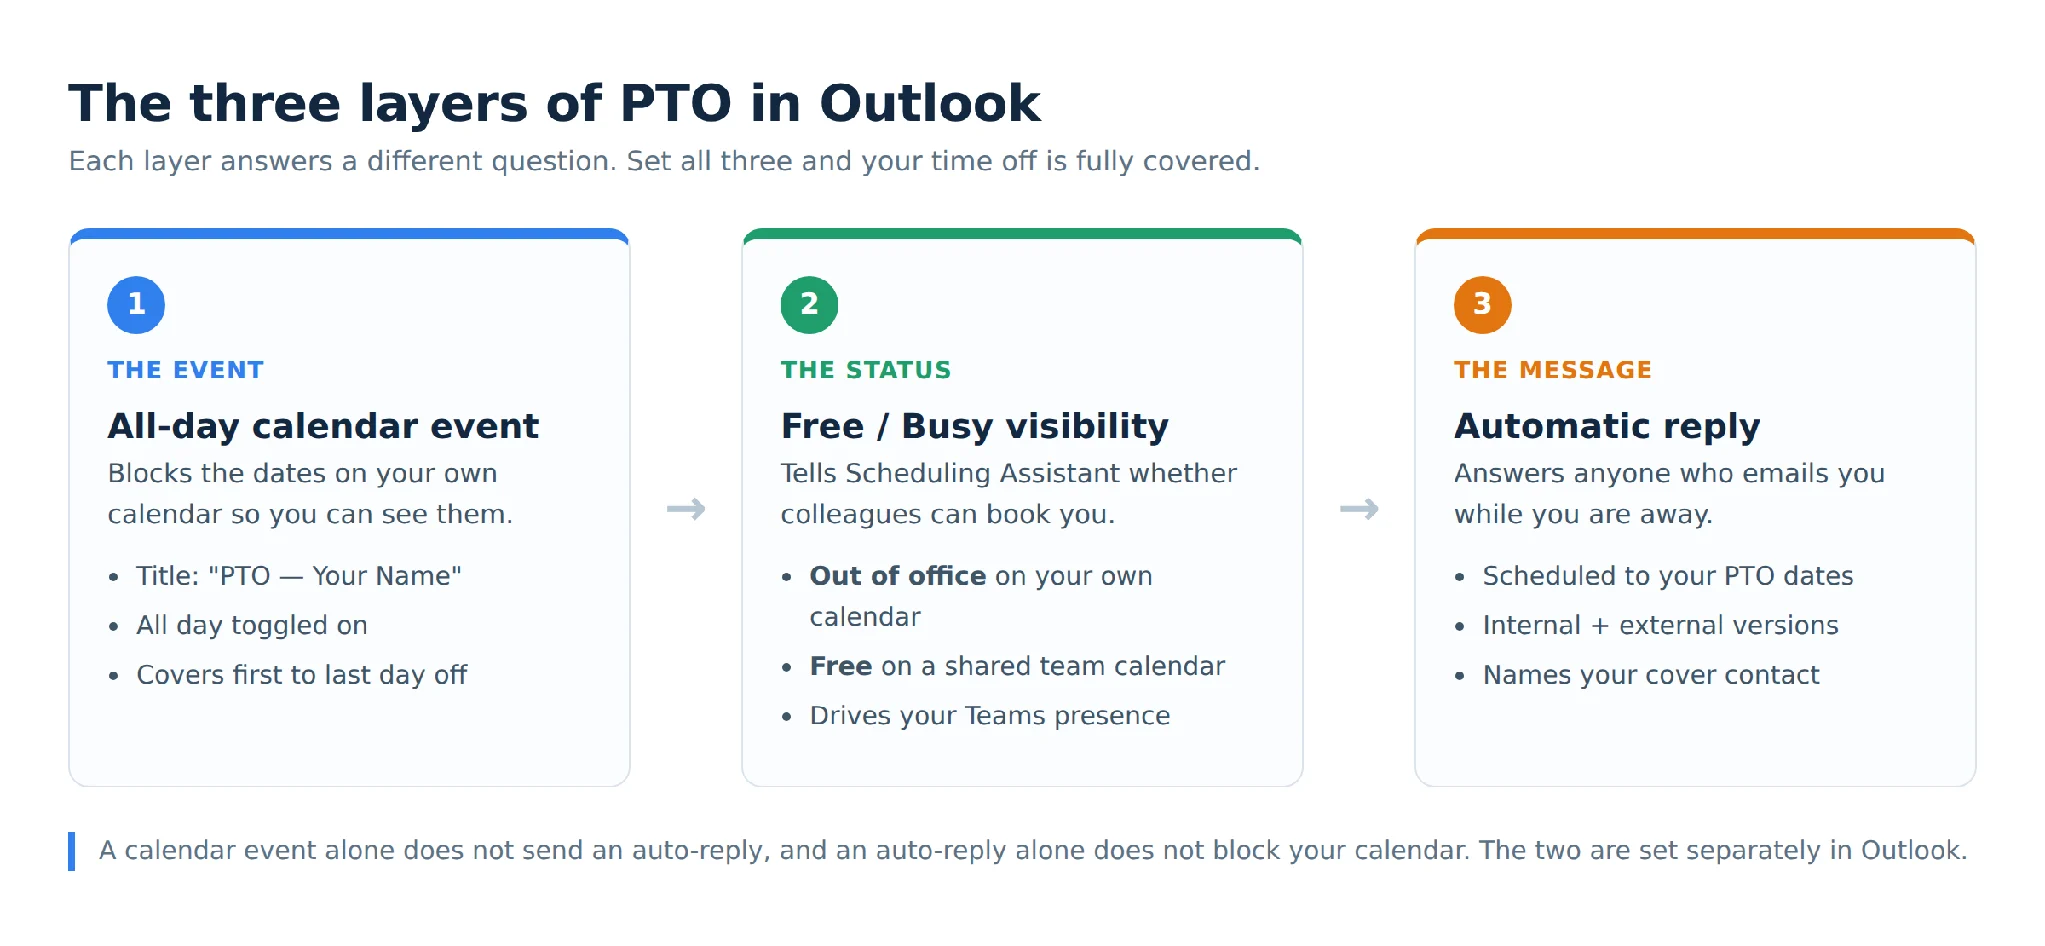
Fig. 1. The three layers of PTO in Outlook: the event, the status and the automatic reply.
PTO event, Out of Office status and automatic reply: what is the difference?
These three get used interchangeably, and they do completely different jobs. Getting them straight saves a lot of confusion later.
A PTO event is a calendar entry. It occupies dates in your calendar and, if you share that calendar, in everyone else’s view of it. On its own it sends nothing and tells Outlook nothing about your availability.
The Out of Office status is the Show as value on that event. It is what Scheduling Assistant reads when a colleague tries to find a slot with you, and in Microsoft 365 it is also what pushes your Microsoft Teams presence to “Out of Office”. Change the status and nothing about the event itself moves; you have only changed what the availability lookup returns.
An automatic reply, sometimes called an out-of-office message, is an email setting. It lives under Automatic Replies, not in the calendar at all, and it answers people who email you during a date range you specify. Turning it on does not block a single minute of your calendar.
A useful habit: set the calendar event as soon as your leave is approved, and set the automatic reply on your last working day. The event needs the lead time; the reply does not.
How to add PTO to your Outlook calendar, step by step
The route differs slightly by platform. Pick the one you actually use — the result is identical, and the event syncs to every other device on the same account.
New Outlook for Windows and Mac
New Outlook is now the default on most managed devices, and the Mac and Windows versions share the same interface.
- Select the Calendar icon in the left navigation bar.
- Select New event in the top-left corner, or double-click the first day of your leave.
- Enter a title such as “PTO — Your Name”.
- Toggle All day to on. The time pickers switch to date pickers.
- Set the start date to your first day off and the end date to your last day off. Outlook treats the end date as inclusive, so a Monday-to-Friday leave runs Monday to Friday, not Monday to the following Monday.
- Open the Busy dropdown on the toolbar and select Out of office.
- Set Remind me to None so you do not get a notification while you are away.
- Select Save.
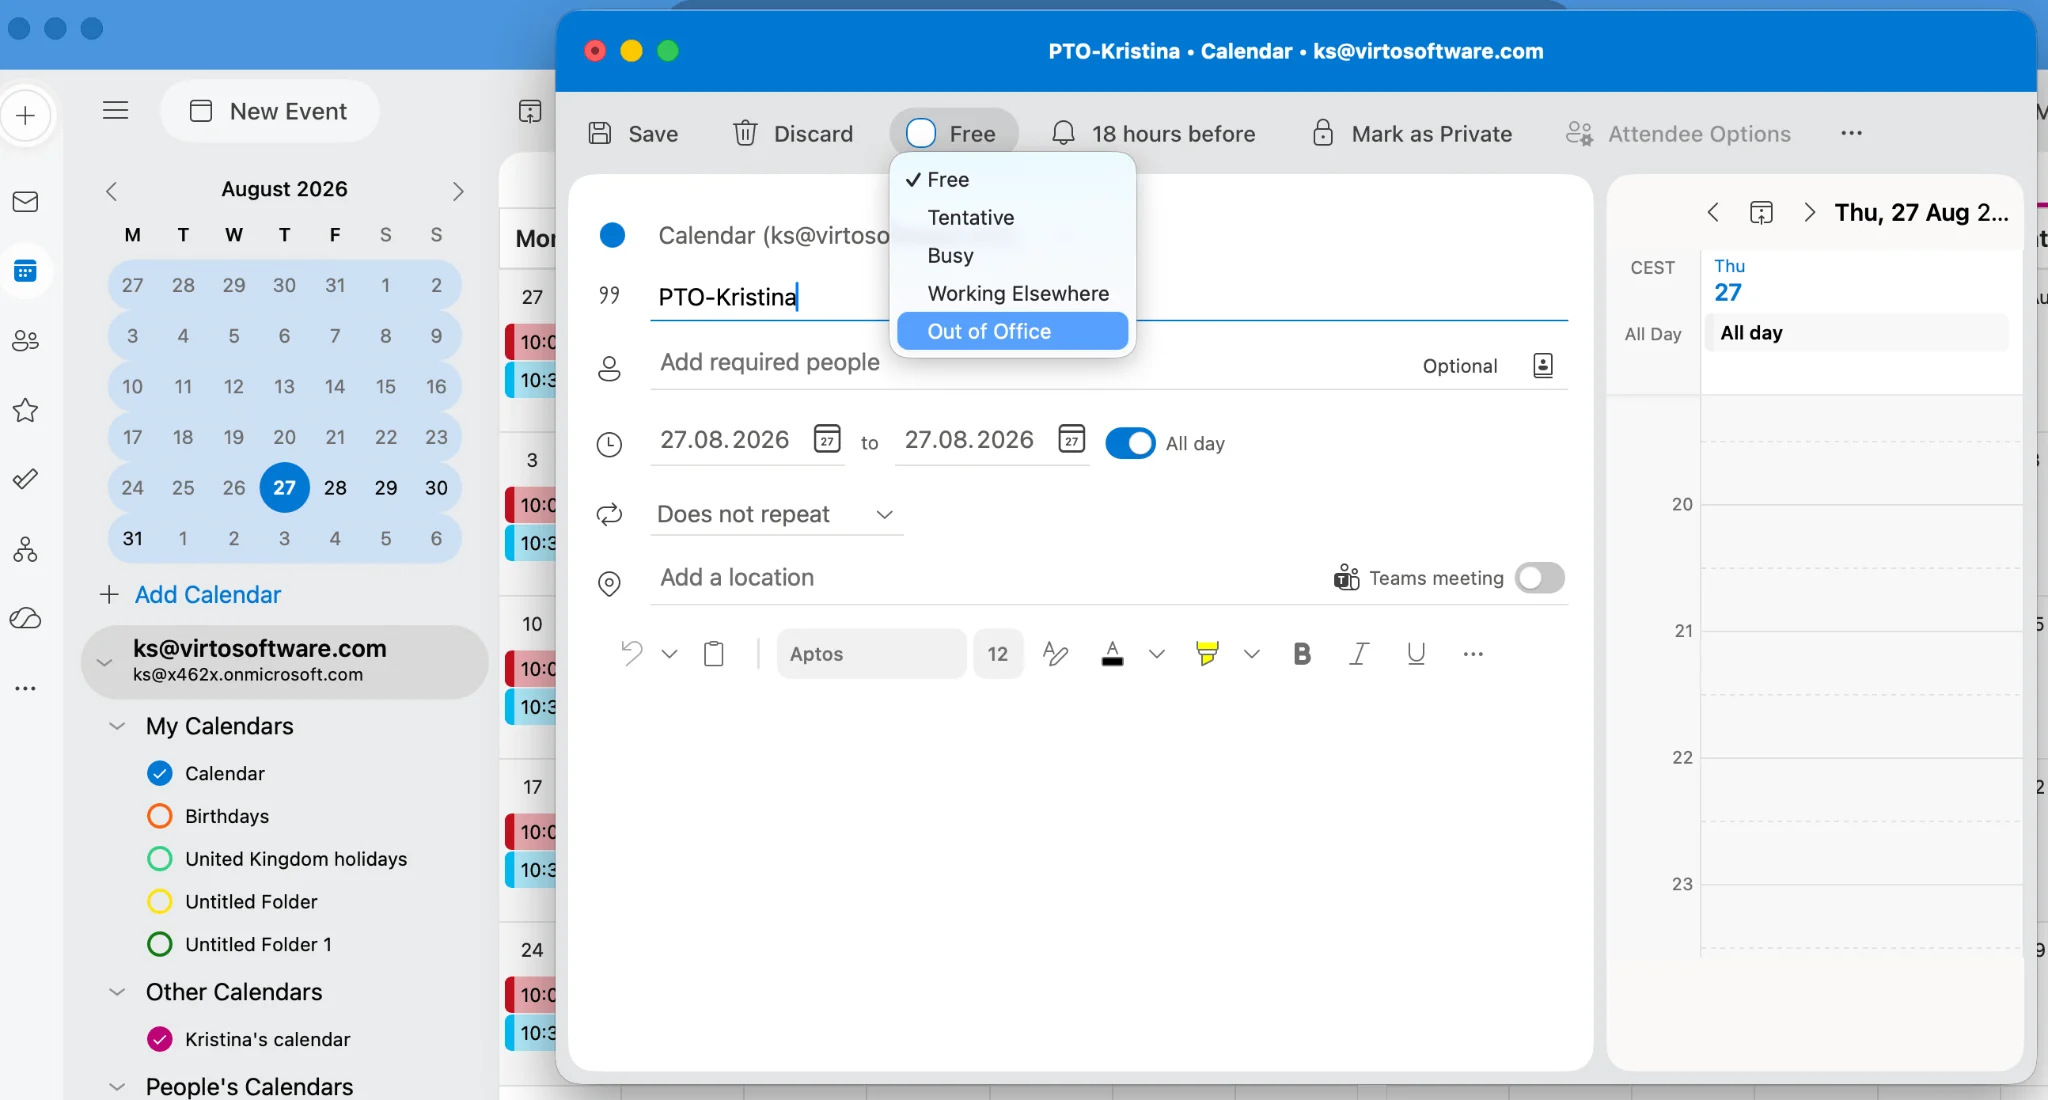
Pic. 1. Creating an all-day PTO event and setting the status to “Out of office” in new Outlook for Mac.
Classic Outlook for Windows
Classic Outlook is still widely deployed, especially on desktops joined to on-premises Exchange.
- Open the Calendar view.
- On the Home tab, select New Appointment. Do not use New Meeting unless you intend to invite people right away.
- Fill in the Subject, then tick the All day event checkbox.
- Set the Start time and End time dates.
- In the Options group on the ribbon, set Show As to Out of Office.
- Set Reminder to None.
- Select Save & Close.
If your organisation uses Outlook categories, this is also the moment to assign one — Categorize, then your “PTO” or “Annual leave” category. Category colours travel with the event when the calendar is shared inside the same tenant.
Outlook on the web
The browser version is the quickest way to add PTO from a machine that is not yours.
- Sign in at outlook.office.com and open the calendar.
- Select New event.
- Enter the title and toggle All day.
- Choose the start and end dates.
- In the Show as dropdown, select Out of office. OWA may prompt you to turn on automatic replies at the same time — a genuinely useful shortcut, and one worth accepting.
- Select Save.
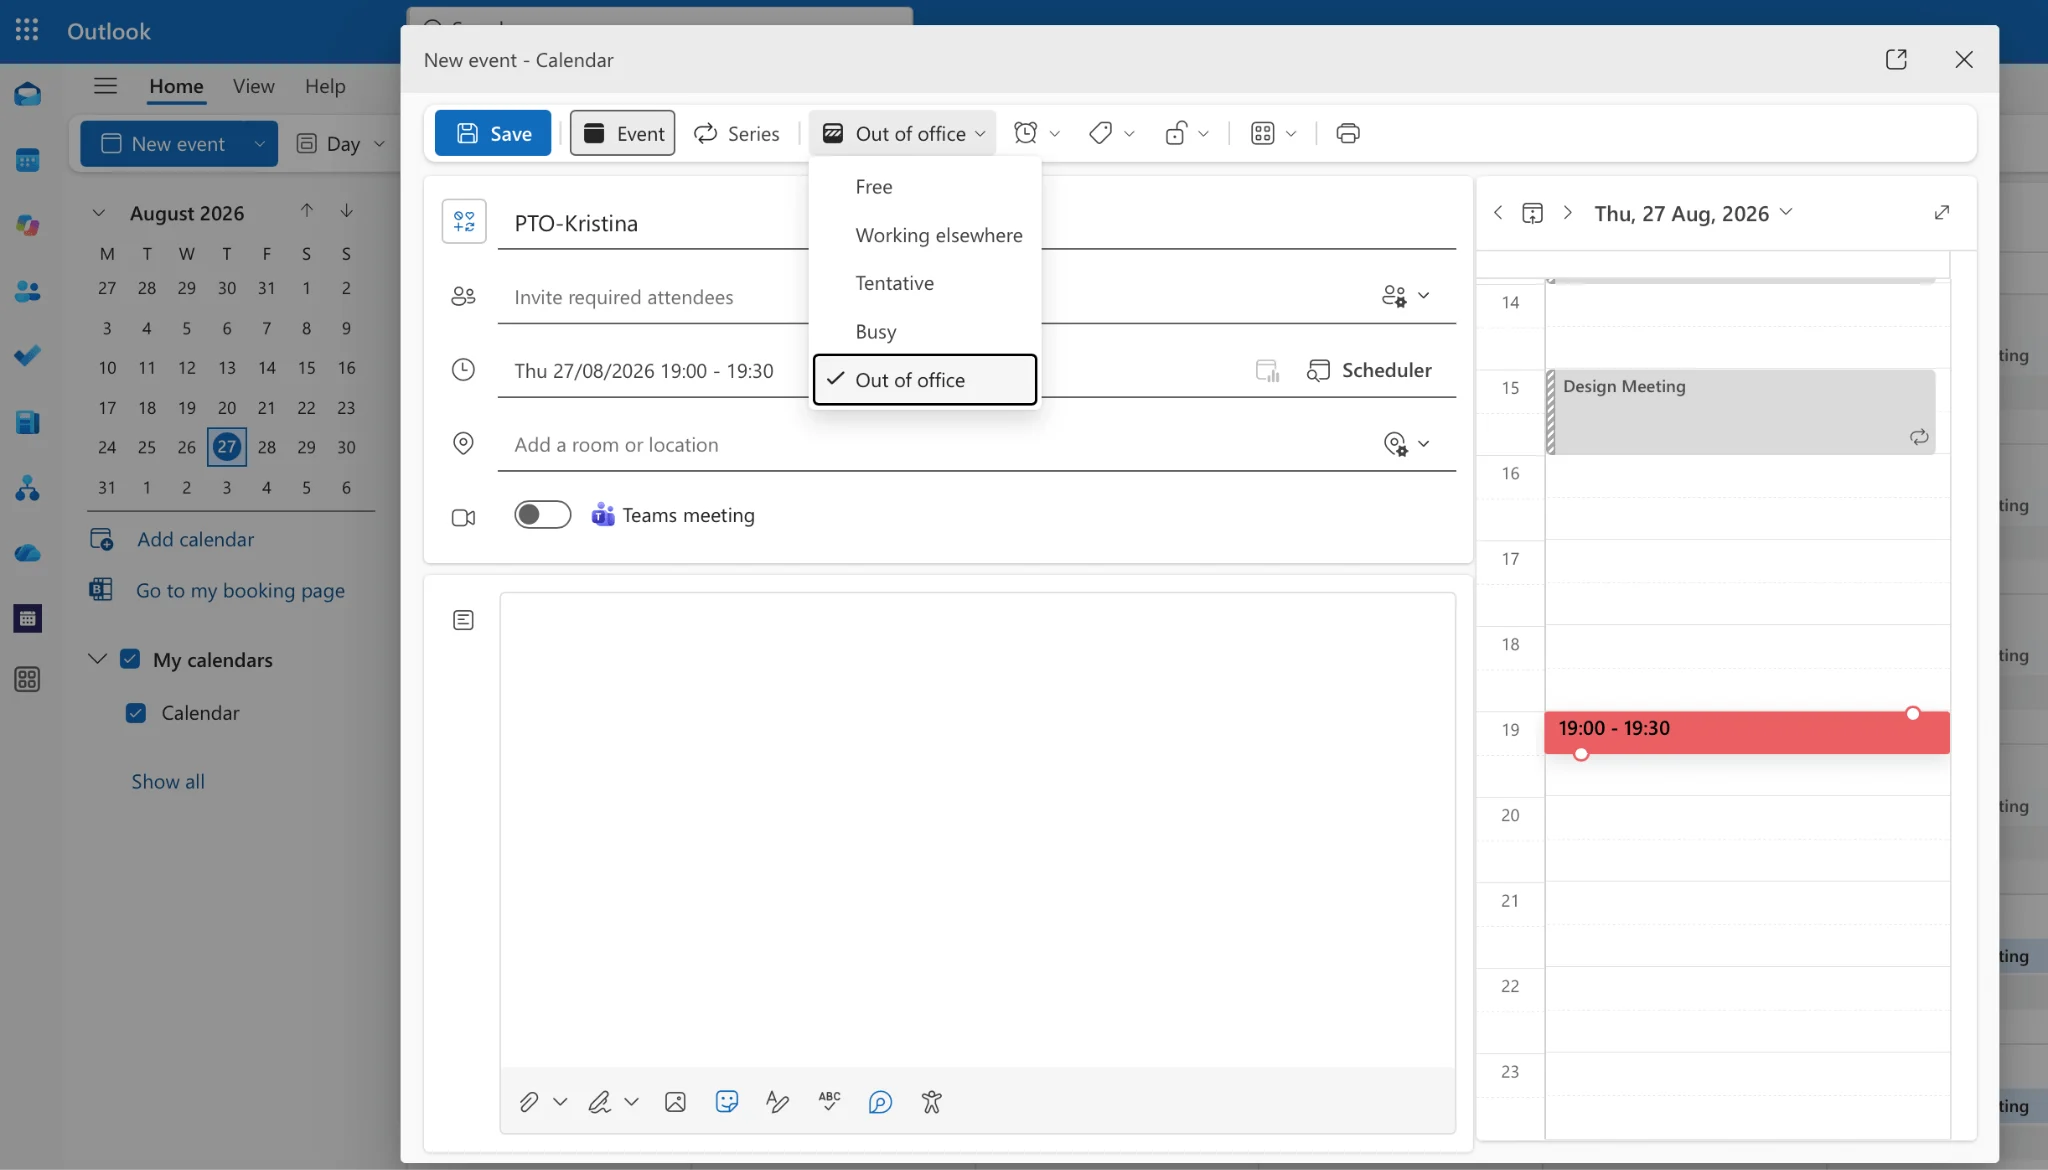
Pic. 2. Scheduling an all-day out-of-office event in Outlook on the web.
Outlook for Mac (classic)
On the classic Mac build the flow is much the same, with slightly different labels.
- Open the Calendar and select New Event, or double-click the start date.
- Enter a title and tick All Day.
- Set the date range.
- Under Status, choose Out of Office.
- Select Save.
Outlook on iPhone and Android
The mobile app can create the event but exposes fewer options.
- Tap the calendar tab, then the plus icon.
- Enter a title and switch All day on.
- Set the dates.
- Tap the availability row — labelled Show As or Busy depending on version — and pick Out of office.
- Tap the tick or Save.
If the availability row is missing on your build, save the event from mobile and change the status later from desktop or the web. The event itself will already be visible to anyone who has your calendar shared.
Half days: leave All day off, set the actual hours, and title it plainly — “PTO (afternoon) — Your Name”. An all-day event marked Out of Office blocks the whole working day in Scheduling Assistant, which is not what you want for a half day.
👉 How do I put PTO on my Outlook calendar so people can see it? Create the all-day event, set Show as to Out of office, then either invite colleagues to a Free copy of it or add the same entry to a shared team calendar they already follow. A personal event on an unshared calendar is visible only as a busy block in Scheduling Assistant, without a title.
How to show your PTO on your team’s calendar
A PTO event on your personal calendar keeps people from booking you. It does not tell anyone why, or let a manager see who else is away that week. For that you need the entry somewhere shared. There are three practical ways to do it.
Option 1: invite your team to a Free copy of the event
This is the method Microsoft documents, and it is the fastest for a one-off absence. The trick is that the copy you send out is marked Free, so it appears on colleagues’ calendars as a note rather than as a block on their own time.
- Right-click your saved PTO event and select Duplicate event.
- Edit the title so it makes sense on someone else’s calendar — include your name.
- Open Response Options and clear Request responses. Nobody needs to RSVP to your holiday.
- Change the status from Out of office to Free.
- Add your team, or a distribution list, in the Invite attendees field.
- Select Send.
Your own calendar still shows Out of Office; theirs shows a free, all-day banner with your name on it. Microsoft’s own walkthrough of this is worth a look if you want the classic-Outlook variant: Add your out of office event to the Outlook calendar of others.
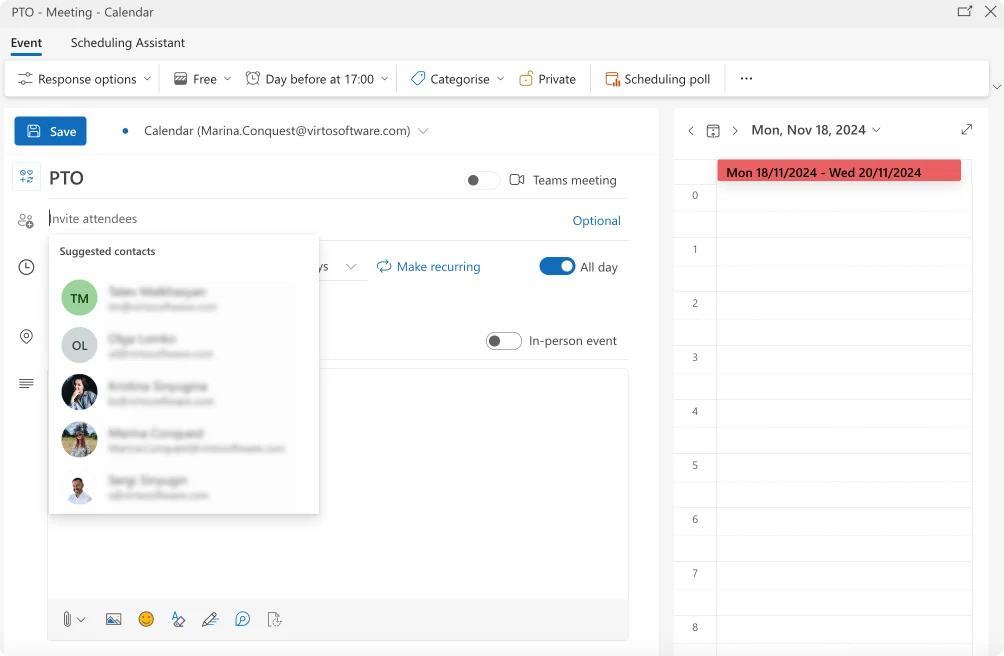
Pic. 3. Adding attendees to a PTO event so it appears on their calendars.
Option 2: use a shared team vacation calendar
For a team that takes leave regularly, a dedicated calendar beats a stream of invitations. One calendar, everyone’s absences, one colour scheme.
- In Outlook on the web, select Add calendar, then Create blank calendar.
- Name it something unambiguous — “Team PTO 2026” rather than “Calendar 2” — and choose where to save it.
- Select Save. It appears under My calendars.
- Open the new calendar and add an all-day event for each absence, titled with the person’s name.
- Mark these events Free, not Out of Office. Because the calendar is shared, an Out of Office entry here can make everyone who has it added look unavailable.
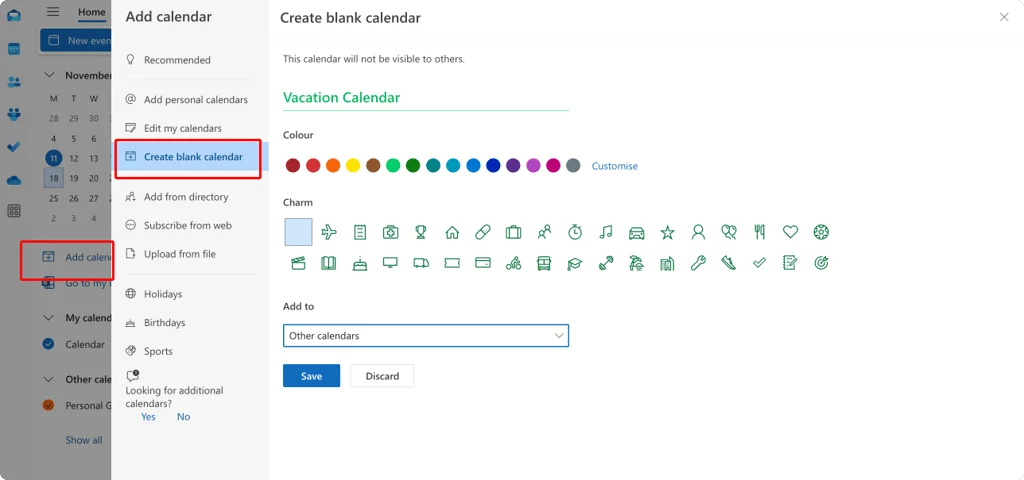
Pic. 4. Creating a new blank calendar in Outlook on the web.
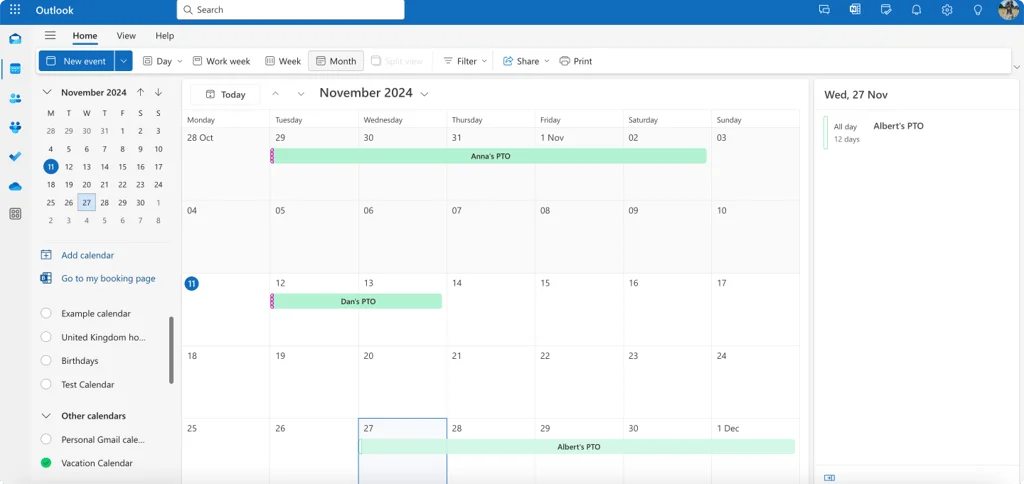
Pic. 5. The new team vacation calendar under My calendars.
If someone adds the calendar and it never appears for them, the cause is almost always a permissions or sync issue rather than a mistake in the setup — our guide to fixing a shared Outlook calendar that is not showing up covers the usual culprits.
Option 3: post it on a Microsoft 365 group calendar
If your team already runs on a Microsoft 365 group, the group calendar is where people look. Add the absence there as an all-day event with the status set to Free, and skip sending an invitation so the group’s inbox stays quiet. Microsoft describes the exact sequence in Block out vacation time on a Group calendar, and we cover the wider setup in our Microsoft 365 group calendar guide.
Setting permissions on a shared PTO calendar
Access rights decide whether a shared calendar becomes a genuine source of truth or a read-only curiosity. Set them once, properly.
- Right-click the calendar in the left pane and choose Sharing and permissions.
- Enter the person, group or distribution list you want to share with.
- Pick a permission level: Can view when I’m busy for free/busy only, Can view titles and locations for a light view, Can view all details for full read access, and Can edit for anyone who needs to add entries.
- Select Share.
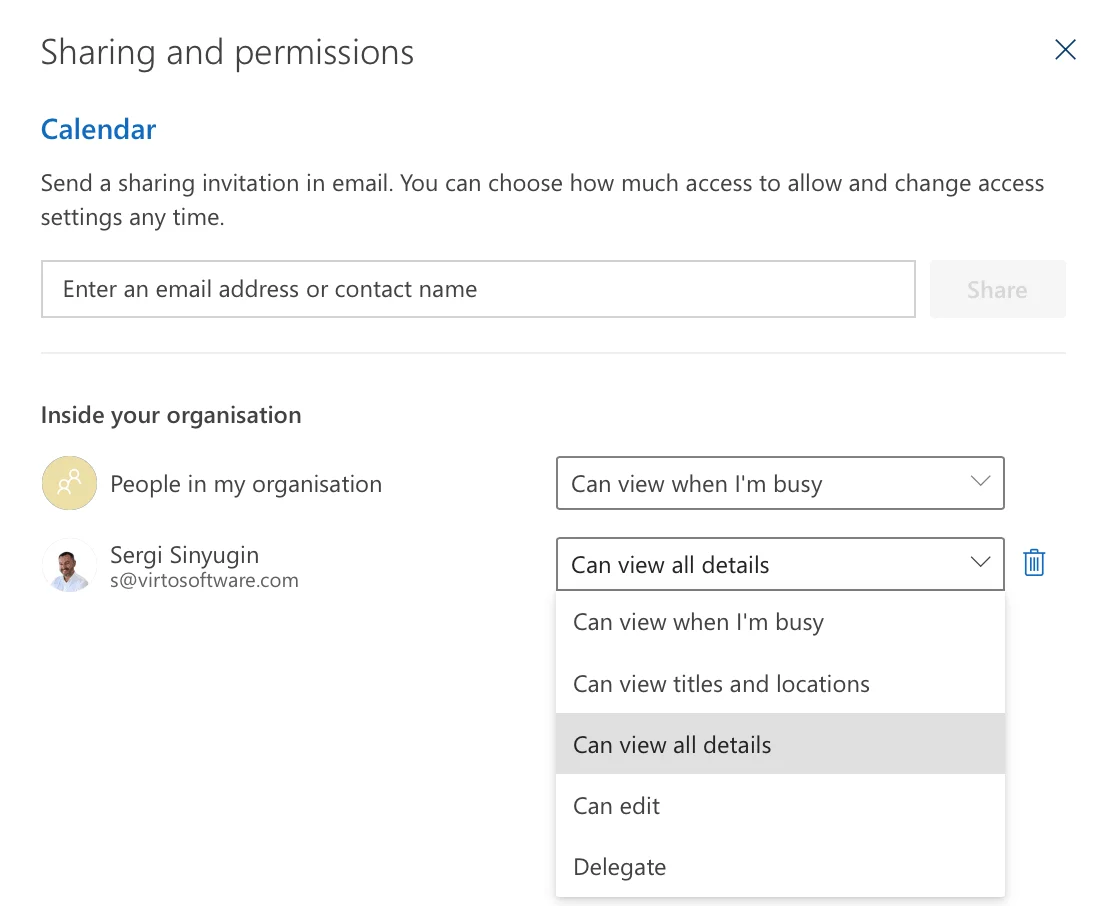
Pic. 6. Opening “Sharing and permissions” for a calendar in Outlook on the web.
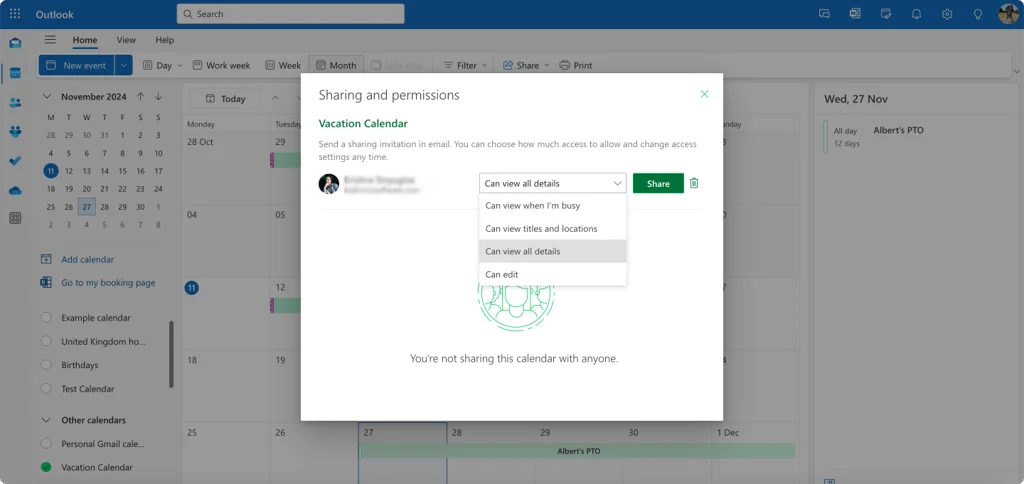
Pic. 7. Granting colleagues access to the team vacation calendar.
As a rule of thumb: the whole team gets Can view all details, team leads and whoever administers leave get Can edit, and Delegate rights go to nobody unless there is a specific reason. Our guide to sharing a calendar in Outlook goes through the permission levels in more depth.
👉 How do I create an employee vacation calendar in Outlook? Create a blank calendar in Outlook on the web, name it for the team and year, share it with the team at Can view all details and with leads at Can edit, then add one all-day event per absence marked Free and titled with the person’s name. Keep colour categories consistent so leave types are readable at a glance.
Reminders and updates for the team
A shared calendar tells people what is coming; a reminder makes sure they notice. On a team calendar, set a reminder one day before on events that need handover — open the event, set Remind me to 1 day, and save. If the event has attendees, use Send update so their copies change too.
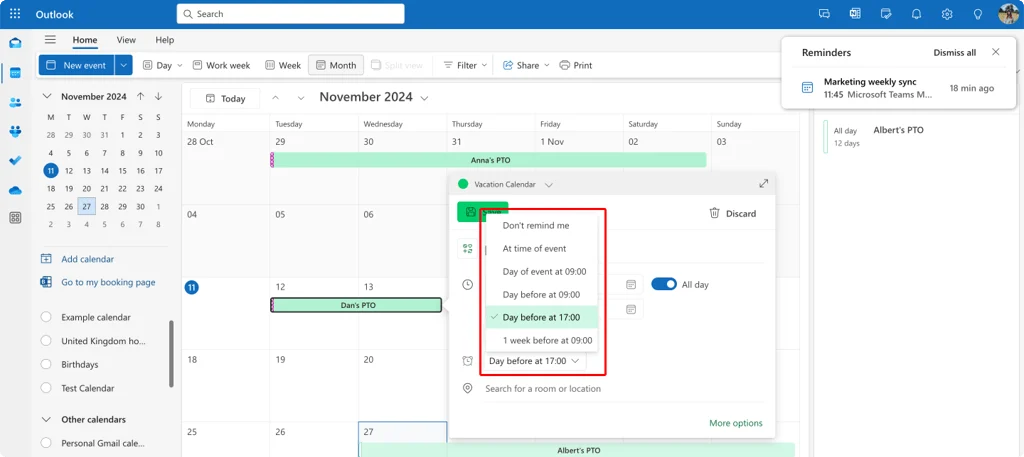
Pic. 8. Setting a reminder on a PTO event in Outlook on the web.
How to set an automatic reply for your PTO dates
The calendar handles meetings. Email needs its own answer, and Outlook will schedule it so you do not have to remember to switch it on or off.
New Outlook for Windows and Outlook on the web
- Go to Settings, then Accounts, then Automatic replies. In new Outlook for Windows you can also reach it from View, then View settings.
- Turn Automatic replies on.
- Tick Send replies only during a time period and enter your first and last day off. Outlook will switch the reply off by itself when the period ends.
- Write the message for people inside your organisation.
- Tick Send replies outside your organization and write a shorter, more formal version if external contacts email you.
- Select Save.
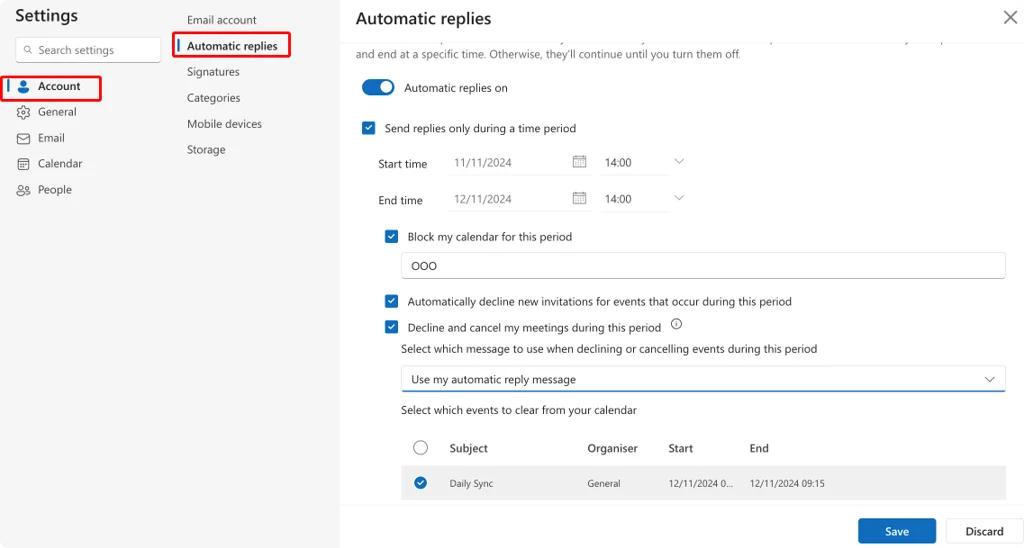
Pic. 9. Setting up automatic replies in Outlook on the web.
Classic Outlook for Windows
- Go to File, then Automatic Replies.
- Select Send automatic replies.
- Tick Only send during this time range and set the dates.
- Write your message on the Inside My Organization tab, then on the Outside My Organization tab.
- Select OK.
Outlook for Mac
Choose Tools, then Automatic Replies, or right-click your account in the folder list and choose Automatic Replies. Tick the box to send replies, set the date range, write the internal and external messages, then select OK.
Automatic replies are an Exchange and Microsoft 365 feature. Accounts connected over POP or IMAP, and personal Gmail or Yahoo accounts added to Outlook, do not support them — you would need a rule that replies with a template instead. Microsoft’s automatic replies reference lists the current limits.
Three auto-reply templates you can paste in
Keep them short. Nobody reads past the second line of an out-of-office message, and the two things they are looking for are your return date and who to contact instead.
Short absence, one to three days
Thank you for your email. I am out of the office from [start date] until [end date], with limited access to email.
For anything urgent, please contact [name] at [email].
I will reply on my return on [return date].
[Your name] | [Title]
Full vacation, one week or more
Thank you for your email. I am on annual leave from [start date] until [end date] and will not be checking email during this time.
While I am away: Project matters — [name], [email] Client matters — [name], [email] Anything urgent — [name], [phone]
I will respond to your message after [return date].
[Your name] | [Title] | [Department]
Working remotely or partially available
Thank you for your email. I am working remotely from [location] until [end date], in [time zone].
Available: [start time] to [end time] [time zone] Typical response time: within [n] hours Urgent matters: [name], [phone]
My calendar is up to date if you would like to book a call.
[Your name] | [Title]
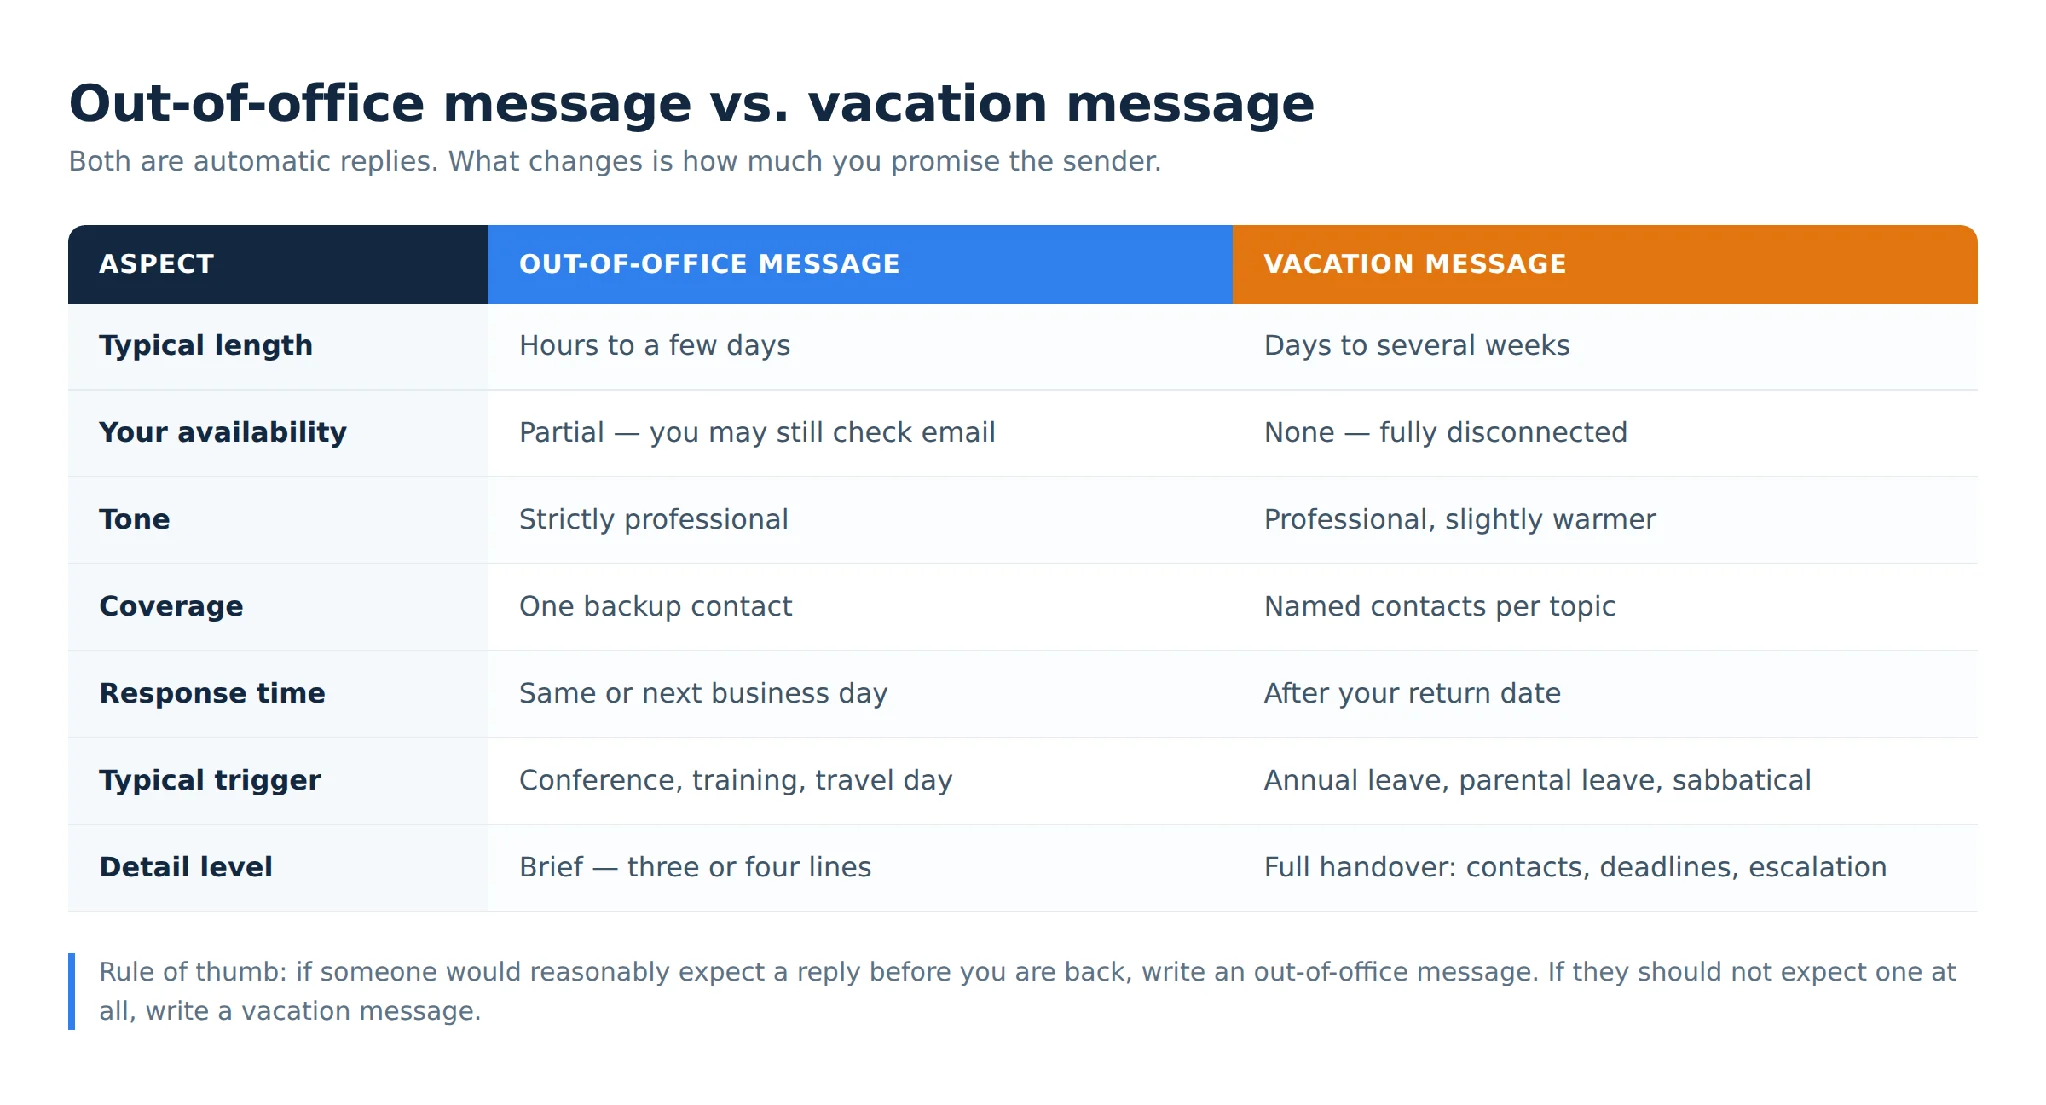
Fig. 2. Out-of-office message vs. vacation message: when to use which.
Four things that make an auto-reply work
- Give an exact return date. “Back next week” starts a follow-up email; “back on Monday 6 April” ends one.
- Name one contact per topic, not a list of five names with no context. Ask them first.
- State how much email you will actually read. “Limited access” and “no access” set very different expectations.
- Send yourself a test message from an external address before you leave. Broken links and stale phone numbers are common and embarrassing.
Add a pre-vacation note to your signature
A line in your signature during the two weeks before you leave does more than the auto-reply that follows it — it reaches people while they can still plan around you.
- In Outlook on the web or new Outlook: Settings, then Accounts, then Signatures.
- In classic Outlook for Windows: File, then Options, then Mail, then Signatures.
- In Outlook for Mac: Outlook, then Settings, then Signatures.
- Add a line such as: “Note: I am on leave 14–28 August. [Name] is covering — [email].”
- Save, and put a reminder in your calendar to remove it when you are back.
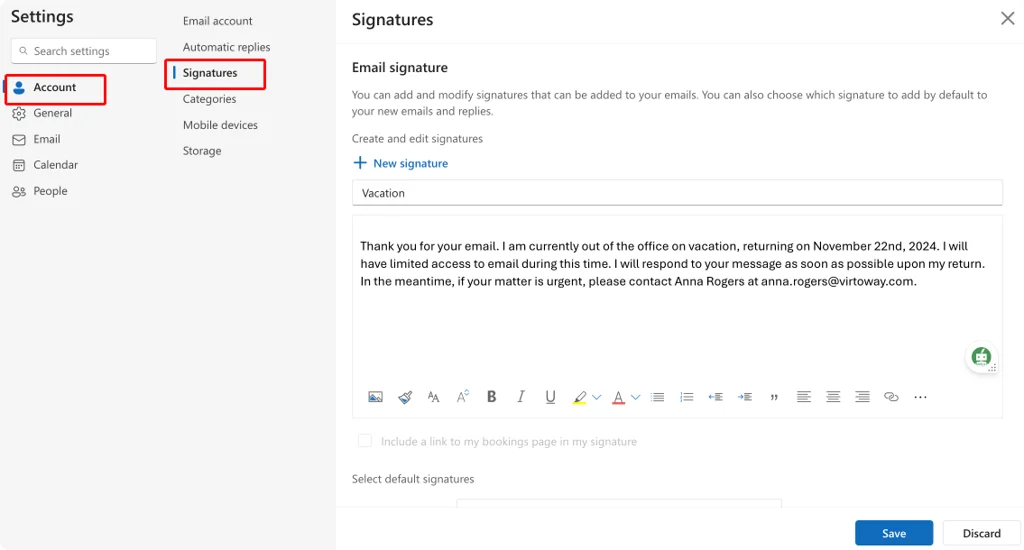
Pic. 10. Configuring a pre-vacation email signature in Outlook on the web.
Different replies for different senders
If key clients need a different message from the rest of your inbox, a rule handles it. In classic Outlook for Windows, go to File, then Manage Rules & Alerts, then New Rule, then Apply rule on messages I receive, and choose Reply using a specific template. Set the condition on the sender’s domain and point it at a template you saved with File, then Save As, then Outlook Template.
In Outlook on the web, open Settings, search for Rules, and select Add new rule. OWA cannot store message templates, so the usual workaround is to save the wording as an extra signature and paste it in when needed.
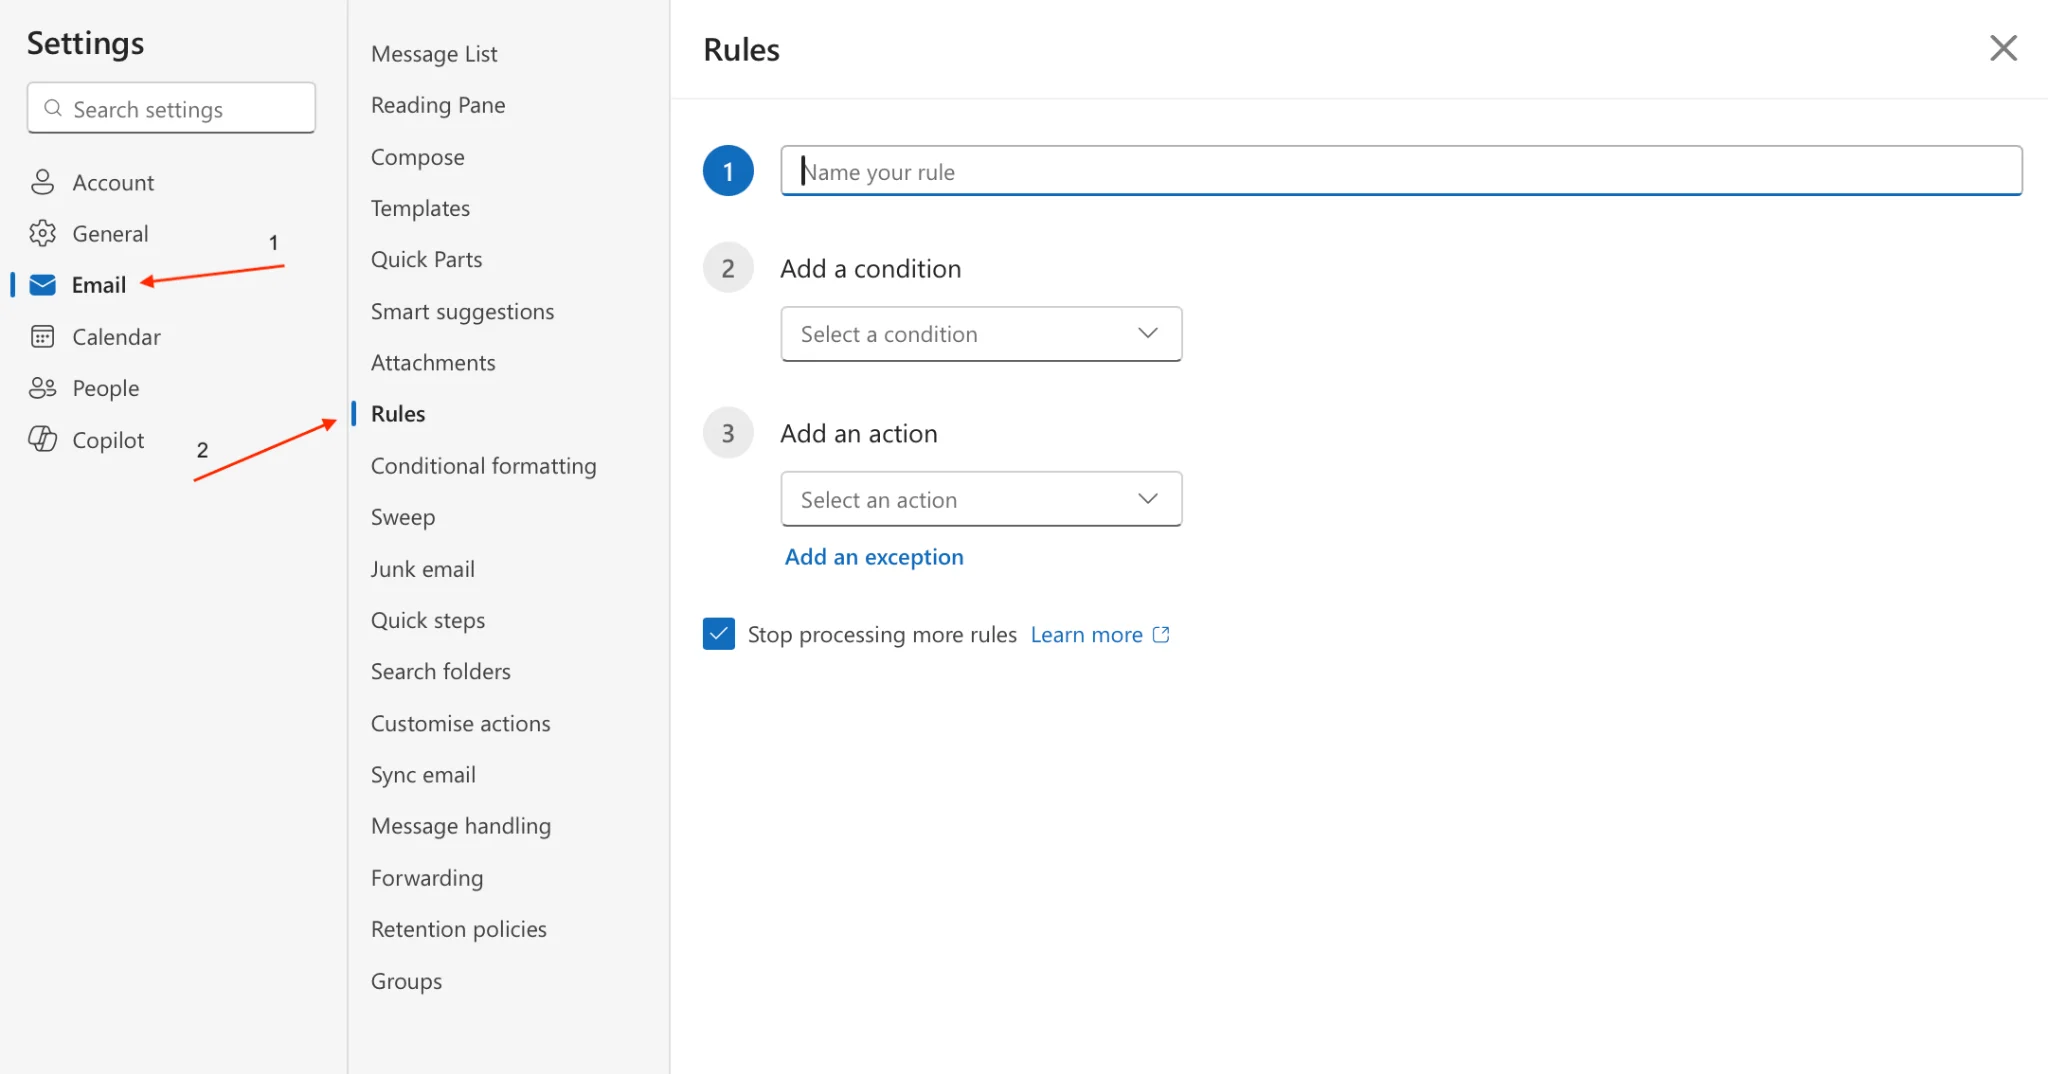
Pic. 11. Creating a rule in Outlook on the web.
How to request PTO through Outlook
Outlook is not a leave-management system, and if your company runs one you should use it. Where there is no such system — and in smaller teams there often is not — the calendar invite is a reasonable substitute because it produces a dated, auditable record that both sides keep.
Requesting by calendar invite
- Create a new meeting rather than an appointment.
- Title it “PTO request — Your Name — [dates]” so it is obvious in an inbox.
- Set it as an all-day event across the dates you want off.
- Add your manager, and anyone who has to approve or cover, in the To field.
- Set the status to Free while it is still a request. Switch it to Out of office once it is approved.
- In the body, list your remaining balance if you track it, who is covering what, and any deadlines that fall inside the period.
- Send. Their acceptance is your approval record.
Requesting by email
For anything longer than a week, or where a formal record matters, send the request as an email and create the calendar event only after approval.
Subject: PTO request — [your name] — [start date] to [end date]
Hi [manager],
I would like to request time off: Dates: [start date] to [end date] Working days: [n] Back in the office: [return date] Leave type: [annual leave / personal / unpaid]
Coverage: [Project A] — [colleague], handover on [date] [Project B] — [colleague], status in [tool] Standups and client calls — [colleague]
Deadlines during the period: [date] — [deliverable], owned by [colleague]
Happy to adjust the dates if the timing is difficult.
[Your name]
How to change or cancel PTO in Outlook
Plans move. The mechanics are the same everywhere: open the event from your calendar, change the dates or details, then save.
- If the event has attendees, Outlook offers Send update. Use it — without it, their copies keep the old dates.
- If the event lives on a shared team calendar, edit it there rather than deleting and recreating it. Recreating it loses the categories and any reminders others have set.
- If you are cancelling entirely, delete the event and, if it had attendees, let Outlook send the cancellation. A stale PTO block is worse than none, because people plan around it.
- Turn the automatic reply off manually if you come back early. A scheduled reply keeps running to its end date regardless of where you are.
Changes not showing up on other people’s calendars is usually a sync problem rather than an editing mistake. Our guides on Outlook calendar not syncing and Teams and Outlook calendars not syncing cover the fixes in order of likelihood.
A pre-departure checklist
Run through this on your last working day. It takes about ten minutes and prevents most of the problems that follow people onto holiday.
- PTO event created for the full date range, All day on, status set to Out of office.
- Reminder set to None so nothing pings you while you are away.
- A Free copy sent to the team, or the entry added to the shared team calendar.
- Colour category applied so the leave type is readable at a glance.
- Automatic reply written, scheduled to the exact dates, and tested from an external address.
- Internal and external versions of the reply both filled in.
- Cover contacts asked in advance and named in both the event body and the reply.
- Handover notes written down somewhere the team can reach without you.
- Deadlines that fall inside your leave reassigned and confirmed.
- Pre-vacation line removed from your signature, and a reminder set for your first day back.
On colour categories specifically: consistency across the team matters more than which colours you pick. If you want a scheme that holds up, see our notes on calendar colour coding and on choosing calendar categories.
When Outlook’s calendar stops scaling
Everything above works well for one person’s time off, and reasonably well for a team of eight. It starts to strain somewhere around three departments and fifty people. The symptoms are recognisable: nobody can see the whole picture at once, requests and approvals live in email threads, colour categories drift because each person sets their own, and there is no way to answer “how many people are off in week 32” without opening several calendars side by side.
This is the gap Virto Calendar App for Microsoft 365 is built to close. It overlays multiple calendar sources — Exchange calendars, SharePoint lists, Google calendars, iCal feeds, Planner tasks — into a single colour-coded view that you can place on a SharePoint page or as a tab in Microsoft Teams, right next to where the team already works.
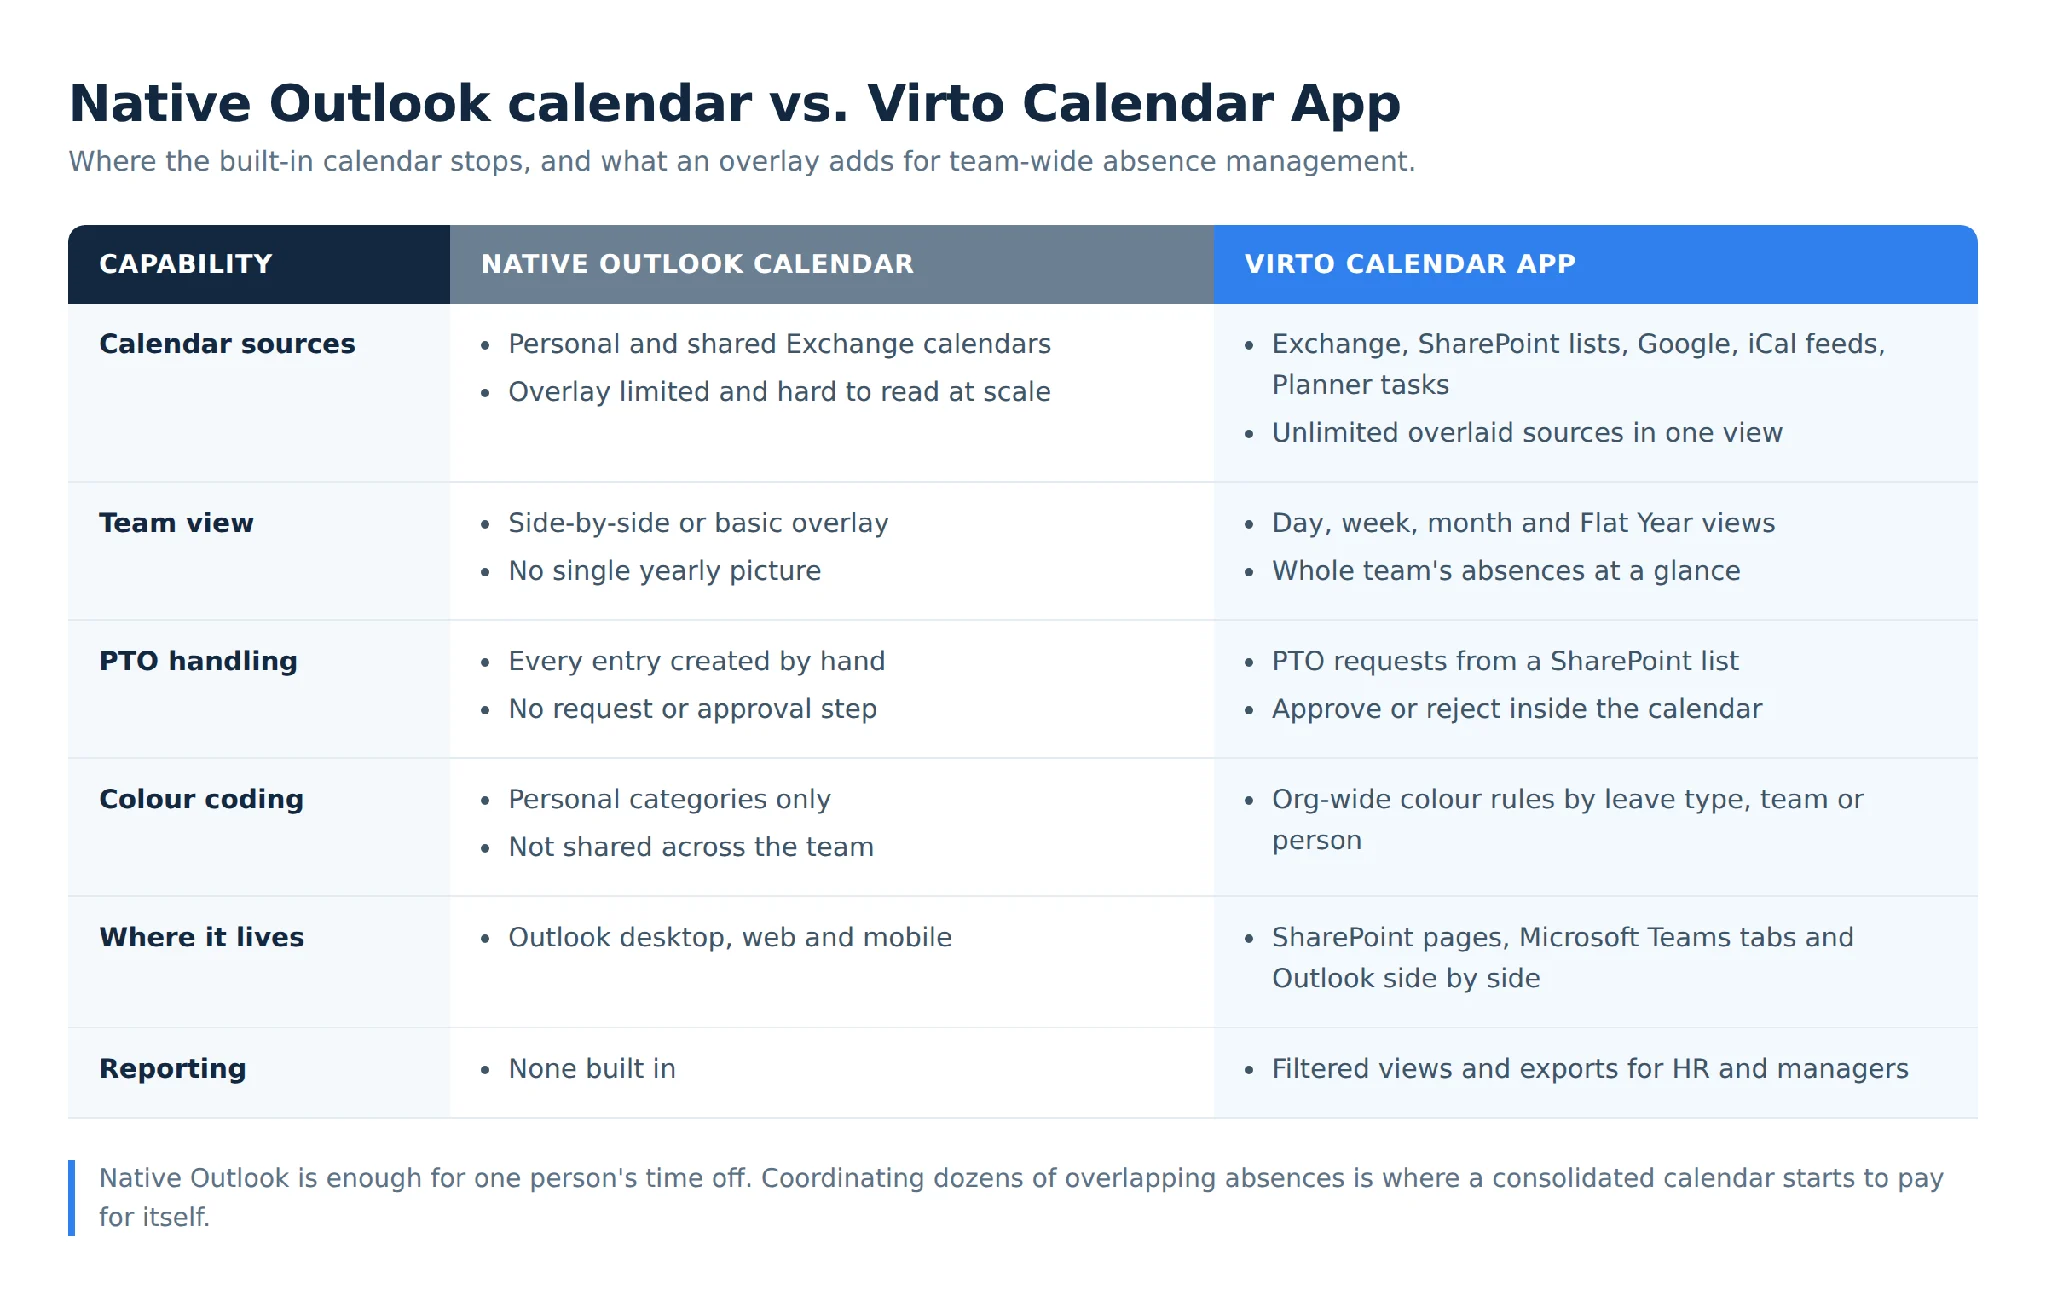
Fig. 3. Native Outlook calendar vs. Virto Calendar App for team absence management.
The parts that matter for PTO
- One consolidated view. Personal, team and departmental calendars overlaid together, so overlapping absences are visible without opening anything.
- Requests from a SharePoint list. Keep PTO requests in a list with the fields you actually need — department, cover, project impact — and surface them on the calendar.
- Approve or reject in the calendar. Managers act on requests where they can see the context, rather than in a separate inbox thread.
- Flat Year view. The whole year on one screen, which is how people spot clashes, long weekends and understaffed weeks.
- Org-wide colour rules. Leave types keep the same colour for everyone instead of depending on individual habits.
- Filtered views and exports for HR and team leads.
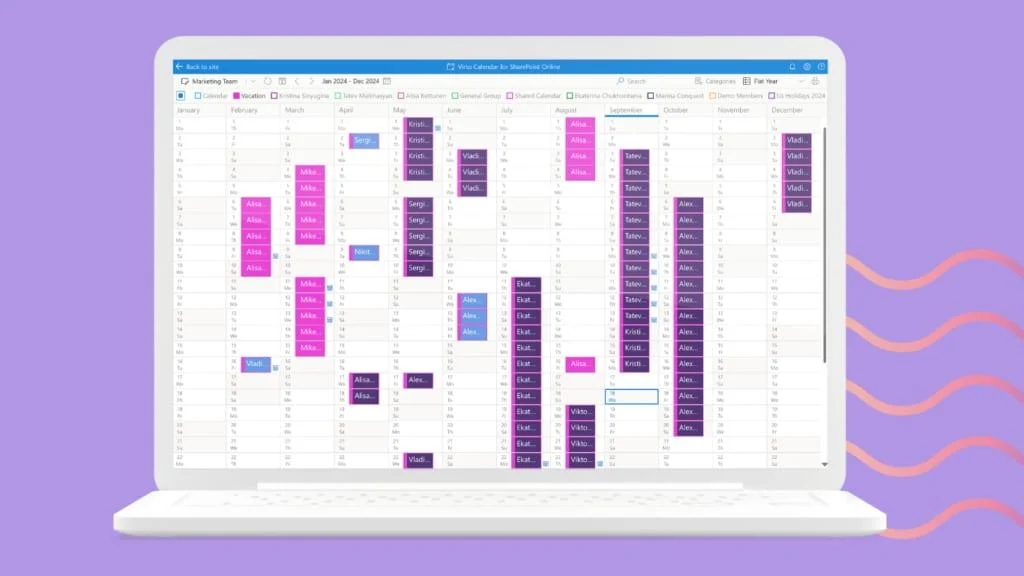
Pic. 12. The Flat Year view showing a full year of team absences on one screen.
What this looks like in practice
A fifty-person marketing agency running Creative, Account Management and Strategy had the standard problem: leave was approved in email, recorded inconsistently, and only discovered when someone was needed. They built a PTO request list in SharePoint with fields for department, cover and project impact, overlaid it with the existing Exchange calendars so historical leave was preserved, and set up one view per department alongside an all-agency view.
Colours were fixed centrally — one per department, plus a separate colour for cross-team training days — and notifications were configured for pending requests, approval decisions and return-to-work dates. Within three months scheduling conflicts were down by roughly 40%, the time spent processing requests fell by around 60%, and adoption reached 95% inside six weeks, largely because nobody had to learn a new tool: the calendar was already sitting in the Teams tab they used daily.
If you want to see the shape of this before committing to it, the employee vacation tracker use case walks through the configuration, and the team calendar use case covers the wider scheduling picture.
Trying it
- Start a free 30-day trial of Virto Calendar App — no card required, and it installs into your existing Microsoft 365 tenant.
- Book a short demo if you would rather have someone walk through your specific setup.
Frequently asked questions
How do I add PTO to my Outlook calendar?
Open the calendar, select New event, title it with your name, toggle All day on, set the first and last day of your leave, set the status to Out of office, set the reminder to None, and save. Then either invite your team to a Free copy of the event or add the same entry to a shared team calendar.
Should PTO be marked Free or Out of Office?
Out of Office on your own calendar — it stops colleagues booking you and updates your Teams presence. Free on a shared team calendar or on a copy you send to colleagues, so the entry shows as information rather than blocking their working day.
Does adding PTO to my calendar send an automatic reply?
No. The calendar event and the automatic reply are separate settings. You have to turn the reply on under Automatic Replies and schedule it to the same dates. Outlook on the web sometimes offers to do both at once when you mark an event Out of Office; that prompt is the only place the two connect.
How do I add my vacation to someone else’s Outlook calendar?
Duplicate your PTO event, change the status to Free, clear Request responses so nobody has to RSVP, add their address under Invite attendees, and send. When they accept, it appears on their calendar without blocking their availability.
Can I add half-day PTO?
Yes. Leave All day off, set the actual hours, and say so in the title — “PTO (afternoon)”. An all-day event marked Out of Office blocks the entire working day in Scheduling Assistant, which is misleading for a half day.
Why can’t my colleagues see my PTO?
Usually one of three things: the event is on a personal calendar that has not been shared, their permission level is set to free/busy only so they see a block without a title, or the shared calendar has not synced. Check the sharing permissions first — that is the most common cause.
How far in advance should I add PTO to Outlook?
As soon as the leave is approved. The calendar entry is what lets other people plan, and it is worth nothing to them the week you leave. Set the event early and the automatic reply on your last working day.
Wrapping up
Adding PTO to Outlook is four small jobs, not one: the all-day event, the Out of Office status, the shared visibility, and the automatic reply. Each takes under a minute, and each covers a gap the others leave open. The event alone keeps you honest; the shared copy keeps the team informed; the reply keeps your inbox from becoming a backlog of unanswered urgency.
Where this gets hard is scale. Once you are coordinating dozens of overlapping absences across departments, the constraint stops being how to create an event and becomes how to see everything at once. That is worth solving with a consolidated calendar rather than with more discipline — Virto Calendar App is free to try for 30 days if you want to test that against your own tenant.
Related reading
- Adding vacation and time off to Outlook and Microsoft Teams
- How to set Out of Office in the Outlook calendar
- How to share your calendar in Outlook
- Microsoft 365 group calendars: setup and management
- Shared Outlook calendar not showing up: fixes
- How to add a Teams calendar to Outlook
- Employee vacation tracker use case
- Microsoft Community Hub: best setup for an Office 365 vacation calendar