



Quick answer. To edit and share multiple files at once in SharePoint, select them in a library and use the command bar to check out, edit, share, move or approve them in bulk.
This guide explains the details of editing, sharing, checking in, and approving multiple files at once in SharePoint — the multi-file operations teams rely on to keep large document libraries organized and under control.
It builds on the basics of bulk operations in SharePoint — the challenges, potential problems, and solutions associated with managing large volumes of files and folders — and focuses on the crucial tasks of editing, sharing, checking in, and approving multiple files at once.
These operations are vital for maintaining an organized and efficient workflow within any organization. Bulk editing ensures that necessary changes are applied uniformly, while sharing multiple files streamlines collaboration. Checking in and approving documents en masse is essential for maintaining document integrity and ensuring compliance with organizational policies.
For other parts in the series, be sure to check out:
Multiple Data Edits & Multiple Files Edit
The need to update multiple items or documents simultaneously in SharePoint is also a common task. This process, known as multiple data edits, involves modifying the properties or contents of several files or list items at once. The purpose of these edits can vary widely, from updating metadata and correcting errors to applying consistent formatting or implementing organizational changes.
Typical scenarios where multiple data edits are necessary include:
- Bulk metadata updates: When a new metadata field is added to a document library or list, and existing items need to be updated to include this information.
- Content standardization: Applying consistent naming conventions, tags, or other standardized elements across multiple documents or list items.
- Data correction: Fixing errors that affect numerous items, such as incorrect dates, misspellings, or outdated information.
- Migration and integration: Adjusting data as part of a migration process or when integrating with other systems.
👉 Does SharePoint allow simultaneous editing? Yes, SharePoint allows simultaneous editing, a feature known as co-authoring. This capability is available for documents stored in SharePoint Online and SharePoint 2016 or later. When multiple users open a document—such as a Word, Excel, or PowerPoint file—stored in SharePoint, they can edit it simultaneously. Changes made by each user are automatically saved and synced in real-time, and users can see who else is working on the document. Additionally, SharePoint maintains a version history, enabling users to track changes and revert to previous versions if necessary.
Standard options for multiple data edits in SharePoint
SharePoint offers several built-in features for handling multiple data edits. These features are designed to cater to different scenarios, whether you need to update items in a list, manage document properties, or automate repetitive tasks.
1. Quick Edit Mode
Quick Edit Mode is a powerful feature in SharePoint that allows users to edit items in a list or library using a spreadsheet-like interface. This feature is particularly useful for making bulk changes quickly and efficiently. Here’s how it works:
- Access Quick Edit Mode: Navigate to the list or library you want to edit. In the modern SharePoint experience, you can click the “Quick Edit” (aka “Edit in grid-view”) button in the command bar.
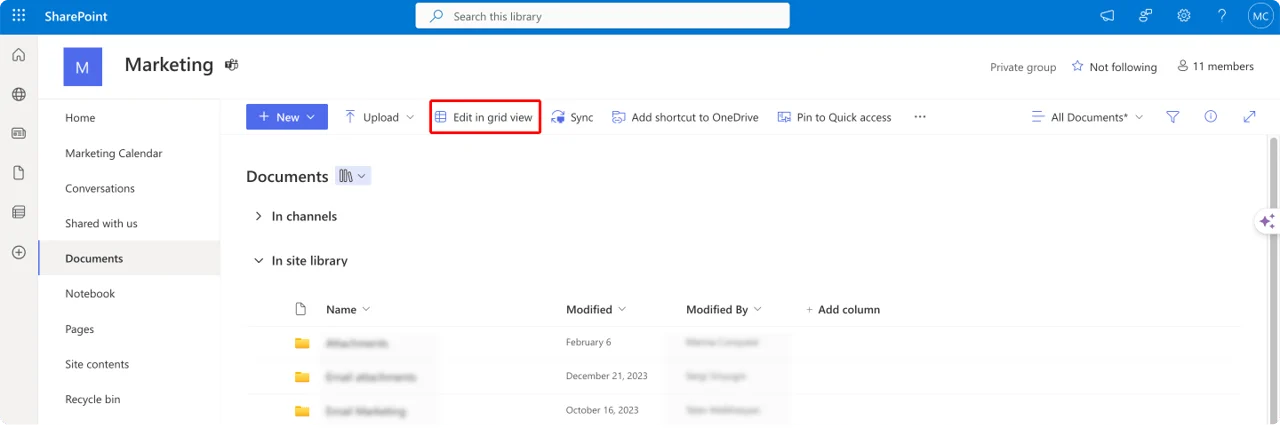
Pic. 1. Navigating to “Edit in grid view” or “Quick Edit Mode”.
- Edit items: Once in Quick Edit Mode, the list or library transforms into a grid where each cell corresponds to a field of an item. You can click on any cell to edit its value, similar to how you would in Excel.
- Drag and fill: You can drag the fill handle to copy values across multiple cells, making it easy to apply the same change to several items.
- Save changes: Changes are saved automatically as you make them, but you can also exit Quick Edit Mode to confirm and save all edits.
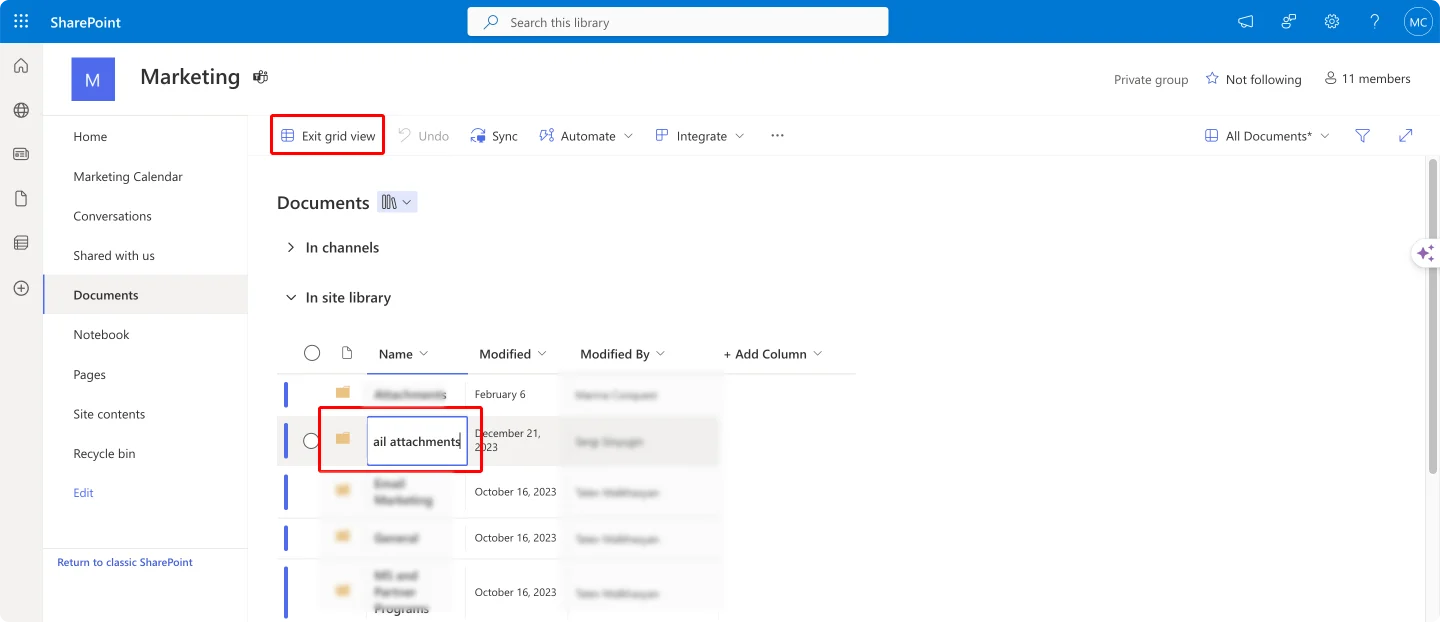
Pic. 2. Editing in grid view.
Quick Edit Mode is ideal for scenarios where you need to update multiple fields across many items, such as adding new metadata, correcting errors, or making bulk changes to item properties.
👉 How do I edit multiple items in a SharePoint list? Editing multiple items in a list is similar to editing folders in a library. Begin by navigating to the SharePoint list containing the items you want to edit. Switch to Quick Edit or Grid mode by clicking the “Quick Edit” or “Edit in grid-view” button in the command bar, which transforms the list view into a spreadsheet-like interface. You can then click on individual cells to make your edits, similar to working in Excel. After making the necessary changes, exit the Grid Edit mode by clicking the “Exit” button. Your changes will be automatically saved.
2. Bulk Edit Properties
The Bulk Edit Properties feature in SharePoint document libraries allows you to select multiple files and edit their properties simultaneously. This is especially useful for updating metadata fields across numerous documents. Here’s how to use this feature:
- Select multiple files: Navigate to your document library, and use the checkboxes to select multiple files. You can also use the “Select All” checkbox to select all files in the current view.
- Edit properties: After selecting the files, click on the “i” (information) icon or the “Edit” button in the command bar. This action opens the properties pane on the right side of the screen.
- Modify properties: In the properties pane, you will see common metadata fields that apply to all selected files. Update the fields as needed and click “Save” to apply your changes.
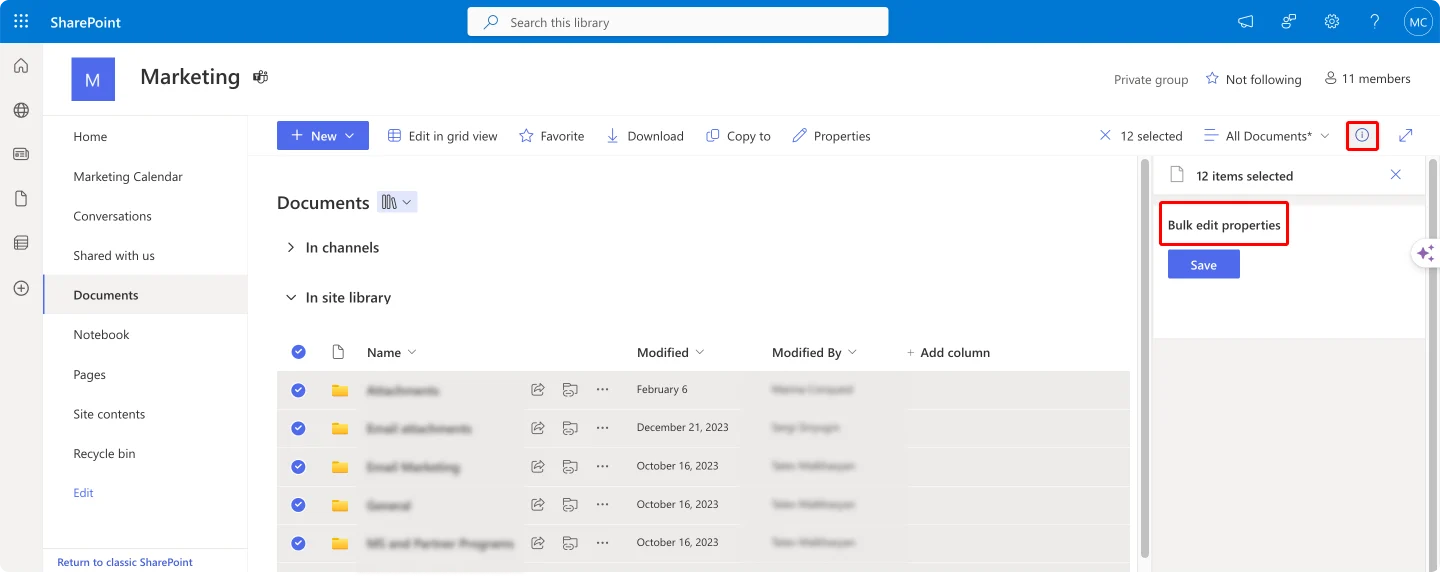
Pic. 3. Navigating to the “Bulk edit properties”.
Bulk Edit Properties is particularly useful when you need to apply consistent metadata across several documents, such as updating author names, tags, categories, or any other custom metadata fields.
👉 How do I change the properties of multiple files in SharePoint? First, navigate to the document library containing the files you want to edit. Once there, select the files or use the “Select All” checkbox at the top. After selecting the files, click on the “i” (information) icon or the “Edit” button in the toolbar to open the properties pane on the right side of the screen. In this pane, you can edit common properties for all selected files. Make the necessary changes and click “Save” to apply them.
3. Power Automate
Power Automate is a workflow automation tool that integrates seamlessly with SharePoint. It allows you to create automated workflows to handle repetitive tasks, including multiple data edits. Here’s how Power Automate can be utilized for this purpose:
- Create a flow: Start by creating a new flow in Power Automate. You can use pre-built templates or create a custom flow from scratch.
- Set triggers: Define triggers that initiate the workflow. Triggers can be based on various conditions, such as when a new item is created, modified, or when a specific event occurs in SharePoint.
- Define actions: Add actions to your flow that perform the desired edits. Actions can include updating item properties, sending notifications, or even integrating with other Microsoft 365 services.
- Automate edits: Once the flow is configured, it will run automatically based on the defined triggers. This allows you to automate bulk edits without manual intervention.
Power Automate is invaluable for automating complex workflows that involve multiple steps and conditions. It helps ensure consistency and reduces the risk of human error in repetitive tasks.
Alternative methods for multiple data edits
While SharePoint’s built-in tools are powerful, there are times when alternative methods may be more efficient or necessary, particularly for more complex or large-scale edits.
- Third-party solutions like ShareGate, Metalogix, and Virto Multiple File Operations (On-premises and Online options).
- PowerShell scripts: PowerShell can be used to automate and script multiple data edits in SharePoint. Below is an example script that updates the “Status” field for all items in a specified list, setting it to “Completed” for items where the “DueDate” field is in the past.
# Connect to the SharePoint site
Connect-PnPOnline -Url "https://yourtenant.sharepoint.com/sites/yoursite" -Interactive

# Define the list name
$listName = "Tasks"

# Get all list items
$listItems = Get-PnPListItem -List $listName

# Iterate through each item and update the "Status" field
foreach ($item in $listItems) {
    # Check if the DueDate is in the past
    $dueDate = [datetime]$item["DueDate"]
    if ($dueDate -lt (Get-Date)) {
        # Update the Status field to "Completed"
        Set-PnPListItem -List $listName -Identity $item.Id -Values @{"Status" = "Completed"}

        # Output the updated item ID
        Write-Output "Updated item ID: $($item.Id)"
    }
}

# Disconnect from the SharePoint site
Disconnect-PnPOnline
Best practices and workarounds
Here’s a brief summary of the best practices and workarounds for bulk operations in SharePoint to ensure optimal results:
- Backup data: Always create backups before making bulk edits to avoid data loss.
- Test changes: Use a test or sandbox environment to verify that your changes will work as intended without affecting production data.
- Use filters and views: Create custom views and apply filters to easily select and edit the items you need.
- Monitor and log changes: Keep track of changes made during bulk edits. This can be done through SharePoint’s built-in logging features or by maintaining a manual log.
- Communicate with stakeholders: Inform relevant team members or departments about planned edits to avoid conflicts and ensure everyone is aware of the changes.
By leveraging both SharePoint’s native capabilities and alternative methods like third-party tools and PowerShell scripts, you can efficiently manage and edit multiple data items, ensuring your SharePoint environment remains up-to-date and well-organized.
👉 If you want to get a quick sense of how multiple file operations work in SharePoint before diving into the full guide, this short video walks you through the process — a great visual companion to the detailed steps that follow: Watch on YouTube.
Multiple Files Sharing
The primary purpose of multiple file sharing in SharePoint is to enable seamless collaboration among team members, streamline workflows, and maintain a centralized repository of documents. Typical cases include:
- Project collaboration: Teams working on a project can share all relevant documents in a single action, ensuring everyone has access to the latest files.
- Departmental updates: Departments can share updated policies, procedures, and other important documents with all team members simultaneously.
- Training materials: HR departments can share training materials with new employees, ensuring they have access to all the necessary documents.
In this section, we’ll take a look at how you can share multiple files in a SharePoint environment using both built-in standard features and alternative methods.
👉 Can multiple people work on a SharePoint file at once? Yes, multiple people can work on a SharePoint file simultaneously, a feature known as co-authoring. This allows users to make changes in real-time, with updates being synced automatically—something we’ve discussed in the earlier section.
Standard options for working with multiple file sharing
SharePoint provides several robust, built-in options for sharing multiple files, each designed to facilitate collaboration and control access efficiently. Here’s a detailed look at these options:
1. Direct sharing
Direct sharing allows you to select multiple files within a document library and share them with specific users or groups. This method is straightforward and quick, especially useful for ad-hoc sharing needs.
- Selecting files: Navigate to the document library, select the checkboxes next to the files you want to share, and click the “Share” button.
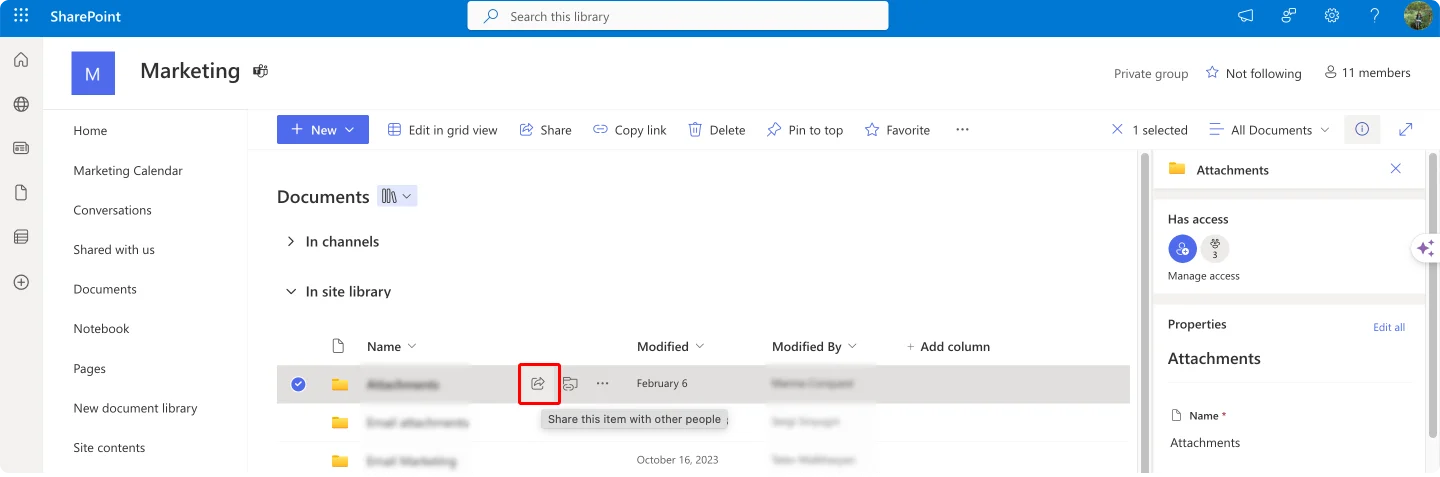
Pic. 4. Navigating to the “Share” button.
- Granting permissions: In the sharing dialog, enter the email addresses of the users or groups you want to share with. You can set permissions to “View” or “Edit”. To make the documents editable by multiple people, select “Edit”.
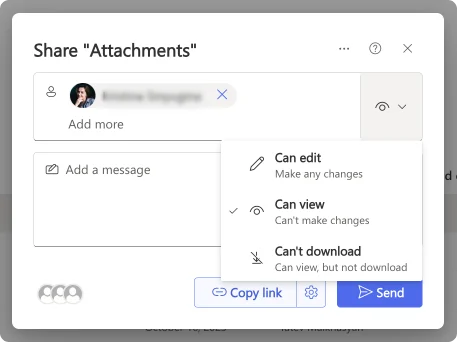
Pic. 5. Adjusting permissions in a sharing dialog.
- Notifications and access: Users receive an email notification with a link to the shared files. They can then access the files based on the granted permissions.
2. Sharing links
Sharing links are another powerful feature that allows you to create links with specific access permissions. These links can be sent to users, making it easy to share documents without explicitly adding each user.
- Creating a link: Select the files you want to share and click the “Copy link” or “Share” button. Choose the type of link you want to create—view or edit.
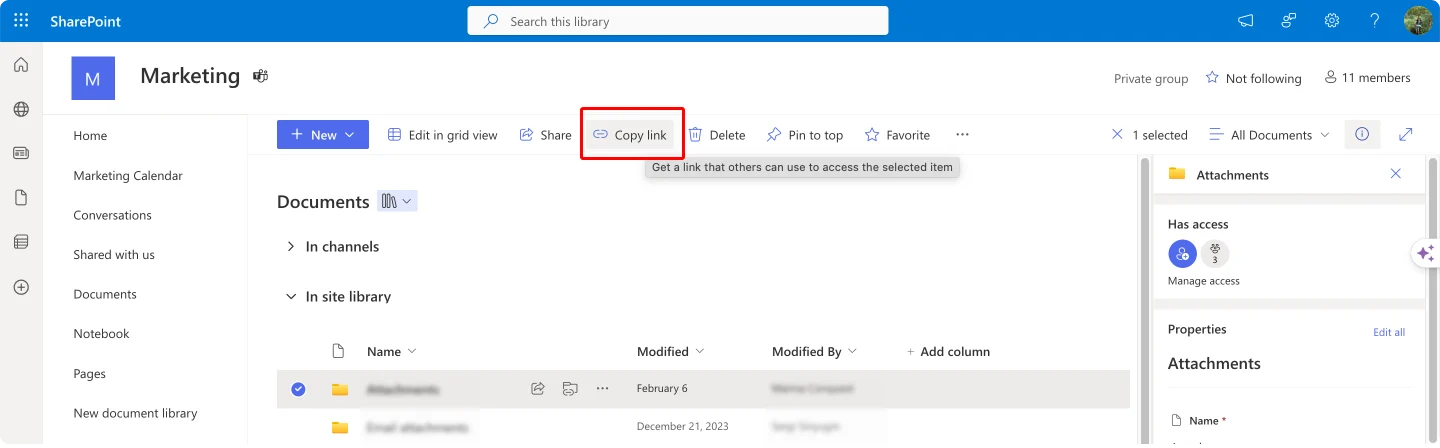
Pic. 6. Navigating to the “Copy link” button.
- Setting expiration and passwords: For added security, you can set expiration dates for the links, ensuring they are only accessible for a limited time. You can also set a password that recipients must enter to access the files.
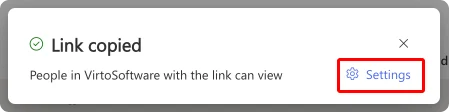
Pic. 7. Adjusting copied link and its settings.
- Distributing the link: Copy the generated link and send it to the intended recipients via email or any other communication method.
👉 Can you share multiple files in SharePoint? Absolutely. SharePoint allows you to select and share multiple files at once. This can be done by selecting the files in a document library and using the “Share” option to grant access to the selected files. The same applies to “How do I make a document editable by multiple people in SharePoint?” To make a document editable by multiple people, share the document and grant “Edit” permissions to the users or groups. Please refer to the detailed instructions above.
3. Document libraries
Sharing an entire document library is a highly efficient way to ensure ongoing access to a collection of files and folders, making it ideal for projects or departments that require continuous access.
- Sharing the library: Navigate to the document library you want to share, click the “Settings” (gear icon) in the top right corner, then select “Library settings.”
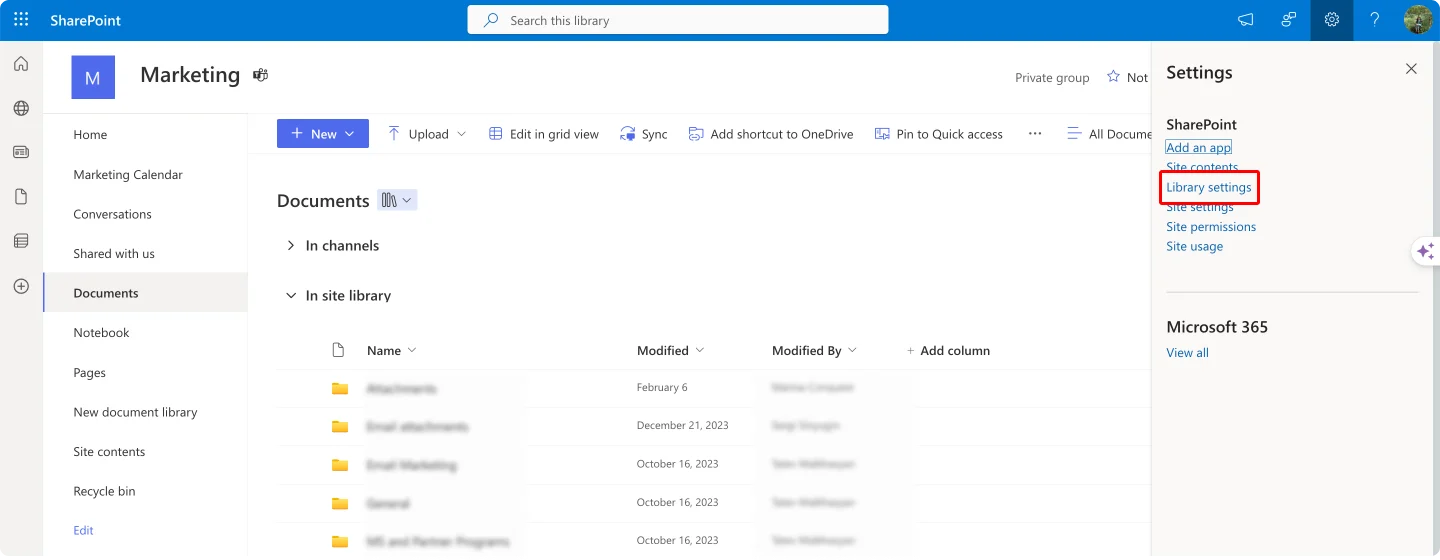
Pic. 8. Navigating to the “Library settings”.
- Setting permissions: You can set permissions at the document library level, allowing users to view, edit, or contribute to all files within the library.
- Centralized management: Any new files added to the library automatically inherit the shared permissions, ensuring consistent access without the need to repeatedly share individual files.
4. Permission management
SharePoint’s permission management system provides granular control over who can access your files, enabling you to manage permissions at various levels—document library, folder, or individual file.
- Library-level permissions: Set permissions for an entire document library to control access for all its contents. This is useful for broad access management.
- Folder-level permissions: If you need more specific control, you can set permissions at the folder level, allowing different groups to access different sets of files within the same library.
- File-level permissions: For the highest level of control, you can set permissions on individual files. This is ideal for sensitive documents that need restricted access.
👉 For more on permission management in SharePoint, please refer to our comprehensive article on the topic: Configuration & Management of SharePoint Permissions: A Complete Guide
Alternative methods for multiple file sharing
In addition to the built-in features, there are alternative methods for sharing multiple files:
- Third-party solutions: Tools like ShareGate, AvePoint, and Virto Multiple File Operations offer advanced features for bulk sharing and permissions management. These solutions can simplify complex sharing scenarios and provide additional security and auditing capabilities.
- PowerShell scripts: For administrators, PowerShell scripts offer a powerful way to automate the sharing process. Scripts can be used to set permissions, share files, and generate sharing links in bulk, saving time and reducing the risk of manual errors.
# Example: PowerShell Script to Share Multiple Files
Connect-PnPOnline -Url "https://yourtenant.sharepoint.com/sites/yoursite" -Interactive
$files = Get-PnPListItem -List "Documents" -Query "<View><Query><Where><Eq><FieldRef Name='Category'/><Value Type='Text'>Important</Value></Eq></Where></Query></View>"
foreach ($file in $files) {
    Grant-PnPListItemPermission -List "Documents" -Identity $file.Id -User "user@domain.com" -AddRole "Contribute"
}
Disconnect-PnPOnline
Best practices and workarounds
Sharing multiple files in SharePoint can be streamlined and made more secure by following a set of best practices and implementing effective workarounds. Here are some key strategies to consider:
1. Organize files
Group related files into folders or document libraries:
- Folders: Use folders within a document library to organize files by project, department, or any other logical grouping. This makes it easier for users to find and manage files.
- Document libraries: Create separate document libraries for different types of content or teams. For example, have one library for HR documents and another for Marketing materials. This segregation helps in applying specific permissions and policies tailored to each library.
- Metadata: Use SharePoint’s metadata and tags to classify and search for documents more effectively. Custom columns can be added to document libraries to capture additional information about files, facilitating advanced filtering and sorting.
2. Use groups
Share files with SharePoint groups instead of individual users:
- Simplified permission management: By assigning permissions to groups rather than individual users, you reduce the complexity of managing access. It’s easier to add or remove users from groups than to update permissions for individual users.
- Standardized access: Groups ensure that all members have the same level of access, maintaining consistency and reducing the risk of permission errors.
- Predefined groups: Utilize SharePoint’s predefined groups (e.g., Owners, Members, Visitors) or create custom groups to suit your organizational needs.
3. Monitor access
Regularly review and adjust sharing permissions:
- Audit permissions: Periodically audit the permissions of your document libraries and folders to ensure that only authorized users have access. SharePoint provides built-in tools for viewing and managing permissions.
- Adjust permissions: Modify permissions as needed to align with changes in team composition or project requirements. Remove access for users who no longer need it.
- Use alerts and reports: Set up alerts to notify you of changes in permissions or document activity. Utilize SharePoint’s reporting capabilities to generate permission reports for review.
4. Additional tips
- Use versioning: Enable versioning in your document libraries to keep track of changes and maintain a history of document revisions. This can be crucial for collaboration and auditing.
- Set up permissions inheritance: Use permissions inheritance wisely. Break inheritance only when necessary to apply specific permissions to subfolders or individual files.
- Leverage sharing links: Use SharePoint’s sharing links to provide temporary or limited access to documents. Configure expiration dates and access levels (view only, edit) to control how documents are shared.
- Training and documentation: Provide training and documentation for users on how to properly share and manage documents in SharePoint. This can help prevent common mistakes and improve overall efficiency.
Multiple Check In and Approve
Multiple check-in and approve in SharePoint refers to the process of managing document approval workflows and version control for multiple files simultaneously. This feature is particularly useful for teams and organizations that handle large volumes of documents and require streamlined approval processes to maintain efficiency and compliance.
Typical use cases for this task include:
- Project documentation: Teams working on large projects often need to check in and approve numerous documents, such as reports, plans, and specifications, to keep project records up-to-date and ensure all stakeholders have access to the latest information.
- Legal and compliance: Legal departments frequently deal with multiple contracts, agreements, and compliance documents that need to be reviewed, approved, and archived systematically.
- Marketing campaigns: Marketing teams may need to manage various assets like brochures, banners, and content pieces that require approval before publication.
Standard options for working with multiple check-in and approve in SharePoint
SharePoint provides several built-in features to facilitate multiple check-ins and approvals:
1. Library settings
1.1. Require check-out
This setting ensures that a document is explicitly checked out before it can be edited by a user. This prevents multiple users from editing the same document simultaneously, which can lead to conflicting changes and data loss. Here’s how to enable it:
- Navigate to the document library.
- Click on the Library Settings (found in the ribbon or under the settings gear icon).
- Under General Settings, click Versioning settings.
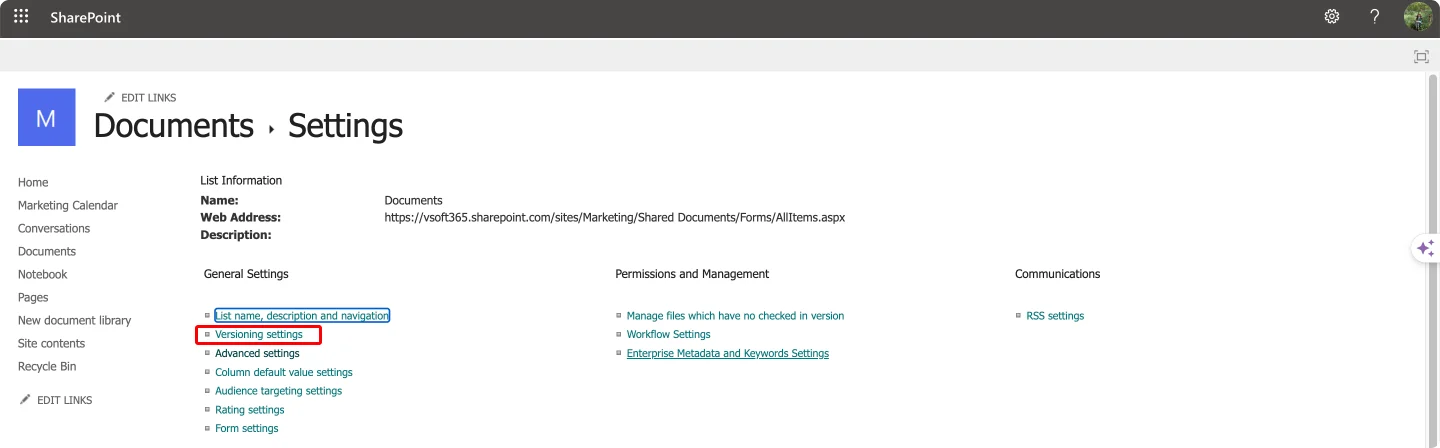
Pic. 9. Navigating to the “Versioning settings”.
- Select Yes under Require documents to be checked out before they can be edited.
- Click OK to save the settings.
1.2. Versioning
Versioning allows you to keep track of changes made to documents by maintaining a history of revisions. This is useful for auditing, rollback capabilities, and understanding the evolution of a document:
- Navigate to the document library.
- Click on the Library Settings.
- Under General Settings, click Versioning settings.
- Choose the type of versioning you want (e.g., major versions only or both major and minor versions).
- Configure the number of versions to retain and other settings as needed.
- Click OK to save the settings.
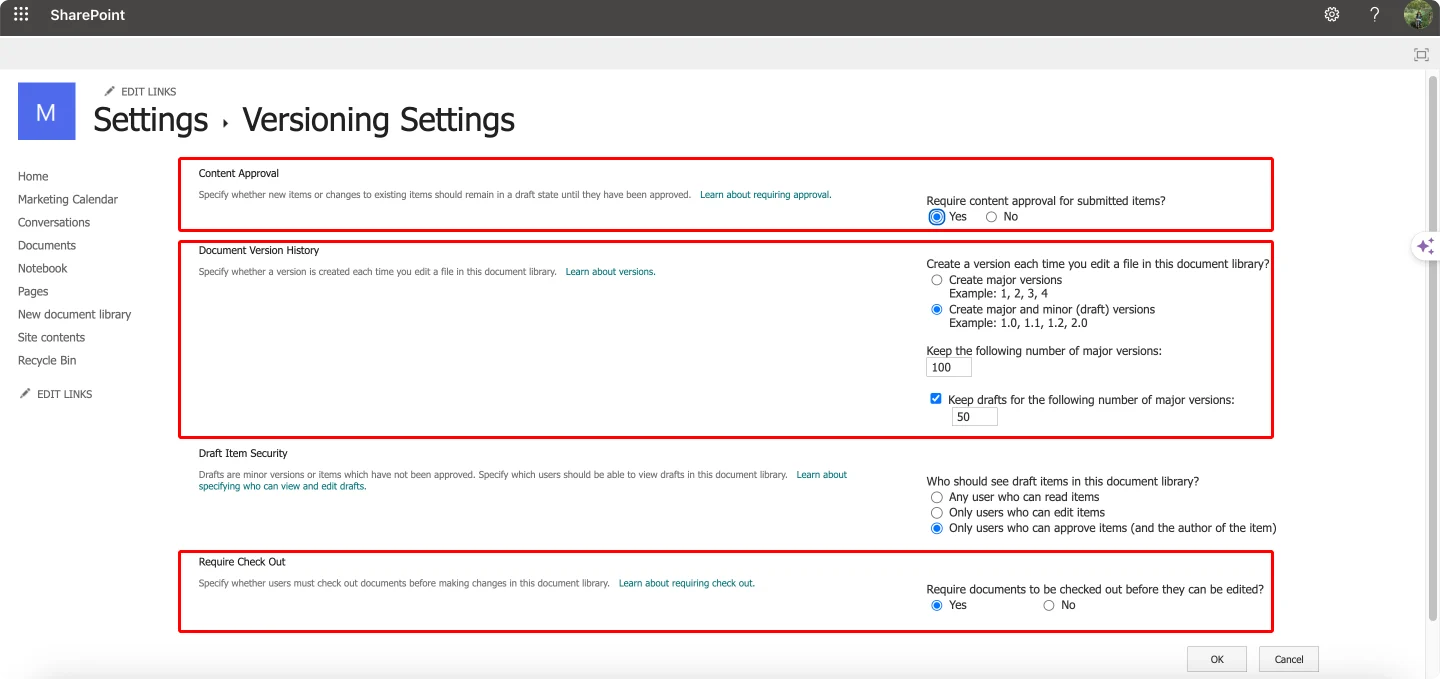
Pic. 10. Selecting settings for approving content, versioning, and checking out.
1.3. Content approval
This setting requires that changes to documents be approved before they become visible to all users. This is crucial for maintaining quality control and ensuring that only vetted documents are accessible:
- Navigate to the document library.
- Click on the Library Settings.
- Under General Settings, click Versioning settings.
- Under Require content approval for submitted items, select Yes.
- Click OK to save the settings.
- Configure who can approve items under Permissions for this document library if necessary.
2. Bulk check-in
- Open your SharePoint site and navigate to the document library where the files are stored.
- In the document library, select the files you want to check in by clicking the checkboxes next to each file.
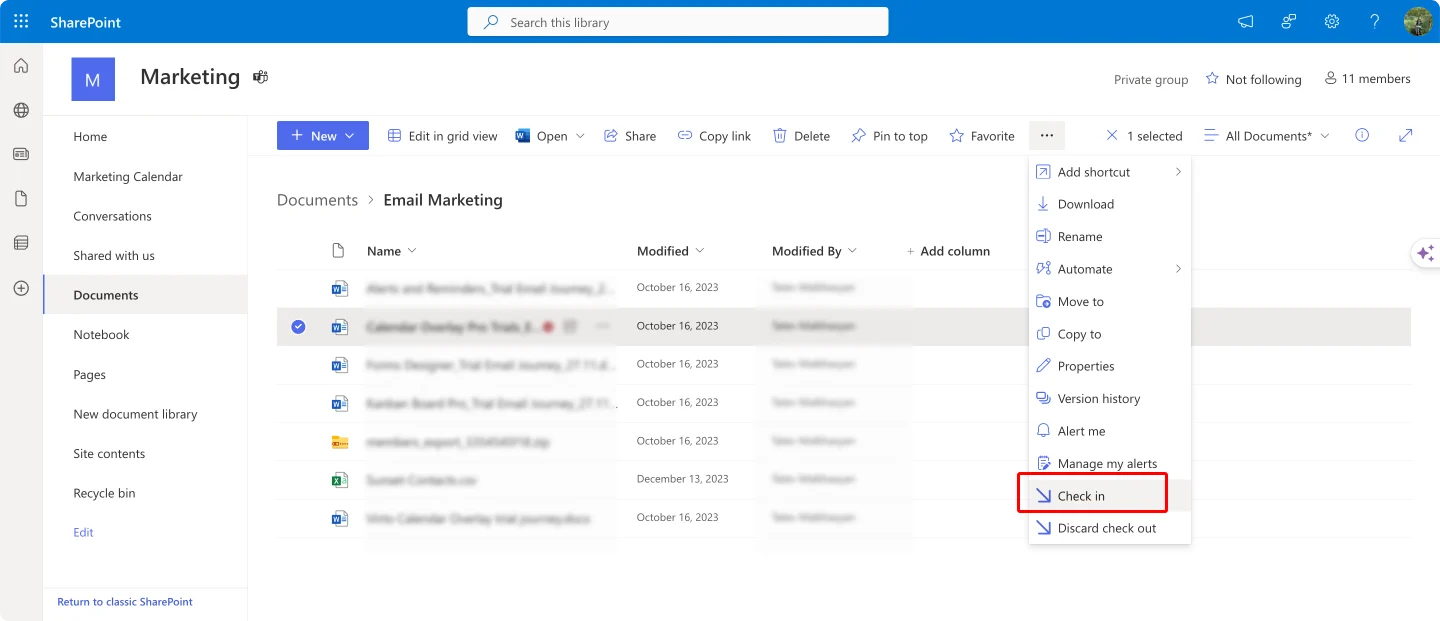
Pic. 11. Checking in your file(s).
- Use the “Check In” option:
- Once the files are selected, go to the ribbon at the top of the library (or right-click to bring up the context menu).
- Click on the Files tab (if using the ribbon).
- Click Check In.
- In the dialog box that appears, enter any comments about the check-in if necessary.
- Confirm by clicking OK.
This process allows you to easily manage multiple files at once, ensuring that all changes are consolidated and documented.
👉 Can I check in multiple files at once in SharePoint? Yes, you can check in multiple files at once in SharePoint. To do this, navigate to the document library, select the files you wish to check in, and use the “Check In” option available in the ribbon or context menu. For instructions, refer above.
3. Approval workflows
Approval workflows automate the approval process, ensuring that documents are systematically routed to the appropriate reviewers. This streamlines the approval process and maintains a clear record of who approved what and when. Here’s how to enable and configure the approval process:
- Navigate to the document library.
- Click on the Library Settings.
- Under Permissions and Management, click Workflow settings.
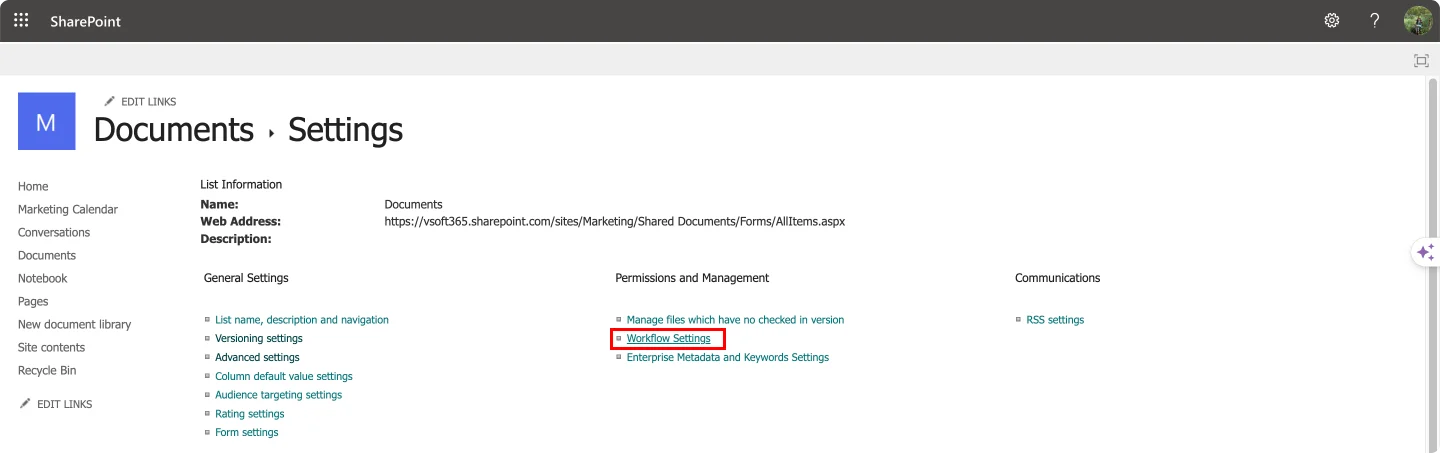
Pic. 12. Navigating to the “Workflow Settings”.
- Click Add a workflow.
- Choose the Approval Workflow from the list of available workflows.
- Configure the workflow settings, such as the name, task list, history list, and start options.
- Specify the approvers and any additional workflow parameters.
- Click OK to save and start the workflow.
Alternative methods
For more advanced scenarios or additional customization, consider the following alternative methods:
- Power Automate: Use Power Automate to create custom workflows that automate the check-in and approval processes. Power Automate provides more flexibility and integration options with other Microsoft 365 services and third-party applications.
- PnP PowerShell: For bulk operations and automation, use the PnP PowerShell module to script the check-in and approval processes. Here’s an example script:
# Import the PnP PowerShell module
Import-Module SharePointPnPPowerShellOnline

# Define variables
$siteUrl = "https://yourtenant.sharepoint.com/sites/yoursite"
$libraryName = "Documents"
$approvalWorkflowName = "Approval Workflow"

# Connect to the SharePoint site
Connect-PnPOnline -Url $siteUrl -UseWebLogin

# Get all checked-out files in the document library
$checkedOutFiles = Get-PnPListItem -List $libraryName -Query "<View><Query><Where><Eq><FieldRef Name='CheckoutUser'/><Value Type='User'>[Me]</Value></Eq></Where></Query></View>"

foreach ($file in $checkedOutFiles) {
    # Check in the file
    Set-PnPListItem -List $libraryName -Identity $file.Id -Values @{"CheckInComment" = "Bulk check-in using PowerShell"; "CheckInType" = "MajorCheckIn"}
    Write-Host "Checked in file: $($file.FieldValues.FileLeafRef)"

    # Start the approval workflow
    $workflow = Get-PnPWorkflowSubscription -Name $approvalWorkflowName -List $libraryName
    if ($workflow) {
        Start-PnPWorkflowInstance -List $libraryName -ListItem $file.Id -Subscription $workflow
        Write-Host "Started approval workflow for file: $($file.FieldValues.FileLeafRef)"
    } else {
        Write-Host "Approval workflow not found for file: $($file.FieldValues.FileLeafRef)"
    }
}

# Disconnect from the SharePoint site
Disconnect-PnPOnline
- Third-party tools: Explore third-party tools that offer enhanced document management capabilities, including advanced approval workflows and bulk operation features. Among those already mentioned, a few stand out—that’s Virto Multiple File Operations, of course, ShareGate, and Metalogix.
Best practices and workarounds
Finally, a few concluding best practices:
- Organize document libraries: Structure your libraries and folders logically to make it easier to manage and locate documents. Use metadata and custom columns to classify files effectively.
- Implement clear approval policies: Define and communicate clear approval policies and procedures to ensure that all team members understand their roles and responsibilities in the approval process.
- Regularly review permissions: Regularly audit and adjust permissions to ensure that only authorized users have access to sensitive documents and can participate in the approval process.
- Use version control: Enable and properly configure version control to maintain a history of document changes and facilitate the review of previous versions if needed.
- Leverage alerts and notifications: Set up alerts and notifications to keep stakeholders informed about the status of documents requiring approval, ensuring timely reviews and approvals.
Conclusion
Working with multiple files in SharePoint presents a range of challenges, from time-consuming bulk edits to the complexities of sharing, checking in, and approving documents en masse. These tasks are crucial for maintaining organizational efficiency and document integrity, yet SharePoint’s built-in tools often fall short when managing large volumes of files.
If you found this article helpful, be sure to check out the other installments in our series on SharePoint bulk operations. Each article provides detailed insights into the various challenges and solutions associated with managing large volumes of content:
- Part 1: Multiple Files Upload & Download
- Part 2: Bulk Deleting, Copying, and Moving Files in SharePoint
For those seeking more efficient and user-friendly solutions, VirtoSoftware offers powerful alternatives to SharePoint’s native tools. Our products, such as Virto Multiple File Operations for SharePoint On-Premises and Virto Multiple File Upload App for SharePoint Online & Microsoft 365, streamline bulk file management processes. These tools are designed to be simple and efficient, requiring no advanced technical expertise to use.
Explore the full range of Virto apps for SharePoint to find the right tool for your workflow, and schedule a demo call now to see how VirtoSoftware tools can help you make SharePoint management a breeze.