If you have opened SharePoint recently and gone looking for the workflow options you used to rely on, you will have noticed they are gone. SharePoint 2013 workflows were fully retired in SharePoint Online on 2 April 2026, SharePoint 2010 workflows went years earlier, SharePoint Designer 2013 reached the end of extended support on 14 July 2026, and the familiar “Alert me” button stopped working in July 2026 as well. An entire generation of SharePoint automation reached the end of the road inside a single eighteen-month window.
The good news is that what replaced it is genuinely better, free with the licence you already own for most scenarios, and buildable in a browser without a developer. This guide covers what SharePoint automation means in 2026, how to build your first flow, the automations that repay the effort fastest, the platform limits that quietly break projects, and how to judge whether you need a third-party tool at all.
Quick answer: what is SharePoint automation?
SharePoint automation is getting SharePoint to carry out repetitive work by itself — routing approvals, sending notifications, moving files and updating list columns — instead of relying on someone to remember. In Microsoft 365 it is delivered through three built-in layers:
- Rules and Quick steps — no-code, inside every list and library, for one-trigger jobs and one-click buttons.
- Power Automate — the real engine: conditions, approvals, schedules, 1,000+ services. Included with Microsoft 365 on standard connectors.
- Copilot in SharePoint — proposes rules and columns from a plain-English description.
SharePoint 2010 and 2013 workflows are retired, so SharePoint Designer is no longer part of the answer. Power Automate is Microsoft’s recommended path for all new automation.
What changed in 2026 (and what it means for you)
If your knowledge of SharePoint automation dates from before 2024, several things you learned are now simply wrong. Here is the short version.
| What you may remember | What is true now |
|---|---|
| Build workflows in SharePoint Designer | SharePoint Designer 2013 was the last version ever released and left extended support on 14 July 2026. There is no SharePoint Designer 2016, 2019 or Subscription Edition. |
| SharePoint 2013 workflows still run in Microsoft 365 | Fully retired on 2 April 2026. Microsoft offered no extension. Old definitions can now only be viewed as raw XML files. |
| SharePoint 2010 workflows are the fallback | Removed from SharePoint Online back in November 2020, and out of support on SharePoint Server since 14 July 2026. |
| Use “Alert me” for notifications | SharePoint Alerts were fully removed in July 2026 after a staged retirement. Microsoft points you to Rules or Power Automate instead. |
| SharePoint Server 2016 / 2019 buys you time | Both reached end of support on 14 July 2026. Only Subscription Edition remains supported, using SharePoint Workflow Manager rather than the old Microsoft Workflow Manager. |
| Nintex for SharePoint is the enterprise answer on-premises | The SharePoint-embedded Nintex product is legacy. Nintex now directs customers to Nintex Automation K2 for self-hosted work and Nintex Automation CE in the cloud. Nintex Workflow for Office 365 is retired. |
| Find it under the Automate menu | The Automate and Integrate menus were consolidated during 2026. There is now a single Integrate dropdown — Flows, Quick steps, Approvals, Rules, Power Apps — plus a standalone Workflows button. Much documentation still says “Automate”. |
| Automation means workflows only | It now spans Rules, Quick steps, Power Automate cloud flows, built-in approvals, Copilot in SharePoint and, for agentic scenarios, agent flows in Copilot Studio. |
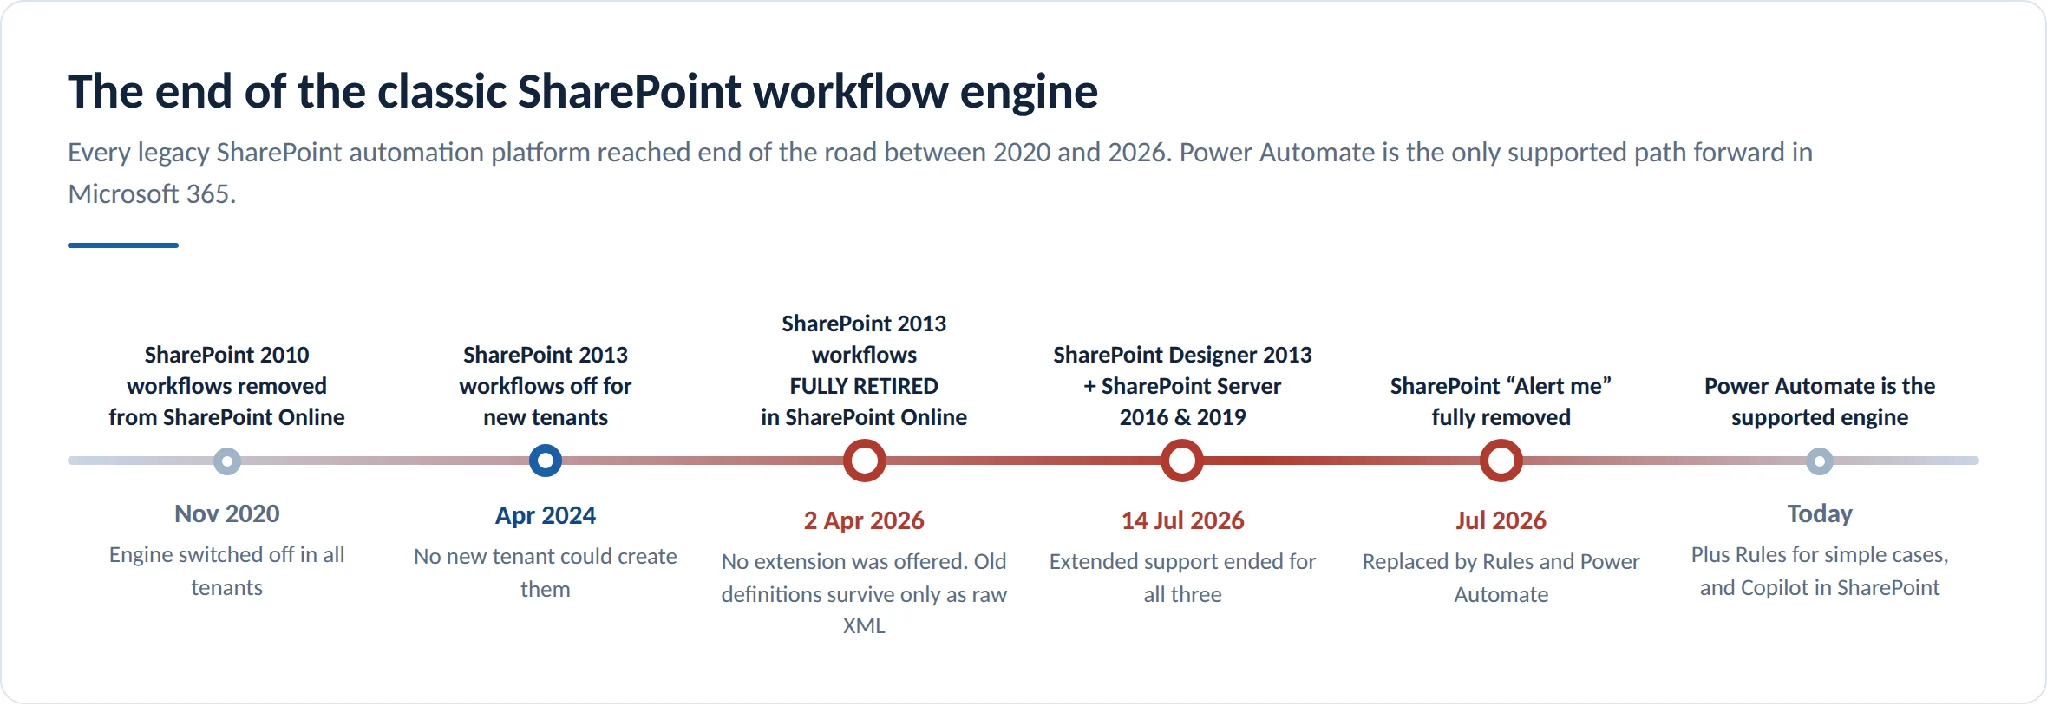
Pic.1. The retirement timeline for classic SharePoint workflow platforms, 2020–2026.
If you still have legacy workflows
Run Microsoft’s free Microsoft 365 Assessment tool against your tenant. Its workflow module inventories every remaining SharePoint 2013 workflow and produces a Power BI report with a “Power Automate upgradability score” per workflow, which tells you which ones can be rebuilt mechanically and which need a rethink. Microsoft’s own migration guidance walks through the equivalents action by action.
SharePoint workflows then and now
What a SharePoint workflow used to be
A classic SharePoint workflow was a set of rules attached to a specific list or library on a specific site, authored in SharePoint Designer and executed by a workflow engine running inside SharePoint itself. It could read and write SharePoint data, create tasks, send email and wait for a response. Within those boundaries it worked, and a lot of organisations built real business processes on it.
The limitations were structural rather than cosmetic. A workflow lived where it was built, so reusing it elsewhere meant rebuilding it. It could not reach outside SharePoint without custom code. When it failed, it usually failed silently, leaving a status column and very little to debug with. And because the engine was tied to the SharePoint platform version, every upgrade became a workflow migration project.
What replaced them
Power Automate takes the same idea and moves it off the SharePoint server. A flow lives in a Power Platform environment rather than in a site, so it can be exported, re-imported and deployed across sites. It connects to hundreds of services, so a SharePoint event can raise a Teams message, create a Planner task, write to SQL and update a Salesforce record in the same run. And it keeps a complete run history: every step, every input, every output, with the option to resubmit a failed run once you have fixed the cause.
Alongside it, Microsoft added Rules for the large category of automations that never needed a workflow engine in the first place — the “just tell me when this changes” cases that used to be handled by alerts.
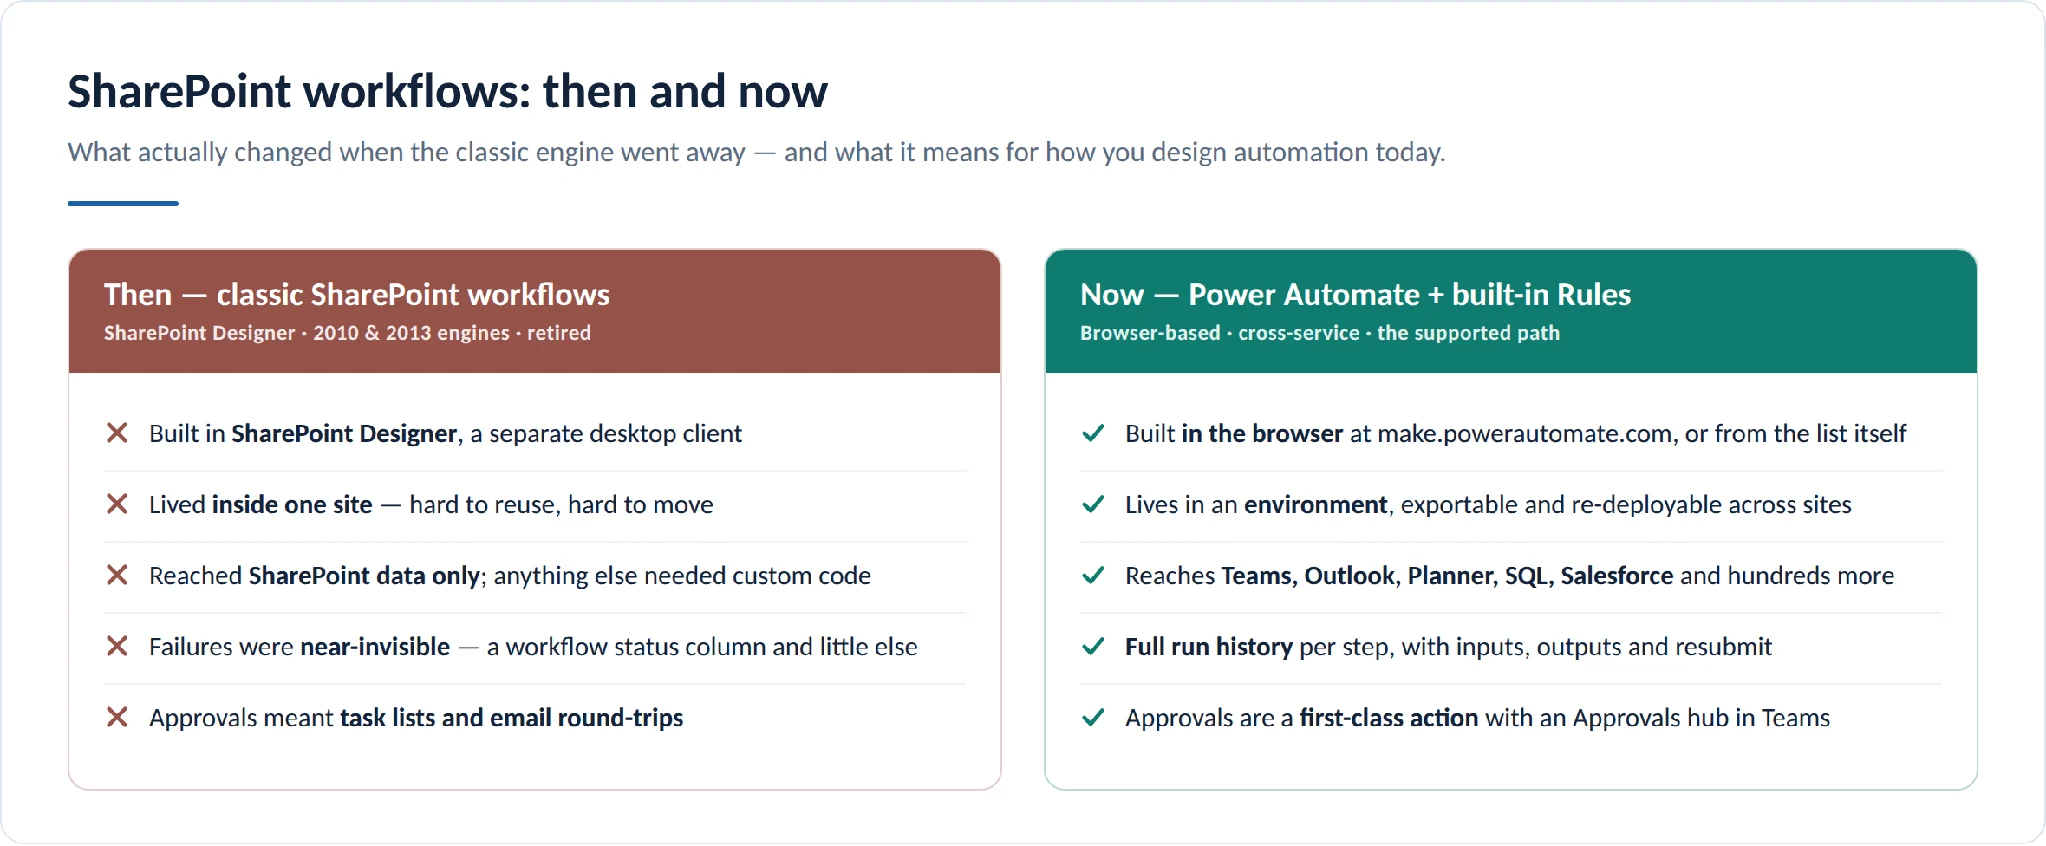
Pic.2. Classic SharePoint workflows compared with the Power Automate and Rules model that replaced them.
What you can automate in SharePoint natively
Everything below is built into SharePoint Online and reachable from the command bar of a modern list or library. If you last looked a year ago, the menu itself has changed: Microsoft consolidated the old Automate and Integrate menus into a single Integrate dropdown and added a separate Workflows button beside it, rolling out to Targeted Release in February 2026 and reaching general availability between April and May 2026.
That rename matters when you follow a tutorial, because a great deal of documentation — including some pages on Microsoft Learn — still says “Automate”. If an instruction tells you to click Automate, look under Integrate instead. Microsoft’s own current support article for Rules now reads: “With the list or library open, select Integrate and then select Rules.”
| Building block | Best for | Where you find it |
|---|---|---|
| Workflows | The main authoring surface: a template gallery, plain-English flow creation and a fill-in-the-blanks editor, with an escape hatch into the full Power Automate designer. | Workflows button on the command bar |
| Rules | One trigger, one action. Email on a column change, a new item, a deletion, or an approaching date. Libraries can also move, copy or set a value. | Integrate › Rules |
| Quick steps | One-click buttons on selected items or in a dedicated column — set a value, draft an email, start a Teams chat, request approval or run a flow. | Integrate › Quick steps, or a Quick steps column |
| Flows | Anything with a condition, a branch, a schedule, or a second system involved. Opens Power Automate. | Integrate › Flows |
| Approvals | Built-in approval status on items, with Request approval, Approve/Reject and Approval details commands. | Integrate › Approvals |
| Power Apps | Custom apps over the list, and customised list forms. | Integrate › Power Apps |
| Copilot in SharePoint | Describing an automation in plain English and having it propose the rule or columns for you. | Copilot pane on the site or list |
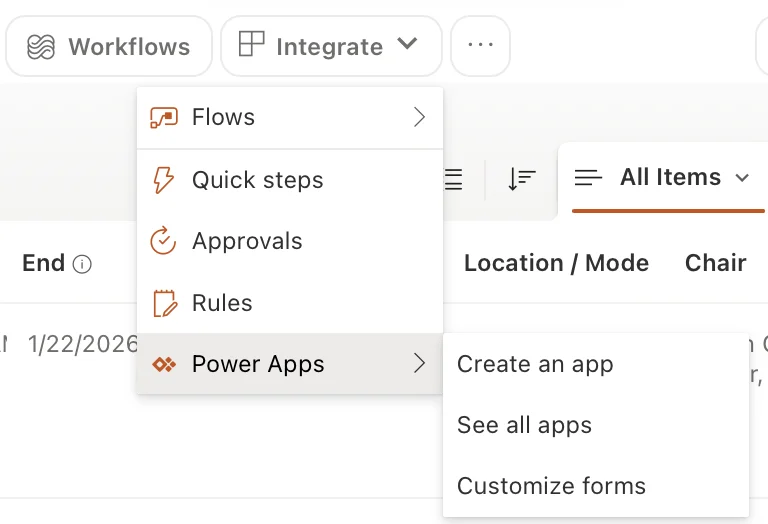
Pic.3. The Integrate menu in a modern SharePoint list, with the Workflows button alongside it.
Rules: the thirty-second option
Rules are worth knowing well because they solve a surprising share of real requests without any licensing conversation. A rule reads as a sentence — “When a column changes, send an email to…” — and takes under a minute to set up. Triggers cover a column changing, a column changing to a specific value, a new item being created, an item being deleted, and a date approaching.
The constraints matter just as much as the capabilities, because hitting one of them mid-project is what sends people looking for a tool:
- No branching or multi-step logic. One condition, one action.
- No external connectors and no approvals.
- A maximum of 15 rules per list or library, and only two “a date approaches” rules per list.
- Not supported on multi-line text columns.
- Cannot notify a mail-enabled security group — only a person or a people column.
- No digests. Rules send one email per event, which is exactly the behaviour that made classic alerts unpopular on busy lists.
Microsoft documents the full behaviour in Create a rule to automate a list or library. One gap worth knowing: Rules are not available in the Site Pages library, so the Integrate › Rules command does not appear everywhere.
Quick steps: one-click buttons on your list
Quick steps are the most useful recent addition and the one most people have not noticed. A quick step is a button that runs a predefined action on the items a user has selected — and, since the Quick steps column type became generally available in early 2026, it can also sit inline on every row so the button is right where the work is.
The documented actions are Set value, Draft an email, Start a Teams chat, Send an approval request, Execute a flow, and Ask Copilot / Ask SharePoint. Document libraries additionally get move and copy actions. The important one is Set value: it updates a column natively, with no flow involved and nothing consuming your daily action budget, which covers a surprising number of “mark this as done” requests that people otherwise build a whole flow for.
Create one from Integrate › Quick steps › Create a quick step, or by adding a new column of the Quick steps type. You configure it as a fill-in-the-blanks sentence, and existing ones are enabled, edited or removed from the Manage quick steps page. If you choose Execute a flow you supply the flow’s identifier — and note the restriction: only manual flows, and flows using the For a selected item or For a selected file triggers, can be run this way.
- Creating or managing quick steps needs Edit permission on the list.
- Running one needs Read for draft email, Teams chat and execute a flow; Edit for Set value and Send an approval request.
- Quick steps are visible to everyone with access to the list, but a user without rights on the underlying flow gets an error rather than a silent failure.
- Ask Copilot / Ask SharePoint requires Copilot in SharePoint to be enabled, which carries its own licensing.
Microsoft’s reference is Create a quick step for your list or library.
The Workflows button
The Workflows button is SharePoint’s new front door for building automations, deliberately aligned with the Workflows app in Microsoft Teams. It opens a panel with a redesigned template gallery, a search box that also accepts a plain-English description of what you want to automate, a build-from-scratch option, and a list of the flows you already own with on/off toggles.
Underneath, it is Power Automate: the flows it creates run in the Power Platform default environment, respect your environment and DLP policies, and can be opened in the full Power Automate designer when you outgrow the simplified editor. Think of it as a faster on-ramp rather than a separate engine — it is the right starting point for a straightforward notification or approval, and the designer is where you go when you need real branching or error handling.
Copilot in SharePoint
The feature Microsoft launched as Knowledge Agent, then renamed AI in SharePoint, is now Copilot in SharePoint. From mid-June 2026 it moved from opt-in to an opt-out preview, meaning it is on by default for users with a Microsoft Copilot licence unless an administrator scopes it back. For automation purposes its most useful trick is describing what you want in plain English and letting it propose the list columns and rules to match, which is a reasonable way to draft a simple automation and then refine it by hand. It is not available in GCC, GCC High, DoD or 21Vianet environments.
Using Power Automate with SharePoint
How to connect Power Automate to SharePoint
There is nothing to install and nothing to enable. The SharePoint connector is a standard connector, included with every Microsoft 365 licence that seeds Power Automate rights. The first time a flow touches SharePoint you sign in once, a connection is stored against your account, and every subsequent flow reuses it.
You have two entry points. Starting from the list — the Workflows button, or Integrate › Flows — pre-fills the site and list and shows only templates relevant to that list, which is why it is the better starting point for most people. Starting from make.powerautomate.com gives you the full template gallery and the flow management screens.
One thing worth knowing before you are surprised by it: flows that use the For a selected item or For a selected file trigger only appear in the SharePoint Automate menu if they live in the default environment. If your organisation has moved makers into a dedicated environment, those manual-run flows will not surface in the list command bar.
The SharePoint triggers you will actually use
| Trigger | Fires when | Watch out for |
|---|---|---|
| When an item is created | A new list item is added. | The safest default. Prefer it unless you genuinely need edits. |
| When an item is created or modified | A new item is added or any existing item changes. | Can fire hundreds of times a day on a busy list, and can retrigger itself if the flow updates the item. |
| When an item or a file is modified | An item or file property changes. | Moving or syncing a file does not count as a modification and will not fire it. |
| When a file is created (properties only) | A file lands in a library. | Returns properties, not content. Add Get file content when you need the file itself. |
| For a selected item / file | A user runs the flow manually from the command bar. | Only appears in the SharePoint menu from the default environment. |
| When an item is deleted | An item is removed. | Useful for audit trails; you cannot recover the item from the trigger. |
| Recurrence (schedule) | On a timetable you set. | The right choice for digests, reminders and overdue sweeps. Not a SharePoint trigger, but the one most SharePoint digests are built on. |
The full list, including preview triggers tied to the new form and document-generation features, is in the SharePoint connector reference.
The shape of a good flow
Almost every SharePoint automation that survives contact with real users has the same three-part structure: a narrow trigger, a condition that decides whether this particular event is worth acting on, and one or more actions that finish by writing the outcome back to the list.
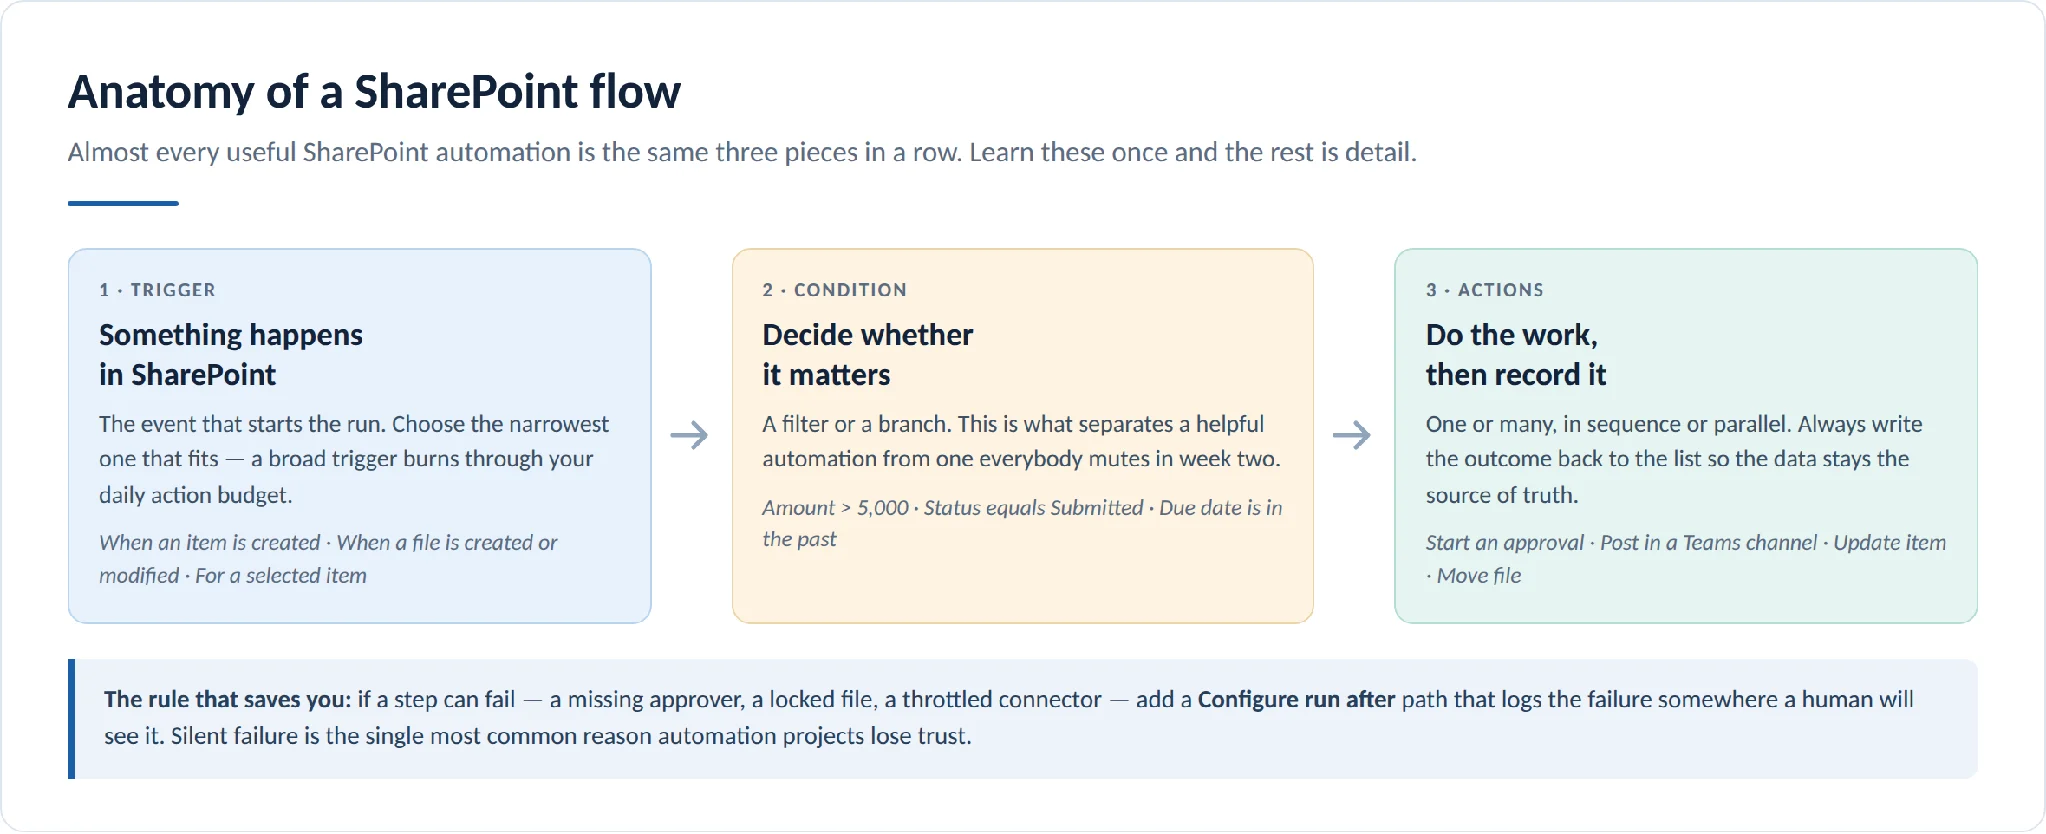
Pic.4. The trigger, condition and action structure behind almost every useful SharePoint flow.
What you get free, and what you pay for
This is the question that decides most SharePoint automation projects, so it is worth being precise about it.
| Seeded with Microsoft 365 | Power Automate Premium | |
|---|---|---|
| Cost | Included with your existing licence | US$15 per user per month, billed annually |
| Connectors | Standard only — SharePoint, Outlook, Teams, OneDrive, Planner, Excel, Approvals | Standard plus premium and custom connectors (SQL, Salesforce, Azure services, HTTP) |
| Daily action limit | 6,000 actions per user per day | 40,000 actions per user per day |
| On-premises data gateway | No | Yes |
| Desktop flows / RPA | No | One attended bot included |
| Process mining | No | Included, with 50 MB of data storage |
| Business process flows | No | Yes |
| Dataverse | Only within Dataverse for Teams environments | 250 MB database and 2 GB file storage |
In practice, the overwhelming majority of SharePoint automations — approvals, notifications, digests, file routing, Teams posts, Planner tasks — sit entirely inside the seeded entitlement. You start paying when you need to reach a database, an on-premises system or a third-party SaaS platform through a premium connector, or when volume pushes you past the daily action budget. Microsoft’s licensing overview has the full breakdown.
A note on agents
If you have read about agent flows, they now live in Copilot Studio rather than Power Automate, and they are billed against Copilot Studio capacity rather than a Power Automate licence. A standard Power Automate cloud flow can be converted into an agent flow, but the conversion is one-way. Separately, SharePoint agents — the .agent files scoped to specific sites and libraries — require a Microsoft Copilot licence or tenant pay-as-you-go billing. Neither replaces a cloud flow for deterministic, rules-based automation; they are for scenarios where you genuinely want reasoning rather than a fixed set of steps.
How to build your first SharePoint flow, step by step
The example below is a purchase-request approval, because it exercises every part of the pattern: a trigger, a real condition, an approval, and a write-back. Budget about twenty minutes.
Get the list right before you automate it. Create the SharePoint list with the columns the flow will read and write — Title, Amount (currency), Requested by (person), Status (choice: Draft, Submitted, Approved, Rejected), Approver (person), Decision date (date). Use real column types. A choice column with fixed values is something a condition can test reliably; a free-text status field is not.
Start from the list, not the portal. Open the list and click the Workflows button, or choose Integrate › Flows. If one of the suggested templates matches, use it. If not, build from scratch and choose the When an item is created trigger. (If a tutorial tells you to click Automate, that menu no longer exists — it was folded into Integrate in 2026.)
Choose the narrowest trigger that works. Here, When an item is created is enough. Resist When an item is created or modified unless edits genuinely need to be actioned — that trigger is the single most common cause of runaway flows, because a flow that updates its own item retriggers itself.
Add a condition before any action. Insert a Condition step: is Amount greater than 5,000? The Yes branch starts an approval; the No branch sets Status to Approved automatically. Auto-approving the small stuff is usually where most of the real time saving comes from, not from the notification.
Add the approval. In the Yes branch, add Start and wait for an approval, choose Approve/Reject — First to respond, set the assigned-to field to the Approver column, and write a title that will make sense in someone’s inbox — include the requester and the amount, not just the item ID.
Write the result back to the list. After the approval, add Update item: set Status from the approval outcome, and stamp Decision date. This keeps the list as the record of what happened, so views, reports and Copilot answers stay correct even if the flow is later rebuilt.
Handle failure explicitly. On any step that can fail, use Configure run after to add a path that fires on failure and posts to a Teams channel or a log list. Silent failure is the fastest way to lose your users’ trust in an automation.
Test with real data, then watch it. Create a genuine item and open the flow’s run history. Check each step’s inputs and outputs rather than just the green ticks. Then rename the flow and every action to something a colleague will understand in a year, and add a second owner so the flow does not die with one person’s account.
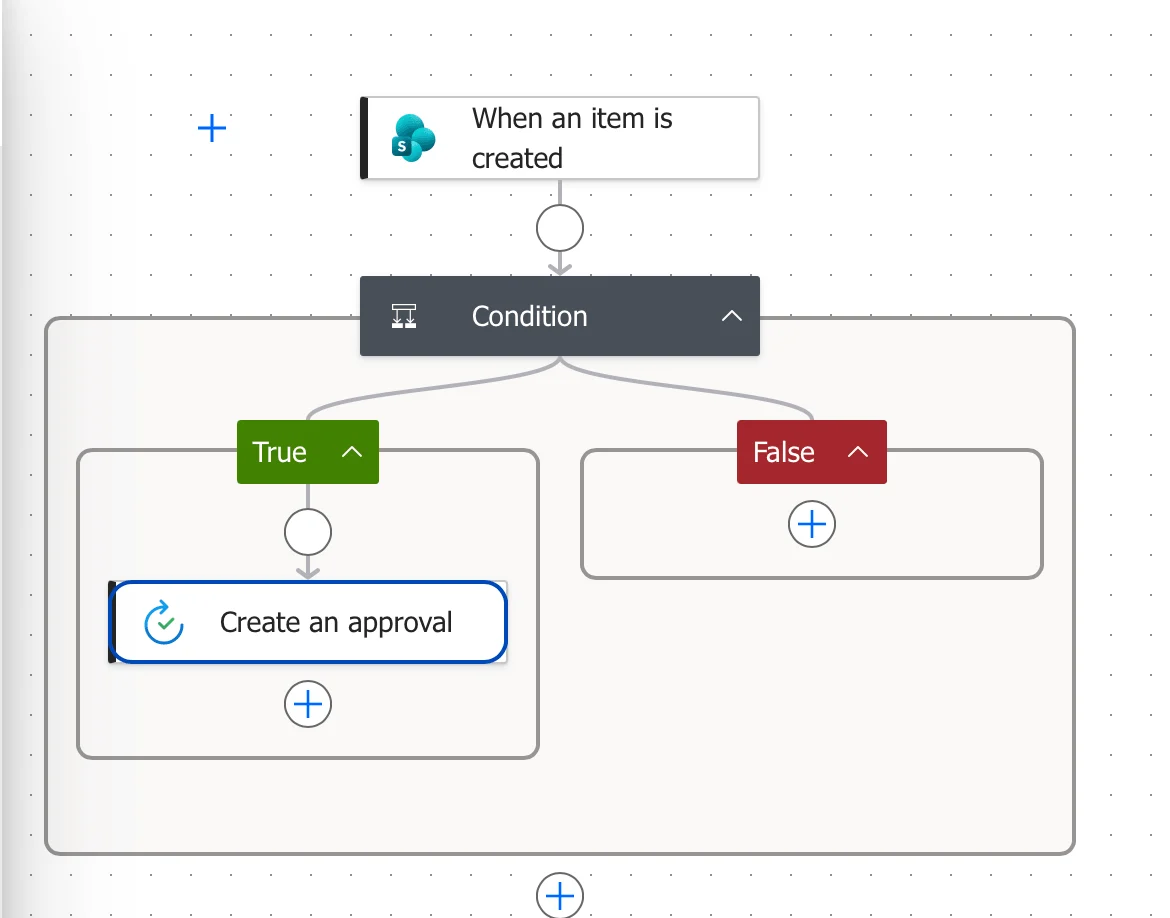
Pic.5. The Power Automate designer showing a SharePoint trigger, a condition and an approval action.
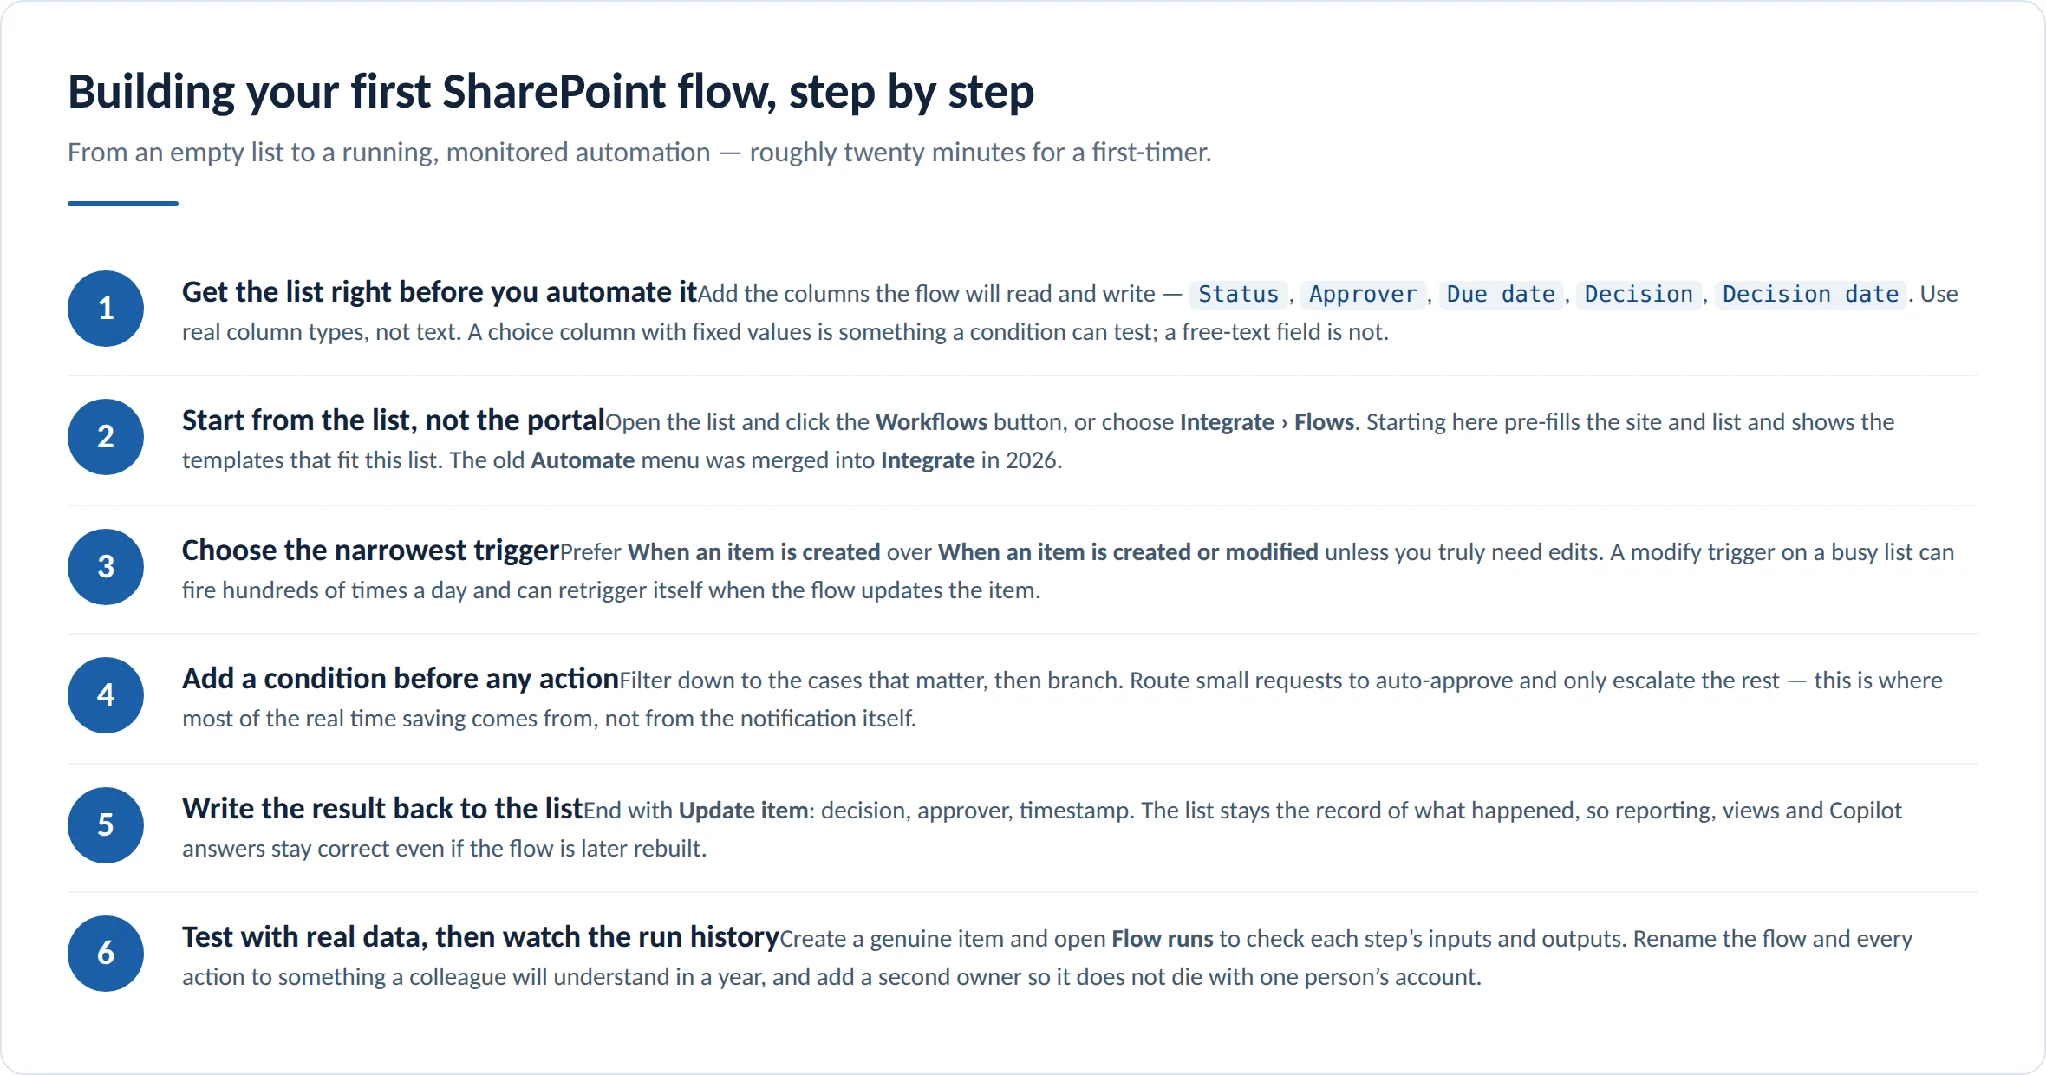
Pic.6. The six-step routine for building a SharePoint flow that will still be running next year.
SharePoint automation examples that pay off
The automations that stick tend to share two properties: they remove a recurring human chase, and their output lands where people already work. Here are six that repay the build effort quickly.
1. Leave and time-off requests
A SharePoint list captures the request. The flow auto-approves anything under three days, routes longer requests to the line manager, writes the decision back to the item and adds an entry to the team calendar. This is the single most common first automation, and it works because the alternative — an email thread and a spreadsheet — is visibly worse.
2. Purchase and budget approval
The pattern from the walkthrough above, extended with a second tier: under 5,000 goes to the department head, above it adds finance as a sequential second approver. Store the approval comments on the item so the audit trail lives with the record rather than in someone’s mailbox.
3. Overdue task escalation
A scheduled flow runs each morning, collects everything past its due date with Get items and an OData filter, nudges the owner, and copies the manager once an item is more than a week late. One scheduled flow replaces dozens of per-item reminders and, crucially, sends one message rather than one message per task.
4. Document review and sign-off
New files land in a Pending library, a built-in approval or a Send an approval request quick step goes to the reviewer, and the file only moves to the published library once approved. Pair it with retention or a review-date column so documents get re-checked rather than quietly ageing.
5. Employee onboarding
One new-starter record fans out into parallel branches: an IT provisioning ticket, a Planner checklist for the manager, a Teams welcome post, a document set for HR paperwork and a calendar invite for the first-week induction. Onboarding is a good automation candidate precisely because it is rare enough that nobody remembers all the steps.
6. Contract and policy expiry
A scheduled flow checks a review-date column and warns the document owner at 90, 30 and 7 days, then flags anything that passes its date unactioned. This one tends to justify itself the first time it catches a renewal that would otherwise have auto-renewed unnoticed.
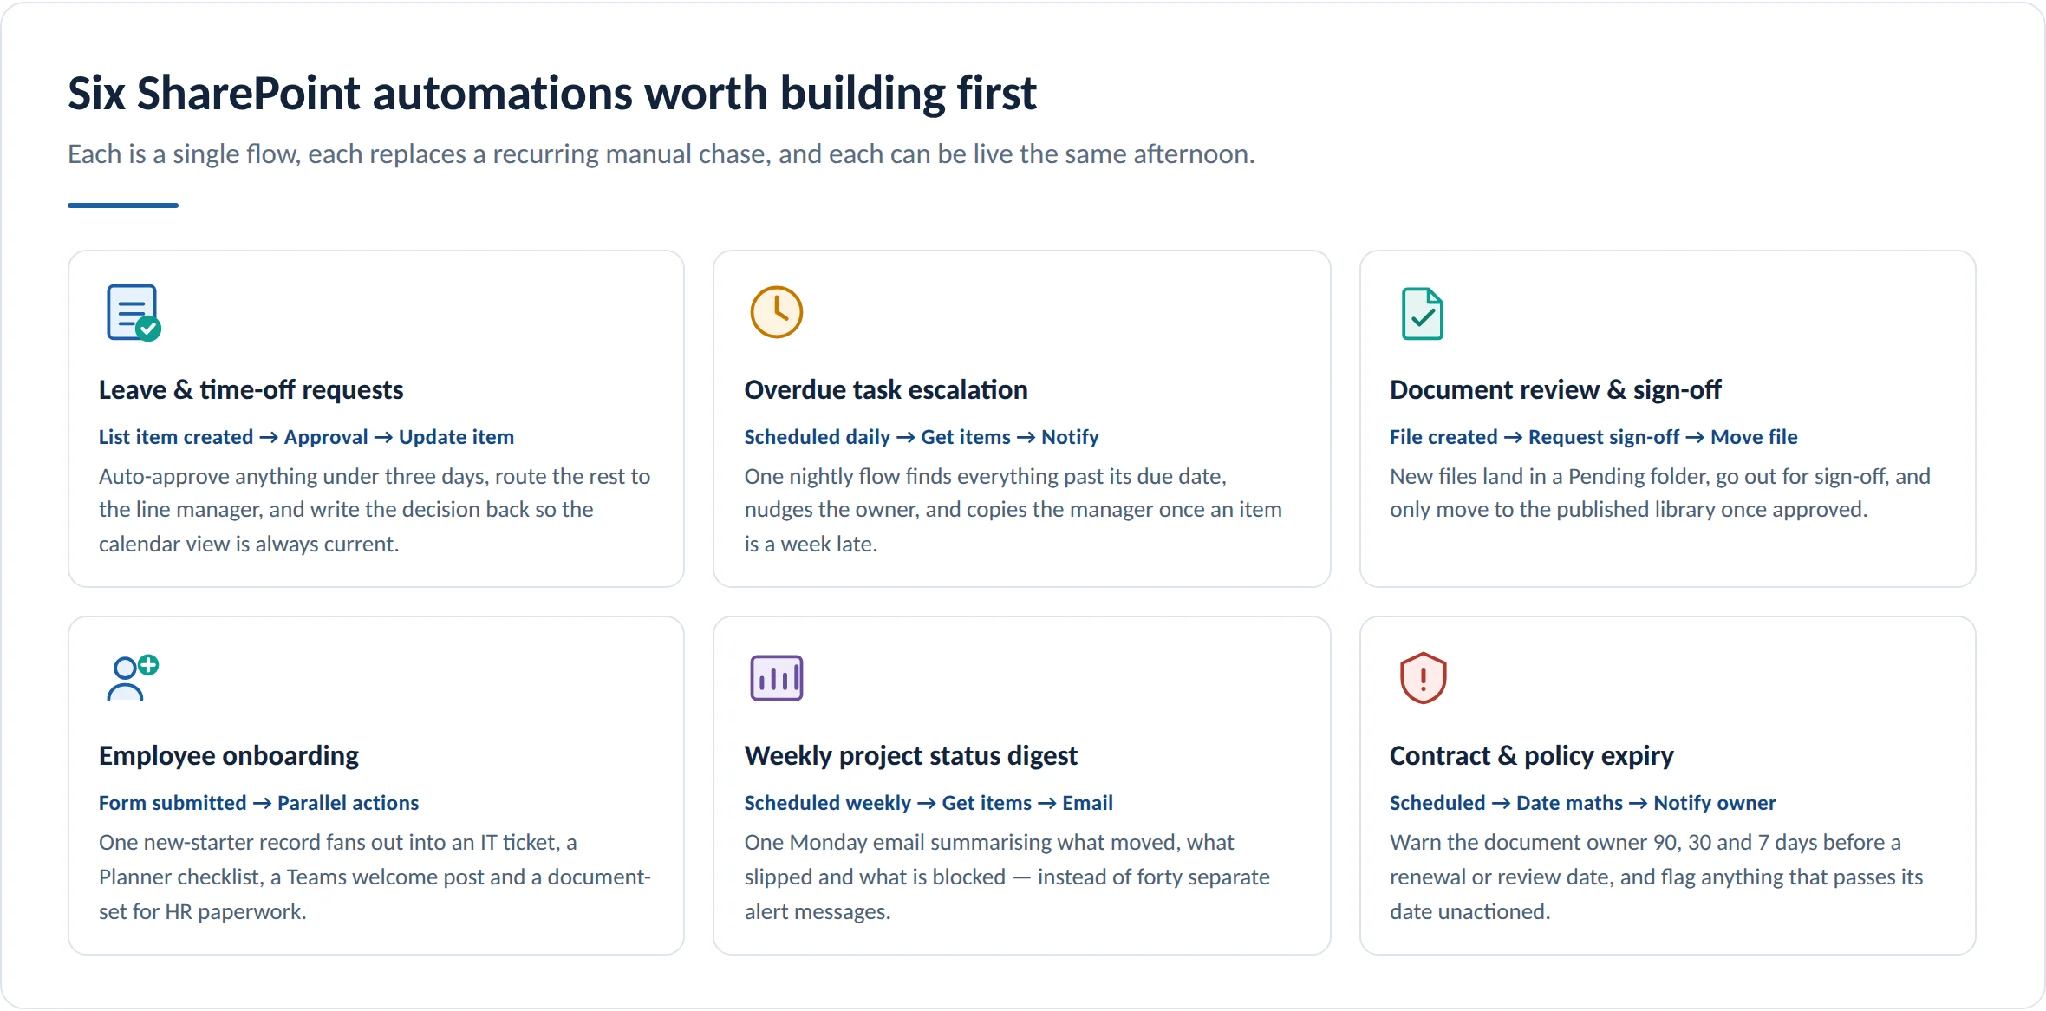
Pic.7. Six SharePoint automations worth building first, with the trigger-to-action pattern behind each.
The limits that quietly break SharePoint automations
Most “it worked in testing and failed in production” stories trace back to a small set of platform limits. They are all documented, and all easy to design around once you know they exist.
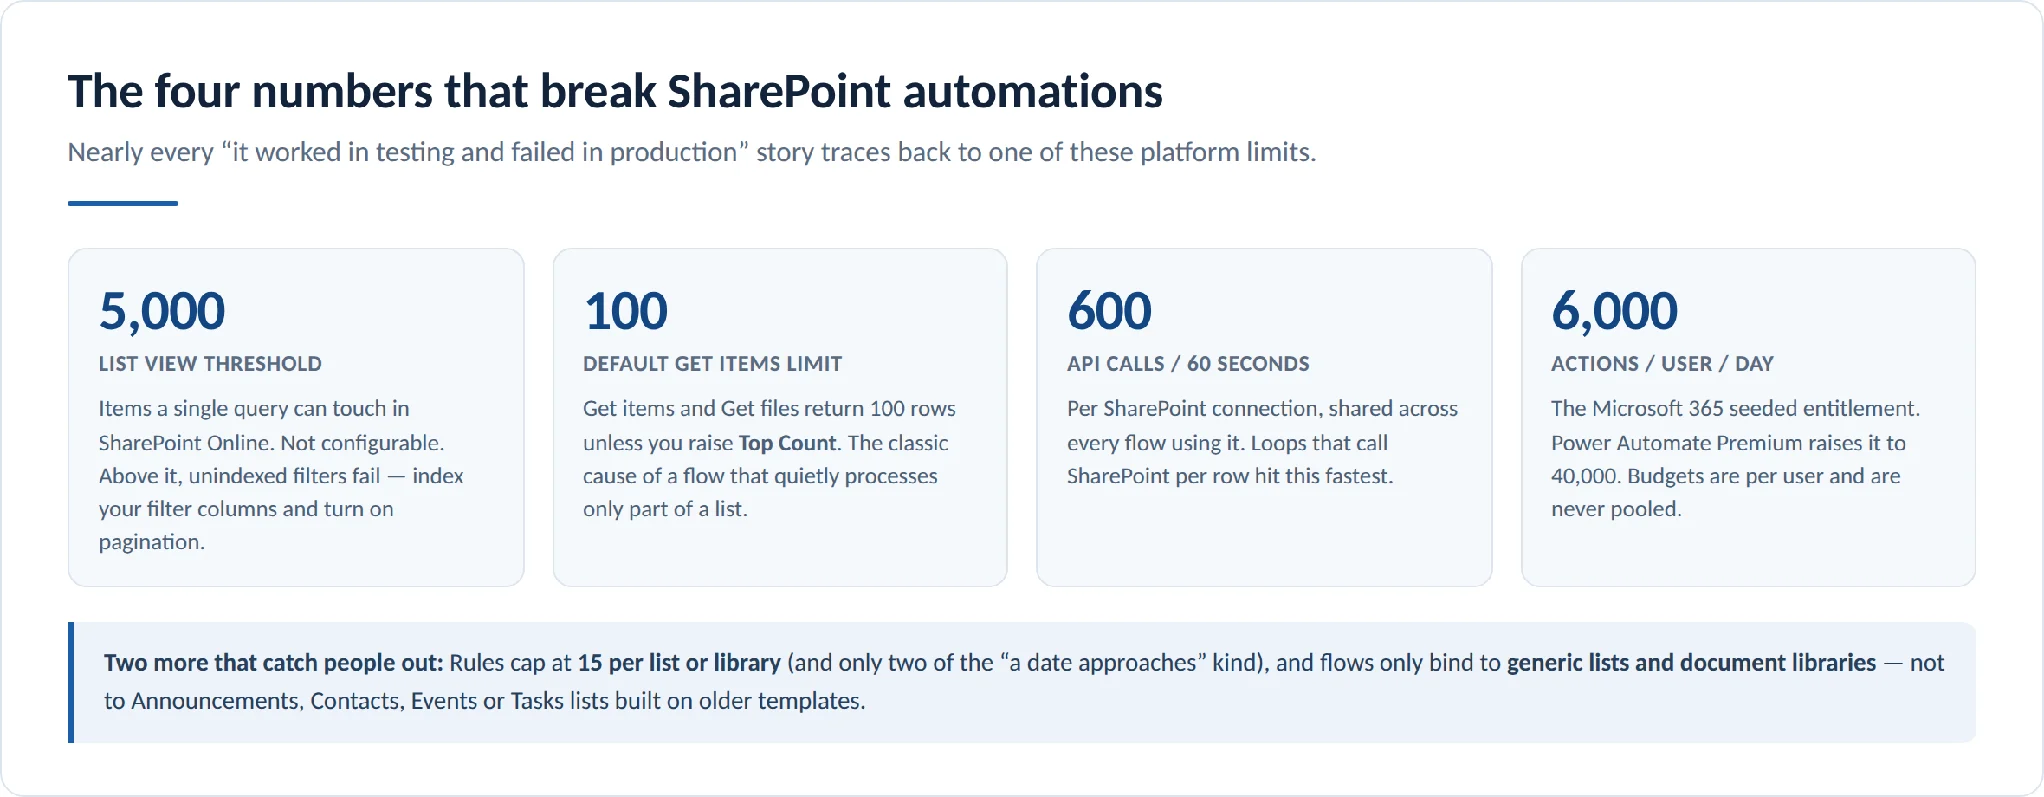
Pic.8. The platform limits behind most failed SharePoint automations.
- The 5,000 item list view threshold. Not configurable in SharePoint Online. Above it, a filter on an unindexed column fails. Index the columns your flows filter on, and enable Pagination in the action settings — on lists over 5,000 items, a Filter Query returns nothing at all if no match happens to fall in the first 5,000 rows.
- Get items returns 100 rows by default. Raise Top Count under Advanced options. This is the classic cause of a flow that appears to work but silently processes only part of a list.
- 600 SharePoint API calls per connection per 60 seconds. Shared across every flow using that connection, and independent of your daily action budget. Loops that call SharePoint once per row hit this first — batch where you can, and add a delay inside heavy loops.
- Daily action limits are per user and never pooled. 6,000 actions per user per day on a seeded Microsoft 365 licence, 40,000 on Premium. A flow that stays above the transition limits for 14 consecutive days is suspended.
- Flows only bind to generic lists and libraries. Lists built on older templates — Announcements, Contacts, Events, Tasks — cannot be used as flow triggers. If you inherited one, recreate it as a generic list.
- Moving or syncing a file does not fire a modify trigger. A common and confusing gap when you are building library automation.
- A maximum of 12 lookup columns can be returned by a single query, or the action fails outright.
Microsoft documents these in Power Automate limits and configuration and in the guidance on working with Get items and Get files.
When to go beyond Power Automate: tools compared
The honest answer for most organisations is that you do not need a third-party automation platform for SharePoint. Power Automate covers the ground the classic workflow engine covered and a great deal more, and it is already paid for. Buy an add-on when you can name the specific gap it fills — not as a general-purpose replacement.
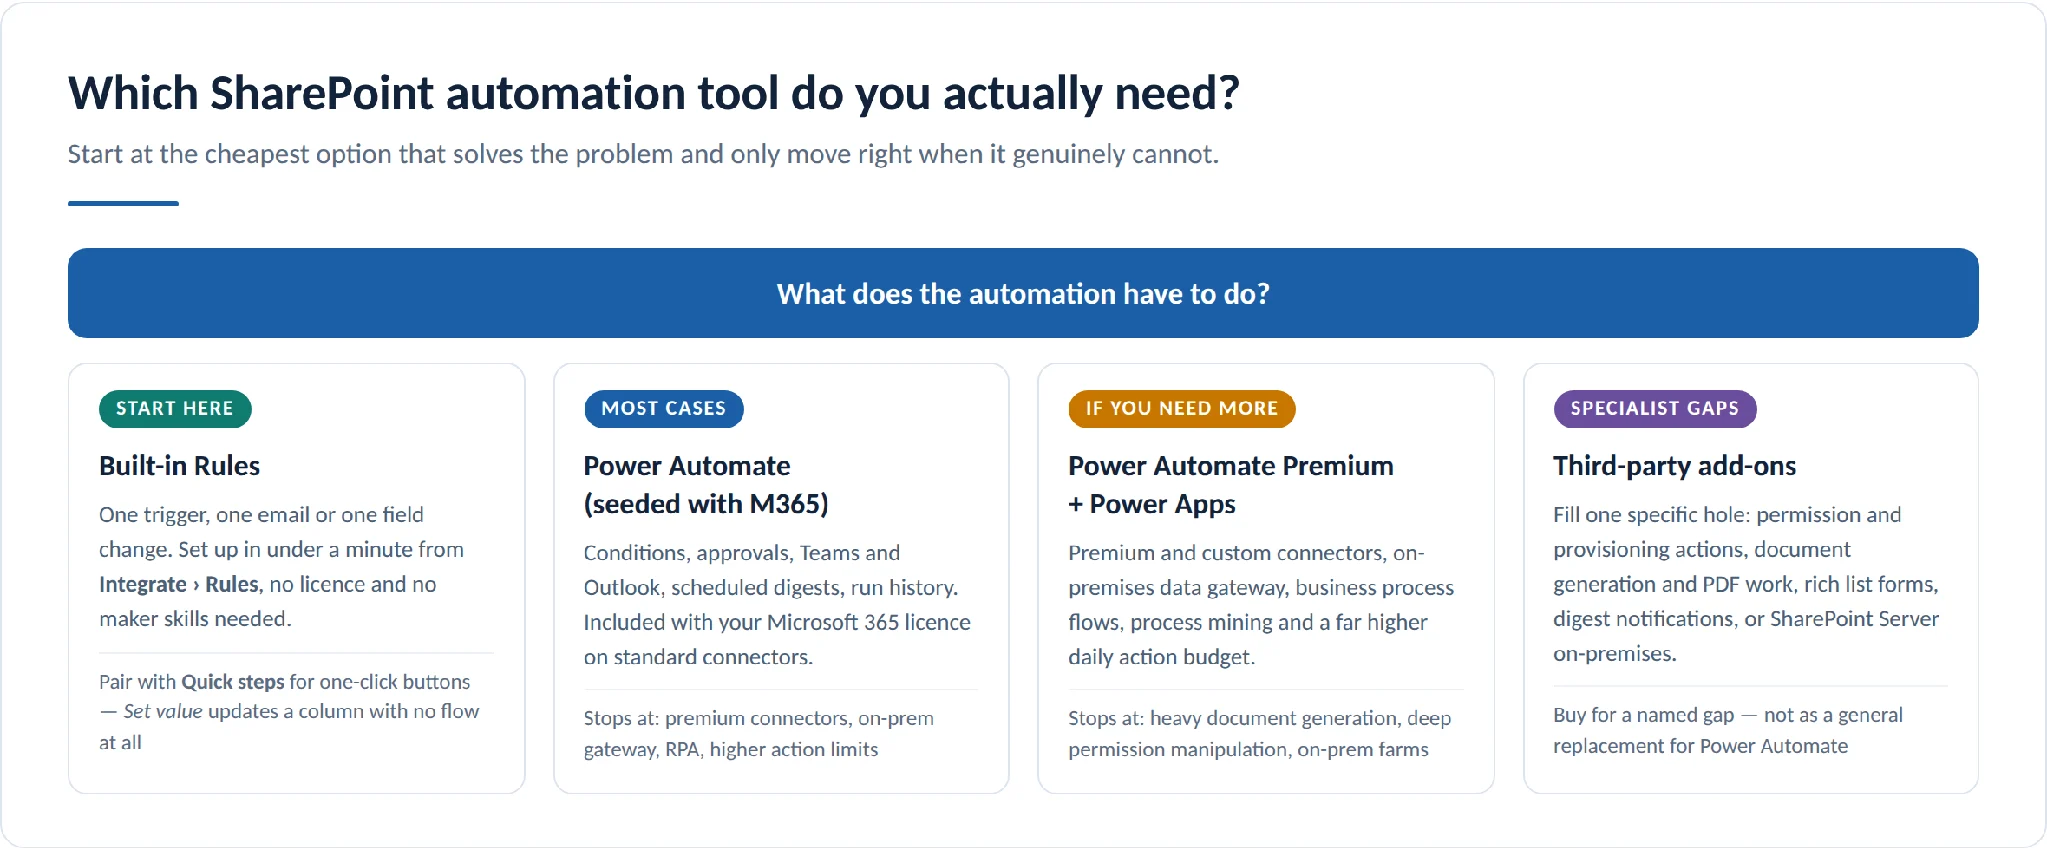
Pic.9. A decision path from the cheapest built-in option to specialist third-party tools.
The gaps that genuinely justify a purchase tend to be these: manipulating SharePoint permissions and provisioning sites from templates, which Power Automate cannot do natively; generating documents and manipulating PDFs at volume; building list forms far richer than SharePoint’s own; sending digest notifications rather than one email per event; and automating SharePoint Server on-premises, which the cloud-only Power Platform does not reach without a gateway.
| Tool | The gap it fills | Environment | Indicative pricing |
|---|---|---|---|
| Power Automate | The default engine. Conditions, approvals, schedules, 1,000+ connectors. | Microsoft 365 | Seeded with M365; Premium US$15/user/mo |
| Power Apps | Custom apps and heavily customised list forms over SharePoint data. | Microsoft 365 | Premium US$20/user/mo, less at 2,000+ seats |
| Nintex Automation CE | Enterprise process management, DocGen, eSign and RPA alongside SharePoint. | Cloud | From around US$15,000/year; tiers on request |
| Nintex Automation K2 | The supported successor for former Nintex for SharePoint on-premises customers. | Self-hosted | Contact sales |
| Plumsail Actions | SharePoint permission management, cross-site file operations, site and list provisioning from Power Automate. | SharePoint Online | Tiered by monthly executions |
| Plumsail Forms | Tabs, wizards, cascading lookups and related items in list forms. | Online + Server 2019/SE | Subscription online; perpetual per WFE on-prem |
| skybow Studio | Low-code solution building on SharePoint: forms, automation actions, dossiers, packaging. | Online + Server 2019/SE | Quote-only, user-based |
| Encodian Flowr | Document generation, conversion and PDF manipulation actions for Power Automate. | SharePoint Online | Free tier; paid from around US$49/mo |
| Infowise Ultimate Forms | Forms, business logic and in-list automation without leaving SharePoint. | Online + on-premises | Per user per site collection, or perpetual per server |
Two things to get right if you are shopping
Nintex for SharePoint is not the same product as Nintex today. The SharePoint-embedded workflow and forms products are legacy: Nintex Workflow for Office 365 was retired with the SharePoint Add-in model, and Nintex’s own end-of-support guidance points on-premises customers at Nintex Automation K2 instead. If a proposal offers you “Nintex for SharePoint”, check exactly which product is being sold.
Two acquisitions changed the names in this space. Encodian joined Circeus in July 2026 with the brand retained. Muhimbi, whose PDF Converter many SharePoint teams still run, was acquired by PSPDFKit and now ships as Nutrient Document Converter — it is one of the few options here that still supports SharePoint Server on-premises.
How Virto helps automate SharePoint
VirtoSoftware has built apps and web parts for SharePoint since 2001, and several of them sit exactly on the gaps described above — the places where a native Rule is not enough and a full Power Automate build is more machinery than the job deserves. All Virto products come with a 30-day free trial, no credit card required.
Notifications that people do not immediately mute
With SharePoint Alerts removed in July 2026, the notification gap is the most immediate one. Native Rules send one email per event and cannot produce a summary; that is fine for a low-traffic approvals list and unusable on a busy project library. The Virto Alerts & Reminders App adds daily and weekly digest emails, conditional alerts based on list values, and reminders driven by date columns — the digest scenario in particular is the one native Rules cannot cover at all. For SharePoint Server, the equivalent is the Virto Notifications & Alerts Web Part.
Better forms feeding better automation
An automation is only as good as the data that starts it, and the default SharePoint form is a thin layer over the column list. The Virto Forms Designer App — a practical replacement for organisations that never fully moved off InfoPath — adds tabs, sections, conditional visibility, validation rules and cascading lookups, so the item your flow receives is complete and correctly typed rather than something a condition has to guess at. If InfoPath forms are still part of the process, our InfoPath end-of-life guide sorts them by type and shows where each one should go.
Visual work management on top of automated lists
Once approvals and status changes are automated, the list itself becomes the source of truth for who is doing what. The Virto Kanban Board App renders any SharePoint list as a board with swimlanes, WIP limits and drag-and-drop status changes that write straight back to the list — so the same items your flows are updating are the ones the team is moving across the board.
Automation for SharePoint Server on-premises
If you run SharePoint Server, the cloud Power Platform is not directly available to you and the classic workflow engine has run out of road. Virto Workflow Automation for SharePoint On-Premises extends what on-premises workflows can do, with downloads for SharePoint 2016, 2019 and Subscription Edition. To be clear about scope: this is an on-premises product. For SharePoint Online and Microsoft 365, Power Automate is the right engine and Virto’s cloud apps complement it rather than replace it.
Explore the full range of Virto apps for SharePoint and Microsoft 365, browse real use cases, or book a product demo with the team. Every app includes a 30-day free trial.
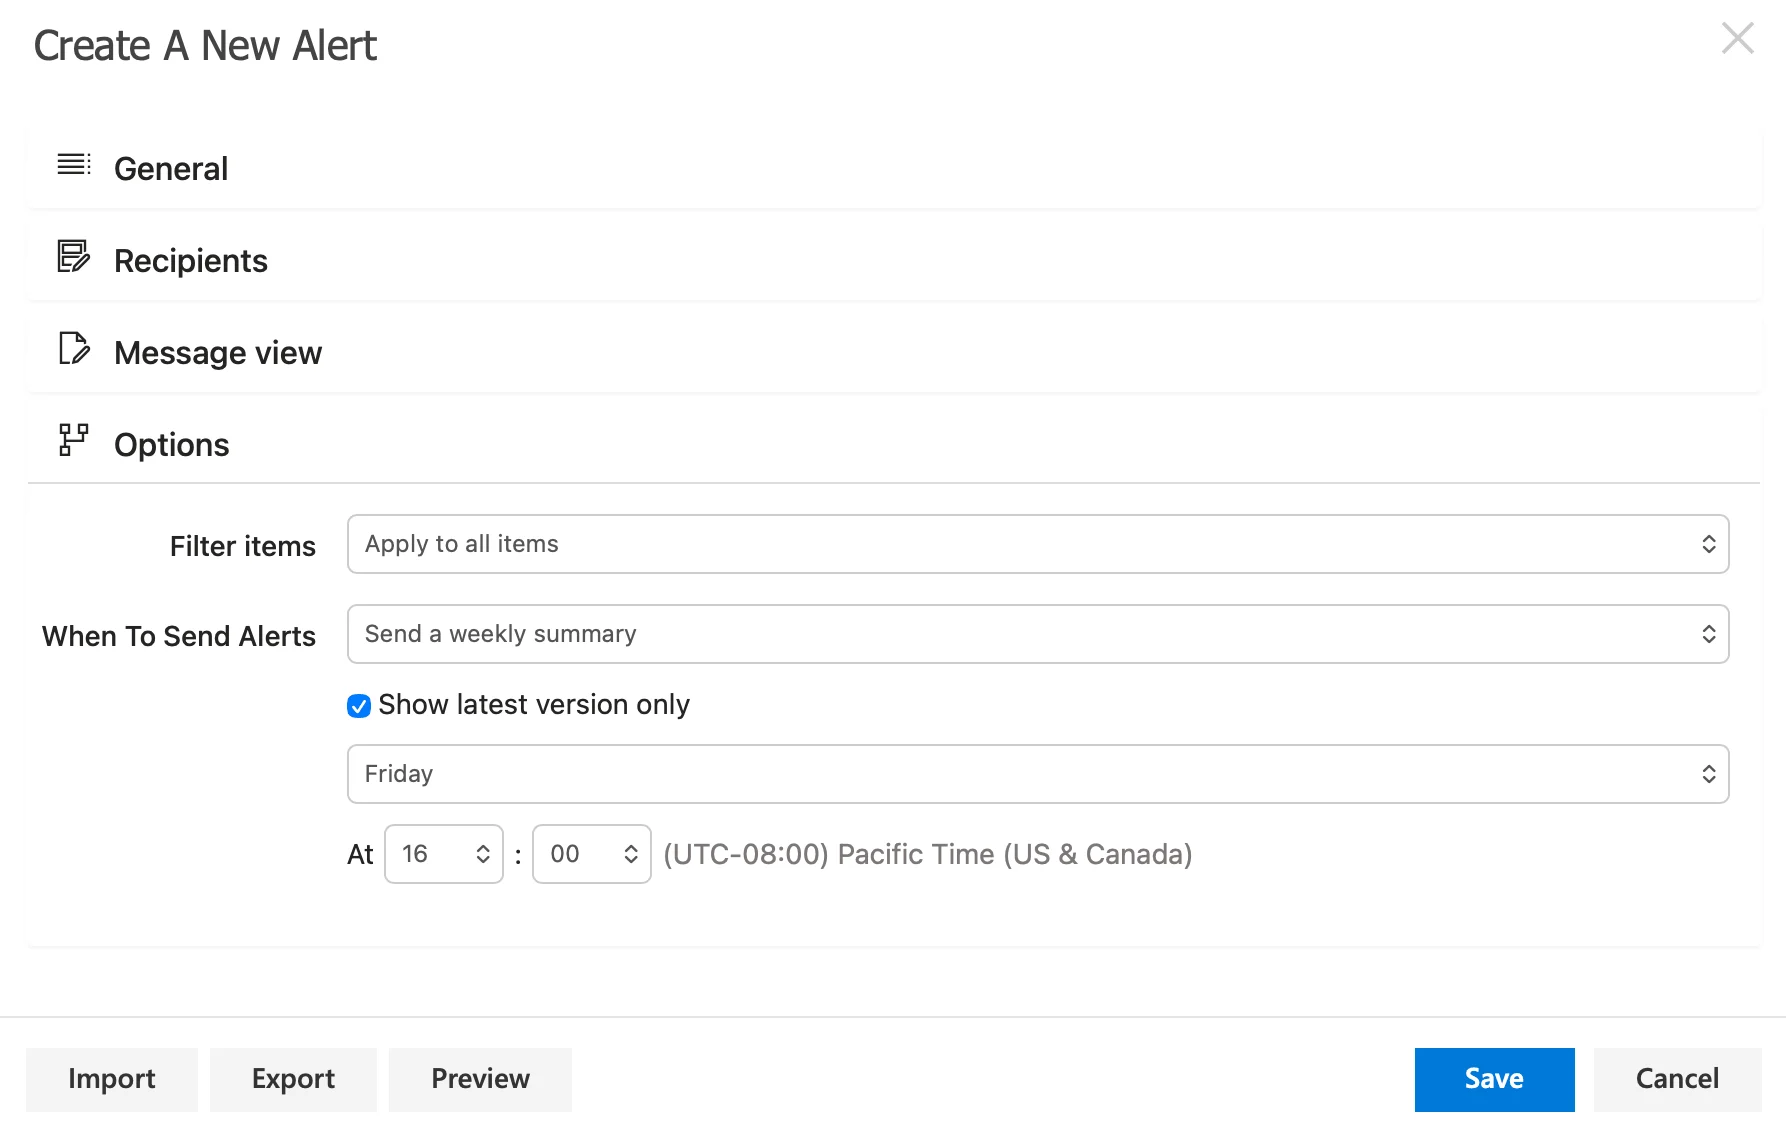
Pic.10. Configuring a weekly digest in the Virto Alerts & Reminders App.
Best practices for SharePoint automation
The technical part of automation is rarely what fails. These are the habits that separate automations still running in two years from the ones quietly switched off.
- Start with a process that is already repetitive and already understood. Automating a process nobody agrees on just encodes the disagreement. Fix the process first, then automate it.
- Fix the data model before the flow. Proper column types, a choice column for status, an indexed column for anything you filter on. Almost every awkward flow is a workaround for a list that was not designed for automation.
- Filter before you act. A notification that fires on everything is a notification everyone mutes. The condition step is what makes an automation welcome rather than merely present.
- Prefer one digest to many alerts. A single well-composed daily or weekly summary is read; twenty individual emails are filtered into a folder nobody opens.
- Make failure visible. Use Configure run after to route errors somewhere a human will actually see them. An automation that fails silently is worse than no automation, because people stop checking.
- Name things for the person who inherits them. Rename every action from “Condition 2” to what it actually tests. Add a description to the flow explaining what it does and who owns the process.
- Always give a flow a second owner. Flows owned by one account stop working when that person leaves. For anything business-critical, move it into a solution and a shared environment.
- Respect permissions. A flow runs under the connection owner’s identity, so it can surface data the recipient would not normally see. Check what your notifications actually reveal before you widen the audience.
- Test with production-shaped data. A flow that works on a 40-item list can fail on a 40,000-item one. Test above your thresholds, not below them.
- Review quarterly. Processes change. Set a recurring reminder to check that each automation still reflects how the work is actually done.
Frequently asked questions
What is a SharePoint workflow?
A SharePoint workflow is an automated sequence of steps attached to a list or library — for example, routing a document for approval, sending a notification, or updating a column when something changes. Historically these were built in SharePoint Designer and run by a workflow engine inside SharePoint. In Microsoft 365 today, the same job is done by Power Automate flows and by built-in Rules.
Are SharePoint 2013 workflows still supported?
No. SharePoint 2013 workflows were turned off for new SharePoint Online tenants on 2 April 2024 and fully retired for all tenants on 2 April 2026, with no option to extend. Existing definitions can now only be viewed as raw XML. On SharePoint Server, 2016 and 2019 reached end of support on 14 July 2026; only Subscription Edition remains supported, using SharePoint Workflow Manager.
How do I automate SharePoint?
Open the list or library and choose Integrate › Rules if the job is a single trigger and a single action, or Integrate › Quick steps if you want a button people click. If you need conditions, approvals, schedules or another service involved, use the Workflows button or Integrate › Flows, pick the narrowest trigger that fits, add a condition, add your actions, and finish by writing the result back to the list. Note that the old Automate menu no longer exists — it was merged into Integrate during 2026.
Is Power Automate free with Microsoft 365?
Power Automate rights are seeded with most Microsoft 365 licences, covering automated, scheduled and instant cloud flows on standard connectors — which includes SharePoint, Outlook, Teams, Planner, OneDrive and Approvals — with a limit of 6,000 actions per user per day. Premium and custom connectors, the on-premises data gateway, RPA and process mining require Power Automate Premium at US$15 per user per month.
What replaced SharePoint Designer?
Nothing replaced it as a single product. Its workflow authoring moved to Power Automate, its form customisation moved to Power Apps and third-party form designers, and its page and site editing moved into the modern SharePoint experience. SharePoint Designer 2013 was the final release and left extended support on 14 July 2026.
What replaced the “Alert me” feature?
SharePoint Alerts were retired in stages through 2025 and removed in July 2026. Microsoft recommends Rules for simple one-event notifications and Power Automate for anything that needs conditions, digests or multiple recipients. If you need summary emails rather than one message per event, neither native option covers it — that gap is what tools such as the Virto Alerts & Reminders App exist for.
What is the difference between Rules and Power Automate?
Rules live inside SharePoint, take under a minute to configure, and handle exactly one trigger and one action with no branching, no connectors and no approvals. Power Automate is a full workflow engine with conditions, loops, error handling, run history and access to hundreds of services. Use Rules when they are sufficient — they are, more often than people expect — and Power Automate when they are not.
Can I automate SharePoint Server on-premises?
Not with cloud Power Automate directly, and the classic 2010 and 2013 workflow engines are now out of support on SharePoint Server 2016 and 2019. The realistic options are Power Automate with an on-premises data gateway (which requires Power Automate Premium), a self-hosted platform such as Nintex Automation K2, or an on-premises product such as Virto Workflow Automation for SharePoint On-Premises.
Why does my flow only process some of my list items?
Almost certainly the Get items action, which returns 100 rows by default. Raise Top Count under Advanced options. If your list is over 5,000 items you also need indexed filter columns and Pagination enabled, because otherwise a Filter Query returns nothing when no match falls inside the first 5,000 rows.
Do I need a third-party tool to automate SharePoint?
Usually not. Power Automate covers everything the classic workflow engine did and much more, and it is already included in your licence. Buy an add-on when you can name the specific gap: permission and provisioning actions, high-volume document generation, rich list forms, digest notifications, or SharePoint Server on-premises.
Conclusion
The retirement of SharePoint 2010 and 2013 workflows, SharePoint Designer and SharePoint Alerts closed a chapter that had been running since 2007. What replaced it is more capable in every direction that matters: flows are portable rather than site-bound, they reach far beyond SharePoint, they keep a proper run history, and for the great majority of business scenarios they cost nothing beyond the Microsoft 365 licence you already hold.
The practical advice is unglamorous. Start with a process people already run the same way every time. Fix the list before you build the flow. Use Rules where Rules are enough. Filter before you notify. Make failures visible. Give every automation a second owner. Do that, and the automation you build this month will still be quietly working long after everyone has forgotten who set it up.
If you hit one of the gaps along the way — digest notifications, richer forms, visual work management on top of your automated lists, or SharePoint Server on-premises — you can explore the Virto apps for SharePoint and try any of them free for 30 days.
Related reading
- What Is Microsoft SharePoint and What Is It Used For?
- SharePoint Forms: What They Are & How to Create Them
- Microsoft Lists Explained: What It Is and How to Use It
- SharePoint Document Management: Capabilities & Best Practices
- SharePoint Document Library: Create, Manage & Best Practices
- SharePoint List Reports: How to Create Them
- SharePoint Task Management: How to Create and Manage Tasks Effectively
- SharePoint Collaboration: Features, Tools & Tips
- SharePoint Project Management: The Complete Guide
- Copilot for SharePoint Explained: Features, Benefits, and Practical Usage