Quick answer: how do you make a leave request form in SharePoint? Create a list called Leave requests with columns for the employee, leave type, start date, end date and approver. Add a list validation rule so the end date cannot come before the start date, and a calculated column that counts working days. Then choose the form people fill in: the default list form is free and covers most needs, Microsoft Lists forms give you a shareable link, and Power Apps or a form designer such as Virto Forms Designer App add tabs, columns and different layouts for different people. Approval runs through Approvals in Lists or Power Automate.
Leave requests are usually the first process a team moves from email into SharePoint, and for good reason. A request has the same few fields every time, one person decides, and the result belongs in a calendar. Done in a list, every request has a status, a history and an owner, and nobody has to search their inbox to find out whether Friday was approved.
This guide builds the whole thing in SharePoint Online: the list, a date check, a working-days count, the form, the approval, the calendar and the reminders. For each step we name what Microsoft 365 does on its own and where an extra tool helps, our own included. We tested the formulas on a SharePoint Online list in October 2026.
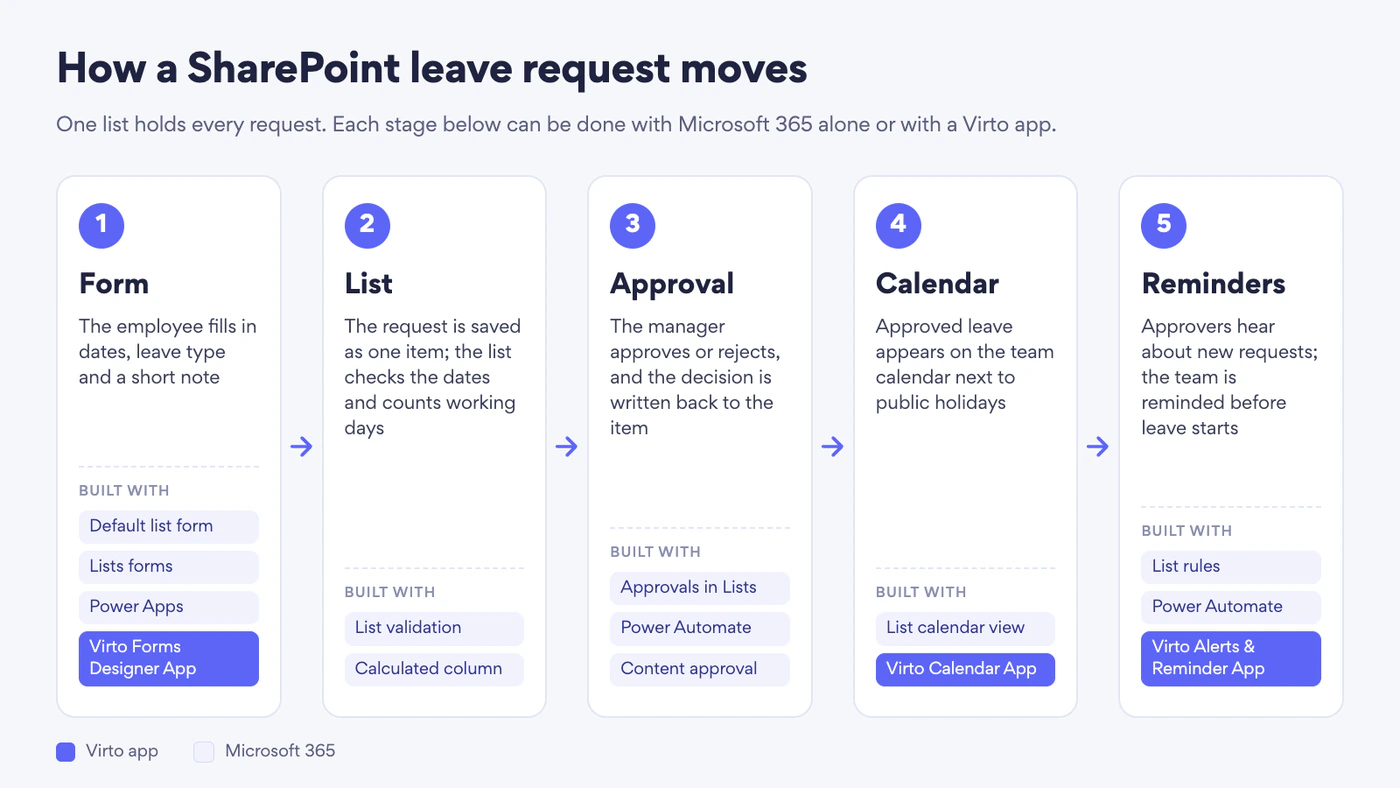
Fig. 1. How a SharePoint leave request moves from the form to the calendar
What a leave request form needs
Keep the form short. Every extra field is one more reason for people to send an email instead. The columns below cover a typical team; add your own only when someone will actually use the answer.
| Column | Type | Why |
|---|---|---|
| Employee | Person | Who will be away. It can differ from the person who submits, for example when a manager files a request for someone. |
| Leave type | Choice: Vacation, Sick leave, Personal, Unpaid | Drives colour in the calendar and reporting. |
| Start date, End date | Date and time, set to Date only, required | The period itself. A time part only causes off-by-one surprises in emails and flows. |
| Working days | Calculated, number | Counted from the two dates, so nobody types it. |
| Approver | Person | Who decides. Approval flows read the address from here. |
| Status | Choice: Pending, Approved, Rejected; default Pending | What the calendar and the reminders filter on. |
| Approver comment | Multiple lines of text | The reason for a rejection, written back by the approver or the flow. |
| Note | Multiple lines of text, optional | Anything the approver should know. Not a place for medical details (see Common mistakes). |
Step 1: create the list
- On your team site, select New → List → Blank list and name it Leave requests.
- Rename the Title column to Request or hide it in the form later. A title such as “Vacation — Anna Keller” makes the list readable at a glance.
- Add the columns from the table. For Start date and End date, set Include time to No and turn on Require that this column contains information.
- Set the default value of Status to Pending.
Step 2: stop impossible dates and count working days
A validation rule for the dates
A column’s own validation can only look at that column, so a rule that compares two dates goes into the list settings:
- Open Settings → List settings → Validation settings.
- In Formula, enter
=[End date]>=[Start date] - In User message, write what the person should fix, for example “The end date cannot be earlier than the start date.”
![Validation Settings page of a SharePoint list with the formula =[End date]>=[Start date] and the user message The end date cannot be earlier than the start date](/images/uploads/2026/10/sharepoint-leave-request-form-validation.webp)
Pic. 1. List validation settings with the date rule, on our test list
The rule is checked when an item is saved, whichever form saves it. On our test list a request ending before it started was refused. One caveat: in a Microsoft Lists form, a failed rule shows a generic error instead of your message (Microsoft Q&A), so make the date fields self-explanatory there.
A calculated column for working days
SharePoint calculated columns do not support the Excel function NETWORKDAYS. When we tried it, SharePoint answered “The formula contains a syntax error or is not supported”. This formula counts Monday to Friday between the two dates, both included:
=([End date]-[Start date]+1)-INT(([End date]-[Start date]+7-MOD(7-WEEKDAY([Start date]),7))/7)-INT(([End date]-[Start date]+7-MOD(8-WEEKDAY([Start date]),7))/7)
Create a column of type Calculated, paste the formula, and set The data type returned from this formula to Number with 0 decimal places. If your columns have other names, replace [Start date] and [End date]. We checked the formula on 63 date pairs, starting on every day of the week and lasting one to fourteen days, and it matched a day-by-day count each time.
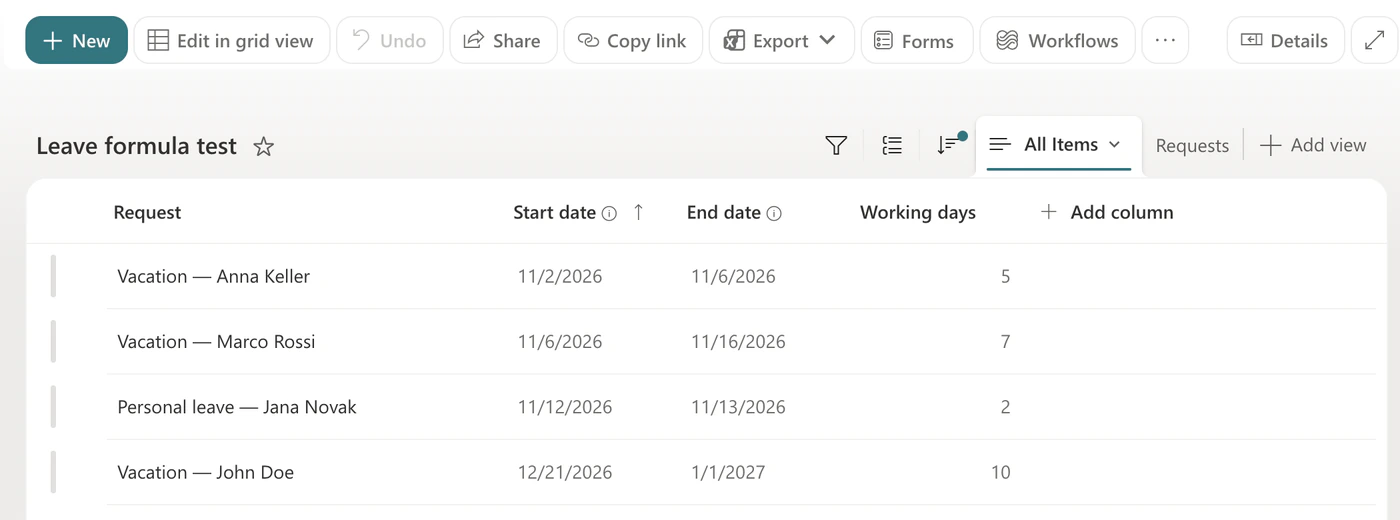
Pic. 2. The Working days column counts Monday to Friday; public holidays are not subtracted
Two limits to know. Public holidays still count as working days: the last row in Pic. 2 covers Christmas and New Year’s Day and shows 10. Half days need a separate number column that the employee fills in.
Step 3: choose the form
The list stays the same whichever form you pick, so you can start simple and change the form later without losing a single request.
The default list form (free)
Open any item and select Edit form → Edit columns. There you can hide and reorder columns and give a column a condition, so it appears only when needed (Microsoft Learn). For example, a Medical certificate column that appears only for sick leave:
=if([$LeaveType] == 'Sick leave', 'true', 'false')
The formula uses the column’s internal name, here LeaveType. Conditions do not work with multi-select columns, currency, calculated or managed metadata columns. Headers, footers and sections are possible with JSON form formatting. What the default form does not do: tabs, several columns side by side without JSON, and a different layout for different people.
Microsoft Lists forms
The Forms button in a list creates a separate, shareable form: each submission becomes a list item. Since the 2025 update these forms support conditional branching (Microsoft Tech Community). They are made for collecting new requests from people in your organization. Editing a request and approving it still happen in the list’s own form.
Power Apps
Integrate → Power Apps → Customize forms replaces the list form with a canvas app (Microsoft Learn). It can do almost anything: required-only-if rules, the current user filled in automatically, calculations on screen. The price is maintenance: the form is now an app someone has to understand and update. Licences also deserve a check. Standard connectors are covered by Microsoft 365, but in a Managed Environment every active user needs a premium licence (Microsoft Learn).
Virto Forms Designer App
Virto Forms Designer App redesigns the list’s own New, Edit and Display forms with drag and drop. Without code you get tabs, two or more columns, and a different form for different people or SharePoint groups: the employee sees a short request, the approver also sees the decision fields. A field can be hidden or made read-only in the form for people who do not need to change it. Who may change the data itself is still decided by the list’s permissions. Rules beyond the layout, such as showing a field based on another field’s value, are written in JavaScript in the designer.
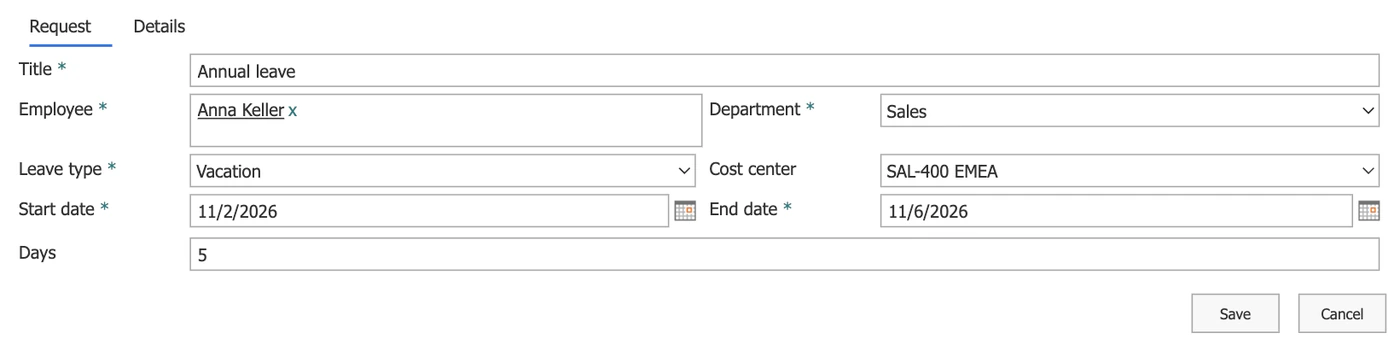
Pic. 3. A leave request form in Virto Forms Designer App: the main fields in two columns, details on a second tab
The app installs from Microsoft Marketplace. Before the first form is published, an administrator allows custom scripts on the site; SharePoint turns that permission off again within 24 hours, and published forms keep working.
| Option | Cost | Layout | Different form per group | Logic | Who maintains it |
|---|---|---|---|---|---|
| Default list form | Included | One column; sections with JSON | No | Show or hide a column by formula | List owner |
| Microsoft Lists forms | Included | Question by question | Several forms per list, one link each | Branching | List owner |
| Power Apps | Included with standard connectors; premium in a Managed Environment | Any | With formulas | Power Fx formulas | Someone who knows Power Apps |
| Virto Forms Designer App | Paid app per tenant | Tabs and columns, drag and drop | Yes, per user or SharePoint group | JavaScript | List owner for layout; a developer for rules |
If you are replacing an old InfoPath leave form, our guide to InfoPath end of life explains how to sort forms by type before you rebuild them.
Step 4: add approval
There are three ways to approve a request in SharePoint Online. Pick one per list: Microsoft does not combine content approval with the newer Approvals in Lists (Microsoft Support).
Approvals in Lists
Open Integrate → Configure approvals and turn approvals on. A request is then sent with Request approval on the item; approvers answer in the Approvals app in Teams or directly in the list, and an Approval status column shows where each request stands. You can require one approver or all of them. Three things from Microsoft’s own list of limits matter for leave: approvers do not get access to the item automatically, editing an item cancels its approval in progress, and the columns show only the latest activity.
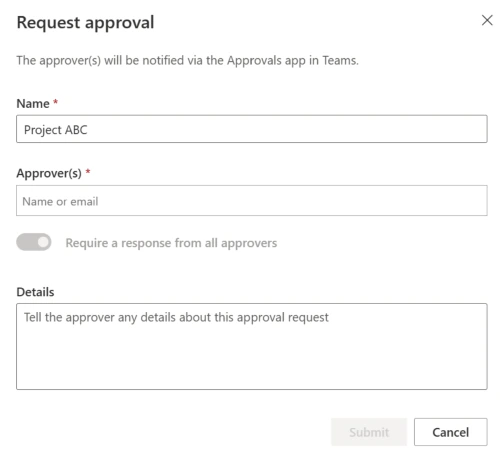
Pic. 4. The Request approval dialog in Microsoft Lists. Source: Microsoft Support
Power Automate
Microsoft’s own approval tutorial is a vacation request flow: when an item is created, Start and wait for an approval sends the request, the approver decides in email or in the approvals center, and the flow emails the employee and writes the decision back to the item (Microsoft Learn). Choose this when you need two approval stages, an HR step after the manager, or your own email wording.
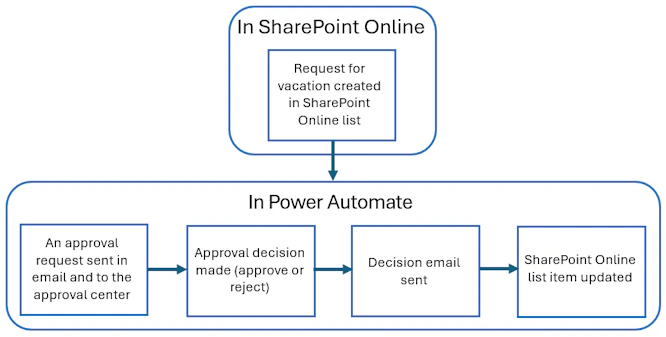
Fig. 2. A vacation approval flow in Power Automate. Source: Microsoft Learn
Content approval
The oldest option: List settings → Versioning settings → Require content approval for submitted items. New requests stay in a draft state until someone with approval rights approves them, and Draft item security decides who can see drafts, down to “only users who can approve items (and the author of the item)”. It has no notifications of its own, so pair it with a rule or a reminder. It is also the option Virto Calendar App works with: an approver can approve or reject a request straight from the event in the calendar.
For a broader comparison of approval tools, see our guide to automated approval workflows; for the approval options side by side with the ways to customize a list form, see our guide to SharePoint forms.
Step 5: show approved leave in a calendar
A list answers “what was requested”; a calendar answers “who is away next week”. In the list, add a Calendar view based on Start date and End date and filter it to Status = Approved. Our guide to building a PTO and vacation tracker in SharePoint covers the calendar view and colour coding step by step.
The built-in view shows one list. When leave has to be read together with public holidays and the team’s other calendars, Virto Calendar App overlays the leave list with national holiday feeds and other sources in one view, from a month to a whole quarter. The Employee Vacation Tracker use case shows the full setup.
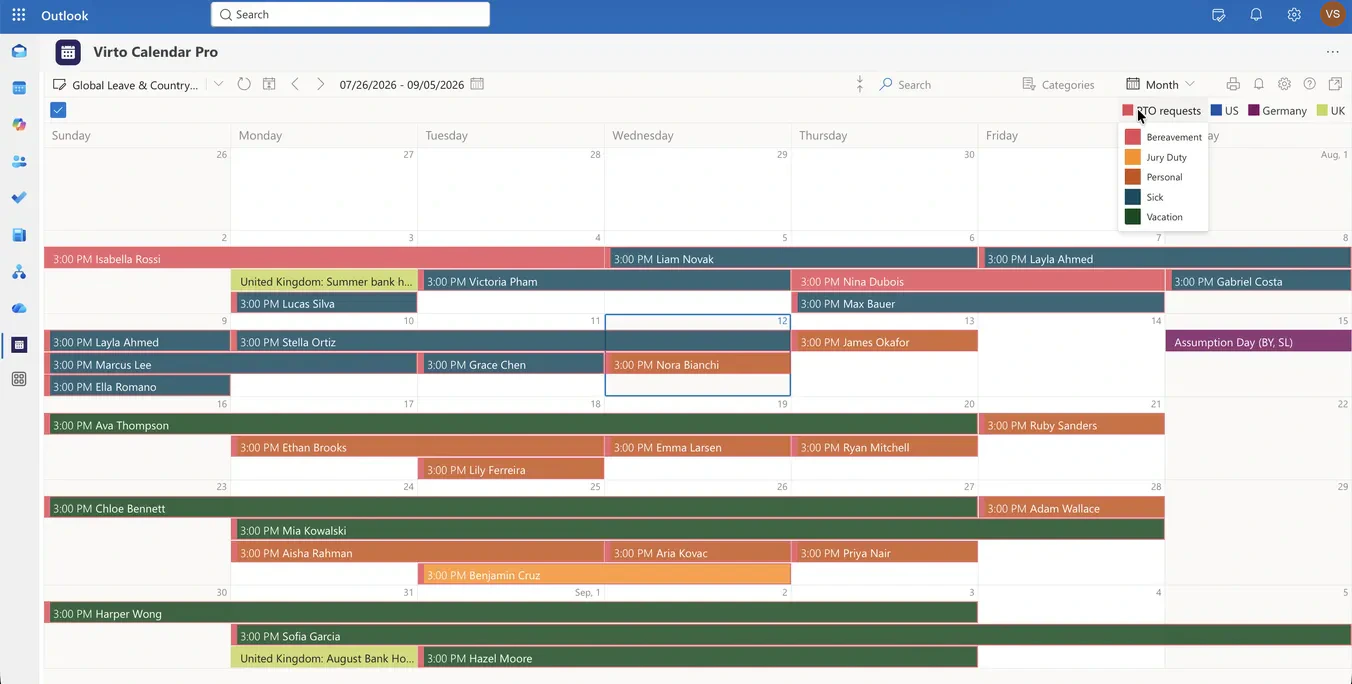
Pic. 5. Approved leave by type next to UK and German public holidays in Virto Calendar App
Step 6: notify approvers and remind the team
SharePoint alerts are gone: Microsoft turned them off in mid-July 2026 and points to Power Automate and rules instead (Microsoft Tech Community). For a leave list that leaves three options.
- List rules. Integrate → Rules sends an email when an item is created or a column changes, for example to the approver for every new request and to the employee when Status becomes Approved (Microsoft Support). Rules cannot use multiple-lines-of-text columns and cannot send to a group address.
- Power Automate. A scheduled flow can look for approved requests that start in three days and remind the team or the employee’s backup.
- Virto Alerts & Reminder App. Virto Alerts & Reminder App emails approvers or posts to Microsoft Teams when a new request is added, and sends a reminder on a date in the list, such as a few days before the start date, without building a flow.
Common mistakes
Everyone can read everyone’s leave
Whoever can submit a request can usually open the list and read all the others. A form does not change that, whichever tool built it: hiding a field in a form does not hide the data in list views. The fix is in List settings → Advanced settings → Item-level permissions: set Read access to “Read items that were created by the user” and Create and Edit access to “Create items and edit items that were created by the user”.
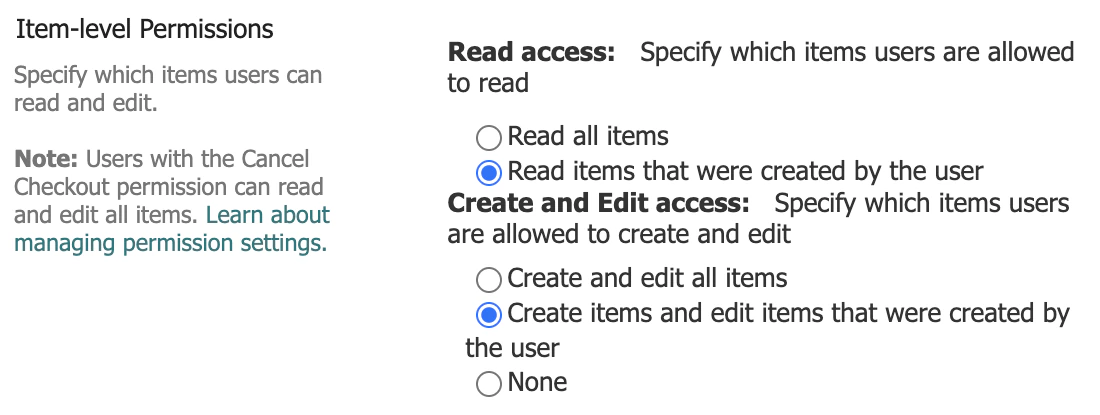
Pic. 6. Item-level permissions: each employee sees only their own requests
Two consequences to plan for. Managers and HR who must see every request need a permission level that overrides this setting, such as Design or Full Control (Microsoft Learn). And the setting follows Created By: a request a manager files on someone’s behalf is invisible to that employee. Our SharePoint permissions guide explains permission levels in more detail.
Asking for the reason
“Sick leave” is enough for a manager to plan. A diagnosis or a doctor’s note does not belong in a list that a whole department can search. Keep the note optional, and keep the leave type, not the note, in the calendar.
Expecting the list to track balances
A list records requests; it does not know how many days each person has left. Remaining days need a second list with one row per employee and year, plus a flow that subtracts approved days, or an HR system that owns entitlements. Decide which before people start asking.
Missing overlaps
Validation checks one request at a time, so two people in a team of three can be away the same week. A calendar makes the overlap visible early; blocking it outright takes a flow that compares the new request with the approved ones.
FAQ
Does SharePoint have a leave request template?
Not a dedicated one. Microsoft’s list templates include Travel requests, Employee onboarding and six others, but none for leave (Microsoft Support). A leave list is quick to build from a blank list with the columns above.
Can I build a leave request form in SharePoint without Power Apps?
Yes. A list, the default form with conditional columns, a validation rule, a calculated column and Approvals in Lists cover a typical team. For tabs, side-by-side columns and a different form per group without Power Apps, a form designer such as Virto Forms Designer App adds the layout.
How do I count working days between two dates in SharePoint?
Use a calculated column with the formula in Step 2. NETWORKDAYS is not available in SharePoint calculated columns, and the formula does not subtract public holidays.
How do I stop employees from seeing each other’s requests?
Turn on item-level permissions in the list’s advanced settings so people read and edit only the items they created. Give managers and HR a permission level that can see all items.
Can managers approve from Teams or Outlook?
Yes. Approvals in Lists sends requests to the Approvals app in Teams. A Power Automate approval arrives by email and in the approvals center, and approvers can answer from either.
What replaced SharePoint alerts for leave notifications?
List rules for simple emails, Power Automate for anything conditional or scheduled, or a reminder app such as Virto Alerts & Reminder App.