Microsoft Teams Planner is the go-to tool for managing tasks and projects in one convenient location, but is it the best fit for your team? Discover its functionality, benefits, limitations, and alternatives.
Quick answer — how to add Planner to Microsoft Teams: Open the channel where you want the board, click + to add a tab, choose the Planner app, then create a new plan or attach an existing one and save. The board then lives as a tab for the whole channel.
Microsoft Planner, a powerful and intuitive task management tool, is built into Microsoft Teams, enabling organizations to organize workflows, visualize tasks, and manage projects effectively. As one of the most popular tools in the Microsoft 365 ecosystem, Planner has long been a go-to solution for teams looking to streamline collaboration and stay on top of their workloads.
Planner has since received a significant makeover: the app now simply called “Planner” in Teams replaced the earlier “Tasks by Planner and To Do,” combining the simplicity of task management with advanced features from Microsoft Project and the intelligence of Microsoft 365 Copilot into a single unified work management experience.
This article walks you through setting up and using the new Microsoft Planner inside Teams so your team stays organized and productive. Whether you’re managing marketing campaigns, coordinating IT requests, or tracking HR onboarding, we’ll show practical examples of how different teams can benefit.
For teams that need even greater flexibility and functionality, we’ll also introduce the Virto Kanban Board App — a robust alternative for advanced task and project management in Teams.
What Is Microsoft Teams Planner?
“Teams Planner” is simply Microsoft Planner used directly inside Microsoft Teams. It lets teams plan, organize, and track work without leaving the Teams app. Since the recent update, the app that appears in Teams is now called Planner (previously Tasks by Planner and To Do). For a full overview of Planner itself, see our Microsoft Planner overview — here we’ll stay focused on the Teams experience.
Key features of Planner in Teams
Added as a tab in a Teams channel, Planner becomes a seamless part of collaboration. From within Teams you can:
- Access all plans and tasks directly inside Teams.
- Discuss tasks in the Teams chat or share files in the same space.
- Automatically sync updates across Microsoft 365, so task changes reflect in connected apps like Outlook and To Do.
This tight integration removes the need to switch between tools, saving time and boosting efficiency. Below are the core capabilities.
Visual task boards
Organize tasks into buckets (categories) and track progress with drag-and-drop. You can move tasks between buckets, group them by due date, priority, progress, or assignee, and see the overall flow of work to spot bottlenecks quickly.
Multiple task views
- Grid view: a detailed list for editing task fields, completing tasks, or quickly adding new ones.
- Board view: a Kanban-style board grouping tasks by bucket, progress, or other attributes.
- Schedule view: tasks on a calendar, to plan schedules and meet deadlines.
- Charts view: visual insights into task statuses, progress by bucket, priority distribution, and workload.
- Premium views: advanced plans add Timeline (Gantt Chart view), People view, and Goals view.
Task assignment and progress tracking
Assign tasks to team members or groups, set due dates and priorities, and track progress in real time with statuses like “Not Started,” “In Progress,” and “Completed.” Add comments, attach files, or build checklists for subtasks.
Notifications and alerts
Planner posts alerts in the Teams activity feed or by email when a task is assigned or marked urgent, when tasks you own are updated, and when deadlines approach — so nothing slips through the cracks.
My Tasks and My Day
- My Tasks: consolidates everything assigned to you across plans, including tasks from Teams meeting notes, flagged emails, and Loop components.
- My Day: a personal workspace that auto-populates today’s tasks and lets you handpick priorities; it resets daily for a fresh start.
Advanced capabilities with premium plans
Premium plans (Planner Premium) add Timeline (Gantt) view, Goals view, People view, and granular Assignments for resource and effort management — making Planner suitable for enterprise-level projects.
Accessibility and Microsoft 365 integration
Planner works across desktop, web, and mobile. It ties into the wider Microsoft 365 ecosystem: Outlook-flagged tasks appear in Planner, Teams meeting notes can generate tracked tasks, and projects created in Project for the web, now premium plans, surface in Planner’s My Plans view.
How Planner in Teams works
You add Planner as a tab in a channel, giving the team quick access to all related tasks and plans. Every update in the Planner tab syncs automatically with the rest of Microsoft 365, keeping tasks consistent across apps like Outlook and SharePoint. For example, a marketing team might create a Planner tab to run a campaign — the manager assigns content, design, and scheduling tasks with deadlines, and team members update statuses, comment, and attach files directly on each task.
Benefits of integrating Planner into Teams
- One window: manage tasks without switching apps.
- Quick communication: discuss tasks in real time via Teams chat and calls.
- Process visualization: visual boards show task status at a glance.
How to Set Up Planner in Teams
Setting up the new Planner in Microsoft Teams is straightforward. Follow these steps to get started.
Add the Planner app to Teams
- Open the Teams app store. In the left-hand sidebar, select Apps (or View more apps).
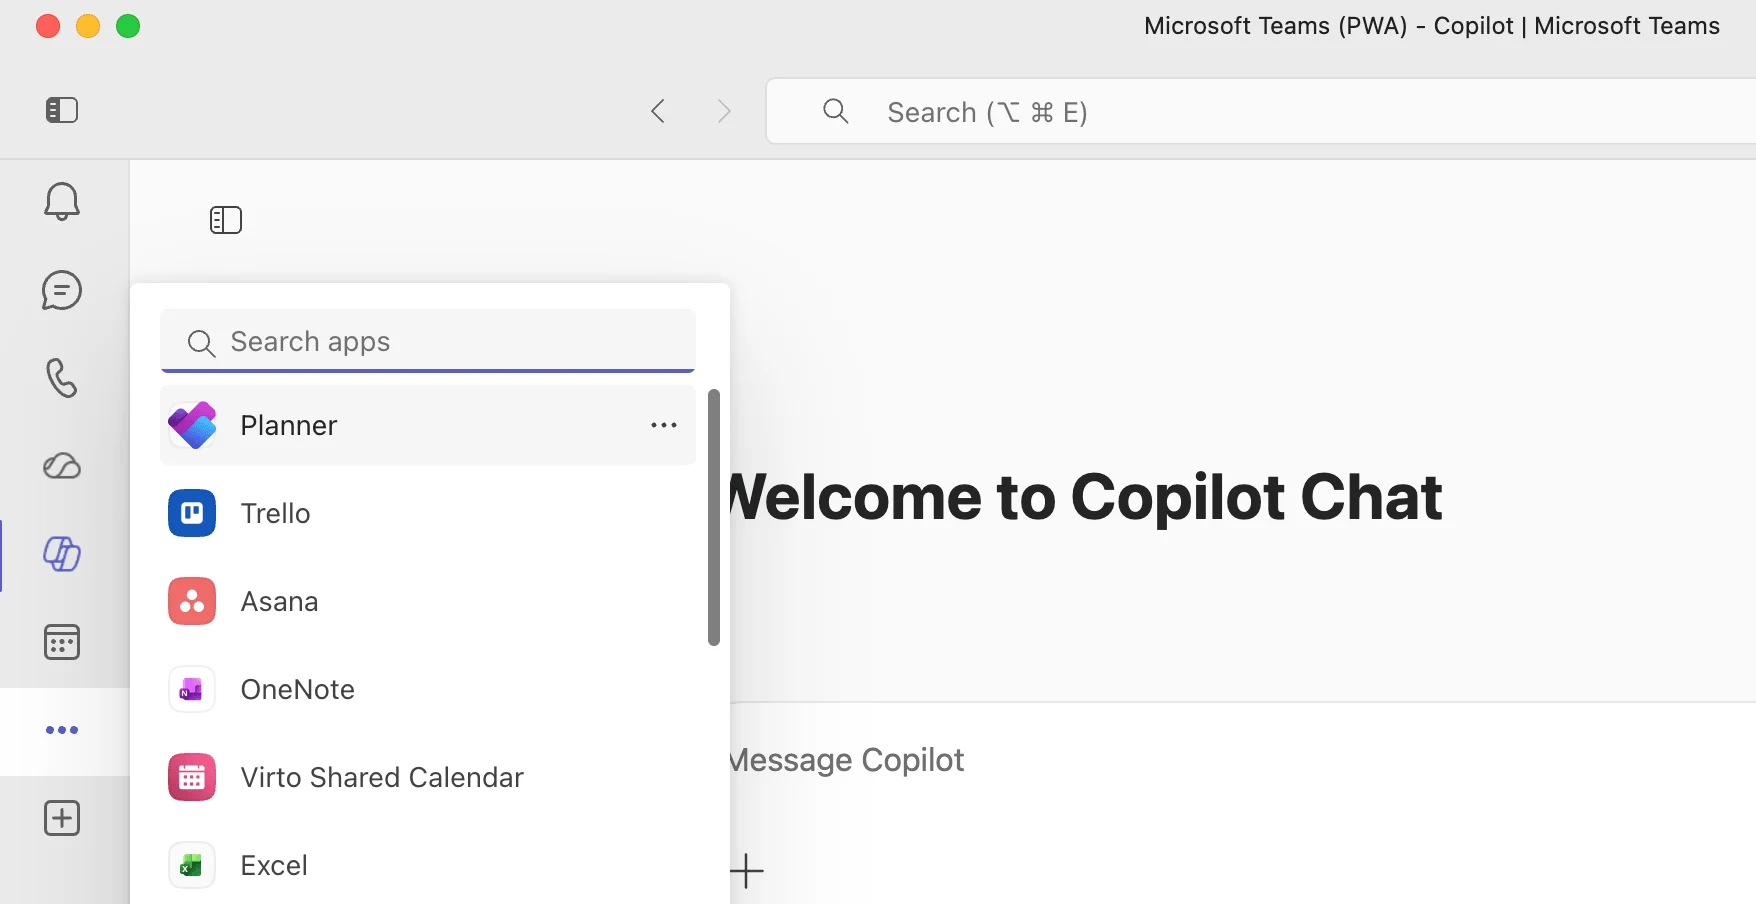
Pic. 1. Navigating to Planner in “View more apps.”
Search for Planner. Type “Planner,” open the app, and select Add.
Pin it for quick access. Right-click the Planner icon in the sidebar and choose Pin.
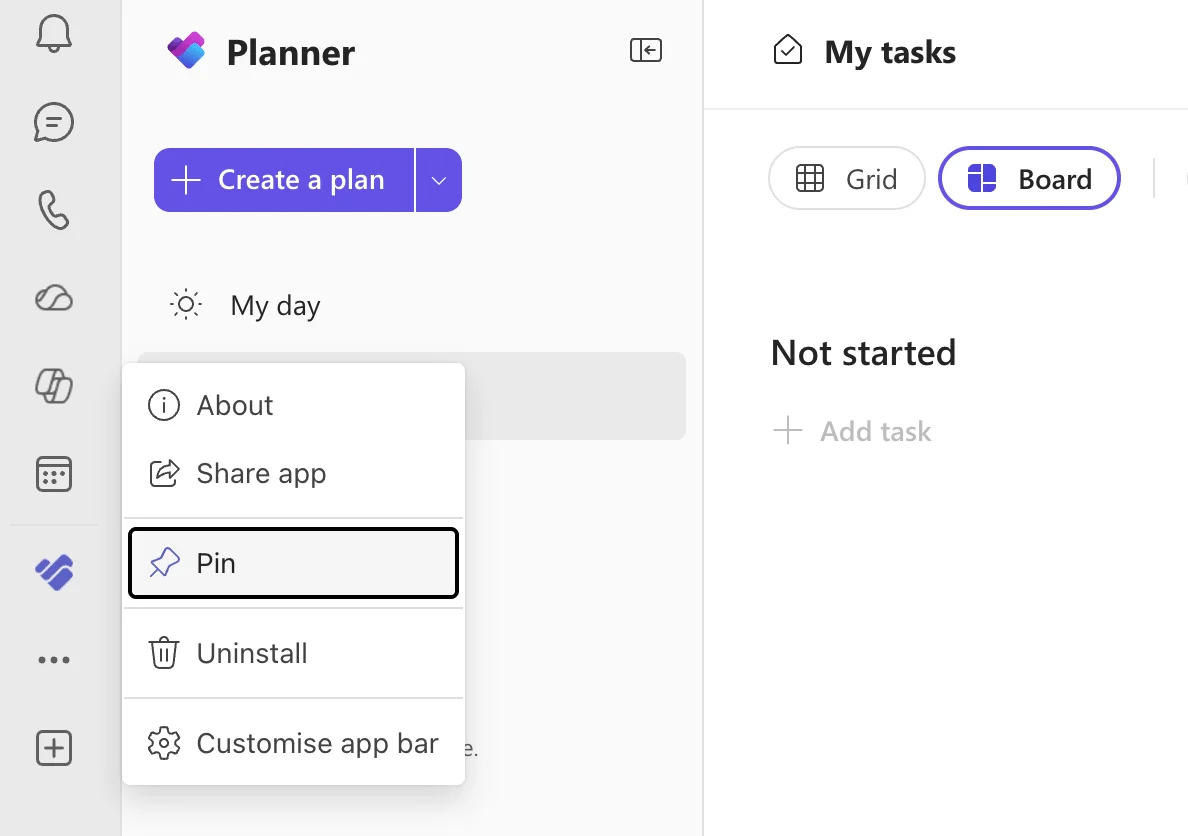
Pic. 2. Pinning Planner.
- Open Planner. Use Open in new window from the sidebar to work in a separate window.
Add Planner as a tab: go to your channel, click + at the top right, and search for Planner.
Good to know:
- Microsoft 365 subscription required. Planner is part of Microsoft 365 and isn’t available in the free version of Teams.
- Automatic sync. Tasks created in Planner sync with your calendar and the To Do app.
- Admin permissions. If the Planner app isn’t visible, ask your IT administrator to enable it for your organization.
Create a plan with Planner in Teams
- Open Planner from the Teams sidebar and select New Plan.
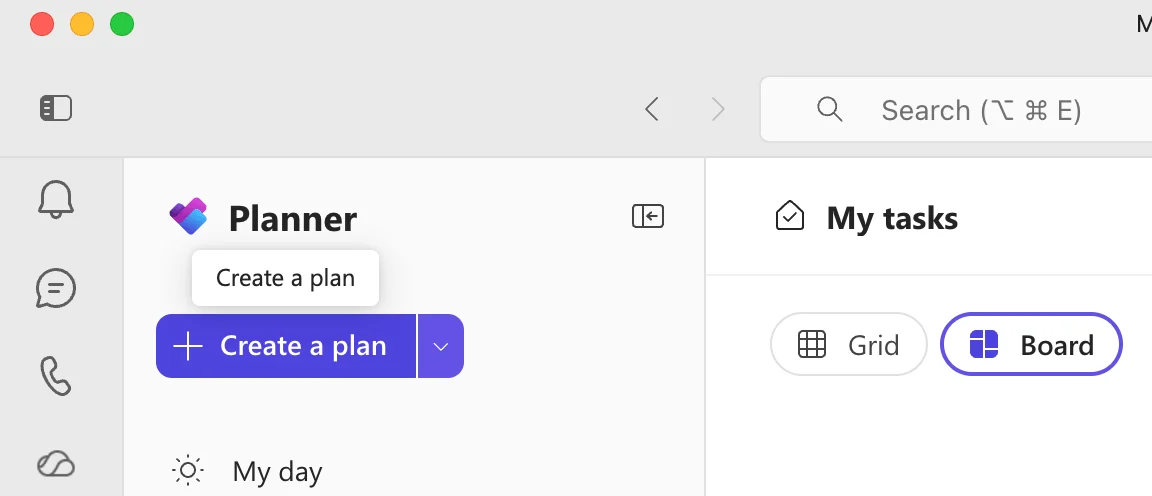
Pic. 3. Adding a new plan.
- Pick a template (optional). Choose an out-of-the-box template (some require a premium license) or click Basic to start from scratch.
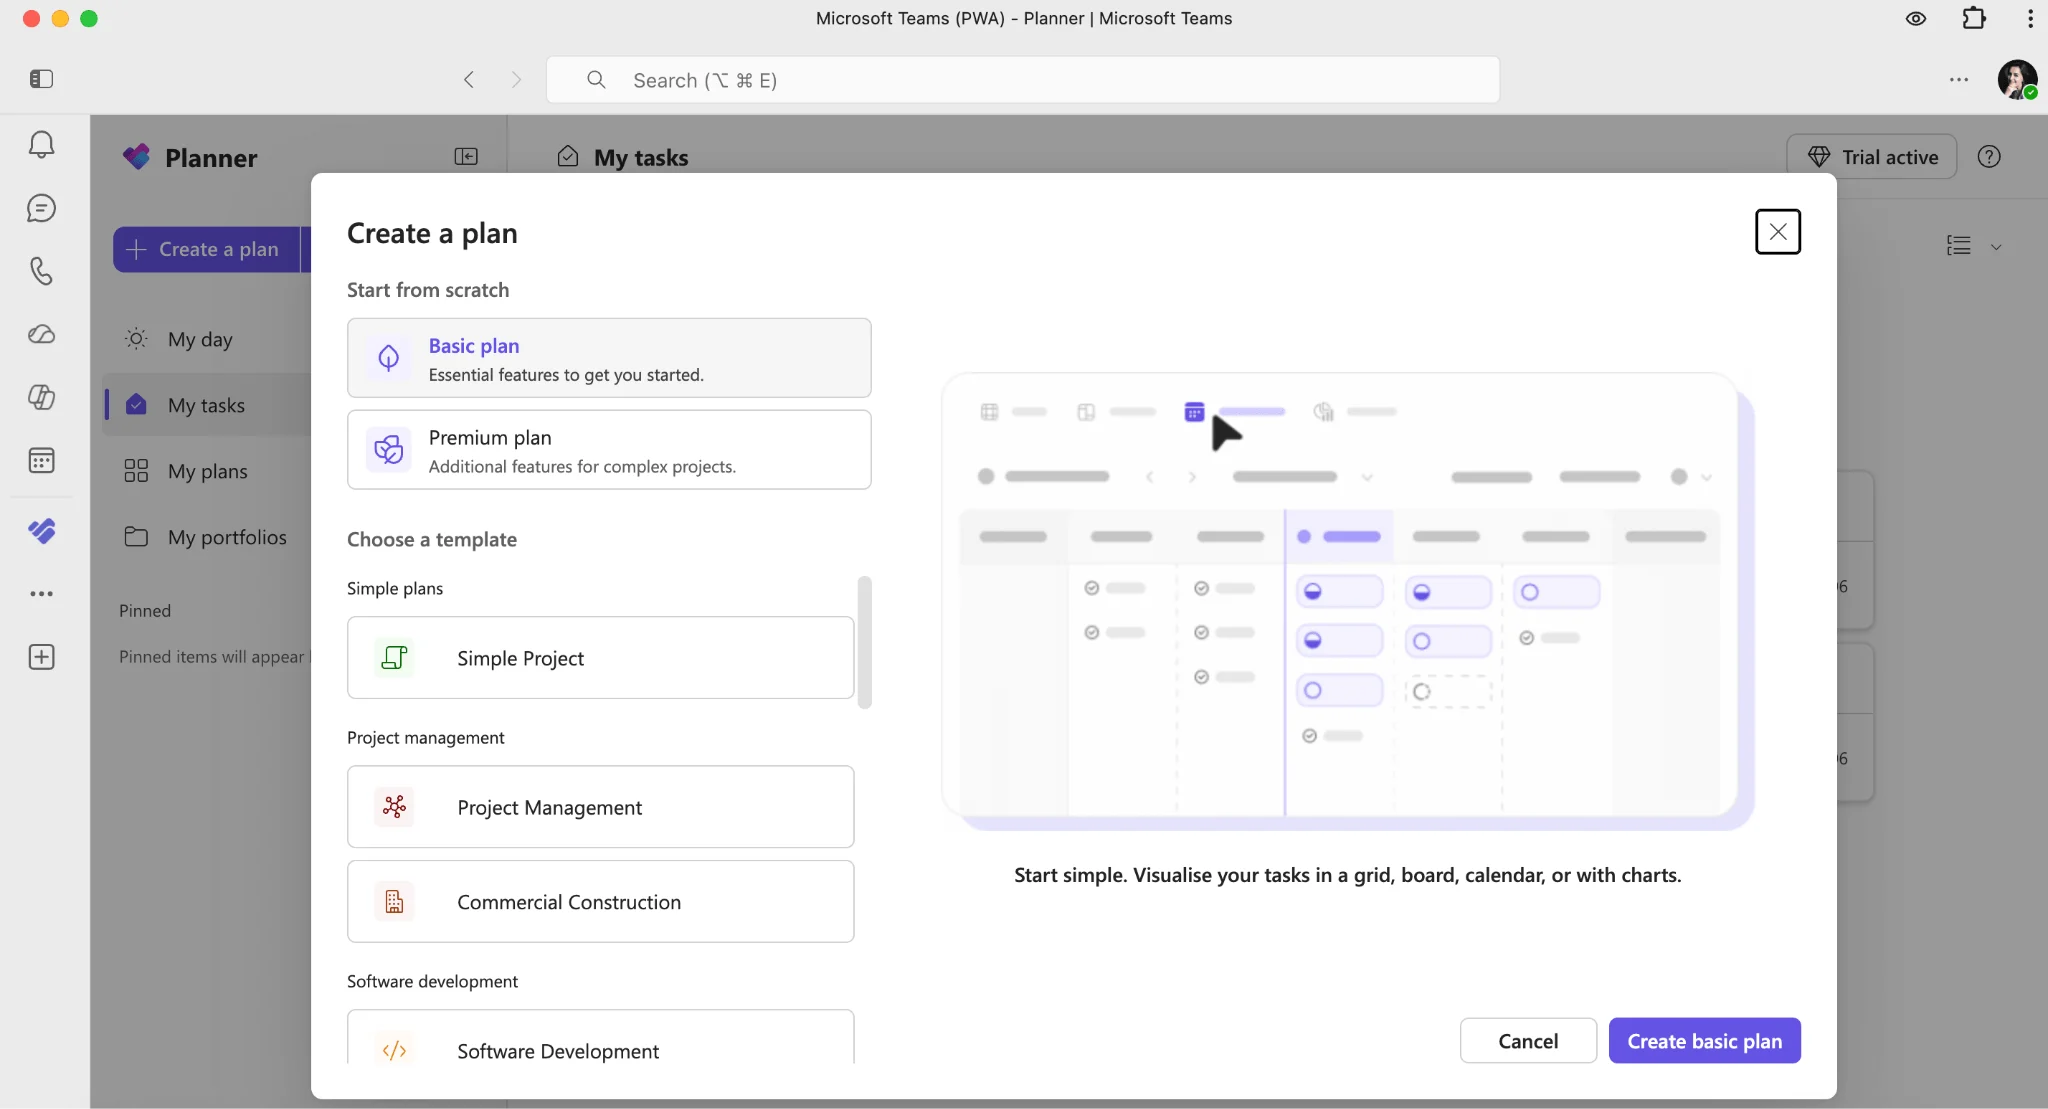
Pic. 4. Creating a new plan from scratch or choosing a template.
Choose plan options. Create a personal or shared plan; for a shared plan, link it to an existing Microsoft 365 group or create a new one.
Name the plan so it’s easy to identify across multiple projects.
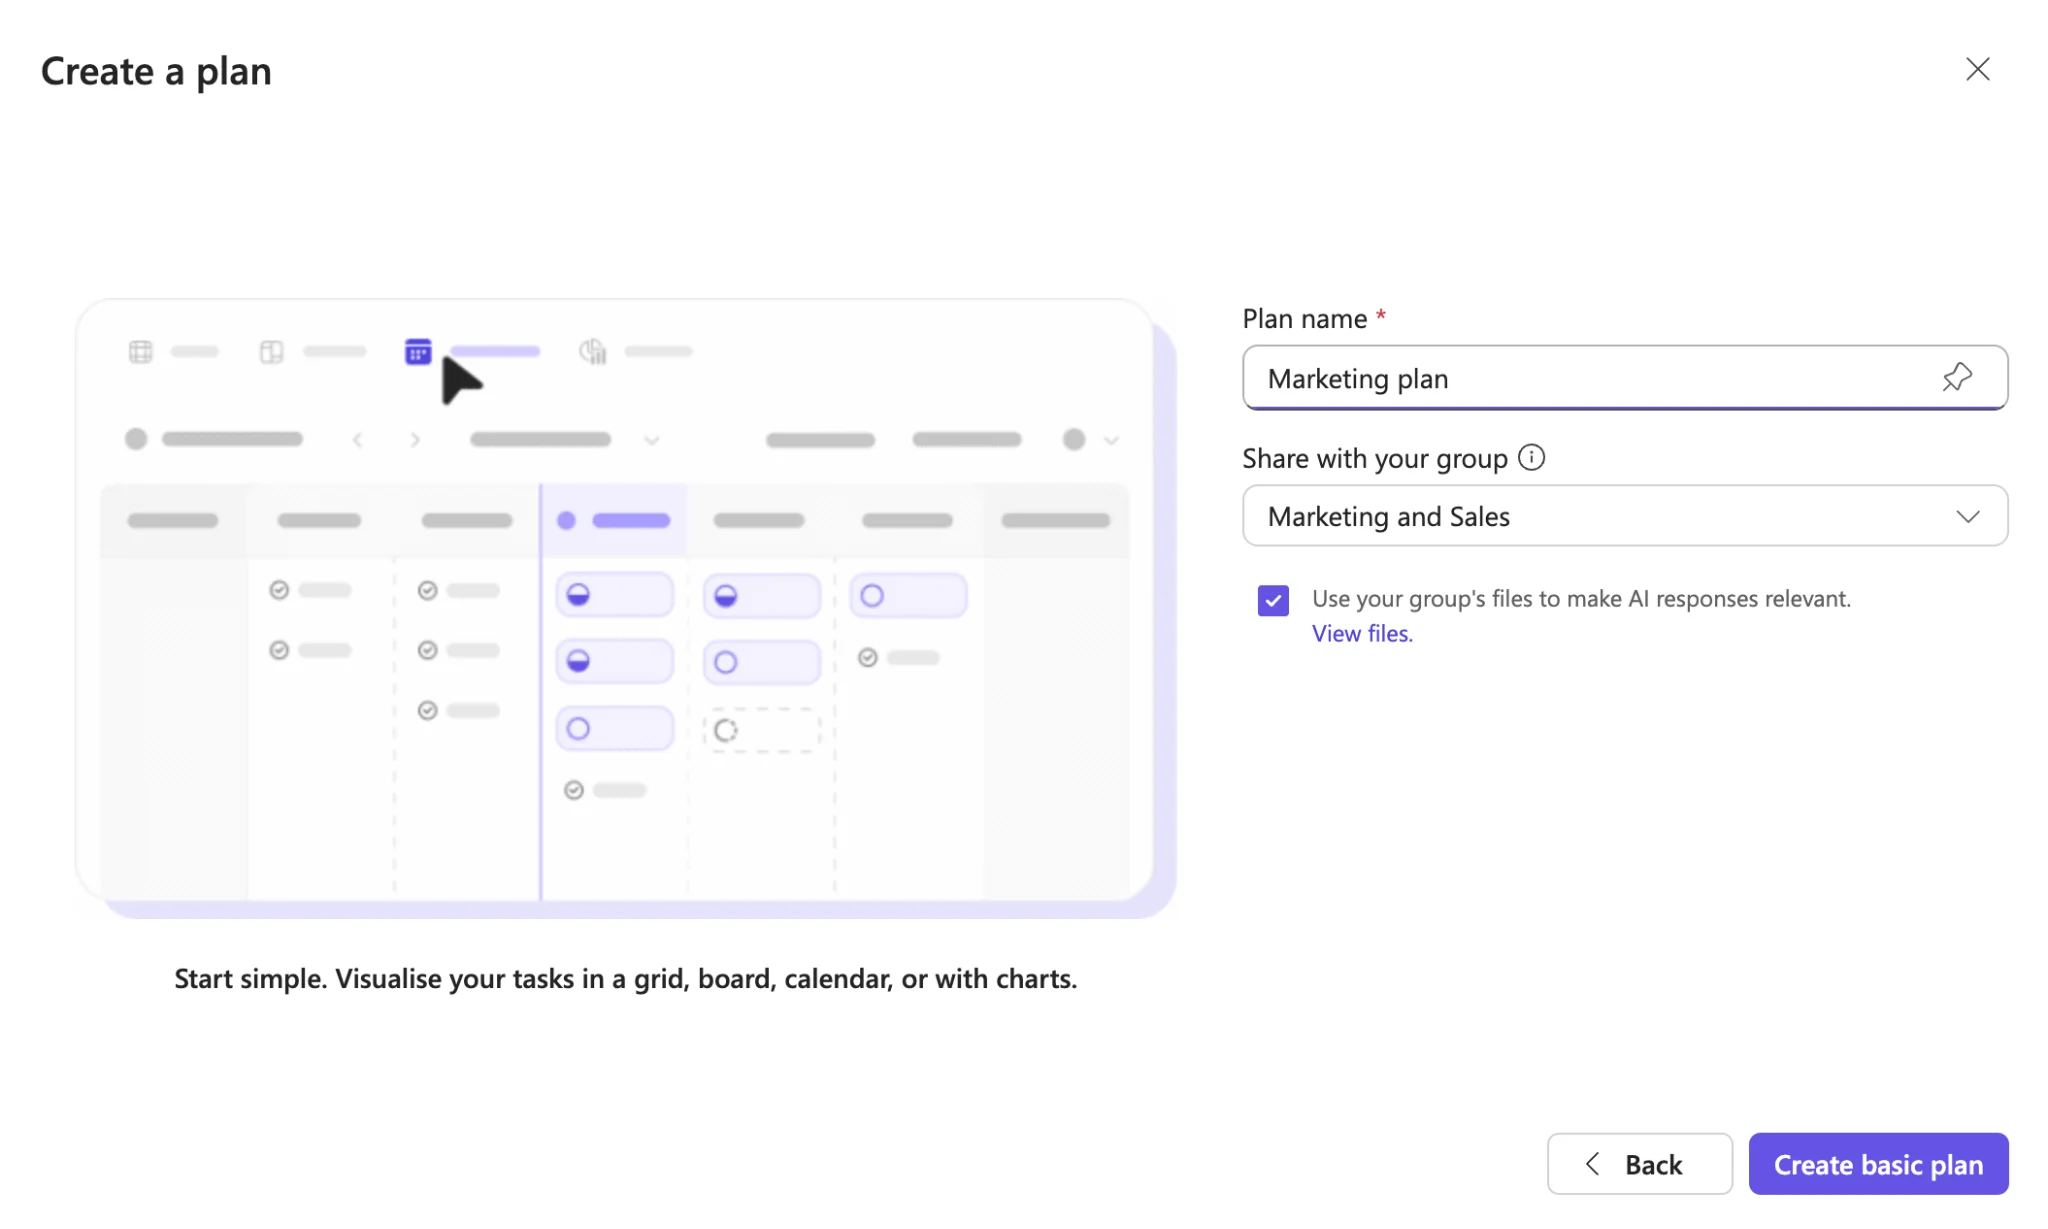
Pic. 5. Naming your plan and sharing it with your group.
Work with Planner in Teams
Adding and organizing tasks
- In the Planner tab, select + Add task under the relevant bucket.
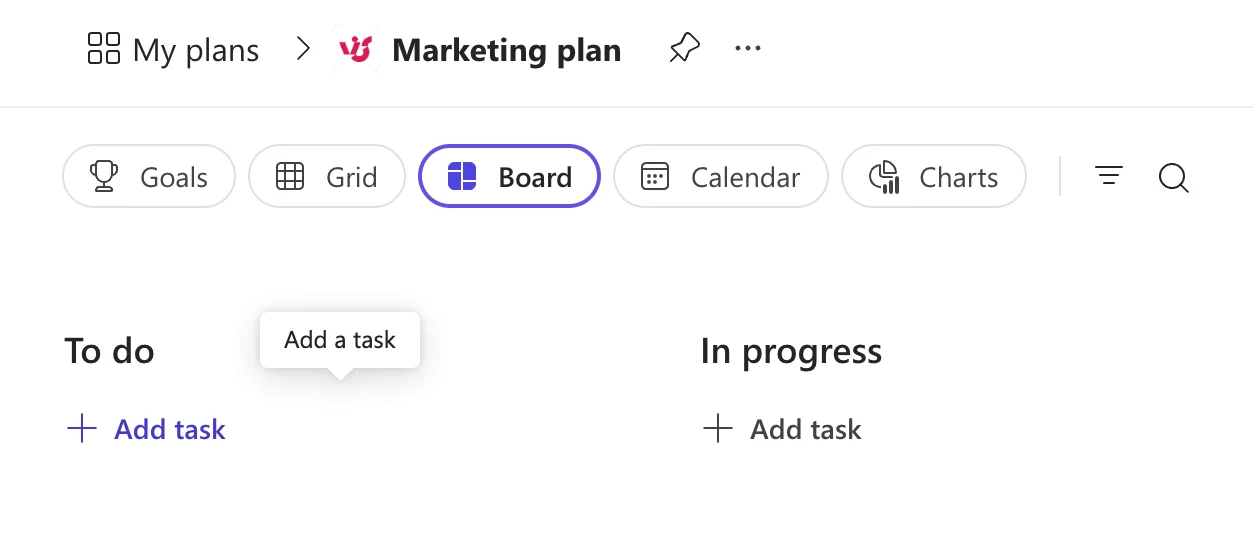
Pic. 6. Adding a task within a plan.
Enter the task name.
Optionally set a due date and assign it to a team member.
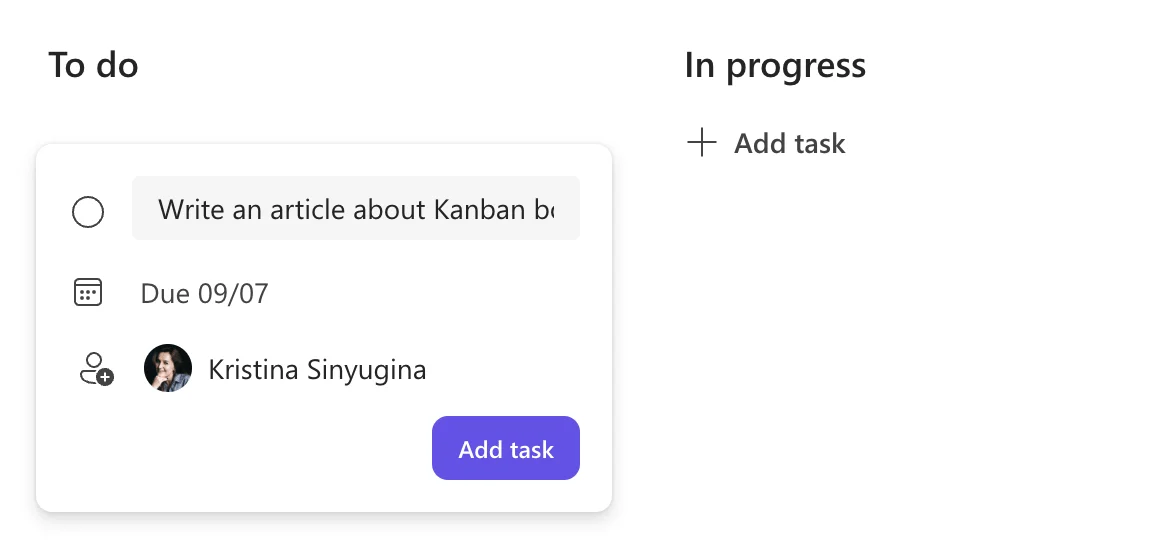
Pic. 7. Providing basic task details.
- Click Add task to save.
To add a bucket, click Add new bucket, name it, and press Enter. Drag and drop tasks between buckets to update their status or category.
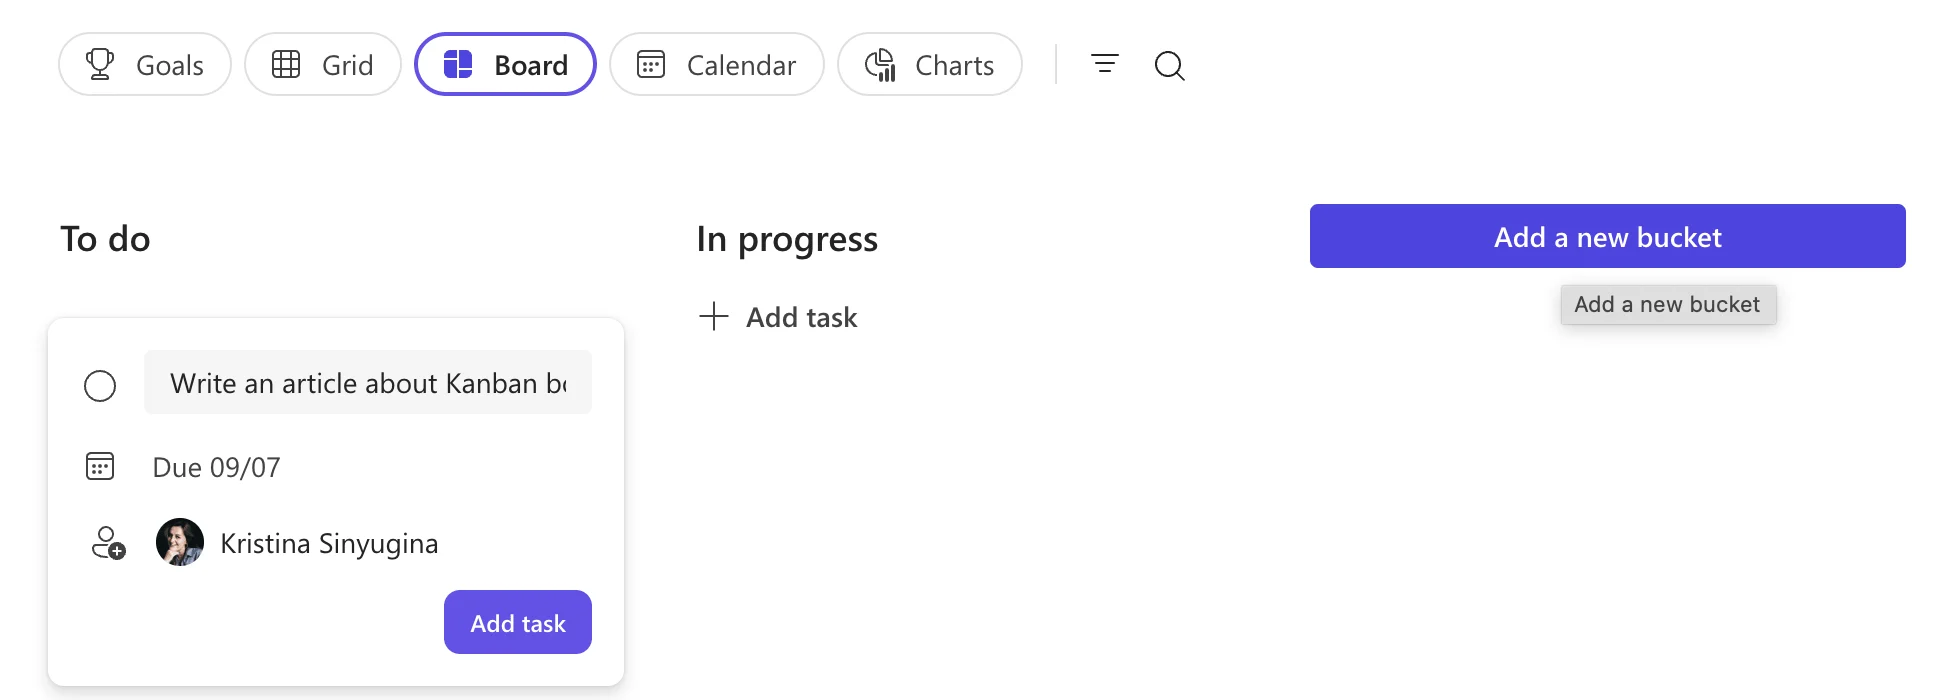
Pic. 8. Adding a new bucket.
Assigning tasks
While creating a task, click Assign and pick a team member (type a name or email to add someone). To assign later, open the task, click Assign in the details pane, and save.
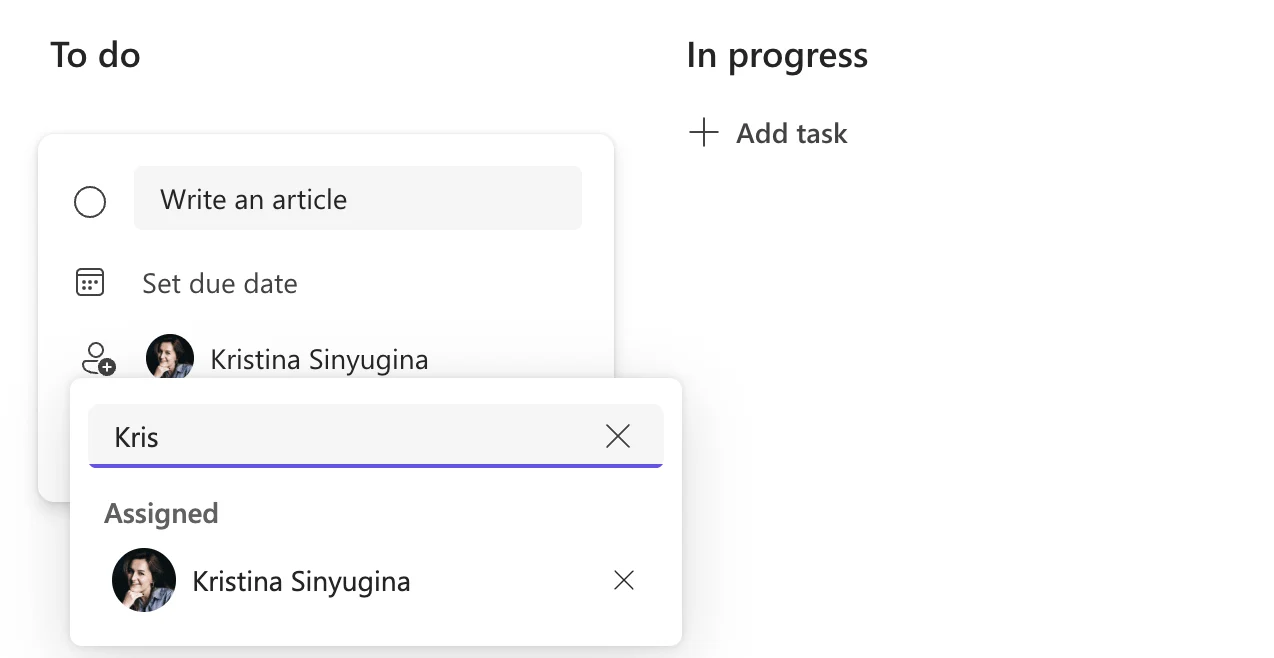
Pic. 9. Assigning a task.
- You can assign a task to up to 11 people; when anyone marks it complete, it’s complete for all assignees.
Tracking progress
Mark tasks as Not Started, In Progress, or Completed from the task’s status dropdown.
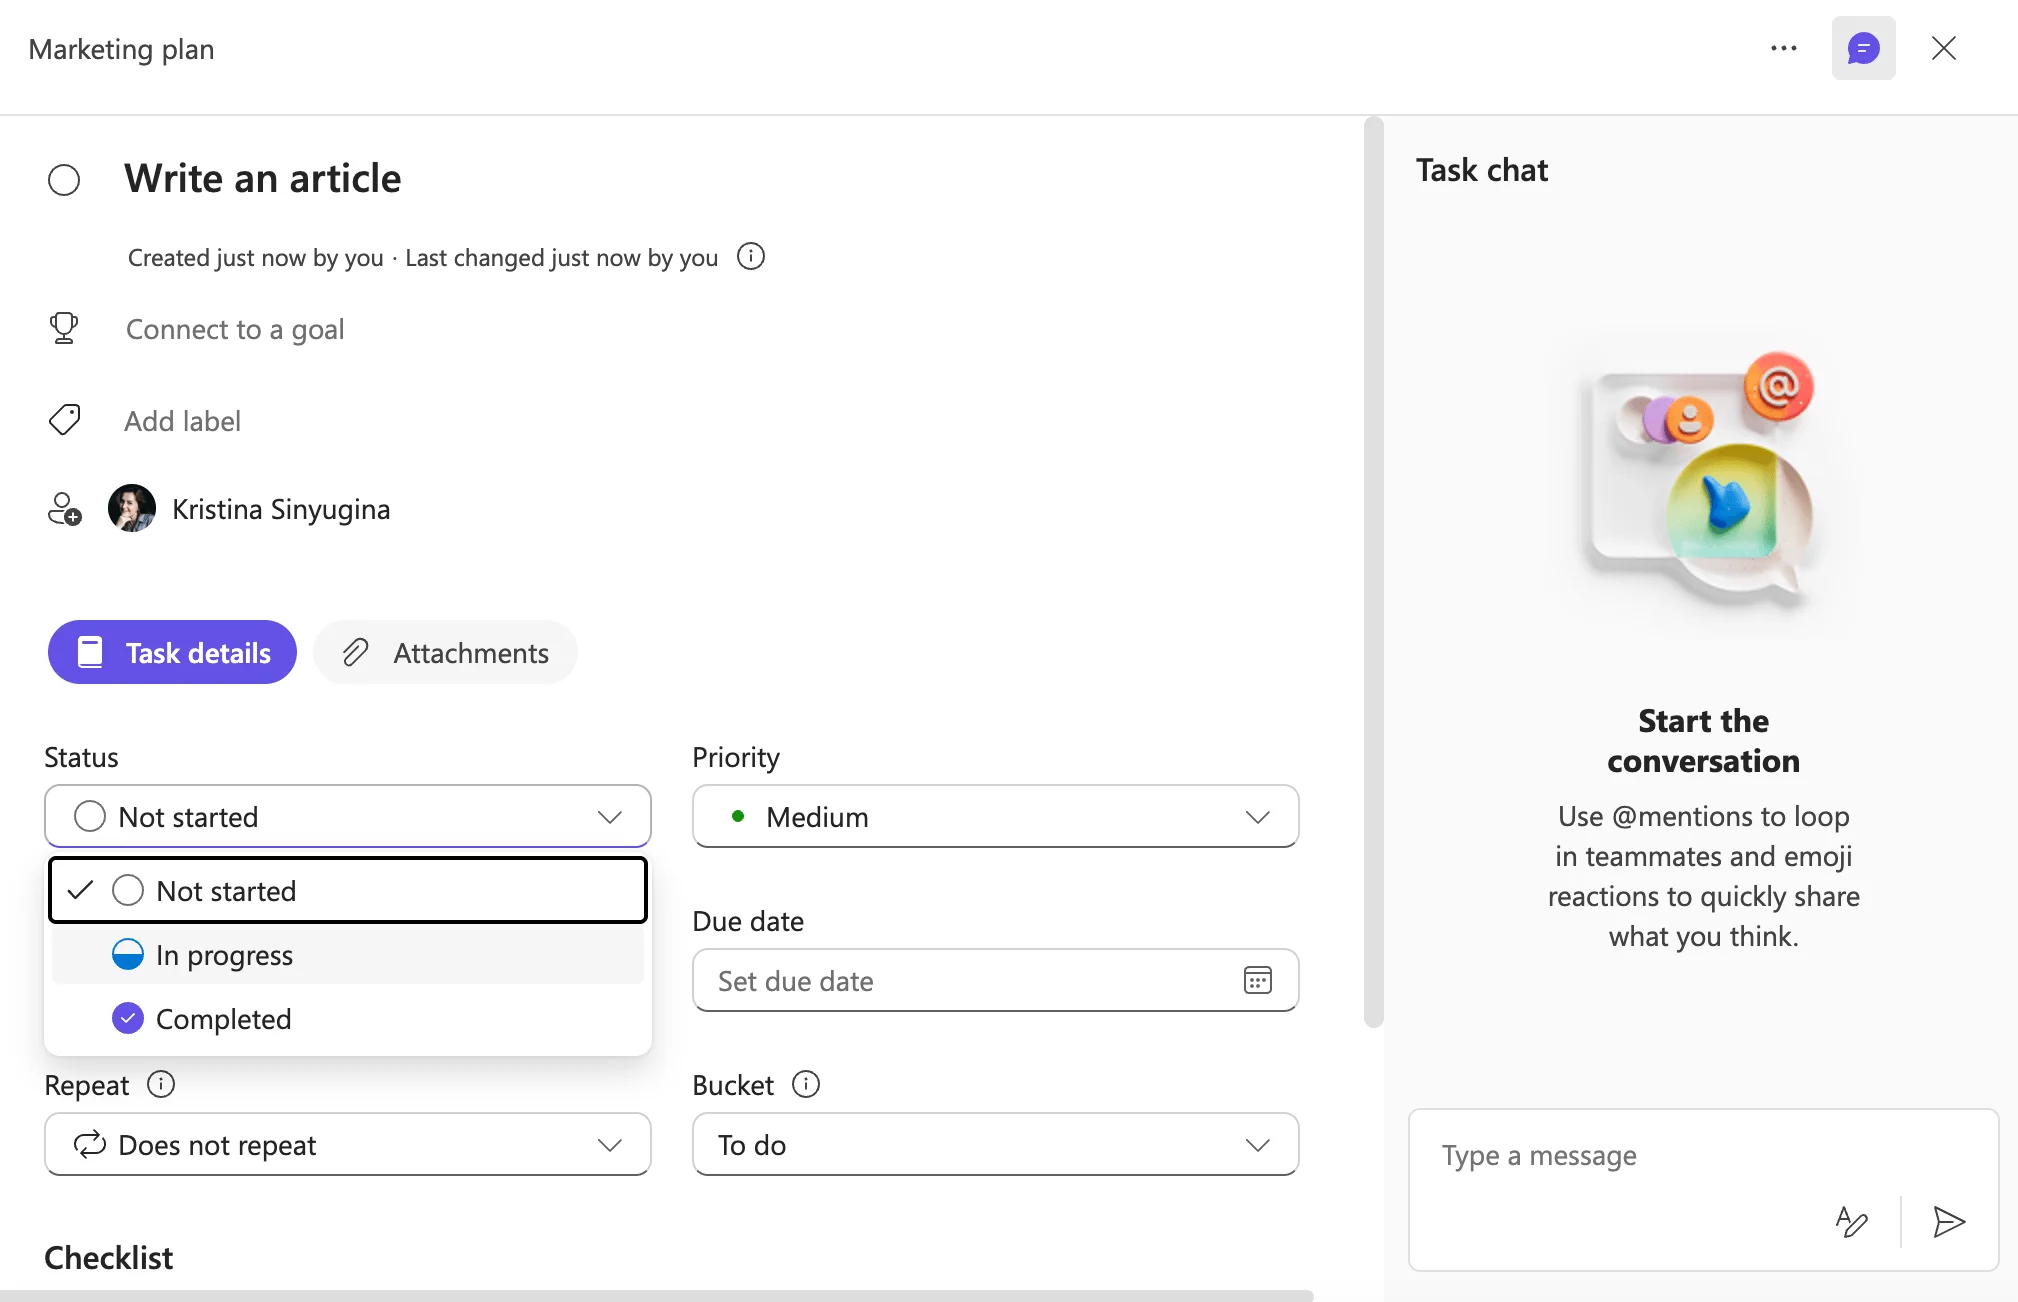
Pic. 10. Changing progress on a task.
- Board view: drag tasks between buckets to update progress visually.
- Charts view: see statuses, progress by bucket/priority/assignee, and workload.
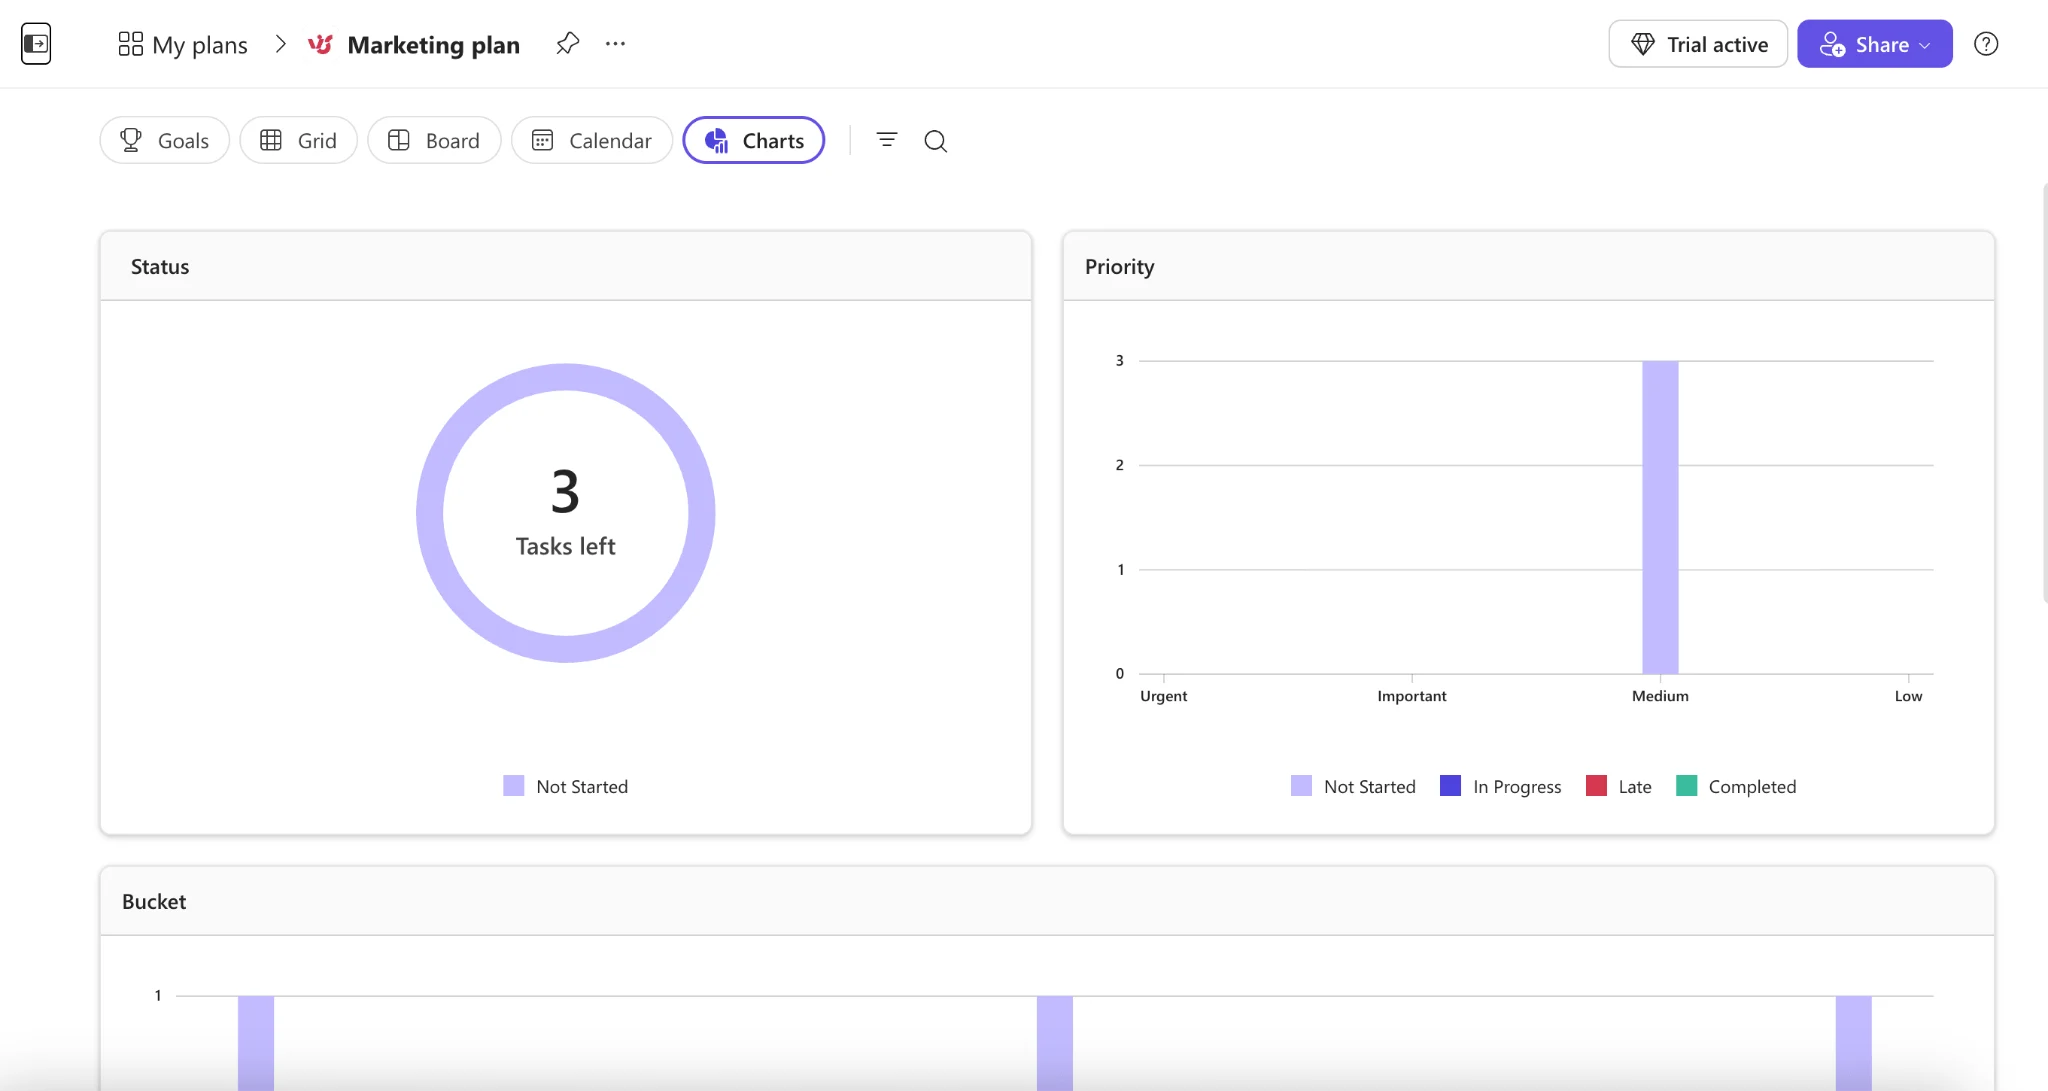
Pic. 11. Navigating to and exploring the Charts view.
- Schedule view: see tasks on a calendar to track deadlines.
Filtering and grouping
Click Filters to narrow tasks by due date, priority, progress, labels, bucket, or assignment (Clear all to reset).
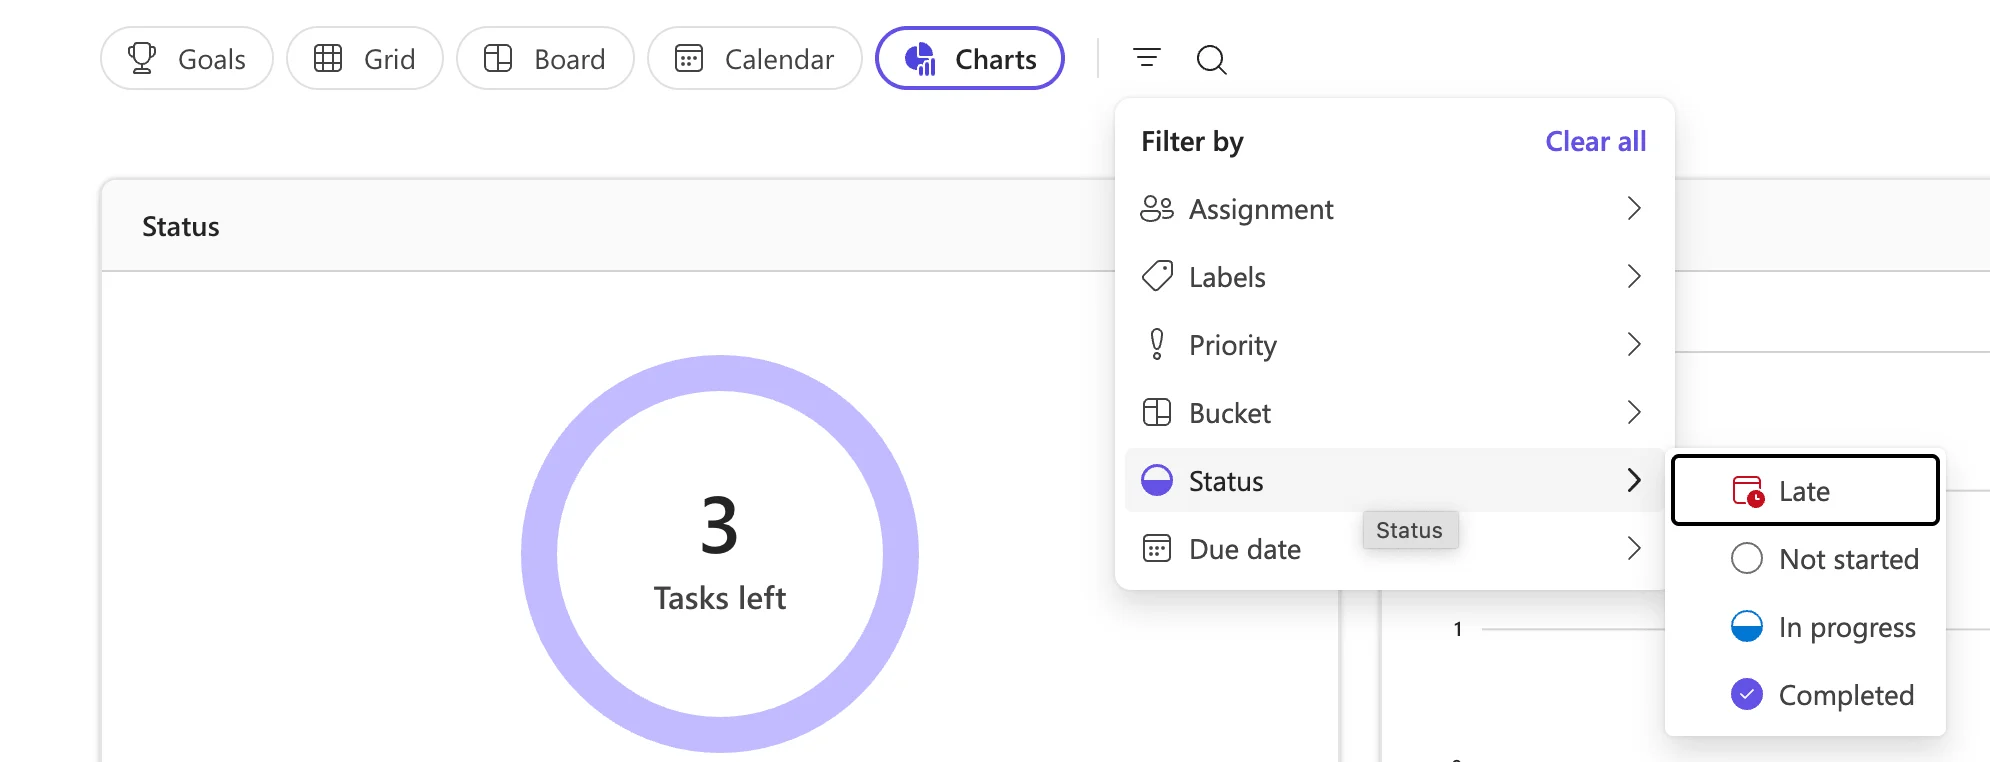
Pic. 12. Filtering your tasks.
Use Group by to organize the board by bucket, assignee, progress, due date, priority, or labels.
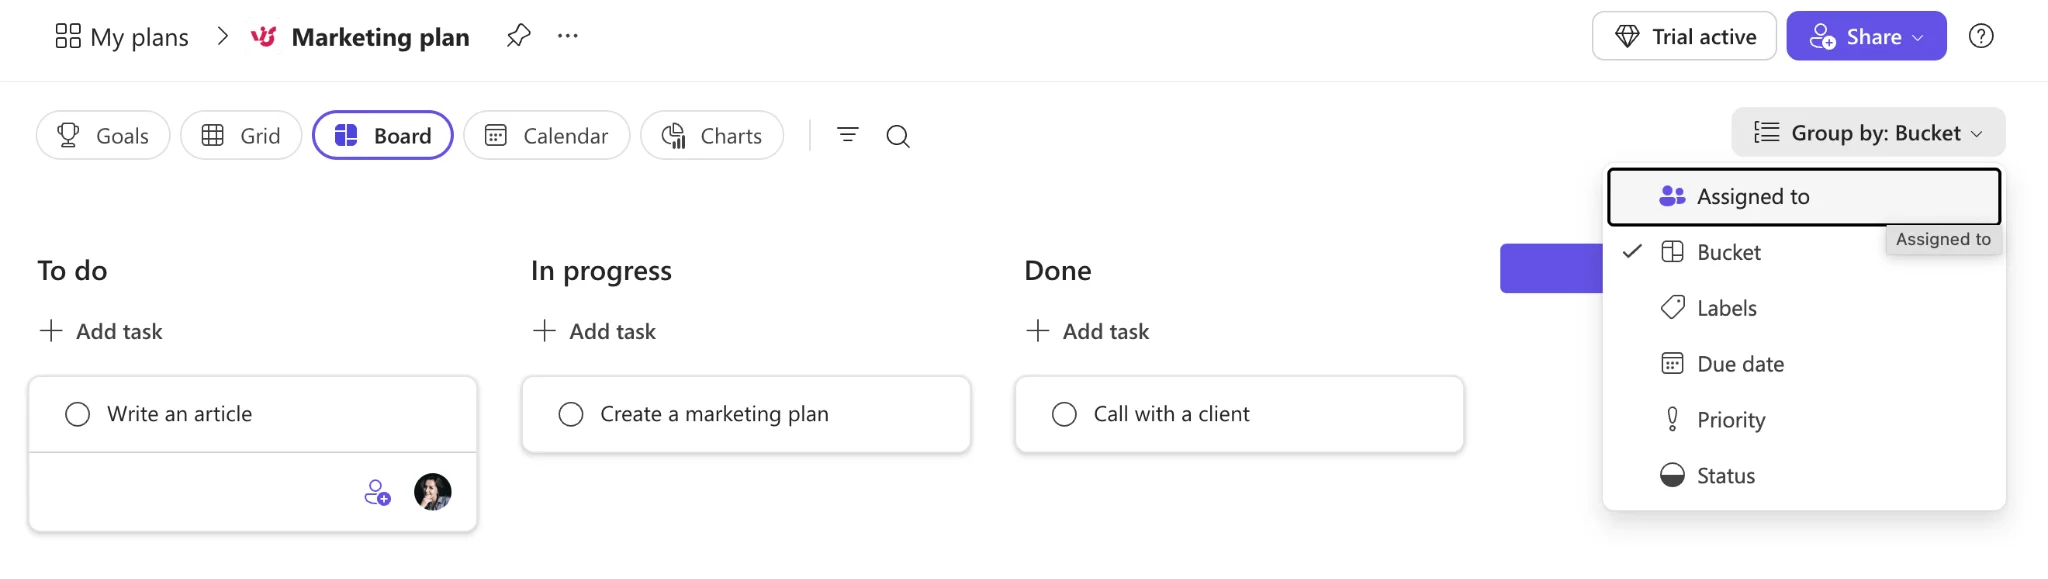
Pic. 13. Grouping tasks by bucket or other criteria.
Adding more task details
Open a task to add start/due dates, priority (Low, Medium, Important, Urgent), notes, checklists for subtasks, attachments, and comments.
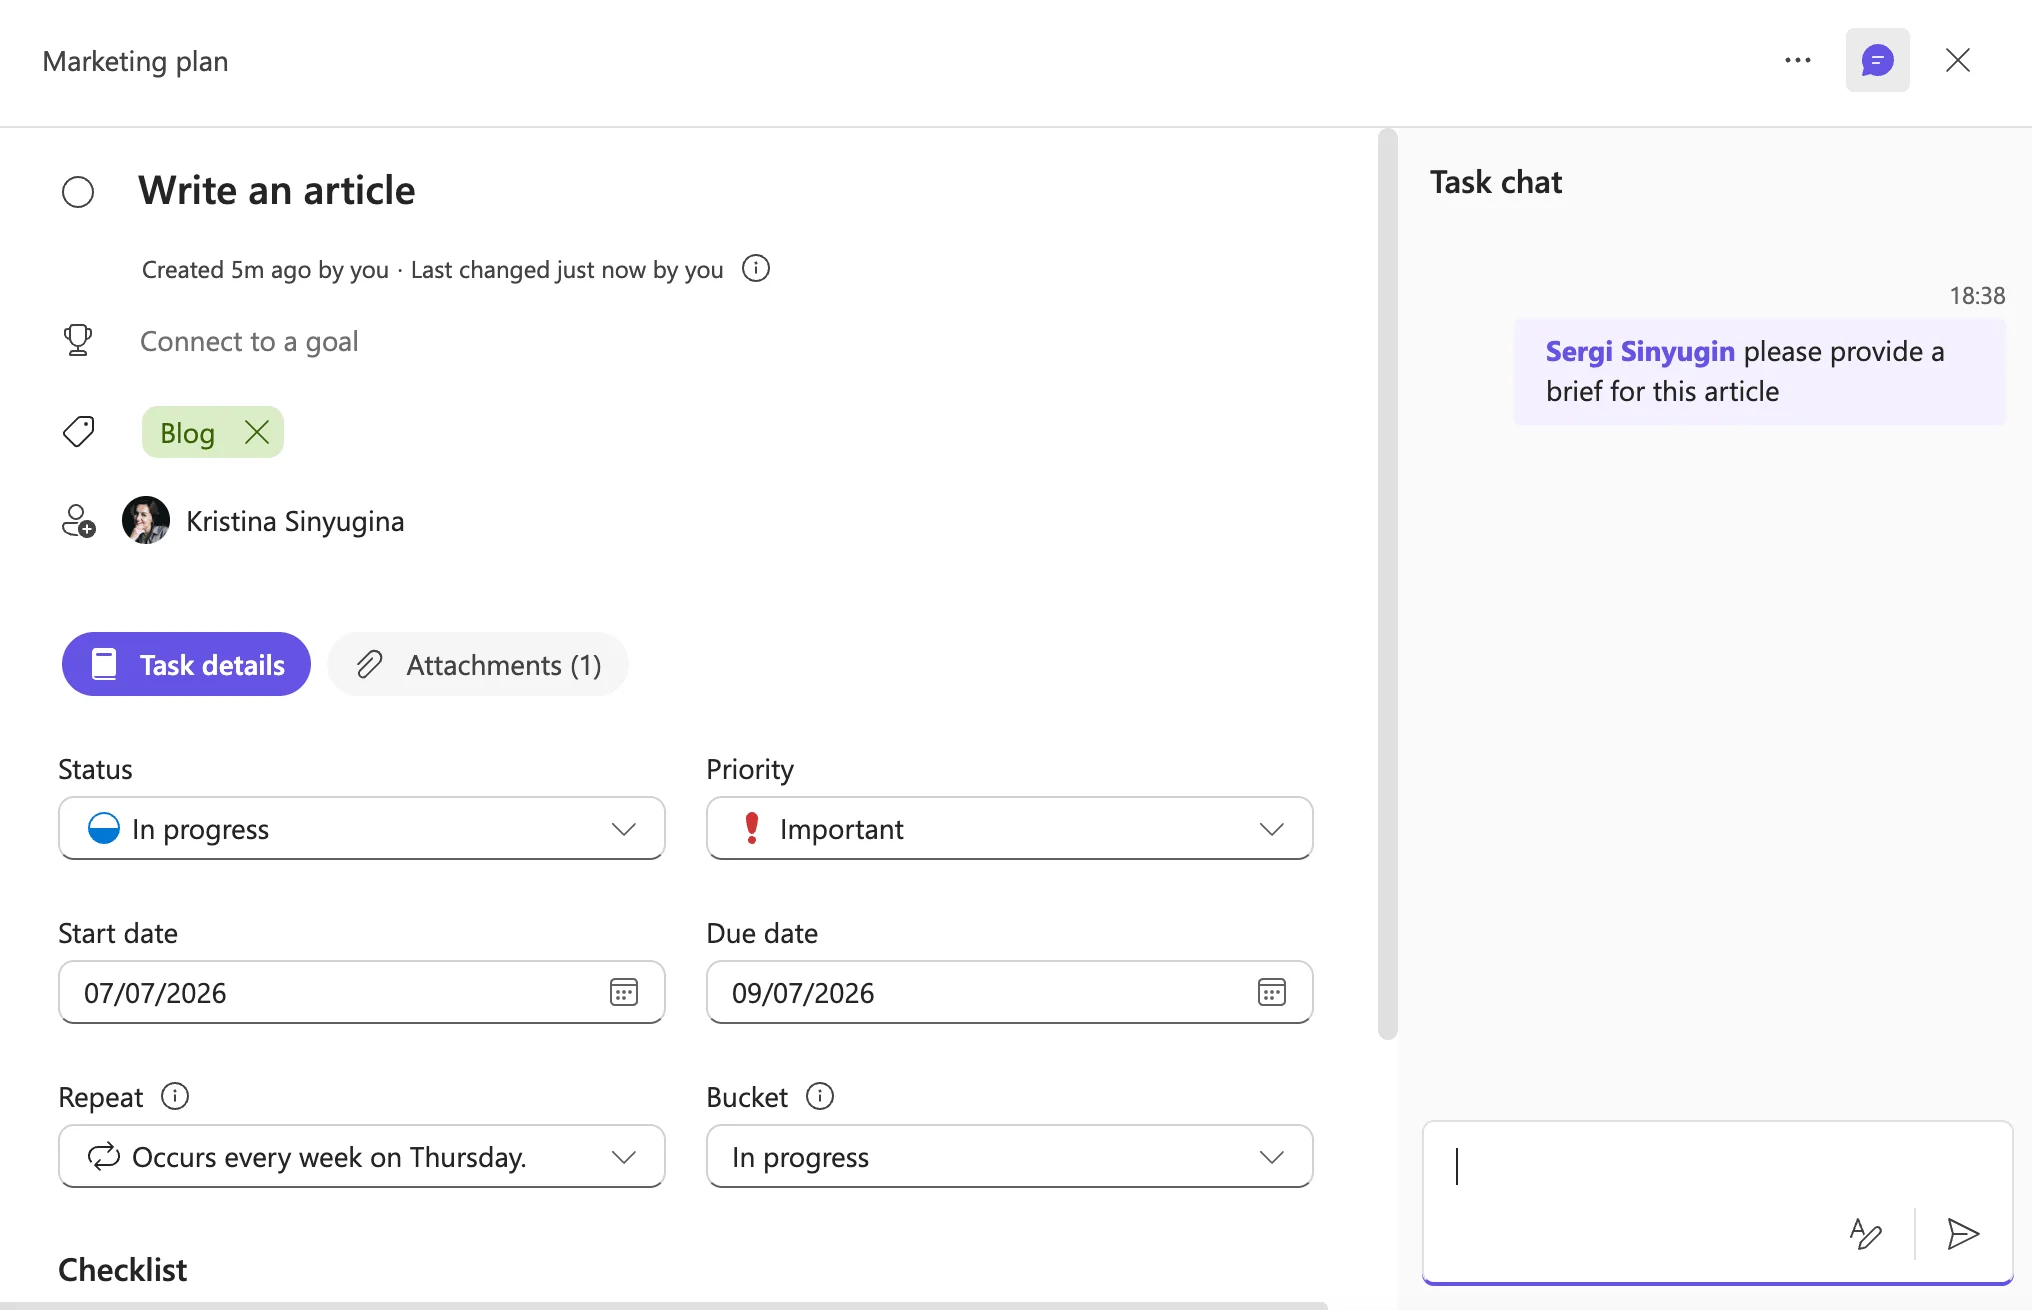
Pic. 14. Adding more details to your task card.
Notifications and alerts
Planner sends alerts about task assignments, due dates, and updates to your Teams activity feed and by email. To configure them, open the Planner app, click the Settings gear in the top-right corner, and select Notifications — then choose which alerts to receive and save. Note that inside Teams these options are limited; for the full set of notification settings, open Planner on the web at tasks.office.com. Also keep in mind the updated Task chat (which replaced Comments): notifications for task discussions are now sent only to people who are @mentioned in the task.
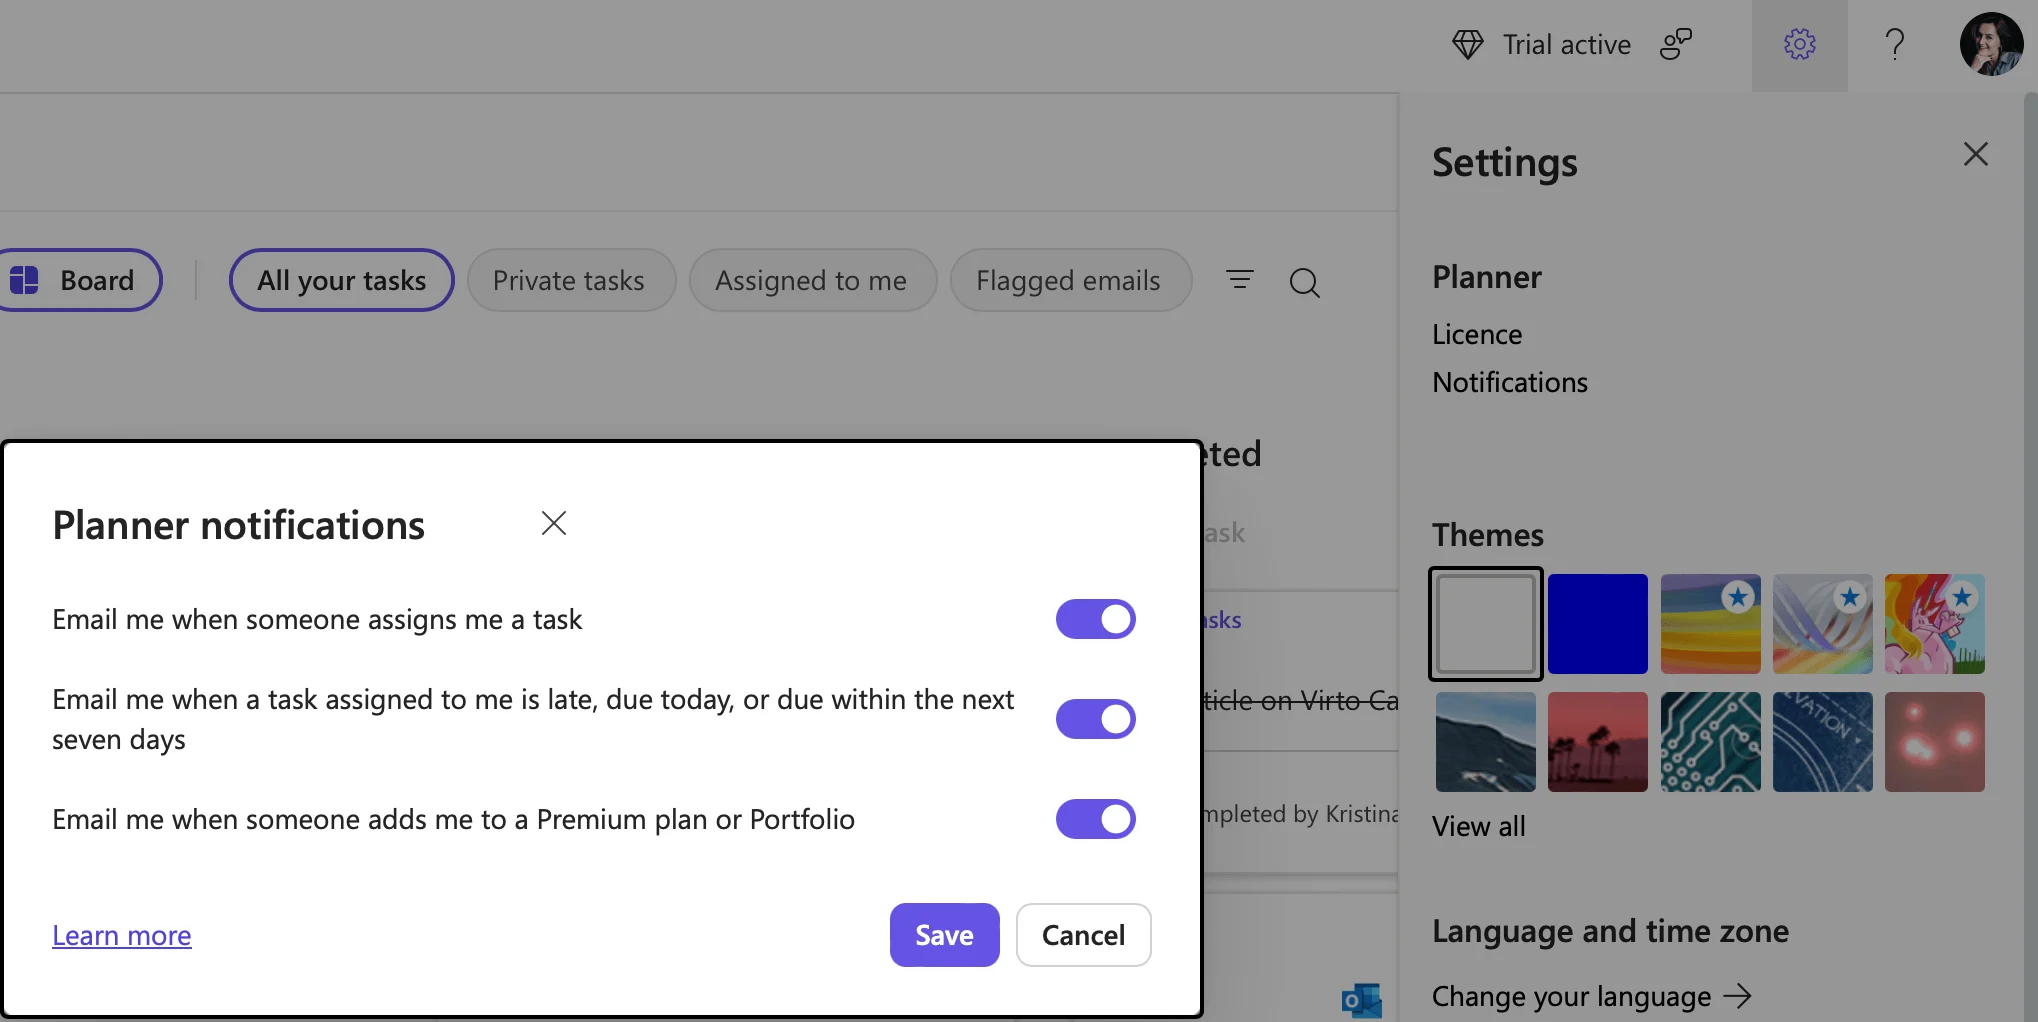
Pic. 15. Adjusting notifications for the Planner.
👉 How do I use Planner in Teams? Add Planner as a tab in a channel or open it from the left-hand navigation, then create a new plan or link an existing one. Tasks live on customizable boards organized into buckets; you can assign them, set due dates, add checklists, attach files, and switch to schedule or chart views to track progress — all alongside Teams conversations and file sharing.
Tips for effective task management
- Use labels (color-coded) to categorize tasks by department, priority, or type.
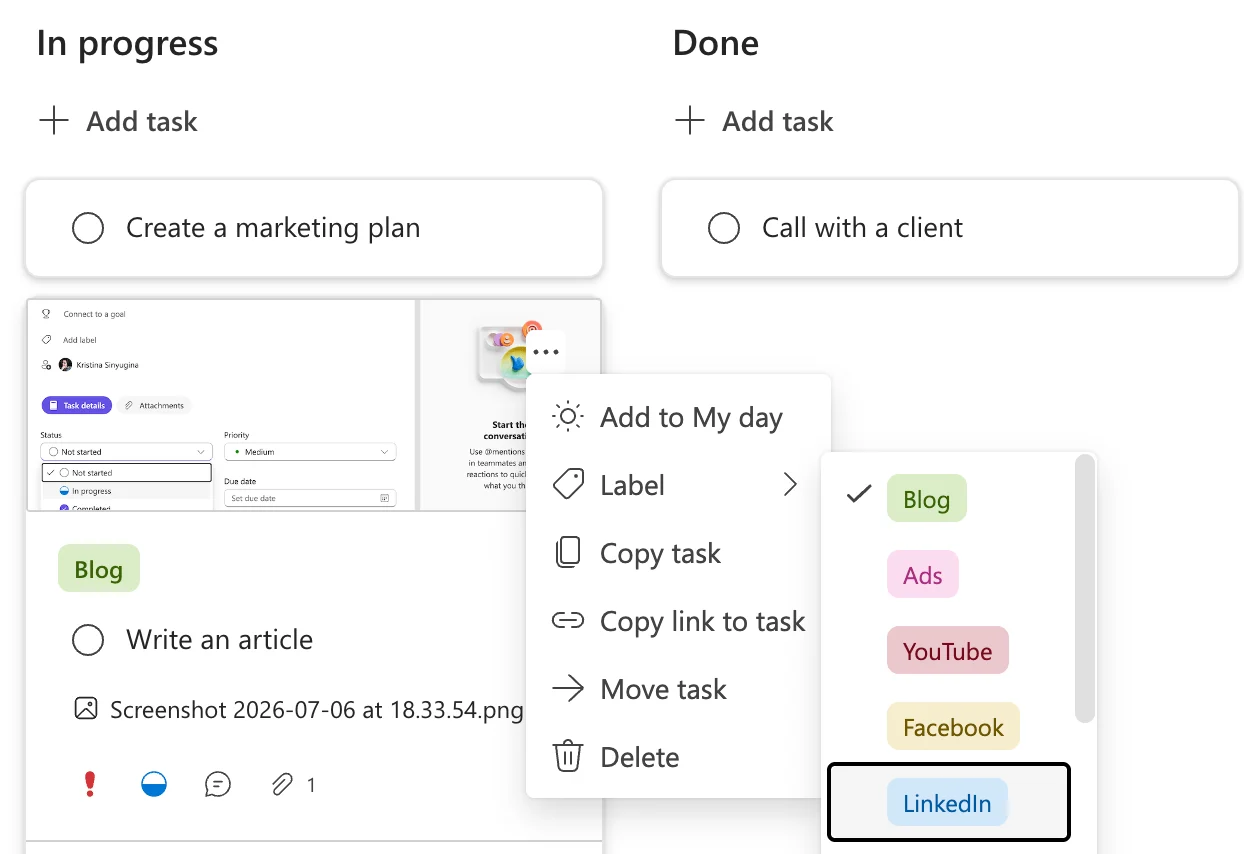
Pic. 16. Changing a label within a task.
- Leverage My Tasks to see everything assigned to you across plans; filter by priority or due date.
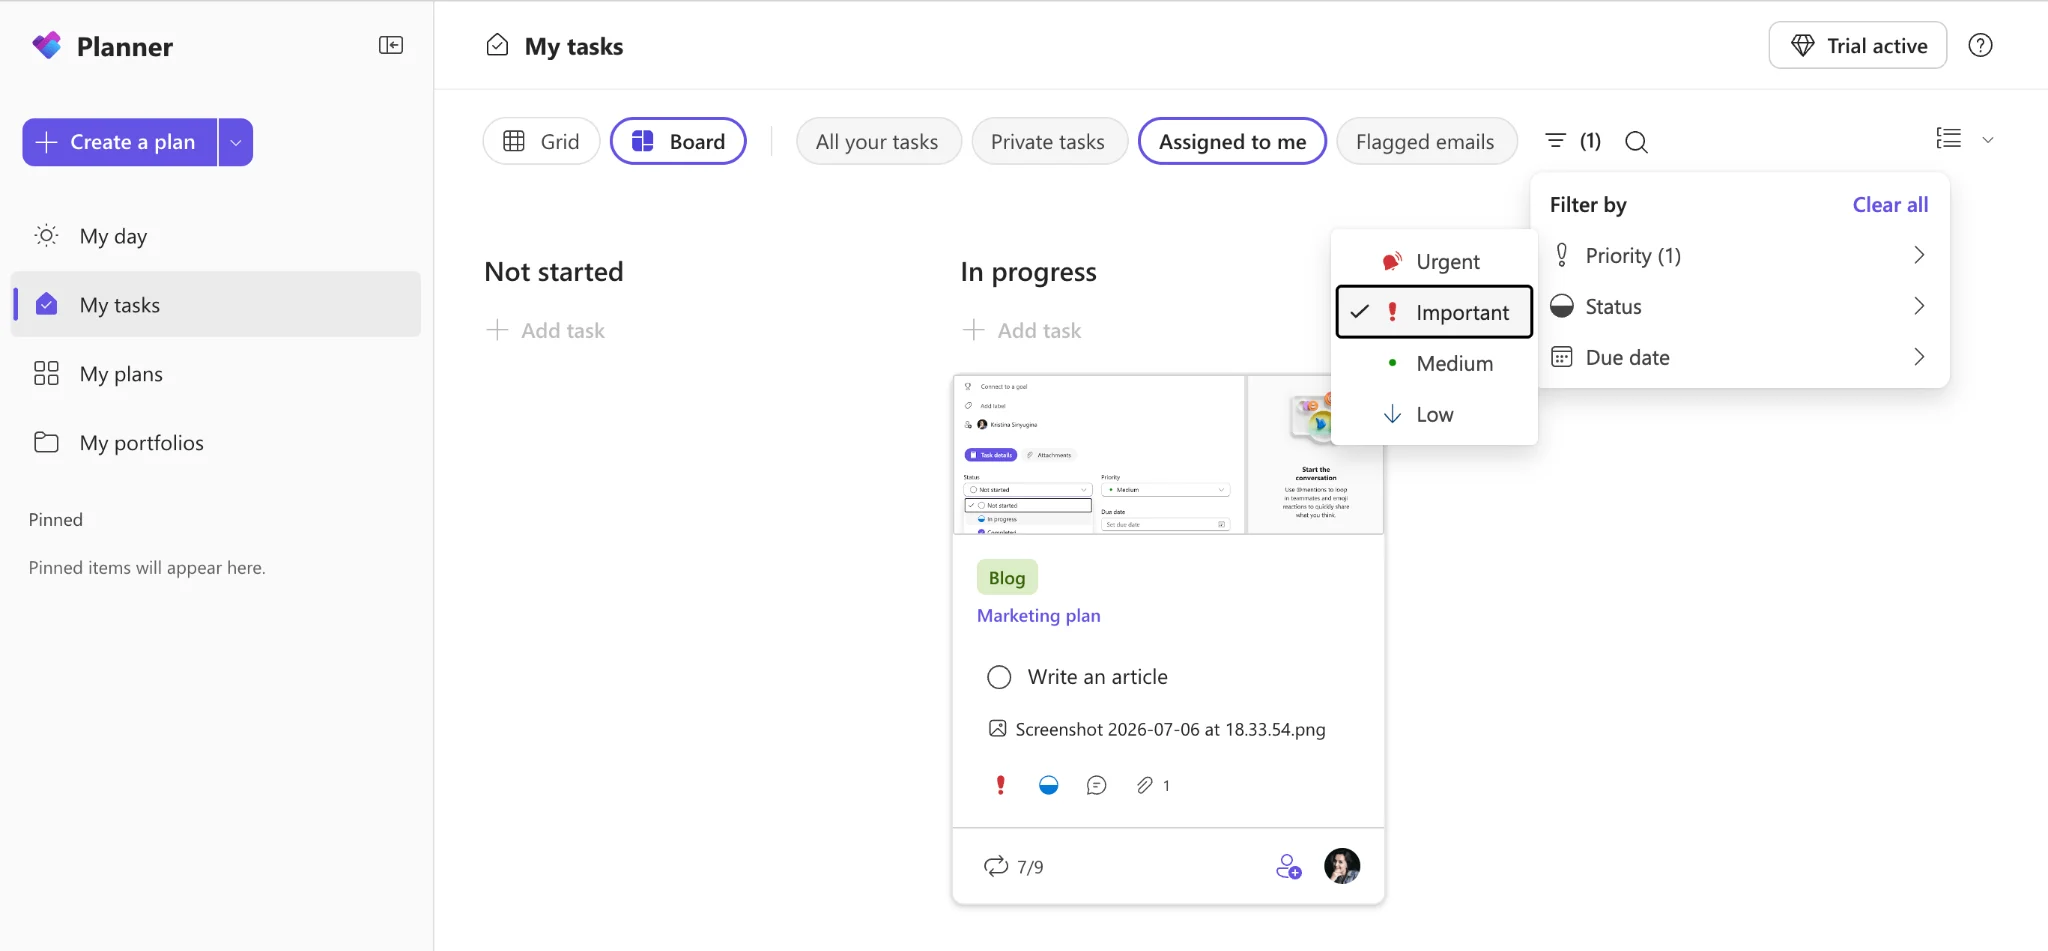
Pic. 17. Navigating to My Tasks and sorting through tasks by priority.
- Collaborate in real time using comments and file attachments on tasks.
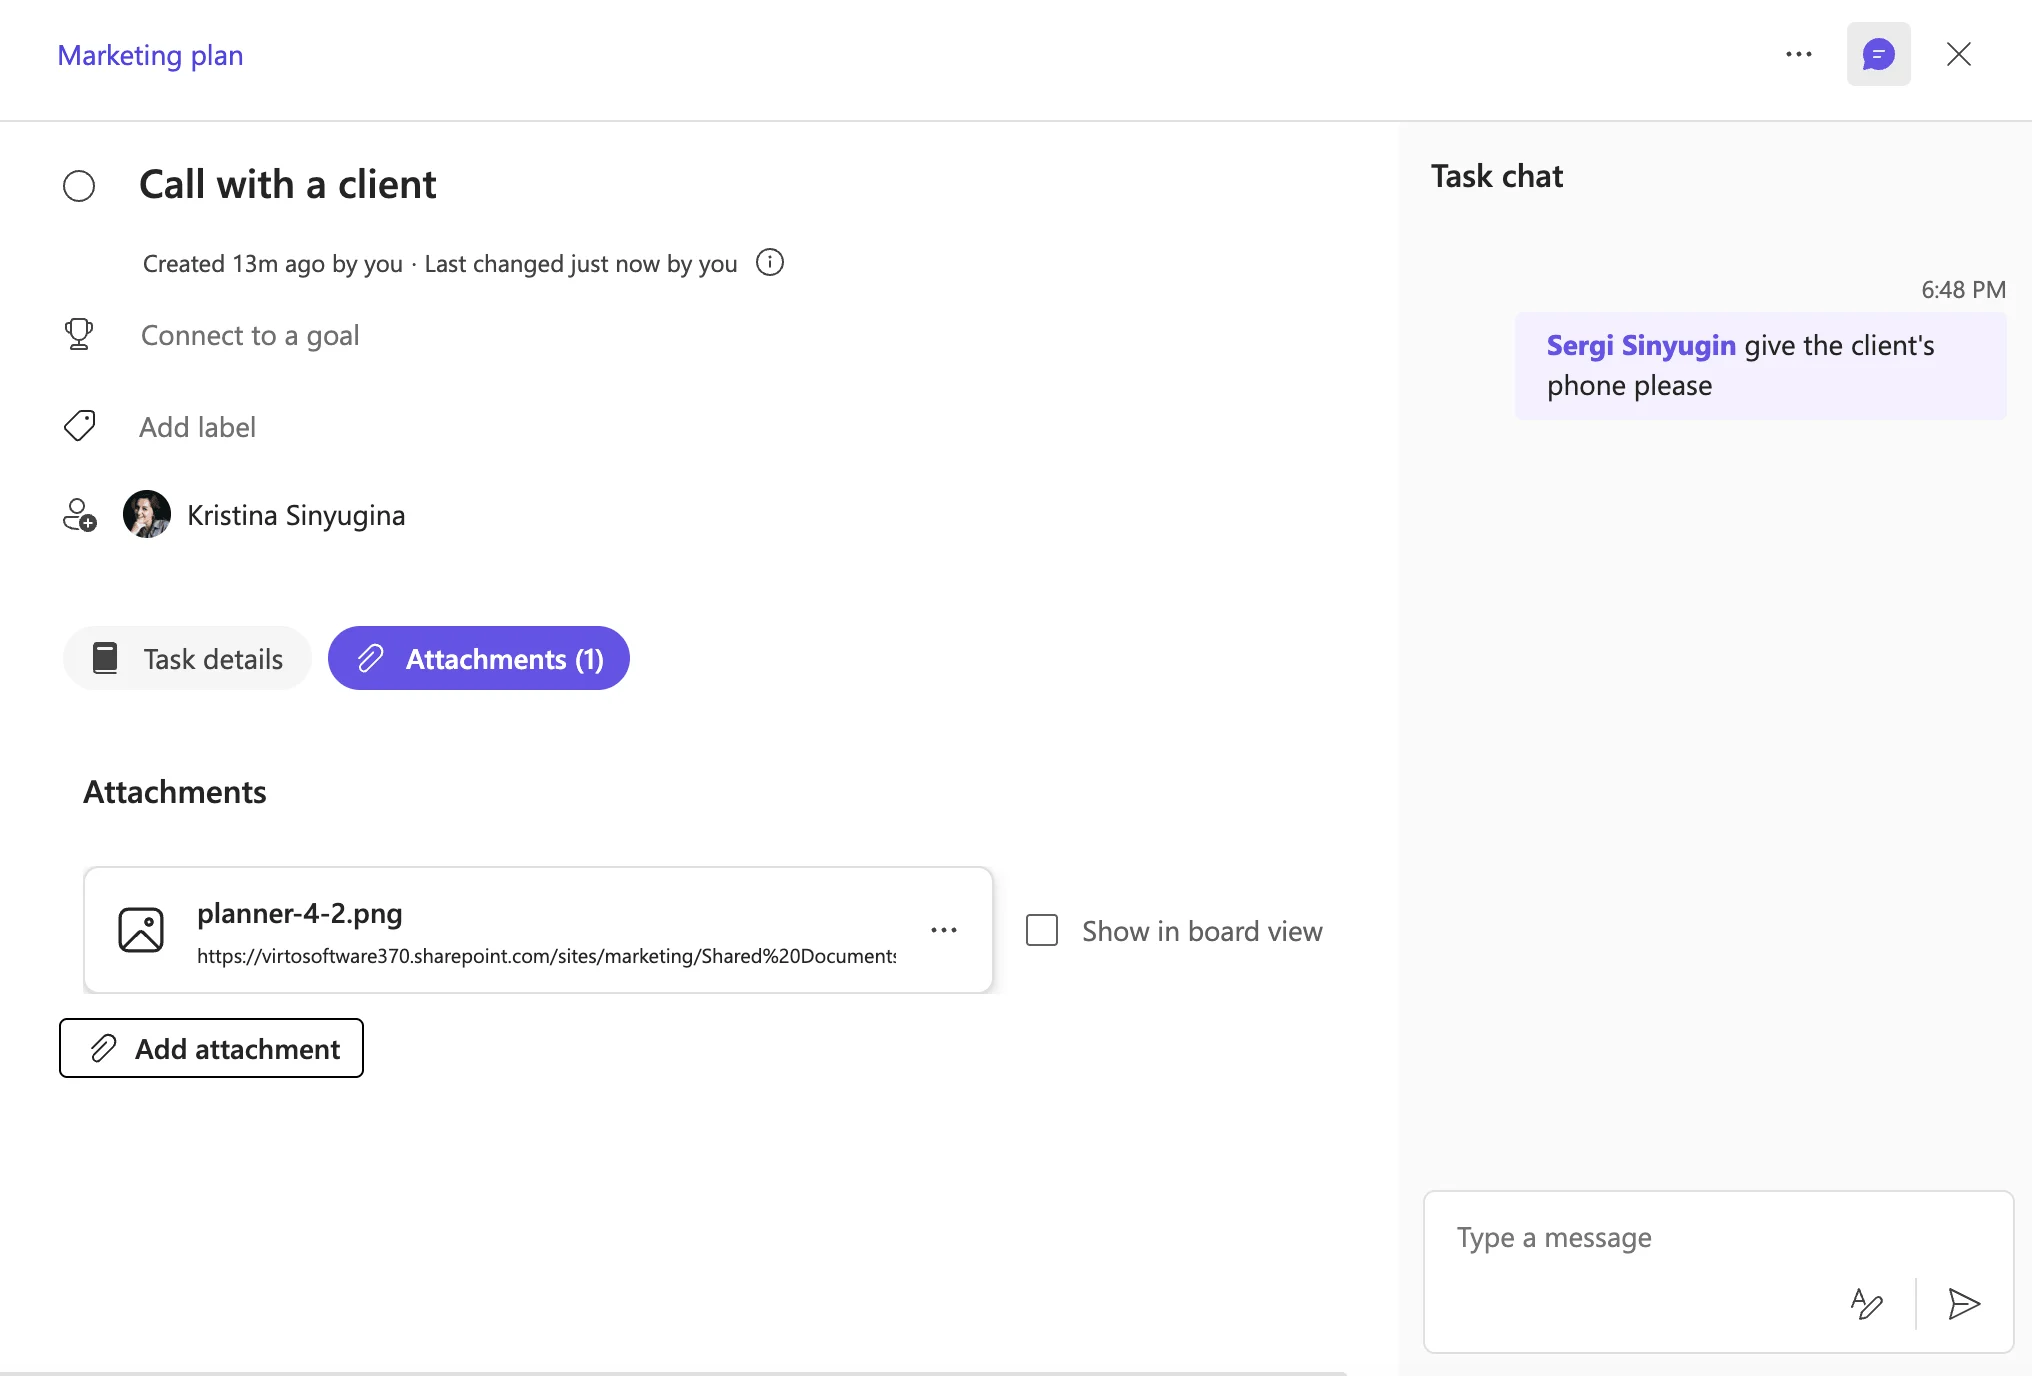
Pic. 18. Attaching documents and leaving comments to a task.
- Update progress regularly so statuses and checklists stay accurate.
- Review the Charts view to monitor workload and spot bottlenecks.
Teams Planner Use Cases by Team Type
Planner adapts to different departments and workflows. Here’s how three common team types put it to work.
Marketing teams
- Project management: create buckets for each campaign phase (brainstorming, content, distribution, analysis) and assign tasks with deadlines.
- Deadlines and control: use Schedule view for milestones, priority labels for critical work, and Charts view to catch overdue or unassigned tasks.
- Tips: build template plans for recurring launches, tag tasks by campaign type, and attach assets directly to tasks.
Development teams
- Sprint management: mirror sprint cycles with buckets like Backlog, In Progress, Testing, Done, and set start/due dates.
- Backlog and priorities: keep a backlog bucket, use High/Medium/Low labels, and pull tasks into sprints during planning.
- Tips: use checklists for coding/testing/deployment steps and the Comments section to document issues.
HR teams
- Recruitment and onboarding: track stages with buckets (Applications Received, Interviews Scheduled, Offers Sent) and build reusable onboarding plans.
- Training and development: plan programs with buckets for prep, sessions, and follow-ups; label by topic.
- Tips: create an onboarding template, track progress in Charts view, and attach offer letters or manuals to tasks.
Benefits and Limits of Planner in Teams
Benefits
- Native Teams integration — manage and discuss tasks without leaving Teams, with automatic sync.
- Ease of use — an intuitive drag-and-drop interface with little training needed.
- Visual task tracking — Kanban boards, grouping, and color-coded labels.
- Real-time collaboration — shared plans, comments, and attachments.
- Time management — built-in reminders and calendar sync.
- Included with Microsoft 365 — no extra cost for subscribers.
- Mobile access, versatility, security, and cross-app sync with Outlook, SharePoint, and To Do.
👉 Is Planner free in Teams? Basic Planner is included with most Microsoft 365 business plans at no extra cost. It isn’t available in the free version of Teams, and advanced features require Planner Premium.
Limitations
- Limited automation and customizable workflows — no conditional triggers or complex dependencies.
- Basic analytics and filters — detailed reporting often needs Power BI.
- Simplified Kanban — advanced metrics and task tracking are missing.
- Requires a Microsoft 365 subscription.
- Limited scalability for very large or complex projects.
- Limited data export, no nested subtasks or task dependencies, basic notifications, and minimal UI customization.
For larger or more complex projects, teams often step up to a dedicated tool. That’s where the Virto Kanban Board App comes in.
A More Advanced Kanban in Teams: Virto Kanban Board App
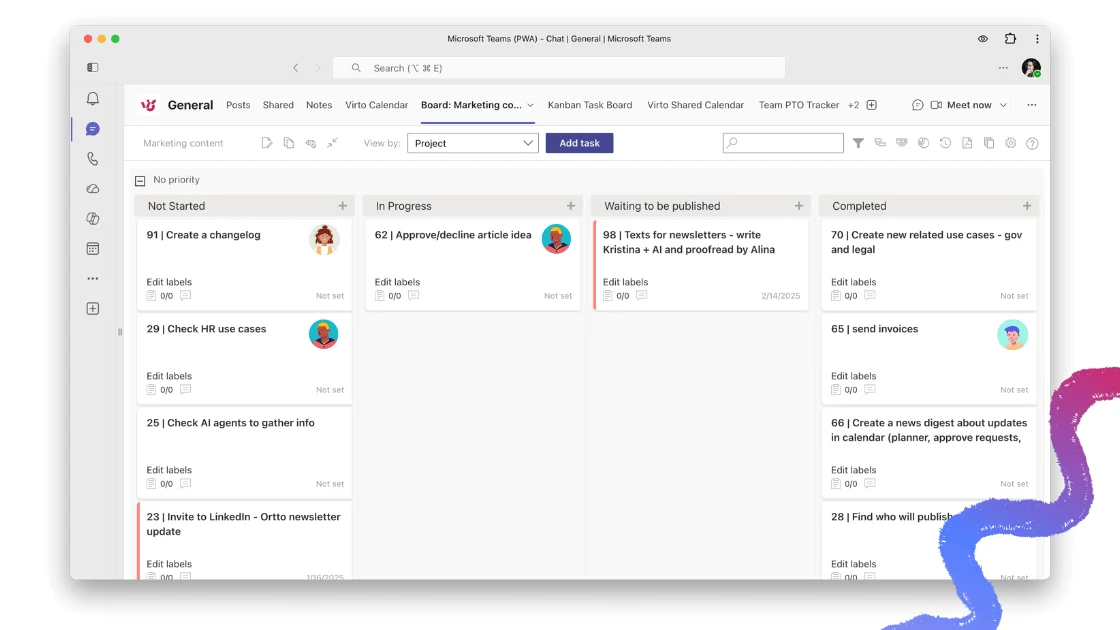
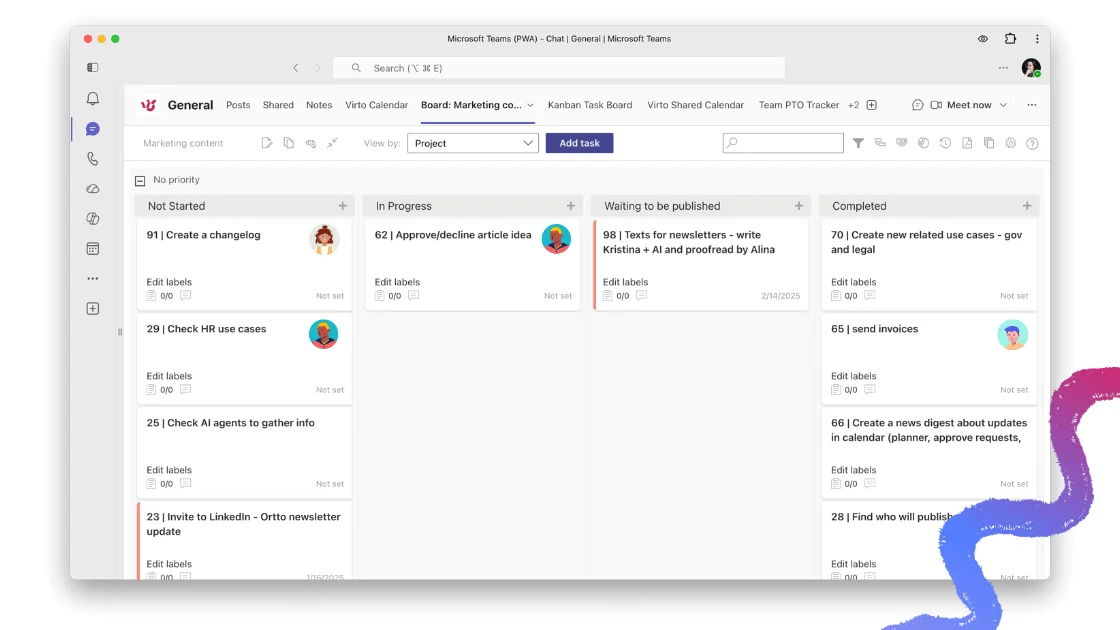
Pic. 20. Sample Virto Kanban Board.
The Virto Kanban Board App is a task and project management solution built for more demanding workflows. It integrates with Microsoft Teams and SharePoint and adds customizable task cards, advanced reporting, and process automation on top of a familiar Kanban board.
Key capabilities
- Customizable cards and columns — add fields like deadlines, assignees, and progress; configure columns and swimlanes to your workflow.
- Teams and Microsoft 365 integration — manage tasks in Teams and use SharePoint lists as a data source.
- Analytics and reports — monitor performance, spot bottlenecks, and track progress with visual metrics and capacity tools.
Advantages over Planner
- More flexible settings — fully customizable cards, columns, and swimlanes.
- Built for large teams — handles high task/user volumes with capacity management.
- Custom workflows — automated rules for status changes and notifications.
- Advanced reporting — dashboards and metrics like velocity and completion rates.
- Cross-platform — Teams web, desktop, and mobile.
- SharePoint integration — display SharePoint lists as Kanban boards.
You can schedule a quick demo or start a 30-day free trial of the Virto Kanban Board App to test it. VirtoSoftware also offers the Virto Calendar App, which now integrates more deeply with Microsoft Planner — letting you manage Planner buckets and edit labels directly from the calendar view.
FAQ
👉 How do I add Planner to a Teams channel? In the channel, click + to add a tab, choose the Planner app, create a new plan or attach an existing one, and save. The board then lives as a tab for the whole channel.
👉 Is Planner free in Teams? Basic Planner is included with most Microsoft 365 business plans at no extra cost, but it isn’t available in the free version of Teams. Advanced features require Planner Premium.
Conclusion
Microsoft Teams Planner is a versatile, user-friendly tool for basic task and project management, with seamless Teams integration that makes it a natural fit for organizations already on Microsoft 365. For smaller projects and straightforward workflows it’s an excellent choice — though limited customization, scalability, and analytics can make it less suited to complex team structures.
For teams that need advanced functionality — customizable workflows, detailed reporting, and automation — the Virto Kanban Board App is a powerful alternative that keeps you collaborating inside Teams while scaling to bigger projects.
Related reading: