


Short answer: an Outlook connector links Outlook to another app or service — for example Power Automate, a calendar, or a data source — so information flows into your inbox or calendar automatically. In Microsoft 365 today this means Power Automate connectors for Office 365 Outlook (work or school) and Outlook.com (personal): you build them in Power Automate or Teams Workflows, not in Outlook’s own settings.
Microsoft Outlook has grown from an email client into a daily control panel. Most people open it first thing to check mail, accept calendar invites, scan deadlines, and act on notifications. Because so much work already flows through Outlook, it makes sense to let it pull in updates from other tools and push timely actions back out—without constant copying, pasting, or app-switching.
That’s where “Outlook connectors” come in. In Microsoft’s current terminology, this usually means Power Automate connectors for Outlook: prebuilt building blocks that let you create automated workflows using Office 365 Outlook (work or school) or Outlook.com (personal). You set them up in Power Automate or in Teams Workflows, not inside Outlook’s settings. Each connector exposes triggers (events like “when a new email arrives” or “when an event is created”) and actions (do something, such as “create a calendar event,” “send an email,” or “update a contact”), so information can move between Outlook and your other apps with clear, predictable rules.
Many administrators and users have heard the term “Outlook connector” but aren’t sure what it actually does, how it’s different from older “connectors” they may remember in Outlook or Teams, or how to configure it correctly today. This article clears that up. We’ll explain what Outlook connectors are in 2026, why they’re useful, how they work at a practical level, and the right way to set them up—plus the design choices that keep your automations reliable and maintainable over time.
Who will benefit:
- Microsoft 365 administrators who need dependable, policy-friendly integrations.
- IT professionals who want to standardize how Outlook talks to other systems.
- Power users who want to cut busywork by automating common Outlook tasks.
Finally, we’ll show how Virto Calendar App for Microsoft 365 and Virto Calendar App for Microsoft Teams extend calendar and notification capabilities alongside these Outlook connectors. Virto Calendar overlays calendars from Exchange/Outlook, SharePoint, Planner, and iCal, and it works neatly with flows you build in Power Automate—so you get richer calendar views and handy updates in Outlook and Teams without rebuilding how people already work.
What Is an Outlook Connector, and How Does It Work?
As mentioned, when people say “Outlook connector” or “Microsoft Office Outlook connector” in 2026, they almost always mean the Power Automate connectors for Outlook that let you build flows using Office 365 Outlook (work/school) or Outlook.com (personal). You create these flows in Power Automate or Teams Workflows, not inside Outlook’s own settings. Each connector exposes triggers (events that start a flow, like “new email arrives” or “event created”) and actions (what to do, like “send an email,” “create a calendar event,” “update a contact”).
| Term you’ll see | What it refers to in 2026 | Where you configure it | Supported today? |
|---|---|---|---|
| Outlook connector | Power Automate connectors for Office 365 Outlook/Outlook.com | Power Automate / Teams Workflows | ✅ Yes |
| Connectors for Groups (Outlook) | Posts into Microsoft 365 Group mailboxes | Outlook (retired UI) | ❌ Retired (2024) |
| Office 365 connectors (Teams) | Legacy incoming connectors in Teams | Teams (legacy) | ❌ Retired (May 2026) — use Workflows |
Fig.1. Connector terminology snapshot (2026).
What is an Outlook connector?
Historically, Outlook had “connectors for Microsoft 365 Groups” that posted updates into group mailboxes. Microsoft retired those in August–September 2024, so you can’t configure or rely on them anymore. If your mental model is “connectors show cards in Outlook Groups,” update it—today the supported pattern is Power Automate flows and, for interactive emails, Actionable Messages.
💡 Learn more about Outlook connectors and what replaces them from official sources:
- Connectors for Groups in Outlook are no longer available - Microsoft Support
- Overview of using Outlook and Power Automate
Separately, Office 365 connectors in Microsoft Teams have now been fully retired. After several deadline extensions, Microsoft permanently disabled them in a rollout that ran 18–22 May 2026. Any remaining webhook-based integrations must be rebuilt on Teams Workflows (Power Automate) or Microsoft Graph. If you still have legacy Teams connectors in your tenant, they have already stopped posting — migrating them is now a remediation task, not a planning one. Our Office 365 connectors guide covers the retirement timeline and the Workflows replacement step by step.
💡 Learn more about the retirement of Office 365 connectors in Microsoft Teams from official sources: Retirement of Office 365 connectors within Microsoft Teams
How an Outlook connector delivers notifications and updates
At a high level, a Power Automate flow acts as a safe, governed bridge between systems:
- Listen — A trigger watches an app or data source (e.g., Trello board, SharePoint list, or Outlook mailbox).
- Decide — The flow evaluates conditions and composes the payload you want.
- Act — Outlook actions send an email, create or update a calendar event, add a contact, or post elsewhere.
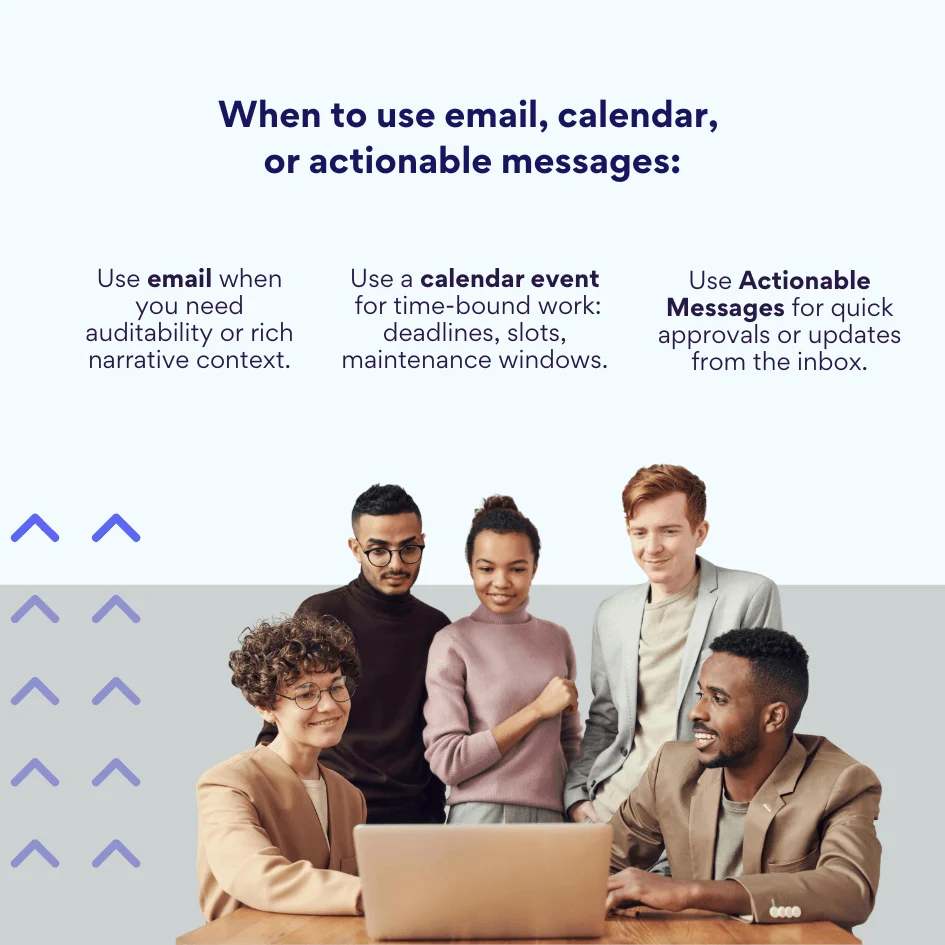
Pic. 1. When to use email, calendar, or actionable messages.
For interactive emails, Outlook supports Actionable Messages—emails that render Adaptive Cards so users can approve, comment, or take an action without leaving their inbox. Use this when you want a “notification + quick action” experience.
💡 Learn more about actionable messages and adaptive cards:
- https://learn.microsoft.com/en-us/outlook/actionable-messages/get-started
- https://learn.microsoft.com/en-us/outlook/actionable-messages/adaptive-card
📍 Important reliability note: Flows can automate both directions—for example, create Outlook events from another app and also post back updates—but they’re not a live database sync. Timing depends on triggers and platform limits (e.g., throttling, recipient/message limits in Exchange Online). Build with retries and backoffs rather than promising “real-time.” Learn more here & here.
Operating principle
To set the context, here’s a quick then-versus-now. The legacy Groups-based connector pattern is retired; the supported approach is Power Automate flows and, when you need interactivity, Actionable Messages:
- Old model (now retired): external service → webhook → Outlook Groups connector → cards in group mailbox. (No longer supported.)
- Current model: external service → connector wraps its API → Power Automate flow → Outlook actions (send mail, create event, etc.) or Actionable Messages for in-mail interactivity. Calendars are affected by creating/updating events, not by “displaying inside Groups.”
| Area | Legacy Groups connectors (retired) | Current approach (Power Automate / Workflows) |
|---|---|---|
| Ingestion | Webhooks posting to Group mailbox | Connector triggers (Planner, SharePoint, Outlook, etc.) |
| Processing | Minimal—display a card | Full flow logic: conditions, approvals, branching |
| Delivery to Outlook | Card in Group mailbox | Email, calendar event, contact update, Actionable Message |
| Interactivity | Limited | Actionable Messages (Adaptive Cards) |
| Status | Retired 2024 | Fully supported |
Fig.2. Then vs now: operating flow.
Built-in and third-party sources
You’ll find first-party connectors for SharePoint, Planner, Teams and many third-party ones like Trello, GitHub, and Asana—so Outlook can react to work happening across your stack.
💡 Learn more here:
- Connector reference overview | Microsoft Learn
- Trello - Connectors | Microsoft Learn
- Asana - Connectors | Microsoft Learn
- GitHub - Connectors | Microsoft Learn
Typical scenarios (quick ideas you can actually ship)
What follows are practical, low-friction patterns you can adapt. Treat them as starting points—swap in your apps, add conditions, and align the actions with your policies.
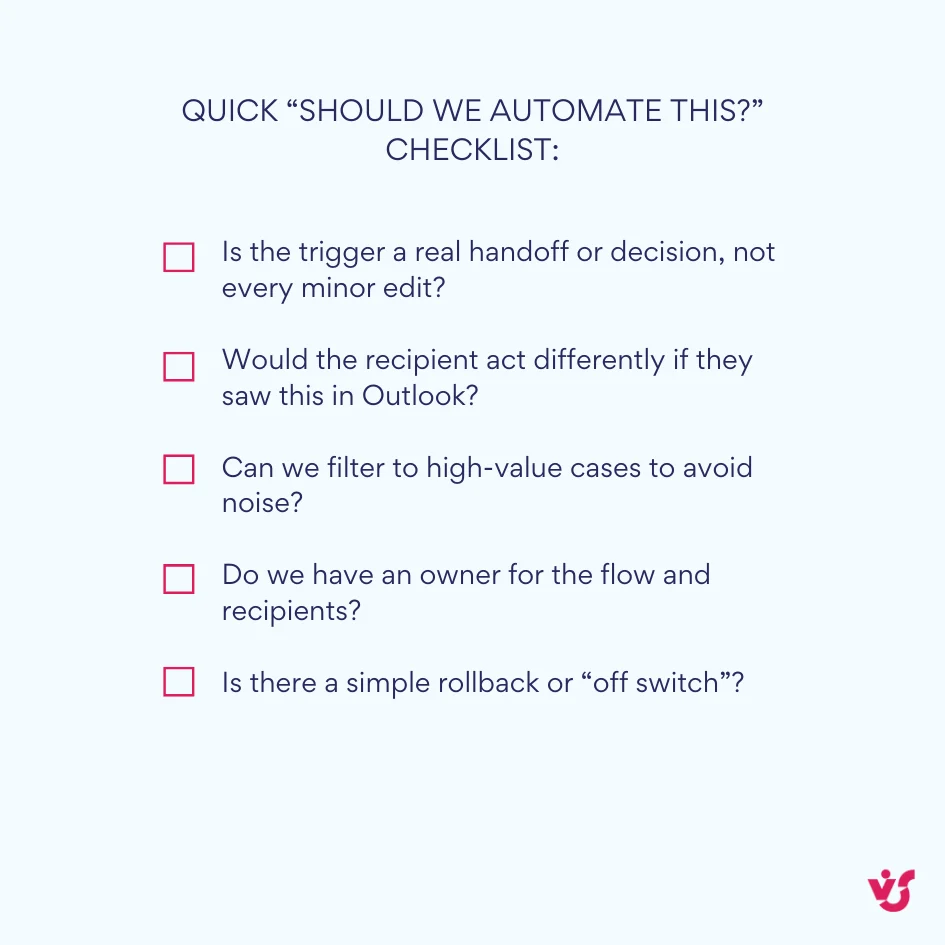
Pic. 2. Quick “Should we automate this?” checklist.
- Task updates to inbox: When a Trello card or Asana task is assigned or moved to “Ready,” send an Outlook Actionable Message that lets the assignee acknowledge or add a due date.
- Auto-create calendar reminders: When a project milestone is added in SharePoint or Planner, the flow creates an Outlook event. That event then appears in your standard Outlook calendar and in Virto Calendar as part of a unified, color-coded overlay.
- Project status to Outlook: When a SharePoint list item changes state or a GitHub release is published, send a summary email to a distribution list—use throttling-friendly batching if volumes are high.
Where connectors shine
Connectors are especially useful in Microsoft 365 enterprises where many departments and systems interact. They let IT create repeatable, governed automations that meet compliance needs while giving teams faster, consistent updates in the tools they already use—Outlook, Teams, and SharePoint.
And when you need richer calendar views, Virto Calendar for Microsoft 365/Teams overlays Exchange/Outlook, SharePoint, Planner, and iCal feeds so users see everything in one place while your flows keep those events up to date.
Coming next: we’ll map the key benefits and constraints—what’s easy, what to watch for, and how to design flows that don’t break under load.
Outlook Connector Features and Benefits
Think of “Outlook connectors” as the glue that moves information into email and calendars at the right time, and sends structured updates back out when needed.
What is an app connector and do I need it?
An Outlook connector integrates Outlook with other systems so you can acquire, route, and process data automatically. Instead of polling apps or copying information by hand, a flow watches for events, evaluates simple rules, and performs the next step in Outlook (or elsewhere) for you.
An app connector is a prebuilt, governed bridge between Outlook and another service. You don’t have to write code; you compose triggers and actions in Power Automate or Teams Workflows. You need one if you’re repeating the same Outlook tasks, want consistent notifications, or want updates to land in calendars and mailboxes without relying on people to remember.
Outlook connector tasks
Key tasks the Outlook connector solves
- Receive automatic notifications from external applications—Planner, Jira, the Virto Calendar App, SharePoint, GitHub—directly into Outlook (email) or by creating calendar events when milestones change.
- Create events, reminders, and tasks based on data from connected systems—for example, turn a Planner due date or a SharePoint milestone into an Outlook calendar event.
- Keep information aligned across Microsoft 365—build flows in both directions to mirror key updates between Outlook, Teams, and other services. This isn’t a live database sync; timing depends on triggers and platform limits.
- Centralize communications so users see essential updates and statuses in one familiar place—Outlook—without constant app-switching.
- Trigger automatic reactions when something changes elsewhere (e.g., send an email when a task moves to “Blocked,” or add a comment when an approval is recorded).
- Save time and reduce manual work by standardizing repetitive steps and eliminating “did anyone see this?” moments.
📌 Why this is especially effective in Microsoft 365: The connectors sit inside the same security, identity, and compliance boundary as Outlook. That makes it straightforward to link Teams, Planner, SharePoint, and the Virto Calendar App into one ecosystem where updates are consistent and auditable.
💡 Learn more about Outlook in our dedicated articles:
- Share Your Outlook Calendar in Easy Steps
- Merging and Managing Multiple Calendars: Simplified Steps for Google & Outlook
- Creating and Managing Group Calendars in Outlook: The Full Guide
- A Complete Guide to Viewing and Booking Someone’s Calendar in Outlook
- Protect Your Outlook Calendar Privacy: An Expert Guide
Benefits of using outlook connectors
Connectors do more than automate clicks. They raise visibility and help teams act faster with fewer mistakes.
- Centralized information: Events, notifications, and status changes land in Outlook where people already work. That reduces scattered updates and improves the experience for busy inboxes and calendars.
- Workflow automation: Routine steps—create events, send notifications, update statuses—run hands-off, the same way every time.
- Faster communication and decisions: Relevant data shows up quickly where it’s needed. People get prompts in context (inbox or calendar) and can respond without hunting for links.
- Better cross-team collaboration: Everyone sees the same source of truth at the same time, which helps projects move without back-and-forth.
- Transparency and accountability: Notifications and created items are timestamped and attributable. It’s easier to tell what happened, when, and who owns the next step.
- Easy to implement: Setup happens in Power Automate or Teams Workflows with a low/no-code designer. Most scenarios require configuration, not development, though admins may need to approve connections.
- Fewer errors: Automated flows don’t forget steps, miss recipients, or duplicate entries. Guardrails like conditions and approvals reduce noise.
- Higher overall productivity: Less context-switching, fewer manual updates, and more predictable handoffs free people to focus on work that actually needs judgment.
Up next: we’ll cover installation & implementation tips.
How to install and configure the Outlook connector
In this section we’ll set up Outlook automation the way Microsoft supports it today: with Power Automate connectors (and the Workflows app in Microsoft Teams). We’ll cover both routes, show where to sign in and grant permissions, and end with a quick test-and-troubleshoot checklist. Skip the old “Manage integrations/Connectors” screens in Outlook—those Groups connectors were retired in 2024.
How do I install the Outlook connector?
As mentioned, there are two supported ways to set this up today. We’ll start with the portal route because it’s the most direct path and works across Outlook and the wider Microsoft 365 stack.
Route A — set it up in Power Automate (recommended)
This route uses triggers and actions to define exactly when Outlook should react and what it should do. You can begin from a template or build a simple flow from scratch in a few clicks.
- Open Power Automate and create a flow
- Go to the Power Automate portal and choose Create → Automated cloud flow. This starts a flow from an event (a “trigger”).
- Pick your trigger
- If you want Outlook to react to another app, choose that app’s trigger (e.g., Planner task created, SharePoint item updated, Jira issue updated via a connector) and proceed.
- If you want Outlook itself to start the flow, choose an Outlook trigger such as When a new email arrives (V3) or When an event is added, updated or deleted (V4) under Office 365 Outlook (work/school) or Outlook.com (personal).
- Sign in and grant permissions
- The first time you add an Outlook action/trigger, Power Automate prompts you to sign in with your Microsoft 365 account. This creates a secure connection governed by your tenant’s policies. A connector is essentially a wrapper over an API, so the connection authorizes the flow to call that API on your behalf. Admin approval may be required in some tenants.
- Add Outlook actions
- Common actions include Send an email (V2), Create event (V4), Update event (V4), or Create contact. Chain additional steps as needed (conditions, switch, delays).
- (Optional) make emails interactive
- If you want users to approve or update something from the email itself, use Outlook Actionable Messages with Adaptive Cards. Register your sender and design the card in Microsoft’s tools.
- Save, test, and review run history
- Use Test to fire the trigger (e.g., create a Planner task) and confirm Outlook receives the email or the event appears on the calendar. If anything fails, open Flow run history to inspect inputs/outputs step by step.
💡 Learn more from official sources:
- Official Microsoft Power Automate documentation
- Office 365 Outlook - Connectors | Microsoft Learn
- Outlook.com - Connectors | Microsoft Learn
- Overview of using Outlook and Power Automate
- Integrate desktop flows with Outlook connector in Power Automate for desktop
- Get started with actionable messages - Outlook Developer | Microsoft Learn
- Design actionable message cards using Adaptive Card format - Outlook Developer | Microsoft Learn
Route B — build the same thing inside Microsoft Teams (workflows)
Choose this route if your users live in Teams. It’s the same automation engine with a Teams-first interface, ideal for scenarios that post to chats or channels while coordinating emails and calendar events in Outlook.
- Open Teams → Workflows
- In Teams, open the Workflows app (formerly “Power Automate” in Teams). If you still see the old name, update the app.
- Start from a template or from scratch
- Templates like “Post a message in Teams and send an email” or “Create a Planner task and add a calendar event” are good starters. You can manage these flows later from Workflows or the Power Automate portal.
- Sign in to each connection
- As with the portal, you’ll be asked to sign in to Outlook, Planner, SharePoint, etc., and to accept the permissions your tenant allows.
📍 Note on legacy Teams connectors: As mentioned, the old Office 365 connectors in Teams were retired in May 2026; Microsoft steers customers to Workflows (Power Automate) instead. Anything that still posted through a legacy connector has to be rebuilt as a workflow.
💡 Learn more from official sources:
- Install the Workflows app in Microsoft Teams - Power Automate
- Create flows in Microsoft Teams - Power Automate
- Use flows in Microsoft Teams - Power Automate
- Install the Workflows app in Microsoft Teams - Power Automate
What to configure (and why)
Before you build anything complex, make a few crisp choices. Decide what should reach Outlook, where it should land, and the guardrails you’ll apply for security and noise control.
- Which updates to send to Outlook: Choose the specific events you care about: new tasks, status changes, due-soon reminders, comments, or releases. Keep the scope tight to reduce noise.
- Where the update lands
- Email for notifications that need attention or auditability.
- Calendar events when you need time-bound reminders, milestones, or resource bookings.
- Actionable Messages when you want quick responses in the inbox.
- Security & governance: Everything runs under Microsoft 365 controls: identity, permissions, and data policies. Admins can govern which connectors are allowed and what data can cross (DLP).
- Virto Calendar integration: When your flows create or update Exchange/Outlook events, those events appear in Outlook and can be overlaid in Virto Calendar for Microsoft 365 or Teams, giving users a unified, color-coded view alongside SharePoint, Planner, and iCal sources.
Quick test plan
A fast, end-to-end test confirms that triggers fire, permissions are correct, and the right item shows up in Outlook. Start small, then iterate.
- Trigger a real event: Create a sample Planner task or change a SharePoint item and watch for the Outlook email or the new calendar event.
- Verify in both places
- If your flow sends an email, check the target mailbox.
- If it creates an event, confirm it appears in Outlook’s calendar and in Virto Calendar’s overlay if you use it.
- Troubleshoot with run history: Open the flow’s run history to see where a step failed. If volumes are high, add conditions or batching and remember that triggers/actions are subject to platform limits—avoid promising “real-time.”
| Symptom | Likely cause | Where to check | Fast fix |
|---|---|---|---|
| No email received | Connection not authenticated / action failed | Run history → failed action | Re-auth, then re-run; add retry |
| Event not on calendar | Wrong mailbox or time zone | Create event step details | Verify calendar ID & time zone |
| Duplicates sent | Trigger fires on minor edits | Trigger conditions | Add condition; tag with unique ID |
| Delays | Platform throttling / heavy volume | Run history timestamps | Batch or schedule digest |
| Missing permissions | Admin approval required | Connections / Data policies | Request approval; use service account |
Fig.3. Quick test & troubleshoot matrix.
FAQ—practical points many teams ask
Teams ask the same practical questions during rollout. Here are the quick answers you can use to plan and set expectations.
- How long does setup take?: Many scenarios can be configured in minutes using templates or a few actions. In some tenants, admins must approve connections or templates before they run.
- Where do I find new integrations?: Microsoft updates connectors and templates regularly—browse the Power Automate catalog or the Workflows gallery in Teams.
- Are my updates “synchronous” across Outlook and Teams?: Flows create or update items in the right system—emails in Outlook, events in Exchange, messages in Teams. That keeps data aligned without claiming instant two-way database sync. Design for practical timing.
- Does this work within Microsoft 365 security policy?: Yes. Connectors run under your tenant’s identity and policy controls; a connector is a governed API wrapper, and admins can restrict usage.
💡 Learn more about sync issues with Outlook in our dedicated resources:
- Troubleshooting Outlook Calendar Sync Problems: Quick Fixes Inside
- Outlook and Teams Calendars Syncing: A Troubleshooting Guide
- How to Fix Shared Outlook Calendar Not Showing Up: A Complete Guide
- How to Seamlessly Sync MS Teams and Outlook Calendars
Next up: we’ll move to typical use cases for connector automation and integration.
Typical Use Cases for the Outlook Connector for Automation and Integration
Outlook connectors are most effective as building blocks inside Power Automate (and Teams Workflows). You compose a trigger, add Outlook actions, and—when helpful—use Actionable Messages so people can respond from the inbox. Below are common, high-value patterns and how to make them work well.
Where the Outlook connector is most useful
These are the highest-impact patterns—simple to set up, easy to maintain, and focused on outcomes people actually see in Outlook (emails and calendar events).
- Notifications about new tasks or comments (Trello, Planner): Trigger on task creation, assignment, or comment-added; send a concise email or an Actionable Message to the assignee or owner. Add conditions to reduce noise—e.g., only for critical boards or buckets.
- Automatically create calendar events from other systems: Convert due dates, milestones, maintenance windows, or request slots into Outlook events. Include metadata (project, requester, link) in the subject/body so events are searchable and auditable.
- Receive Teams or SharePoint status updates in Outlook: When a SharePoint item changes state or a Planner task moves to “Blocked,” send a summary email to a distribution list or owner. For busy projects, batch changes into a timed digest.
- Integrate with the Virto Calendar App: Flows that create or update Exchange/Outlook events appear in Outlook and in Virto Calendar’s unified overlay alongside SharePoint, Planner, and iCal. Use this when teams plan in Teams but still live by Outlook calendars—add reminders automatically, color-code by source, and keep everyone aligned.
📌 Why these help: fewer missed notifications, automatic planning, clearer ownership, and a single place—Outlook—for updates people won’t overlook.
Example patterns with Power Automate
Use these as mini playbooks. Each one lists the trigger, the Outlook actions to add, and a few tips so you can adapt the flow to your tools and policies.
1) Email stakeholders when a Planner task is completed
- Trigger: Planner—When a task is completed (or When a task is updated with a condition percentComplete = 100).
- Actions: Get task details → Send an email (V2) via Office 365 Outlook to a stakeholder list (DL or dynamic list from a SharePoint “Owners” column).
- Tips:
- Add a formatted summary (title, bucket, labels, checklist progress, links).
- Prevent duplicates by checking for a custom category or marker in the task before sending.
- If volume is high, switch to a daily digest using a scheduled trigger plus List tasks + filter.
2) Create calendar events for new requests from Microsoft Forms
- Trigger: Forms—When a new response is submitted → Get response details.
- Actions: Create event (V4) on the instructor’s or team’s calendar; Send an email (V2) confirmation to the respondent.
- Tips:
- Normalize time zones before creating the event.
- Avoid double-booking: query the calendar first (Get events (V4) for the window) and branch if busy.
- Include a cancellation link or instructions in the confirmation email.
3) Synchronize notifications between systems (SharePoint → Outlook)
- Trigger: SharePoint—When an item is created or modified.
- Condition: Only continue when Status in {Needs Approval, Rejected} or when a key field changes.
- Actions:
- Send an email (V2) to the approver with context and links.
- Create event (V4) as a short reminder with the approval deadline.
- Optional: use Actionable Messages for Approve/Reject directly from the email.
- Tips: Tag emails with a unique ID (e.g., SP list item ID) in the subject to tie threads to records.
4) Surface Teams activity to Outlook cleanly
- Trigger: Planner or SharePoint events that represent “work moved”—or a scheduled summary of a Teams channel (via Graph-connected data).
- Actions: Summarize the top changes and Send an email (V2) to a team alias.
- Tips: Don’t mirror every chat; favor summaries for signal over noise. Use Teams Workflows if you also want to post a matching message to a channel.
5) Virto Calendar reminders and shared schedule sync
- Trigger: SharePoint list item created (e.g., “Marketing events”), Planner task assigned, or Forms submission.
- Actions: Create event (V4) with categories or custom text so Virto Calendar can overlay and group by source; optionally add Send an email (V2) reminders to the owner.
- Tips: Use consistent naming conventions and categories to make Virto’s multi-source view intuitive.
Design pointers for production-ready use cases
Before you scale, sanity-check the basics: when flows should fire, how to control noise, and how to keep timing predictable. The checklist below keeps things reliable in real use.
- Target the right moments: Choose triggers that represent a real decision or handoff, not every minor edit.
- Guard against noise: Filter, batch, or digest frequent events; keep messages short with clear calls to action.
- Plan for timing, not “instant sync”: Triggers and throttling influence when actions run. For time-sensitive alerts, add retries and escalation rules.
- Make items traceable: Include record IDs, links, and owners in emails and events; use consistent subjects and categories.
- Stay governed: Use approved connections, DLP policies, and service accounts where appropriate.
Used this way, Outlook connectors become dependable plumbing: they move the right information into inboxes and calendars, and they do it in a way people actually trust and act on.
Advanced Features and Tools in the Microsoft 365 Ecosystem
This section shows how Outlook automation fits with the rest of Microsoft 365 today.
How the Outlook connector works with other Microsoft tools
First, let’s look at the orchestration layer. Power Automate (and Workflows in Teams) is where you define when something happens and what Outlook should do next.
Power Automate:
- Build flows with triggers (e.g., Planner task completed, SharePoint item updated) and Outlook actions (send an email, create/update an event, add a contact).
- Use conditions, approvals, and run history to keep flows reliable at scale.
- For inbox interactivity, send Actionable Messages (Adaptive Cards) so users can approve or update without leaving Outlook.
Microsoft Teams:
- Use the Workflows app to create the same Power Automate flows in a Teams-first UI.
- Typical pattern: an event in Teams/Planner/SharePoint triggers a flow that posts to a channel and sends an Outlook email or adds a calendar event for owners.
SharePoint:
- Triggers such as When an item is created or modified kick off notifications, create reminders as Exchange events, or start approvals that can be completed from Outlook via Actionable Messages.
📍 Reality check on timing: Flows can move information in both directions, but they are not a live database sync. Execution depends on triggers and service limits. Design for prompt updates, not “instant” mirroring.
Where the Virto Calendar fits
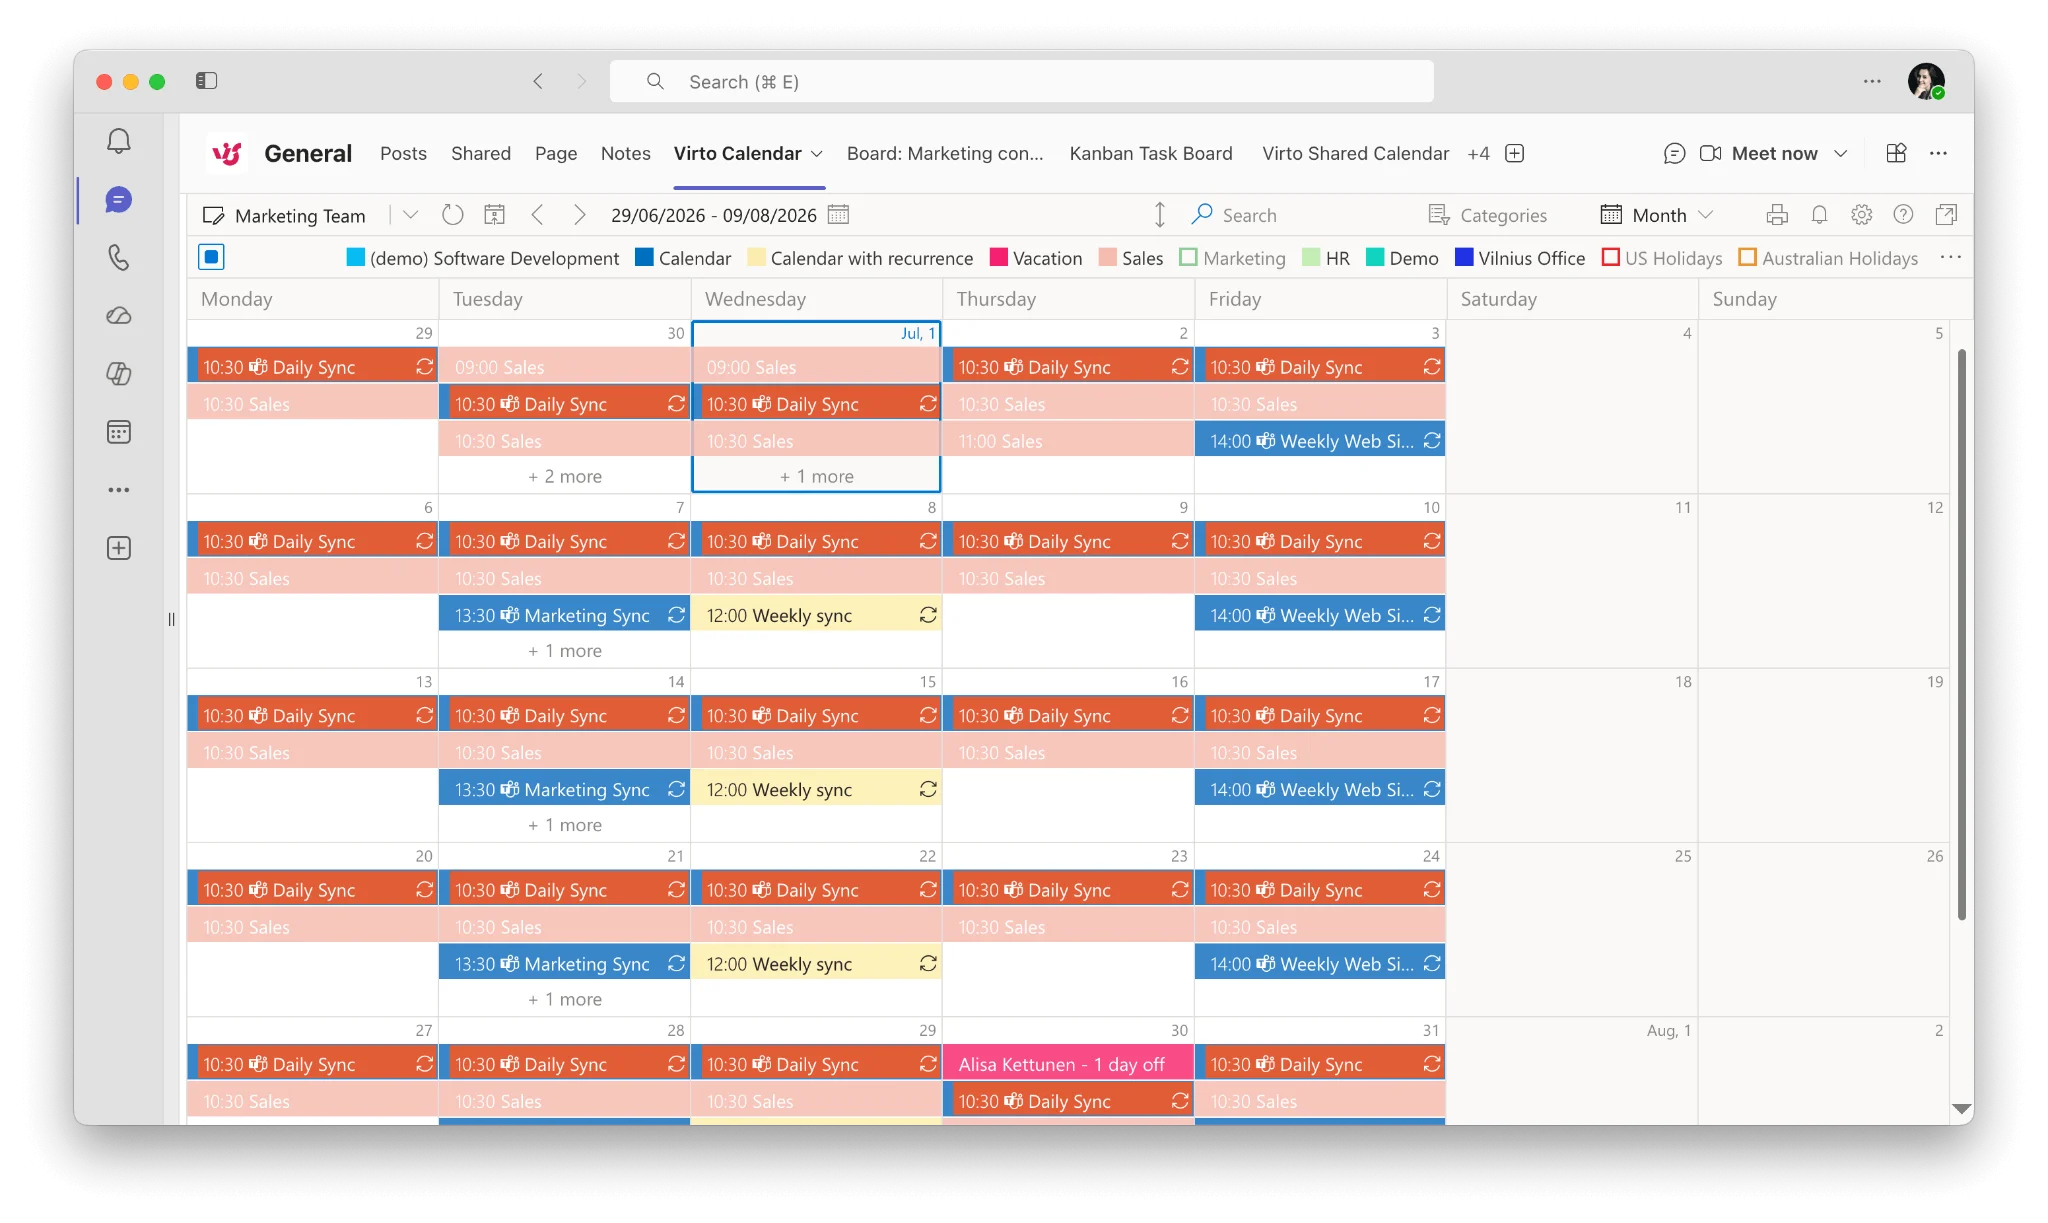
Pic. 3. Sample Virto Calendar.
Virto Calendar App for Microsoft 365 and Virto Calendar App for Microsoft Teams provide a unified, interactive calendar view. They overlay/aggregate events from Exchange/Outlook, SharePoint, Planner, and iCalendar sources. They are not an Outlook “connector.” Instead, they display and manage events that already live in those systems—and they work cleanly with the events your Power Automate flows create in Exchange.
What this means in practice:
- If a flow creates or updates an Outlook event, that event appears in Outlook and is immediately reflected in Virto Calendar’s overlay.
- If someone edits an event in Outlook (time, attendees), those changes are seen in Virto because the source of truth is still Exchange.
- Virto Calendar adds value with multi-source views, color-coding, search/filters, and team-shared calendars inside Outlook and Teams.
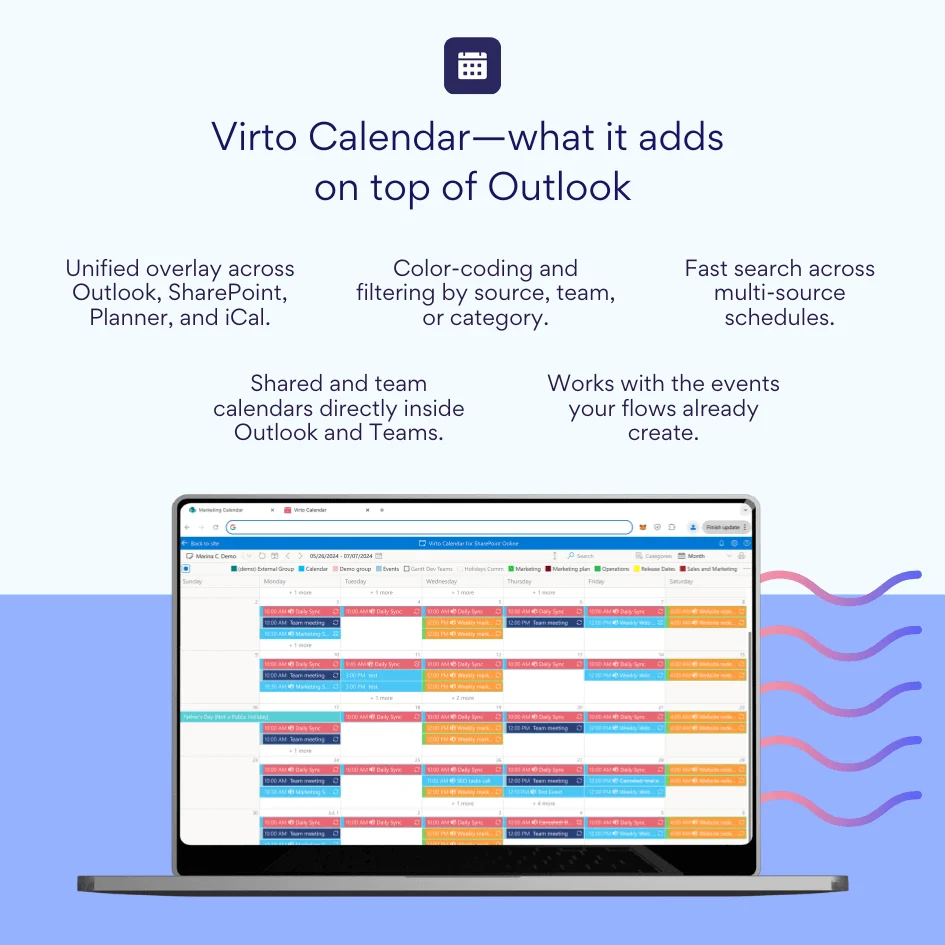
Pic. 4. Virto Calendar - what it adds on top of Outlook.
Key integration features
With the basics in place, here are the capabilities that make day-to-day scheduling and communication smoother across Outlook, Teams, SharePoint, and Virto Calendar.
Coordinated updates across calendars: Set up flows to create or modify Exchange events when work changes elsewhere—Planner milestones, SharePoint requests, or Forms submissions. Virto then shows those events alongside other sources, so teams plan in one place. This is bidirectional by design choices (you build both directions), not a background “real-time sync.”
Unified view of events from different sources: Outlook remains the authoritative mailbox and calendar. Virto combines Outlook/Exchange with SharePoint lists, Planner schedules, and iCal feeds into a single, filterable view—ideal for people spread across projects and departments.
Enhanced reminders and notifications: Use Outlook actions to send confirmations, nudges, or escalations. Add categories or consistent subject tags so notifications are traceable. In Virto, surface the same events with color rules and views tailored to teams.
Automatic event creation from business processes examples:
- A Planner task gets a due date → flow creates an Outlook event with participants and a meeting link.
- A SharePoint request moves to “Scheduled” → flow adds or updates the corresponding Outlook event and emails the requester.
- A Forms submission for office hours → flow books a slot on the instructor’s calendar and sends a confirmation email.
Shared calendars across departments and projects: Maintain shared calendars (e.g., releases, PTO, training). Flows help populate them; Exchange stores them; Virto displays them across Outlook and Teams so everyone follows the same schedule.
Create and send notifications from Outlook data: Start in Outlook—new meeting booked, attendee declined, or event changed—then use a flow to notify a Teams channel, update a SharePoint list, or ping a service queue. No manual copying.
Design tips for advanced scenarios
Before you scale up, anchor your approach with a few guardrails. These practices keep flows dependable, auditable, and easy to maintain.
- Model the source of truth. Keep canonical records in SharePoint/Planner/Line-of-business apps; create Exchange events as the communication layer.
- Control noise. Filter on priority or status, batch frequent updates, and reserve instant emails for exceptions.
- Make items auditable. Include record IDs, deep links, and owners in subjects and event bodies; use categories for fast filtering in Outlook and Virto.
- Plan for limits. Large tenants should add retry/backoff and consider digests for high-volume lists.
- Stay governed. Use approved connections, DLP policies, and service accounts where appropriate; document who owns each flow.
Used together—Power Automate for orchestration, Outlook for delivery, Teams for collaboration, SharePoint for data, and Virto for the calendar experience—you get a cohesive system where updates are timely, visible, and easy to act on without rebuilding how people already work.
Best Practices for Using the Outlook Connector Effectively
Here’s how to get dependable value from Outlook automation as it works today—via Power Automate connectors and Teams Workflows (not the retired Outlook/Groups connectors). The goal is simple: timely, useful updates in email and calendars without noise or surprises.
Start with the essentials
Connect what you already use every day, then layer on complexity only when you see clear wins.
- Planner for task handoffs and completions.
- Forms for request intake → calendar bookings and confirmations.
- SharePoint for document/task status changes.
- Teams for channel summaries and owner notifications.
These give you a solid foundation before you bring in Jira, CRM, or other line-of-business apps.
Control notification volume
The fastest way to lose trust is a noisy inbox.
- In Outlook, create rules to file routine flow emails to folders, flag exceptions, and surface critical alerts in the main inbox.
- In flows, add trigger conditions and filters (only send when status changes to a meaningful value; only for high-priority items). Prefer digests for high-volume sources.
Chain actions with Power Automate
Use flows to turn events into decisions and next steps—no manual copying.
- Common chains: task completed → email stakeholders, form submitted → create calendar event + send confirmation, status changed → reminder before deadline.
- Keep it reliable: add retry policies, configure run after for error branches, and guard against duplicates using record IDs in subjects or custom columns.
- Remember timing: flows are near-real-time at best. Design with triggers and platform limits in mind rather than promising instant two-way sync.
Integrate Outlook with Virto Calendar App
Use Virto Calendar for Microsoft 365/Teams to give people a unified view across Exchange/Outlook, SharePoint, Planner, and iCal sources. Your flows create or update Exchange events; Virto Calendar overlays those events alongside others so teams plan in one place. It isn’t an Outlook “connector” itself—it’s the multi-source calendar layer your users see.
Gradually expand integrations
Once the basics work and adoption is steady, connect specialized tools (e.g., Jira, CRM, service desk). Start with a single, high-value scenario per system, measure outcomes, and only then add more flows.
Review settings regularly
Microsoft 365 evolves. Quarterly, revisit:
- Active flows, triggers, and recipients.
- Folder rules and alerting thresholds.
- Connection health and ownership (make sure there’s a backup owner).
- Retired features—migrate legacy Teams connectors to Workflows where needed.
Design for reliability and scale
- Filter early. Use trigger conditions/OData filters to avoid firing on noise.
- Batch where sensible. Replace per-item emails with hourly/daily digests for busy lists.
- Idempotency matters. Check if an email/event already exists before creating another.
- Use approvals for risk. High-impact actions (big mailouts, status changes) should require Approve/Reject.
- Plan for limits. Large sends and spikes hit throttling; add delays, backoff, and escalation paths.
Security and governance
- Run under approved connections and DLP policies; avoid personal accounts for business-critical flows.
- Prefer service accounts or connection references managed in solutions.
- Limit permissions to what the flow needs; document data movement for compliance.
Testing, change management, and monitoring
- Separate Dev/Test/Prod environments; move flows as solutions.
- Write short runbooks: trigger, recipients, data fields, owner, support contact.
- Turn on notifications for failed runs; review run history weekly.
- Add simple health pings or dashboards so ops teams know flows are alive.
Naming and documentation
- Name flows by purpose: SP-Requests → Outlook-Event+Confirm.
- Use consistent categories/subject tags in emails and events so users and Virto views can filter quickly.
- Keep a one-page index of flows per department.
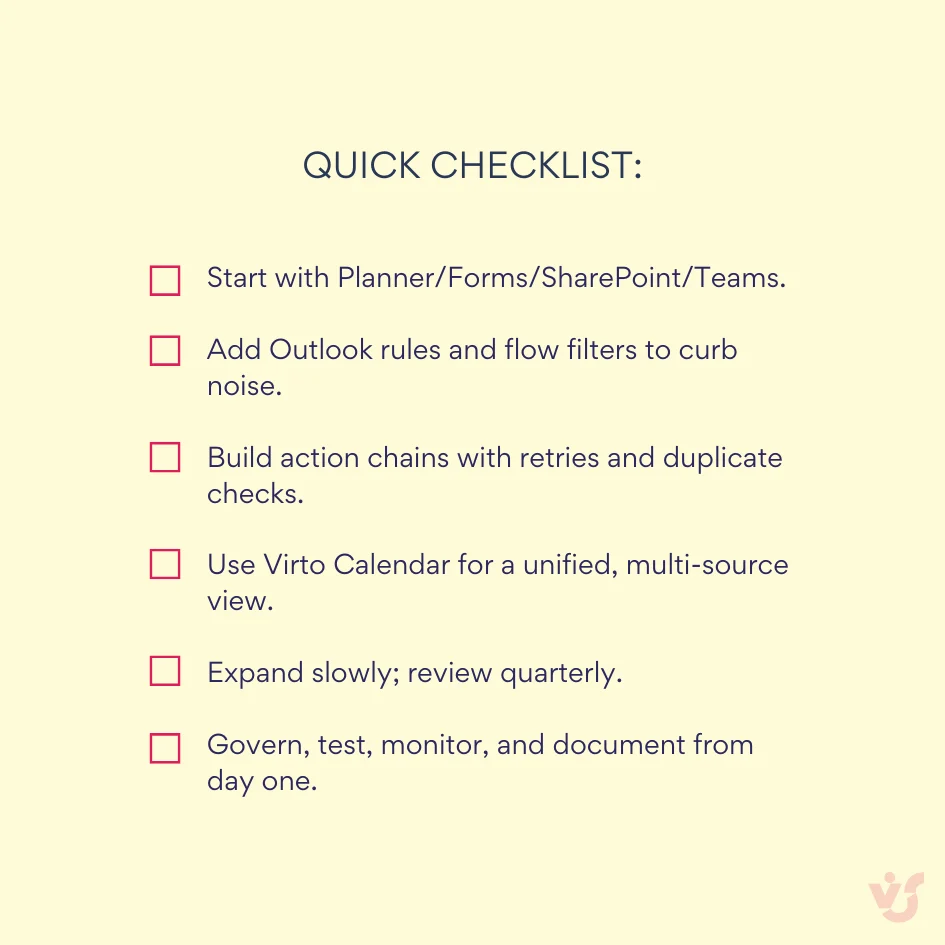
Pic. 5. Quick checklist.
Conclusion on Microsoft Outlook Connector
Outlook connectors—implemented through Power Automate and Teams Workflows—give you a practical way to integrate Outlook with the rest of your stack and automate routine work. Used well, they bring the right updates into email and calendars, and push the next steps out to the systems that need them. They’re not a legacy Groups “connector” or a real-time data mirror; they’re governed workflows that run on triggers and actions.
If you want one place to track communication, calendaring, notifications, and tasks, Outlook plus connectors is a strong foundation. Start with common scenarios (Planner, SharePoint, Forms), then layer in approvals, digests, and Actionable Messages as needed.
To extend calendar planning and collaboration, add Virto Calendar App for M365 and Virto Calendar App for MS Teams. Virto overlays events from Exchange/Outlook, SharePoint, Planner, and iCal so teams see a unified schedule in Outlook and Teams, while your flows create or update the underlying Exchange events. If you’d like to see it in action, schedule a demo or start a free 30-day trial of the Virto Calendar App from the VirtoSoftware site.
Further reading
Official Microsoft resources
- Office 365 Outlook connector
- Outlook.com connector
- Power Automate email overview
- Actionable Messages for Outlook (Adaptive Cards)
- Official Microsoft Power Automate documentation
- Teams Workflows (Power Automate in Teams)
Related articles on our blog
- Outlook Calendar Not Syncing? Learn How To Fix It
- Teams Calendar Not Syncing with Outlook: How to Fix It
- How to Overlay Calendars in Outlook: A Complete Guide & Tips
- A Complete Guide to Viewing and Booking Someone’s Calendar in Outlook
- How to Seamlessly Sync MS Teams and Outlook Calendars
- How to Fix Google Calendar Not Syncing with Outlook
- How to Merge Calendars in Outlook: Guide and Tips