To move files in SharePoint Online, open the document library, select the file or files you want to move, click “Move to” on the command bar, choose the destination library or folder, and confirm. SharePoint moves the files along with their version history and keeps the originals out of the source location. You can move a single document, dozens at once, or relocate files between separate SharePoint sites — all without leaving the browser. This guide walks through every method, plus best practices for keeping links intact and a faster option when you need to move hundreds of files at scale.
All steps below reflect the current SharePoint Online / Microsoft 365 interface as of 2026. The ribbon was refreshed in 2025, so the screenshots in this article use the latest layout.
How to move a single file in SharePoint Online
Select the file, click “Move to” on the command bar, pick a destination, and confirm. The built-in “Move to” command relocates the file and preserves its full version history.
- Open the SharePoint site and go to the document library that contains your file.
- Hover over the file and click the circle to the left of its name to select it.
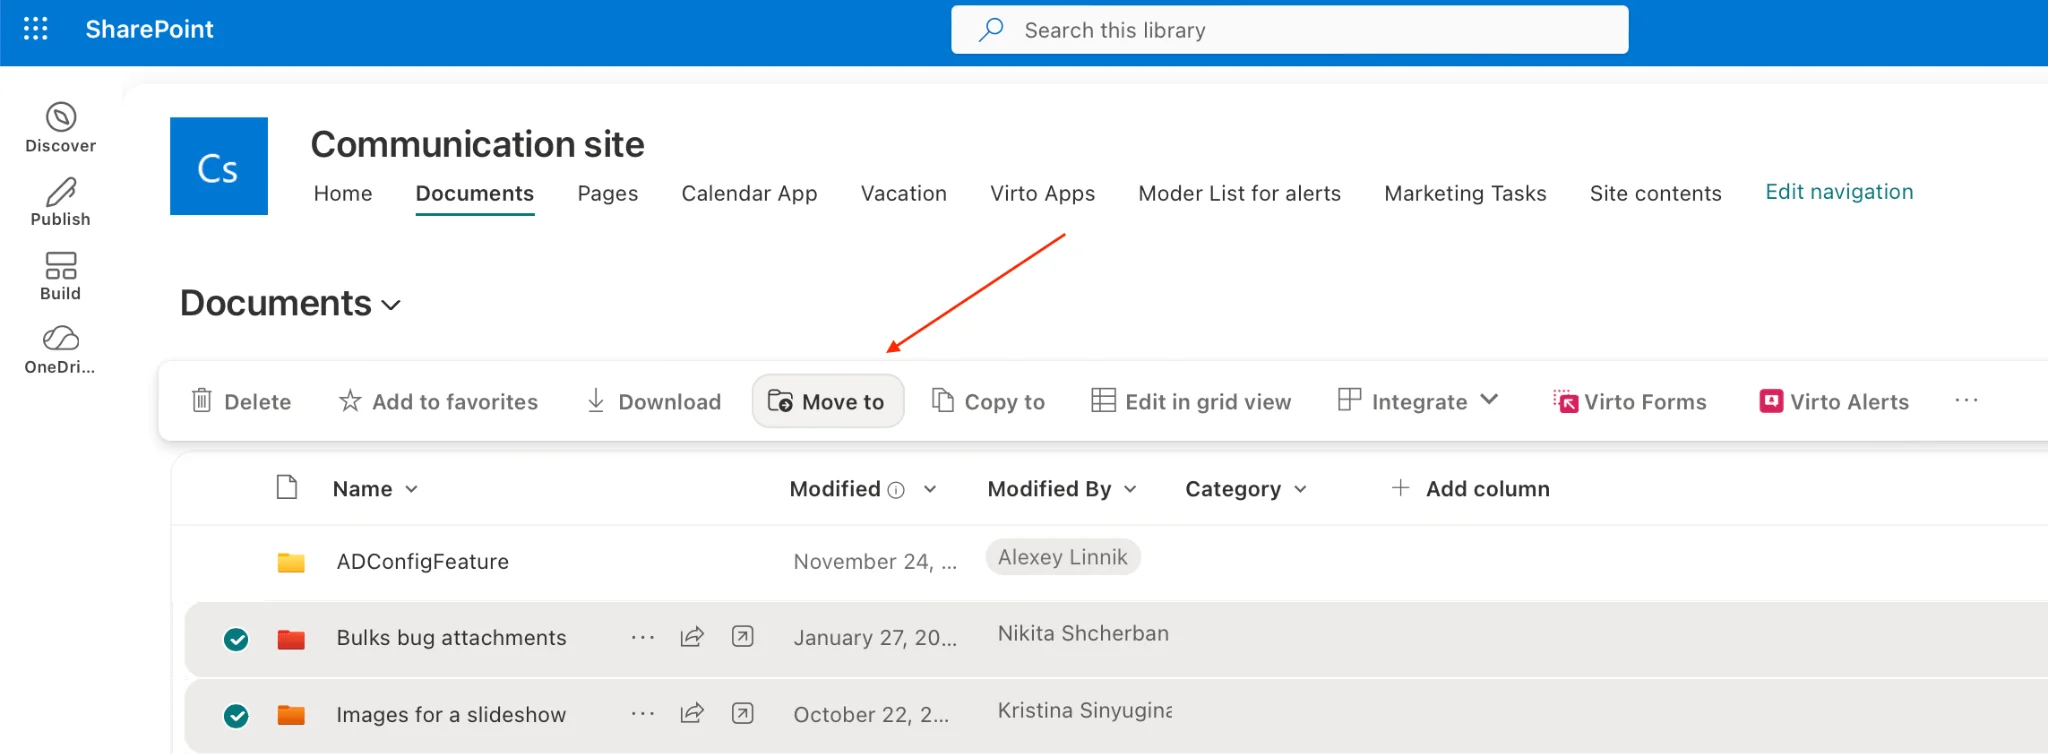
- On the command bar at the top, click Move to. If you don’t see it, click the three-dot “Show more” menu.
- In the panel that opens, choose a destination: the current library, another library on the same site, or a different site you have access to.
- Browse to the target folder and click Move here.

“Move to” command highlighted on the document library command bar.
SharePoint confirms the move with a notification. The file disappears from the source location and appears in the destination with its metadata and version history attached.
How to move multiple files at once
Select several files using the checkboxes, then use “Move to” once to relocate the whole batch. SharePoint applies the same destination to every selected file in a single operation.
- Open the document library and switch to a list or tiles view that shows the selection circles.
- Select each file by clicking its circle. To grab a continuous range, click the first file, hold Shift, and click the last. Hold Ctrl to add or remove individual files.
- With the files selected, click Move to on the command bar.
- Choose the destination library or folder and confirm. SharePoint moves every selected file together.
Multiple files selected with checkboxes, ready for a bulk “Move to.”
This works well for small batches. Keep in mind that selecting large numbers of files one by one in the browser becomes slow, and SharePoint’s view typically loads items in pages — so very large moves may need a different approach, covered in the bulk section below.
How to move files between SharePoint sites
Use “Move to” and select a different site as the destination — SharePoint can move files across sites you have access to within the same Microsoft 365 tenant. This is the cleanest way to consolidate content or reorganize a site structure.
- Open the library on the source site and select the file or files you want to move.
- Click Move to. In the destination panel, look for the list of sites under “More places” or your followed/frequent sites.
- Pick the target site, then browse into the destination library and folder.
- Click Move here to complete the cross-site move.
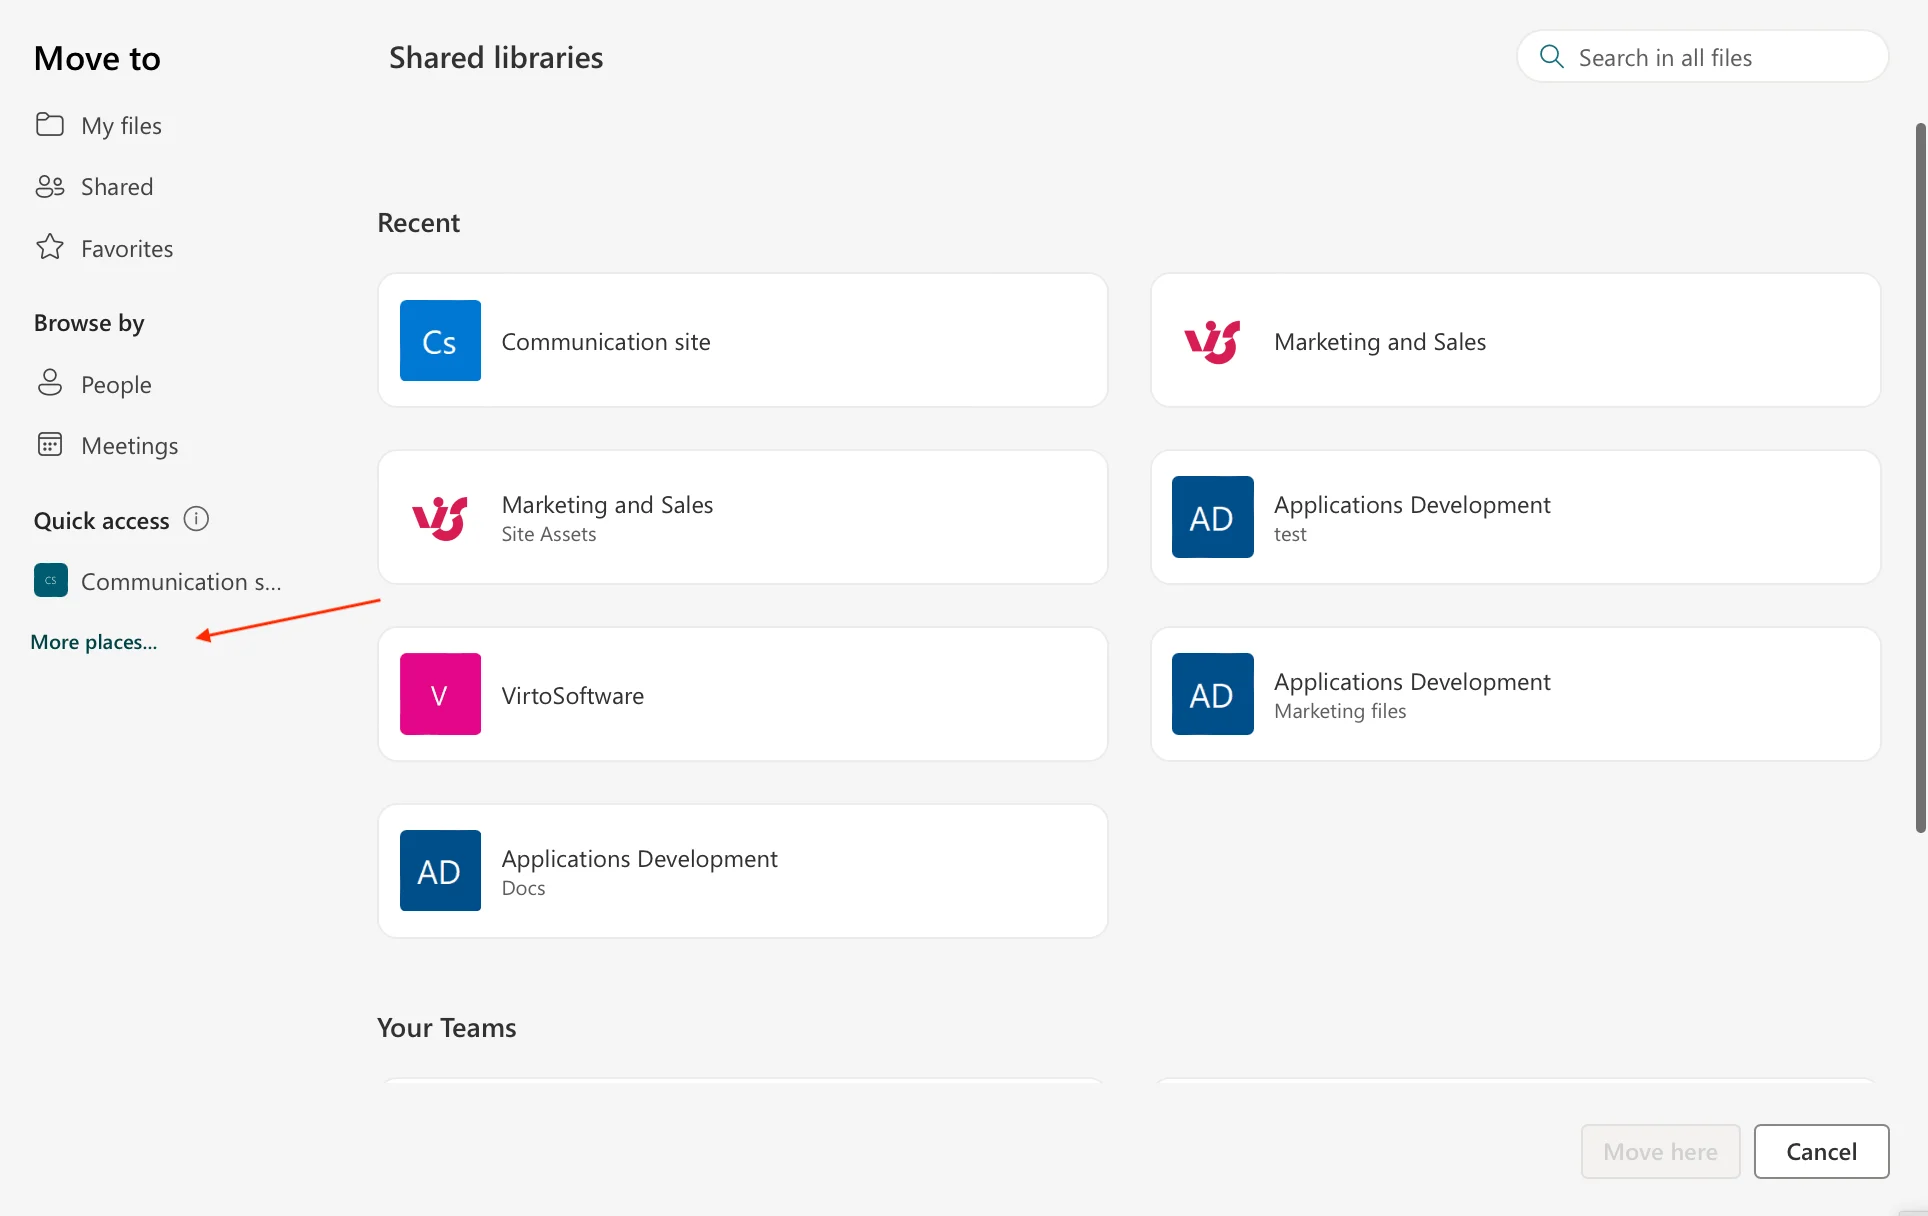
Selecting a destination site in the “Move to” panel.
A few things to know about moving between sites: the destination site must be in the same Microsoft 365 tenant, and you need at least edit permissions there. Version history travels with the files, but site-specific metadata columns that don’t exist in the destination library won’t carry over. For guidance on access, review your SharePoint permissions best practices.
Move files without breaking links (best practices)
Use “Move to” rather than “Copy to,” and prefer moving within the same tenant so SharePoint can preserve sharing context. Moving a file changes its URL, which can break existing links and bookmarks if you’re not careful.
- Understand move vs. copy. “Move to” relocates the file and its version history and removes it from the source. “Copy to” leaves the original in place and creates a duplicate — useful for templates, but it can create confusion about which version is current.
- Expect URLs to change. A file’s address is tied to its library and folder path. After a move, old direct links may return a “not found” error. Update any references in pages, emails, or pinned links.
- Check shared links. Existing sharing links generally continue to work after an in-tenant move, but it’s good practice to verify access for key collaborators afterward.
- Preserve metadata. Make sure the destination library has matching columns so important metadata isn’t lost in transit.
- Move during low-traffic hours. For shared libraries, schedule large moves when fewer people are actively editing to avoid conflicts.
For a broader framework on structuring libraries, naming, and retention, see our SharePoint document management best practices.
Common issues and how to fix them
Most move failures come from permissions, locked files, path-length limits, or unsupported destinations. Here are the issues administrators run into most often and how to resolve them.
- “Move to” is greyed out or missing. You may lack edit permissions, or the item is checked out. Check the file back in and confirm your access level.
- File is locked or in use. If someone has the document open or it’s checked out, the move can fail. Wait until it’s closed or ask the editor to check it in.
- Path or file-name too long. SharePoint enforces URL-length limits. Shorten folder names or the file name before moving into a deeply nested destination.
- Destination site not listed. You can only move to sites in the same tenant where you have edit rights. Cross-tenant moves require migration tools, not “Move to.”
- Move stalls on large selections. The browser interface throttles big batches. For hundreds or thousands of files, use a bulk tool — see the next section.
Microsoft documents the move and copy behavior in detail; for reference, see the official Microsoft Support guide to moving and copying files in SharePoint.
How to bulk move files in SharePoint (advanced)
For large-scale moves, use a dedicated bulk-operations tool rather than the native “Move to” command, which is limited by browser paging and per-action throttling. SharePoint’s built-in interface is fine for a handful of files, but it wasn’t designed to relocate hundreds or thousands of documents in one pass.
The native limitations show up quickly at scale: views load files in pages, so you can’t always select an entire library at once; selecting items individually is slow and error-prone; and large batches can time out or stall mid-move. For IT administrators managing document libraries across departments, this turns a routine reorganization into a multi-hour task.
A faster way: Virto Multiple File Operations
Virto Multiple File Operations for SharePoint is a SharePoint web part built for exactly this problem. It lets you upload, download, delete, copy, and move multiple files at once — with drag-and-drop handling and the ability to edit metadata across many files in a single action. Instead of paging through a library and clicking files one by one, you can select and move large batches in a single operation, no scripting required.
- Bulk move, copy, and delete across libraries and folders in one click.
- Drag-and-drop uploads and bulk downloads for large document sets.
- Edit metadata for many files at once, so columns stay consistent after a move.
It’s trusted by organizations with heavy document workflows — including government agencies and universities — where bulk file operations at scale are a daily requirement.
If you’re on SharePoint Online or Microsoft 365 rather than on-premises, the Virto Multiple Operations for SharePoint Online & Microsoft 365 delivers the same bulk power as a modern app: drag-and-drop hundreds of files for instant upload, filter and delete by date, creator, or type, and assign metadata in bulk — all from within your M365 environment.
Need to move hundreds of files at once? Virto Multiple File Operations lets you move, copy, and delete files in bulk — in one click.
Explore Virto Multiple File Operations → • Try the Multiple Operations app for M365 →
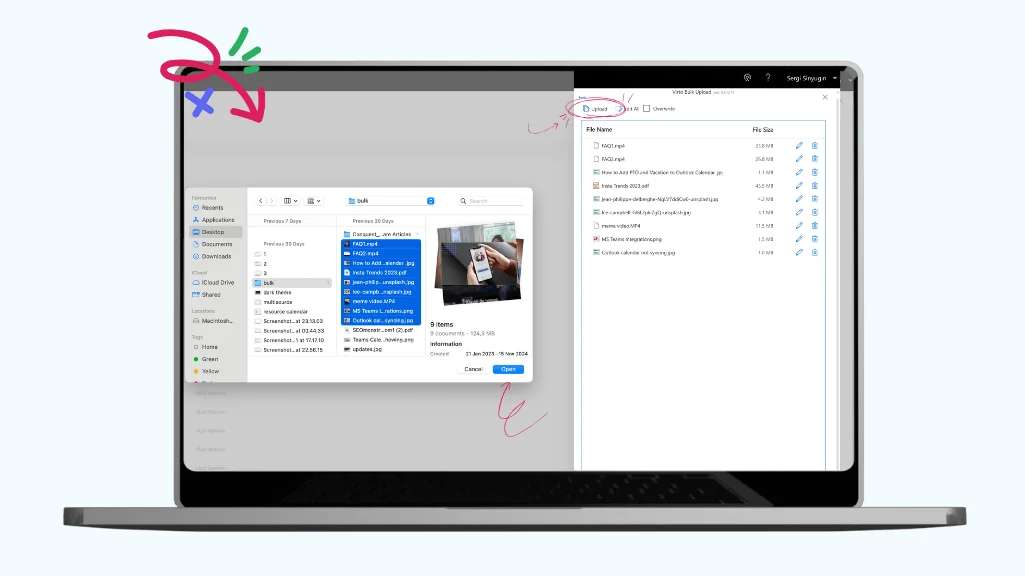
Bulk move of many files in a single operation with Virto Multiple File Operations.
Summary
Moving files in SharePoint is straightforward for single files and small batches: select, click Move to, choose a destination, and confirm — within a library, across libraries, or between sites in the same tenant. Always mind the move-vs-copy distinction and expect URLs to change. When the job grows to hundreds or thousands of files, the native interface hits its limits, and a purpose-built bulk tool like Virto Multiple File Operations turns an all-day chore into a one-click task.
