Quick answer. To set up desk booking in Microsoft Places, an admin takes six steps: (1) get the permissions, meaning the TenantPlacesManagement and MailRecipient roles in Exchange Online or the Exchange Administrator role, plus PowerShell 7 with the MicrosoftPlaces module; (2) create buildings and floors; (3) add sections to the floors; (4) create individual desks or desk pools in those sections; (5) set each desk’s mode: reservable, drop-in, assigned or unavailable; (6) turn on buildings and Places finder for users. Desk pools and assigned desks work with any Microsoft 365 plan that includes Outlook and Teams. Since 1 April 2026, booking a specific desk also needs a space licence (Microsoft Teams Shared Space) on that desk. Places works only with Exchange Online mailboxes.
Next question: where do vehicles and equipment go? Places models buildings, floors, rooms and desks, and has no object type for company cars or shared equipment. To see which meeting rooms, vehicles and equipment are booked or free, with their maintenance and blackout periods, in one calendar in Microsoft Teams, add Virto Calendar App.
Microsoft spreads its desk booking instructions across many Learn pages, and some still describe the licensing that ended in April 2026. This guide puts the route on one page, in the order you do it: roles, the building hierarchy, desks and desk pools, desk modes, the space licence, optional maps, switching it on for users, and the delays before anyone sees a change. Every command comes from Microsoft Learn as it stood in October 2026. For the overview first (what Places does and where it appears), see our guide to Microsoft Places.
Step 1: Get the roles, PowerShell 7 and the Places module
Places is managed with Exchange Online permissions. Your account needs two management roles: TenantPlacesManagement, to manage Places, and MailRecipient, to manage the mailboxes behind rooms, desk pools and desks. The Exchange Administrator role covers mail recipients and often carries TenantPlacesManagement too. If it doesn’t, assign it in Exchange Online PowerShell:
New-ManagementRoleAssignment -Role TenantPlacesManagement -User <UPN>
Once the directory exists, day-to-day work can move to three built-in Places roles:
| Role | Assigned in | What it can do |
|---|---|---|
| Places Administrator | Microsoft 365 admin center or Microsoft Entra PowerShell | Everything, including features, bulk upload, maps and all objects |
| Places Building Administrator | Exchange PowerShell | Floors, sections, assigned or unavailable desks, desk modes and reservation settings in existing buildings |
| Places Desk Administrator | Exchange PowerShell | Desk modes and assigning desks to people |
Building and Desk Administrators can’t create resource mailboxes, so the first build usually stays with IT.
You need PowerShell 7, version 7.4.0 or later; Windows PowerShell can’t manage Places. Add the Exchange Online, Microsoft Teams and MicrosoftPlaces modules, then connect:
Install-Module -Name MicrosoftPlaces -Force
Connect-MicrosoftPlaces
Two conditions can’t be configured around:
- Exchange Online only. In an Exchange hybrid organisation, users with an on-premises mailbox can’t use the Places app, Places finder or work plans. They keep Room Finder in Outlook.
- The portal needs a mailbox. The admin account needs an Exchange licence and a mailbox to open the Places management portal, and the tenant setting EnablePlacesWebApp must be on (it is by default).
Portal or PowerShell: which to use
The Places management portal (places.cloud.microsoft/places/admin; choose Admin in the upper-right menu) creates objects through forms: select Create new, choose building, floor, section, room, desk or desk pool, fill in the Create panel and select Create. It is also where you change desk modes, edit reservation settings and move spaces. It doesn’t do batch work: batch upload and updates aren’t supported, so every desk is one form.
PowerShell is Microsoft’s recommendation for the first deployment and anything in bulk. In existing tenants, turning on buildings and Places finder is a PowerShell task, and maps go up through PowerShell or Microsoft Graph.
A workable split: IT builds the hierarchy and desks with PowerShell; facilities staff with the Building or Desk Administrator role maintain modes and assignments in the portal.
Step 2: Create buildings and floors
Everything in Places hangs off one hierarchy: building → floor → section → desk or desk pool. A floor belongs to a building, a section to a floor, a desk or desk pool to a section. Rooms sit under a floor or a section. Without a hierarchy, users can set their work location only to “in the office” or “remote”, and Places finder doesn’t work.
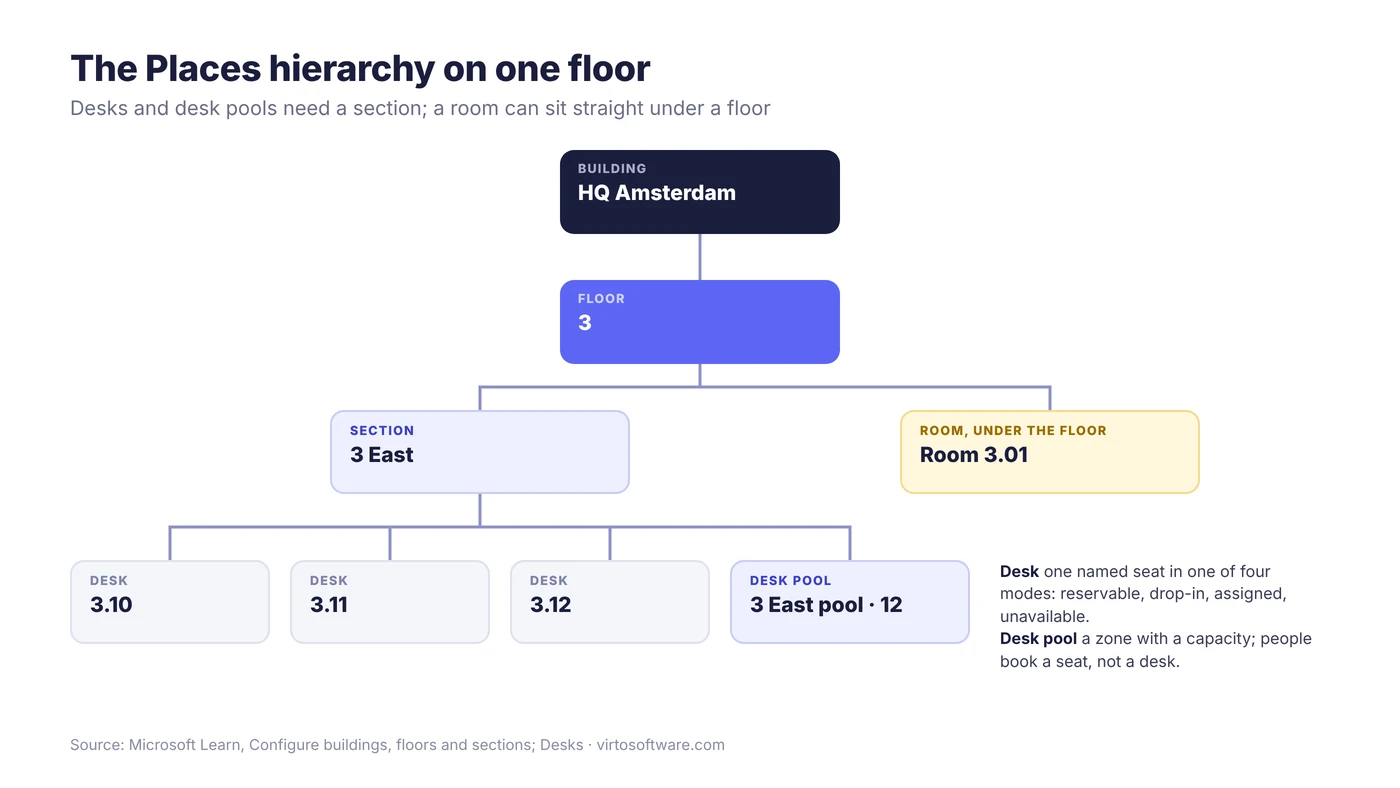
Fig. 1. The Places hierarchy: desks and desk pools need a section, rooms can sit straight under a floor
If your tenant has no hierarchy yet
Since 28 July 2026, Places builds the hierarchy automatically for tenants that haven’t created one, from the building and floor metadata on room mailboxes (set with the Exchange Set-Place cmdlet), and picks up new metadata daily. Tenants that built a hierarchy earlier keep doing it by hand. Either way, users don’t see buildings until Step 6. The automatic build works from building and floor metadata only, and Set-Place has no field for a section, so add sections yourself (Step 3) before you create desks or desk pools.
From existing room mailboxes: Initialize-Places
Initialize-Places reads your rooms and proposes a hierarchy, inferring building and floor from each room’s room list. Run it and choose option 1 to export a CSV. Correct the names in InferredBuildingName and InferredFloorName, keep only those two columns plus InferredSectionName and PrimarySmtpAddress, and save. Run it again with option 2 to import. Option 3 only exports the script it would run, for a security review. Spell every name identically across rows and files: any difference creates a new building, floor or section.
By hand
$building = New-Place -Type Building -DisplayName "HQ Amsterdam"
$floor = New-Place -Type Floor -DisplayName "3" -ParentId $building.PlaceId -SortOrder 3
Set-PlaceV3 -Identity room-3.01@contoso.com -ParentId $floor.PlaceId
The last line places an existing meeting room under the floor. Rooms themselves are Exchange room mailboxes; our guide on how to create a room mailbox and show meeting room availability in Microsoft 365 covers that part. If people still use Room Finder in Outlook, Microsoft recommends one room list per building, named exactly like the building: Room Finder reads room lists, Places finder reads the hierarchy. Set -SortOrder now if you plan maps; the floor numbers in the map file must match it.
Step 3: Add sections
A section is a group of spaces on a floor: a neighbourhood, a team zone, a wing. Desks and desk pools must belong to one.
$section = New-Place -Type Section -DisplayName "3 East" -ParentId $floor.PlaceId
In a new session, look the floor up first:
$building = Get-PlaceV3 -Type Building | Where-Object DisplayName -eq "HQ Amsterdam"
$floor = Get-PlaceV3 -AncestorId $building.PlaceId | Where-Object DisplayName -eq "3"
New buildings, floors and sections appear in Places straight away.
Step 4: Create desks or desk pools
Places can make a desk bookable in two ways. Both can share a building, but each physical desk is configured one way only.
Desk pool or individual desk: what the employee sees
| Desk pool | Individual desk | |
|---|---|---|
| In Exchange | One workspace mailbox with a capacity | One desk mailbox per desk |
| The employee books | A place in an area, such as “3 East” | One specific desk, such as “Desk 3.12” |
| On arrival | Takes any free desk in the area | Goes to the desk they booked |
| Limit | Bookings until the capacity is taken | The booked desk is theirs |
| Modes | Reservable, drop-in, unavailable | Reservable, drop-in, assigned, unavailable |
| Licence for booking | Included in plans with Outlook and Teams | A space licence on the desk |
| Analytics | Pools under 10 desks aren’t analysed | More detailed; occupancy reports need the licence |
Fig. 2. Desk pools and individual desks in Microsoft Places
Employees book in the new Outlook and Teams calendars on Windows and the web, and in the Places app in classic Outlook, Outlook mobile and Teams mobile. Microsoft recommends individual desks over pools for a better booking experience, more detailed analytics and more management options. Pools remain the no-extra-licence option for hot-desking areas.
Create an individual desk
$desk = New-Place -Type Desk -DisplayName "Desk 3.12" -ParentId $section.PlaceId -Mode @{Name='Reservable'} -Mailbox desk-3.12@contoso.com
Set-PlaceV3 $desk.PlaceId -Tags "height-adjustable-desk"
A reservable or drop-in desk needs a mailbox for its bookings. If the address exists, the desk links to it; if not, Places creates a mailbox with that name; without -Mailbox, it generates one. Places creates mailboxes this way only for an account with the Places Administrator, Exchange Administrator or Global Administrator role. The second line adds a tag people can filter on.
Two traps. A desk created without -Mode is Unavailable and gets no mailbox. An existing mailbox you link must have the resource type Desk, not Room or Workspace, and keep it after linking, or updates to the desk fail.
Create a desk pool
A desk pool is a workspace: a place in a section, backed by an Exchange workspace mailbox. New-Place creates both in one step:
New-Place -Type Workspace -DisplayName "Desk pool 3 East" -ParentId $section.PlaceId -Capacity 12 -Mailbox deskpool-3east@contoso.com
Capacity is the number of desks. In Microsoft’s example, a pool with capacity 2 takes two bookings for 8am to 5pm and refuses a third. Exchange doesn’t enforce capacity by default, so once the mailbox is provisioned (up to 24 hours), turn it on:
Connect-ExchangeOnline
Set-CalendarProcessing -Identity deskpool-3east@contoso.com -EnforceCapacity $True
To show the pool in Outlook Room Finder too, add it to a room list with Add-DistributionGroupMember. Learn’s Desks page still shows the older route, an Exchange New-Mailbox -Room ... | Set-Mailbox -Type Workspace followed by Set-PlaceV3 -Identity <address> -Capacity 12 -ParentId $section.PlaceId; the New-Place reference calls creating workspaces with New-Mailbox “not recommended”. The Set-PlaceV3 line is still how you move a workspace mailbox you already have into a section.
Step 5: Set the desk mode
| Mode | What it means | Applies to |
|---|---|---|
| Reservable | Booked in advance or on the spot | Desks and desk pools |
| Drop-in | On the spot only; link the desk’s monitor so plugging in a laptop reserves it | Desks and desk pools |
| Assigned | Permanently linked to one person; nobody else can book it | Individual desks only |
| Unavailable | Not bookable, for example under maintenance; the default for a new desk | Desks and desk pools |
Fig. 3. The four desk modes in Microsoft Places
In the portal, select the ellipsis (…) next to the desk, then Edit properties, and pick a Mode. Assigned needs a person in Assigned to, Unavailable a Reason. Select Apply. In PowerShell:
Set-PlaceV3 -Identity $desk.PlaceId -Mode @{Name='DropIn'}
An assigned desk takes the person in the mode’s metadata:
$modemetadata = New-Object 'System.Collections.Generic.Dictionary[String,object]'
$modemetadata.Add("AssignedPersonEmailAddress","anna.jansen@contoso.com")
Set-PlaceV3 -Identity $desk.PlaceId -Mode @{Name='Assigned';Metadata=$modemetadata}
Unavailable accepts a Reason of New or Maintenance the same way. Switching an unavailable desk without a mailbox to Reservable creates and links one automatically.
Booking rules and auto-release (optional)
Edit reservation settings in the portal sets, for a reservable desk or pool, how far ahead people can book, who may book, whether recurring bookings are allowed and whether unclaimed bookings are released. Drop-in desks only take the “who may book” rule; assigned and unavailable desks have none. In PowerShell, use Exchange’s Set-CalendarProcessing:
Connect-ExchangeOnline
Set-CalendarProcessing desk-3.12@contoso.com -BookInPolicy <BookableGroupDL>
Set-CalendarProcessing -Identity "desk-3.12@contoso.com" -EnableAutoRelease $true -PostReservationMaxClaimTimeInMinutes 60
Auto-release frees a booking if nobody checks in, by default after 10 minutes. People check in by plugging into a linked peripheral or from an email sent 15 minutes before release. Of the four desk modes, only reservable desks support it. It needs a space licence on the desk (or Teams Premium bought before 1 April 2026), and changes take up to 48 hours, so make them before a weekend.
The space licence for individual desks
Since 1 April 2026, Microsoft licenses premium desk features per space, not per user. Booking an individual desk, auto-release and occupancy reports need the desk to carry a Microsoft Teams Shared Space licence or its free companion, Teams Shared Space – Single Space. Desk pools, desk assignment, Places finder and the portal stay in the core plans, and Microsoft’s FAQ confirms that assigned desks need no licence. Learn doesn’t say whether a drop-in desk needs one: its licence table lists booking, auto-release and occupancy reports for “individual desk” without naming a mode.
- One licence per desk, assigned to the desk’s account in the Microsoft 365 admin center: Users > Active users, open the account, Assign licenses.
- The free licences don’t appear on their own. Each paid licence entitles you to three Single Space licences, which you acquire yourself: in Marketplace on a Microsoft Customer Agreement, in the Volume Licensing Center on an Enterprise Agreement.
- Allow lead time. Reseller orders can take several weeks.
- Teams Premium customers keep the premium features until their subscription renews.
Prices, purchase paths and a worked example are in our guide to Microsoft Places licensing.
Optional: add floor maps
Desk booking works without maps. A floor plan helps people see the layout and find nearby rooms and desks, but the requirements are firm:
- IMDF only. The Indoor Mapping Data Format, an open standard based on GeoJSON, georeferenced.
- One building per package. Each ZIP holds one whole building. The
building,footprint,levelandunitfiles are required;sectionandfixtureare optional, but without them sections and desks don’t show on the map. - Matched to the directory. Each floor’s ordinal must equal its
SortOrder, and features must be correlated with Places IDs;Import-MapCorrelationsproduces themapfeatures.csvfor that.
$building = Get-PlaceV3 -Type Building | Where-Object DisplayName -eq "HQ Amsterdam"
New-Map -BuildingId $building.PlaceId -FilePath "C:\maps\imdf_correlated.zip"
In Microsoft Graph, the building ingestMapFile action does the same, with the Place.ReadWrite.All permission and the Exchange Administrator role. New maps take up to an hour to appear. To change a map in PowerShell, run Remove-Map and upload the full package again; Graph can also update individual map features. Preparing IMDF files is the hard part, so Microsoft lists four conversion partners (Archilogic, Pointr, Mappedin and JLL Technologies) and notes the list isn’t exhaustive or an endorsement.
Step 6: Turn on buildings and Places finder for users
Two tenant settings decide whether people see any of this. EnableBuildings shows buildings in work plans, workplace presence and Places finder; with it off, users can set only “in office” or “remote” and can’t use Places finder. PlacesFinderEnabled gives users Places finder and individual desk booking.
Both are on by default for tenants onboarded on or after 1 August 2026. In older tenants, EnableBuildings is off, and PlacesFinderEnabled stays off where room lists exist. Turn them on:
Set-PlacesSettings -EnableBuildings 'Default:true'
Set-PlacesSettings -PlacesFinderEnabled 'Default:true'
To pilot Places finder first, scope it to a mail-enabled security group (a standard security group may not work), up to 20 groups:
Set-PlacesSettings -PlacesFinderEnabled 'Default:false,OID:<GroupObjectId>@<TenantId>:true'
Each user sees either Room Finder or Places finder, never both. To test, be a member of the group, not only its owner. Settings take up to 12 hours.
Then put the app where people look. In the Teams admin center, go to Teams apps > Setup policies, open Global (Org-wide default) or select Add for a pilot group, and under Pinned apps select Add apps. Search for Places, select Add, set the order and select Save. Places also runs at aka.ms/places and as an app in Outlook and the Microsoft 365 app.
How long until users see the changes?
| Change | Typical wait |
|---|---|
| New buildings, floors and sections | Right away |
| Rooms and desk pools created, edited or moved | Up to 24 hours (an Initialize-Places import applies them immediately) |
Room and desk pool mailboxes created by New-Place | Up to 24 hours to provision |
Set-PlacesSettings (buildings, Places finder) | Up to 12 hours |
| New floor maps | Up to 1 hour |
| Auto-release settings | Up to 48 hours |
| Desk peripherals for automatic check-in | 24–48 hours |
Fig. 4. Propagation delays in Microsoft Places
Common problems and fixes
A desk shows as unavailable
Check in order. The mode: a desk created without one is Unavailable. The licence: Microsoft’s notice MC1235124 says desks without a space licence “will appear as unavailable to users”. The user: only people enabled for Places finder can book individual desks. The clock: see the table above. And test with an ordinary account, because for a limited time Teams Premium users can also book unlicensed desks.
Users can only choose “in the office” or “remote”
EnableBuildings is off, or the building has no hierarchy yet. If people see Room Finder instead of Places finder, they are outside the PlacesFinderEnabled scope or on a client without it: Places finder runs in classic and new Outlook on Windows, Outlook on the web, and Teams on Windows, macOS and the web.
Some users don’t see Places at all
Their mailbox is on-premises. In Exchange hybrid, Places serves only Exchange Online mailboxes; on-premises users keep Room Finder, and a work location they set is visible only to them. The fix is moving the mailbox to Exchange Online.
A desk pool is missing from analytics
Pools with fewer than 10 desks aren’t analysed, for privacy reasons, and pools used without reservations aren’t counted. Analytics is also enabled separately, for users and for buildings.
Duplicate buildings or floors after an import
A name was spelled two ways in the CSV, for example “HQ Amsterdam” and “HQ-Amsterdam”. Fix the file, then move or delete the extra objects; the portal deletes a place only once it has no children.
Vehicles, equipment and rooms in one calendar: Virto Calendar App
Places stops at buildings, rooms and desks. Its directory has no object type for vehicles or equipment: Exchange can hold equipment mailboxes, but Places doesn’t show them. So facilities teams that book desks in Places often still track the pool car, the projectors or the lab kit somewhere else.
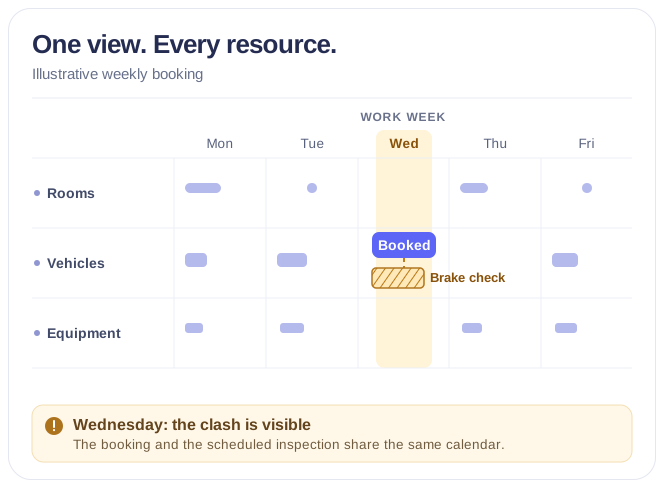
Virto Calendar App puts those in one calendar in Microsoft Teams: meeting rooms, offices, vehicles and equipment, who has booked what and what is free, with maintenance jobs and blackout periods next to the bookings they interrupt. It draws on the Exchange calendars and SharePoint lists your organisation already uses, while desks stay with Places. The Rooms, Equipment, and Availability in One Calendar use case shows it in action, and the app has a 30-day free trial.
See Rooms, Vehicles and Equipment in One Calendar

Rooms & Equipment Calendar
Combine rooms, offices, vehicles and equipment in one Microsoft 365 calendar, with the maintenance jobs and blackout periods that make them unavailable.
Learn more about Rooms & Equipment CalendarFAQ
Is desk booking in Microsoft Places free?
Partly. Desk pools, desk assignment, Places finder and the portal come with any Microsoft 365 plan that has Outlook and Teams. Since 1 April 2026, booking an individual desk, auto-release and occupancy reports need a space licence on each desk.
Do I need Teams Premium for desk booking in Places?
No. Teams Premium was the requirement before April 2026. Existing Teams Premium customers keep the premium features until their subscription renews.
Can I set up Microsoft Places without PowerShell?
Partly. The portal creates buildings, floors, sections, rooms, desks and desk pools one at a time and manages modes. Bulk setup, turning on buildings and Places finder in existing tenants, and map uploads need PowerShell (maps can also go through Microsoft Graph).
Do I need floor plans to book desks?
No. Without maps, people choose desks by building, floor and section in Places finder.
Does Microsoft Places work with Exchange on-premises?
No. Only users with an Exchange Online mailbox can use Places; in a hybrid organisation, on-premises users keep Room Finder.
Conclusion
Desk booking in Microsoft Places is mostly directory work. Get the Exchange roles and PowerShell 7 in place, build buildings, floors and sections, choose pools or individual desks, set the modes, license the desks people book individually, and switch on buildings and Places finder. Then allow a day for changes to show and two for auto-release. Maps can come later, or not at all.
If Places is more than your office needs, compare the alternatives in our guide to every way to book desks in Microsoft 365.
Places covers desks and rooms. For the vehicles and equipment it has no object type for, Virto Calendar App shows meeting rooms, vehicles and equipment, their bookings and their maintenance windows in one calendar in Microsoft Teams, and the 30-day free trial is the quickest way to see whether it fits.