The Scheduling Assistant in Outlook shows attendees’ free/busy times side by side so you can pick a meeting slot that works for everyone. It sits inside the meeting form in every current version of Outlook, reads availability straight from Exchange and Microsoft 365 calendars, and can pick the earliest open slot for you.
Next question: what about everything free/busy does not show? The grid tells you that someone is busy, not why. Leave tracked in a SharePoint list, Planner deadlines and external calendars stay out of sight. To see Outlook calendars next to SharePoint lists, Planner and Google calendars in one color-coded view, add Virto Calendar App.
Booking a meeting for six people should take thirty seconds. In practice it turns into a thread of “does Tuesday work?” messages that ends with someone double-booked. Outlook already ships with the fix, and most people never open it.
This guide covers what the Scheduling Assistant does, how to use it in classic Outlook, new Outlook, Outlook on the web and mobile, how to read the availability grid, what changed in 2025 and 2026, and what to do when it shows you nothing at all. At the end we look at where it runs out of road and what to add when it does.
What is the Outlook Scheduling Assistant?
The Scheduling Assistant is Outlook’s built-in meeting scheduler. When you invite people to a meeting, it pulls their free/busy data from Exchange or Microsoft 365 and draws it as a horizontal timeline — one row per attendee, one column per time slot. Instead of guessing, you look at the grid and click an open column.
It is not a separate app and there is nothing to install. It is a view inside the meeting form, and it only appears once you are creating a meeting with at least one attendee — a private appointment has nothing to compare.
How Outlook works out who is free
It helps to know what the grid is actually reading. Every event on an Exchange or Microsoft 365 calendar carries a free/busy value — Free, Tentative, Busy, Out of Office or Working Elsewhere — set by whoever created it. When you add someone to a meeting, Outlook queries the Availability service, which returns that value for each time slot and nothing else. No subjects, no locations, no attendee lists.
That design explains most of the behavior people find confusing. Availability is only as accurate as the events people bother to create, so a colleague who blocks focus time as Free will look permanently available. It is tied to Exchange, so mailboxes hosted elsewhere return nothing. And it respects each person’s calendar permissions, so a single Default permission set to None makes someone invisible to the whole organization.
Where to find the Scheduling Assistant in Outlook
The feature exists in every supported Outlook client, but the route differs. In classic Outlook for Windows it is a ribbon button; in new Outlook and Outlook on the web it is a tab above the event form; on mobile it is folded into the date picker.
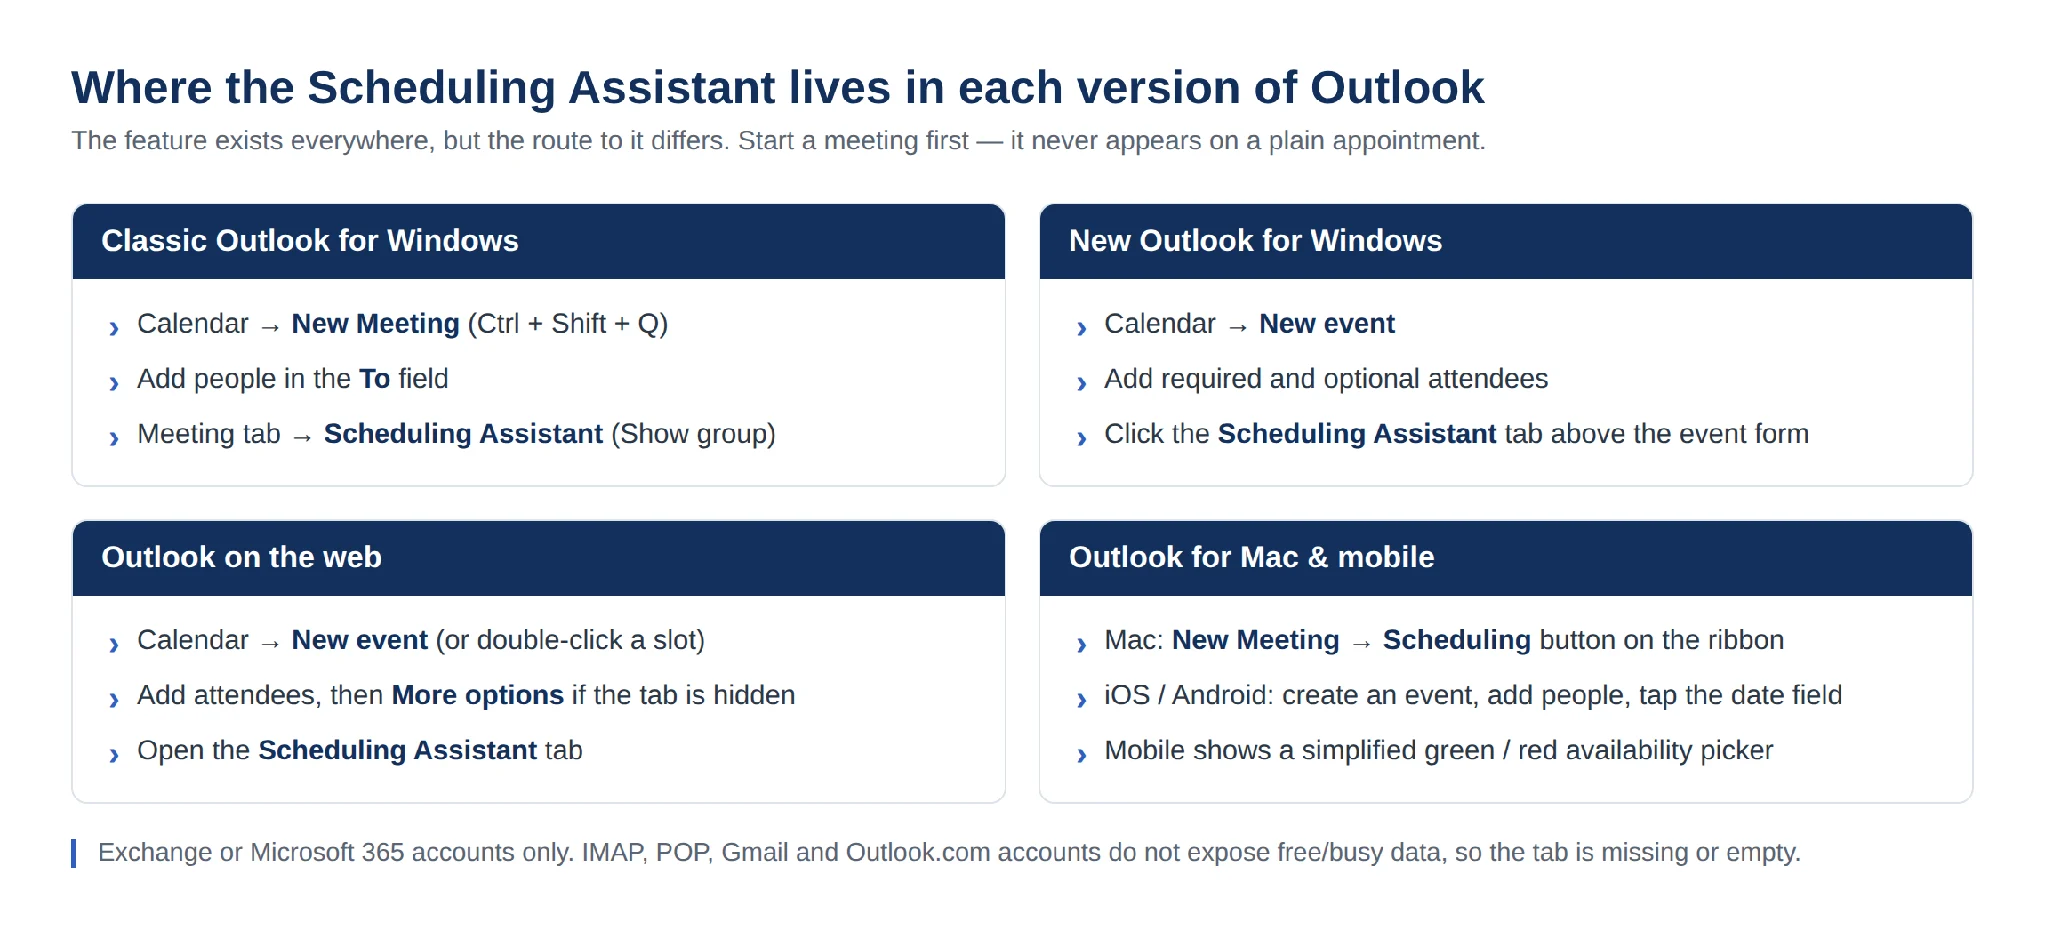
Fig. 1. Where to find the Scheduling Assistant in each version of Outlook.
What the Scheduling Assistant can do
- See everyone’s availability at once. Each attendee gets a row of colored blocks showing when they are free, busy, tentative or away.
- AutoPick the next open slot. Called Suggested times or Find a time in the web and new Outlook clients, it jumps to the earliest slot that works for all required attendees.
- Book rooms and equipment alongside people. Room and equipment mailboxes appear as rows in the same grid, so you can see at a glance whether the room is free when the people are.
- Respect working hours. Slots outside a person’s configured working day are grayed out, which keeps you from booking someone’s evening by accident.
- Handle time zones. Attendees in other zones are converted to your view automatically, and recent builds label only the people who differ from you.
- Separate required from optional. Optional attendees show in the grid but do not block AutoPick’s suggestions.
- Flag conflicts before you send. If the slot you picked collides with an existing event, Outlook warns you in the form rather than after the invitations go out.
- Read the combined bar. A summary row rolls every required attendee into one line — in most cases the only row you need to look at.
What do the colors mean in the Outlook Scheduling Assistant?
White means free, solid blue means busy, striped means tentative or working elsewhere, purple means out of office, and gray means the slot falls outside that person’s working hours. A cross-hatched block means Outlook could not read that person’s availability at all.
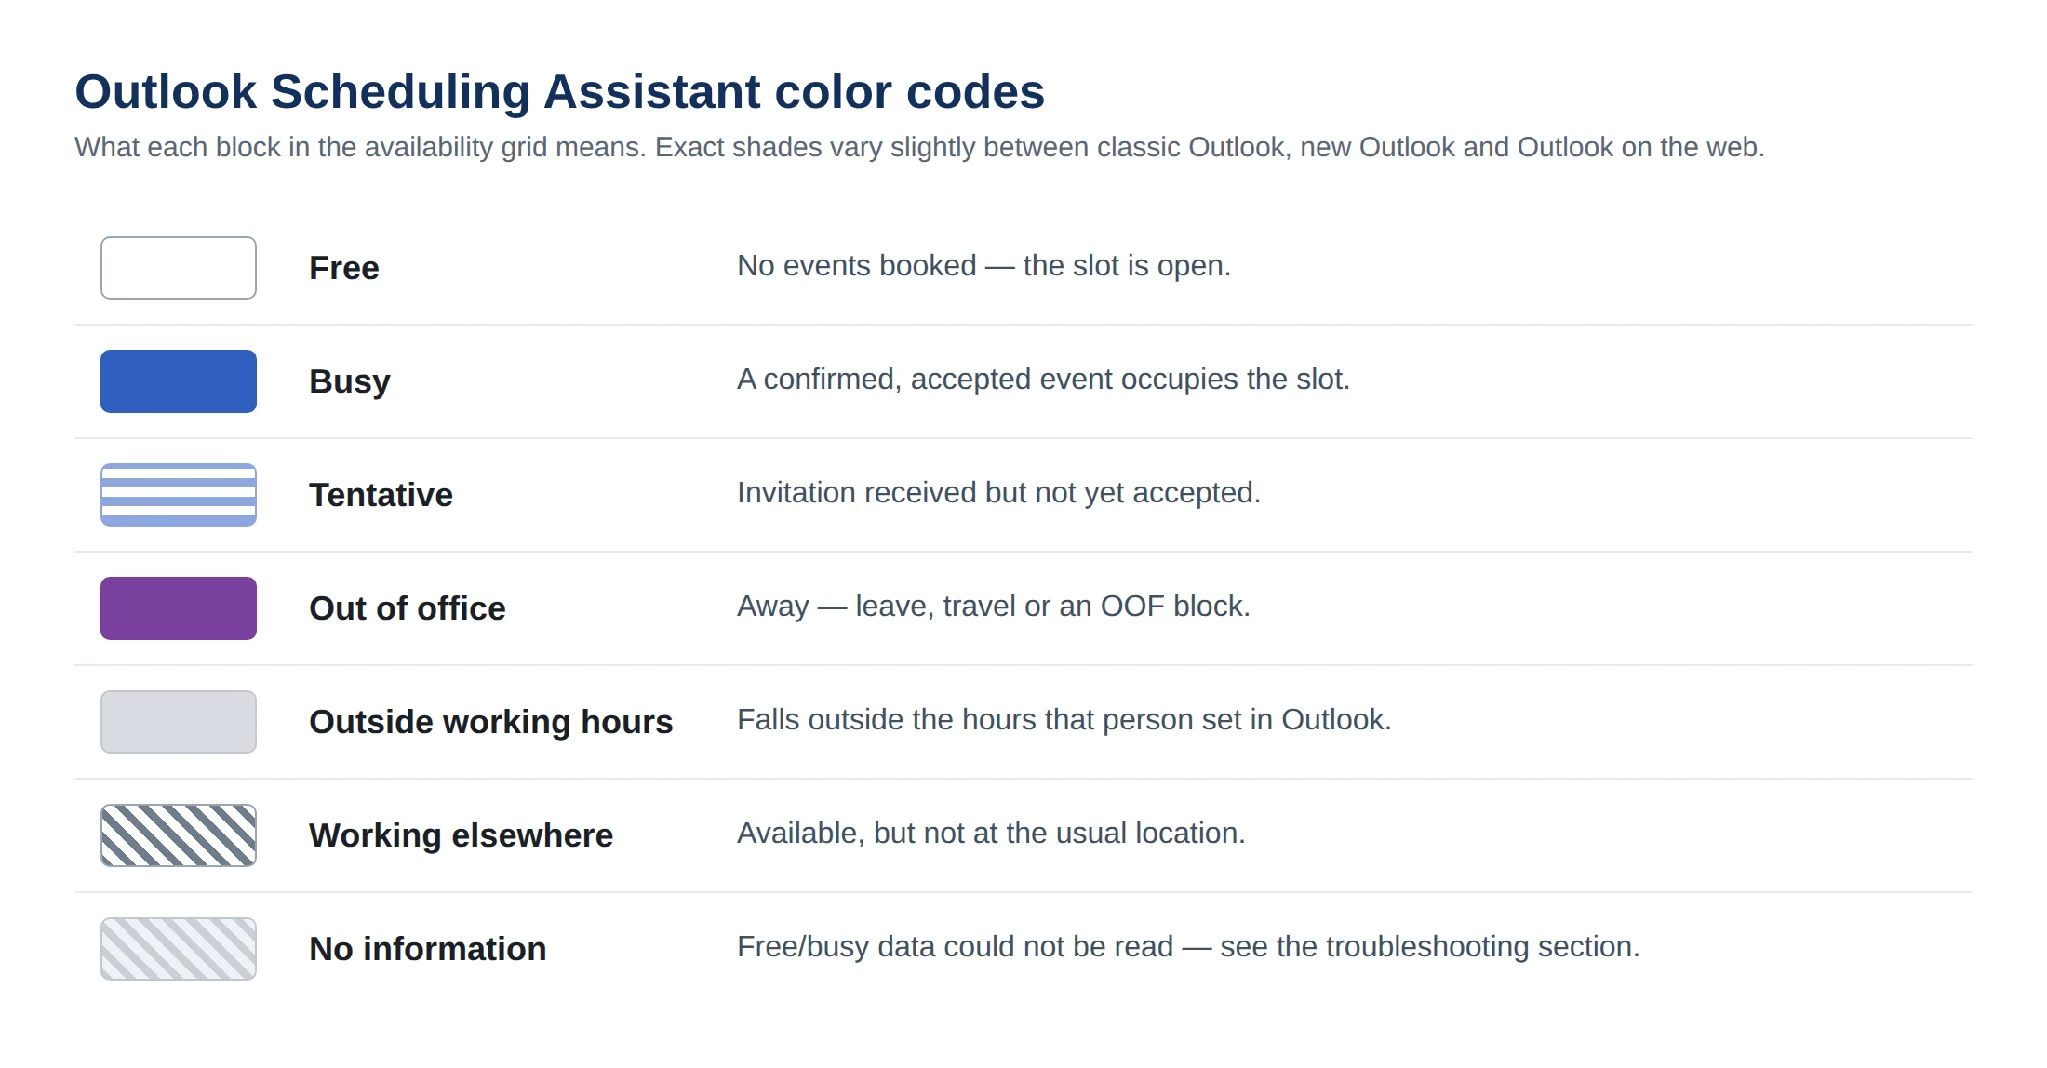
Fig. 2. Color codes in the Outlook Scheduling Assistant.
Shades shift slightly between classic Outlook, new Outlook and the web client, and hovering over a block shows the status as text (OOF, Tentative, Working elsewhere). The meanings do not change.
How to Use the Outlook Scheduling Assistant, Step by Step
Classic Outlook for Windows and Mac
- Open Calendar and click New Meeting. On Windows the shortcut is Ctrl + Shift + Q; on Mac it is Cmd + Shift + M. Double-clicking a slot in your calendar works too.
- Add people to the To field. Use the dropdown beside each name to mark them Required, Optional or a Resource.
- On the Meeting tab, click Scheduling Assistant in the Show group. On Mac the button is labeled Scheduling.
- Read the grid, click the column you want, and check the All Attendees summary row before you commit.
- Switch back to the appointment view, add an agenda, and send.
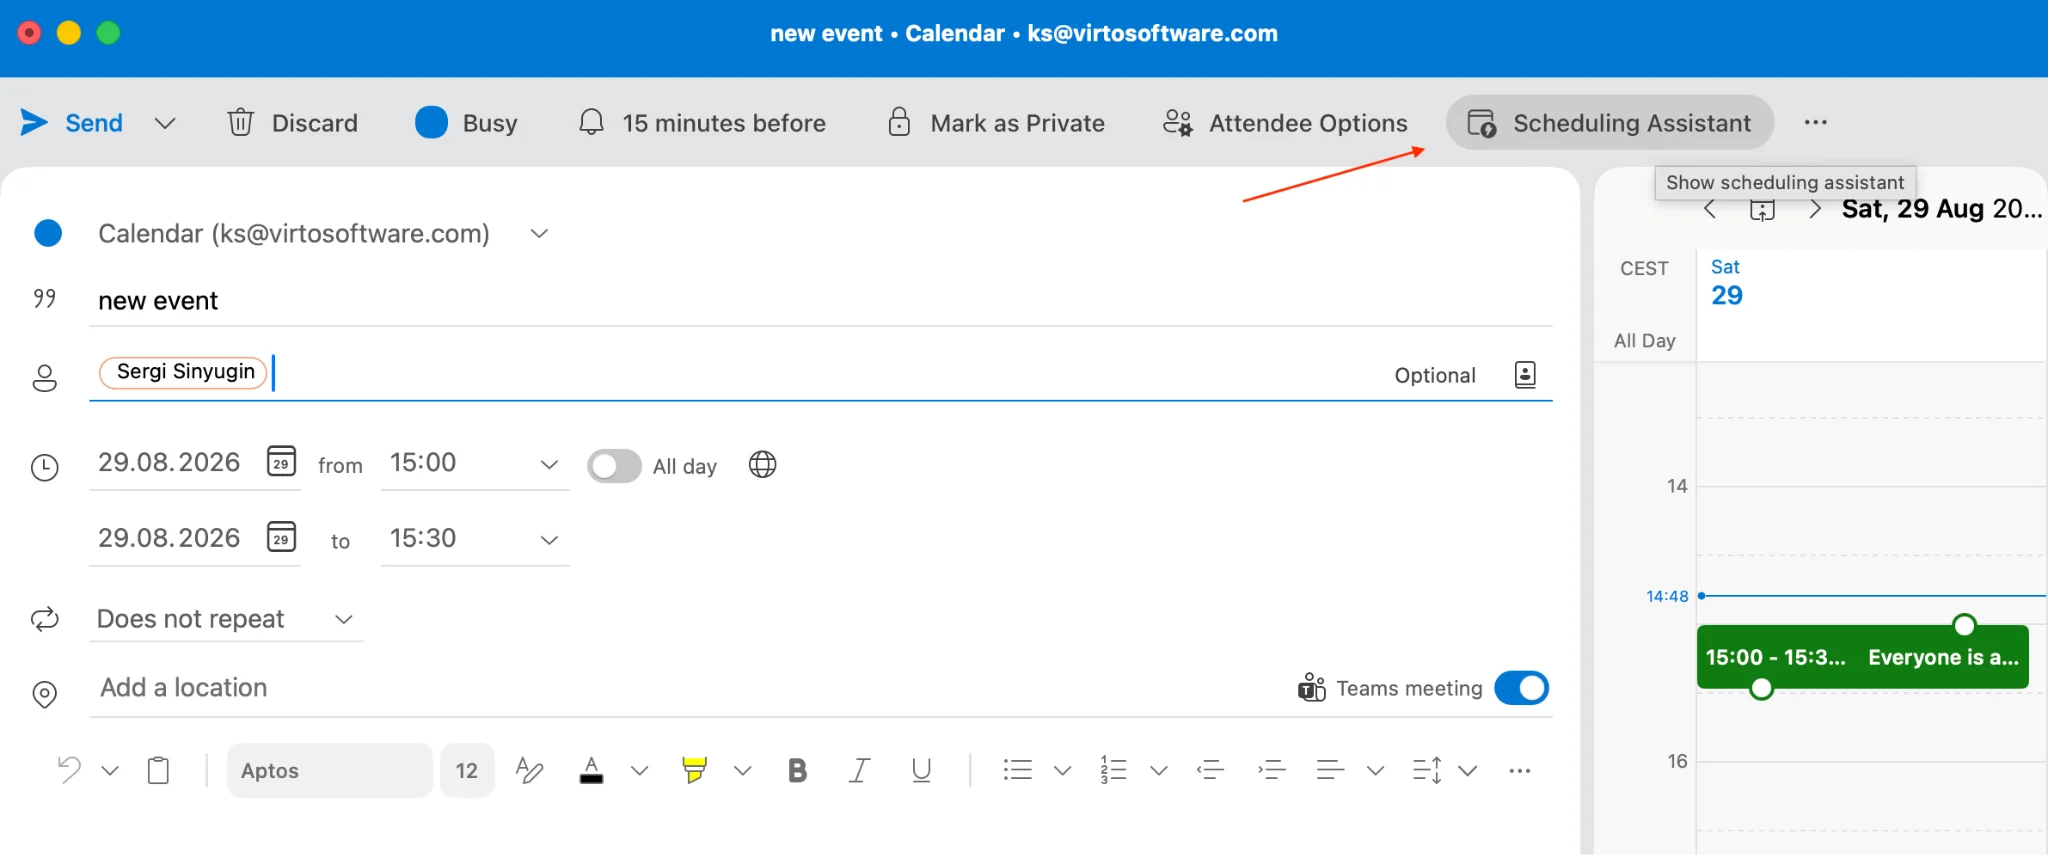
Pic. 1. The Scheduling Assistant button in a new meeting window in Outlook for Mac.
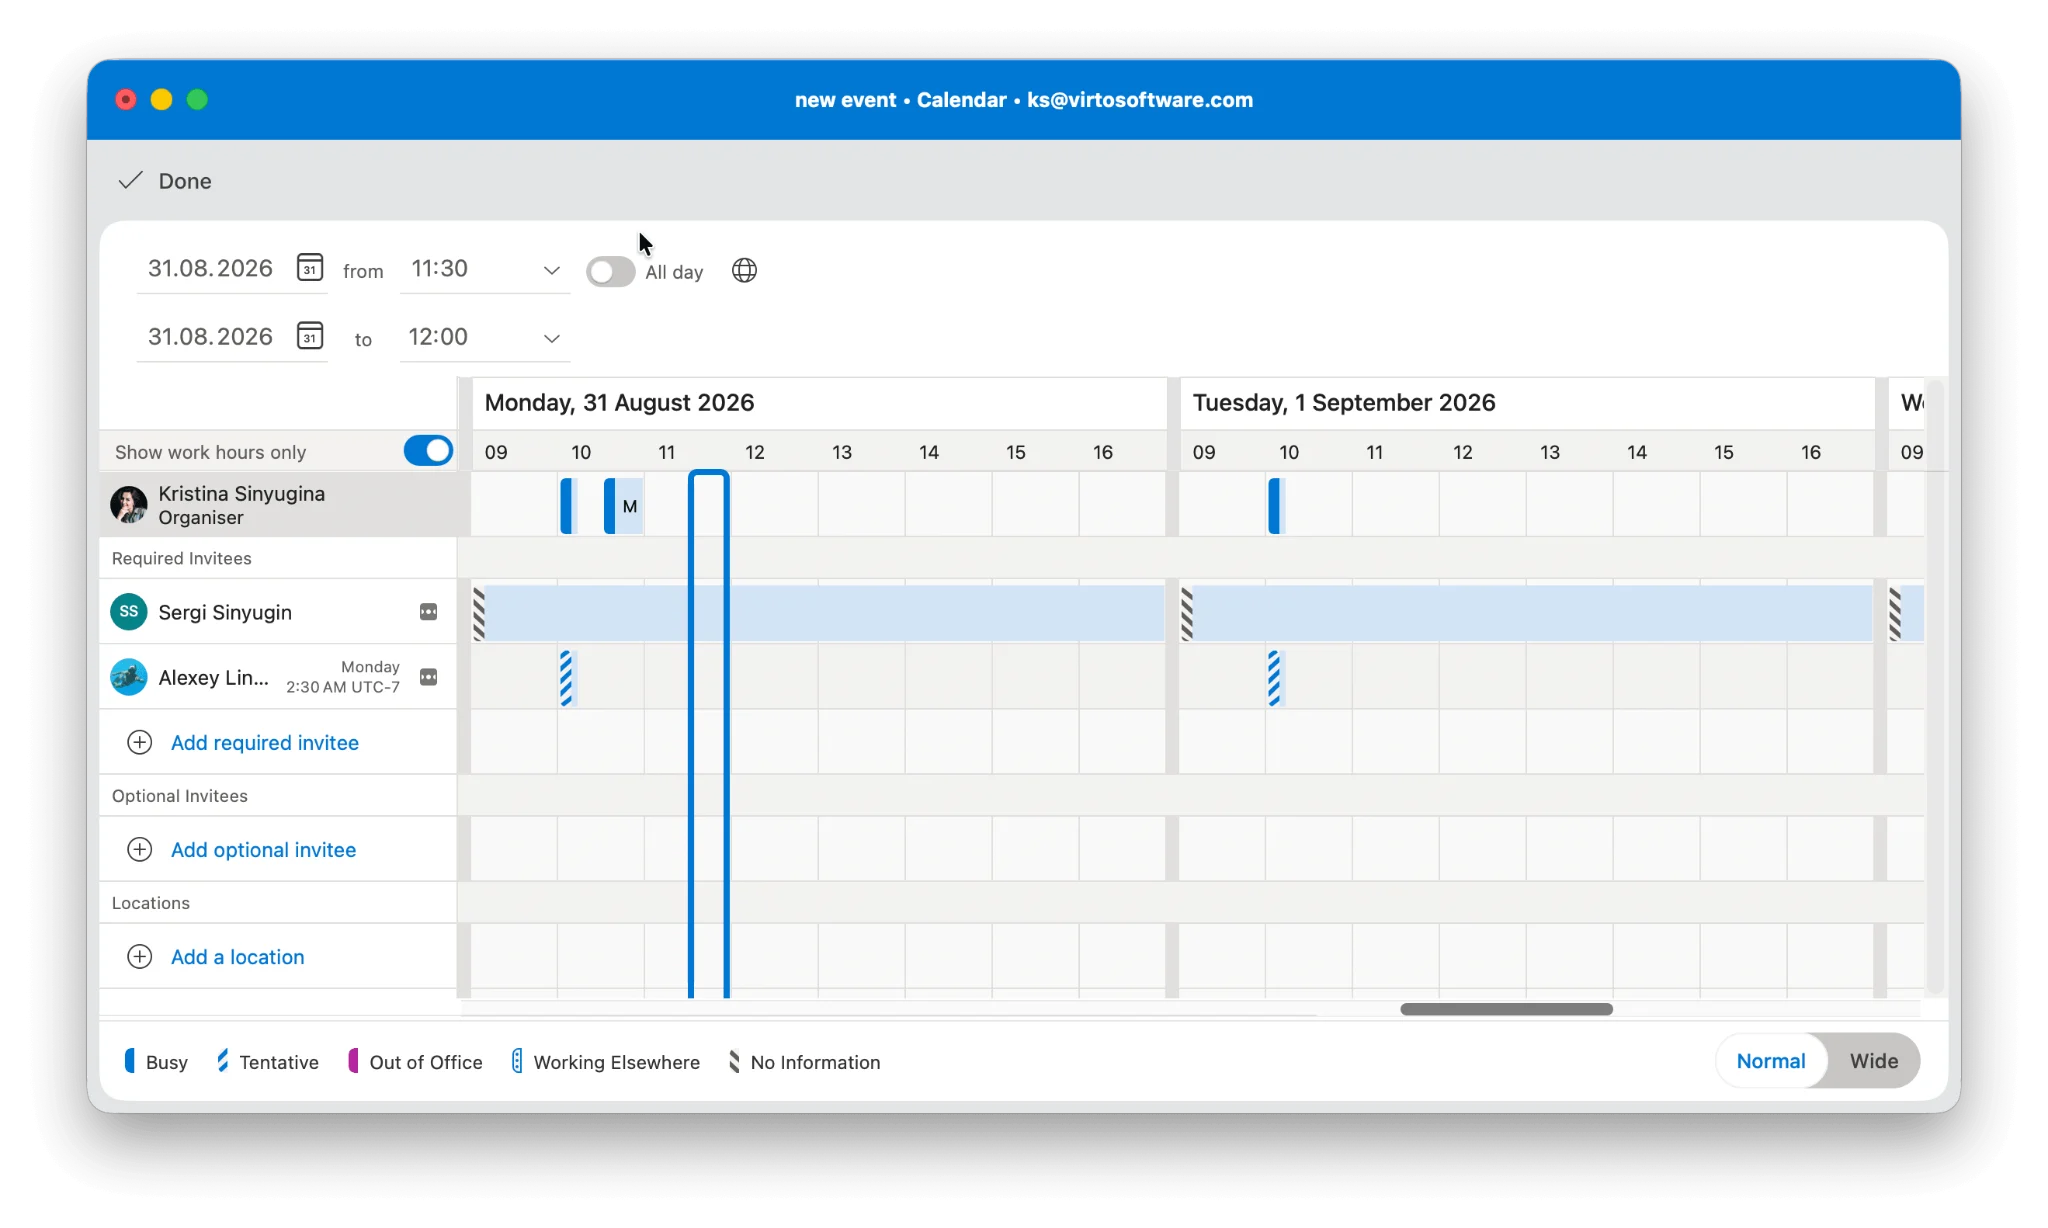
Pic. 2. The availability grid in Outlook for Mac, with the All Attendees row at the top.
The button is grayed out or missing if you started an appointment rather than a meeting, or if your mailbox is an IMAP, POP or Gmail account. Free/busy lookup is an Exchange service — non-Exchange accounts have nothing to query.
New Outlook and Outlook on the web
The two clients share the same interface. Both put the Scheduling Assistant on a tab rather than a ribbon.
- Go to Calendar and click New event, or double-click a time slot to open the event pane.
- Type names into the Invite attendees field. Use the Optional link to split required from optional invitees.
- Click the Scheduling Assistant tab above the form. If you don’t see it, click More options first to expand the compact composer.
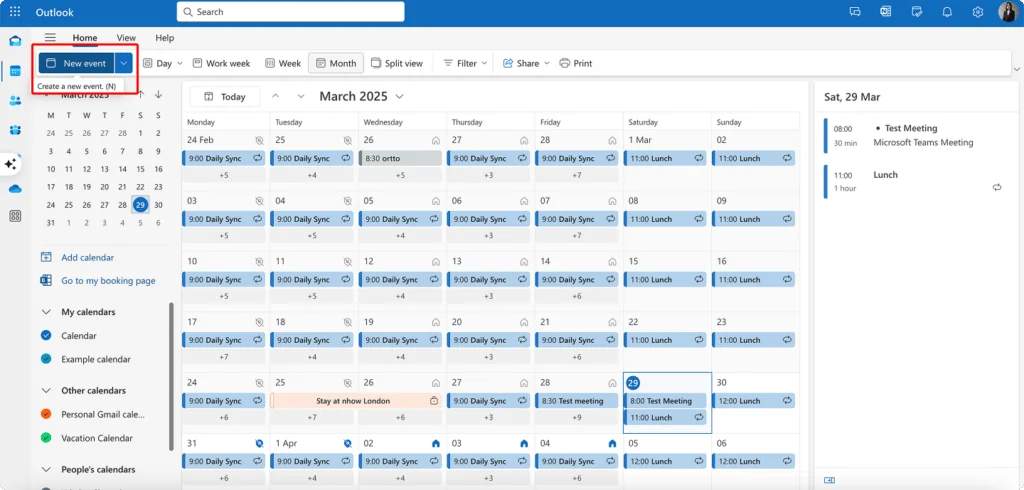
Pic. 3. Creating a new event in Outlook on the web.
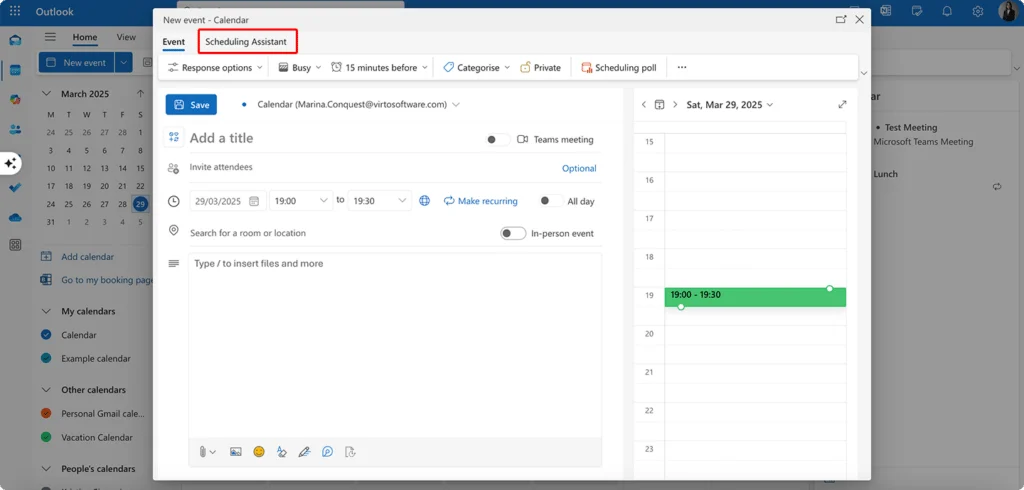
Pic. 4. Opening the Scheduling Assistant tab in Outlook on the web.
- Add a room with Add a room, or type a known room name into the location field. The room appears as its own row.
- Drag the meeting block along the timeline, or click a start time, to move the meeting. The grid updates live as you add people.
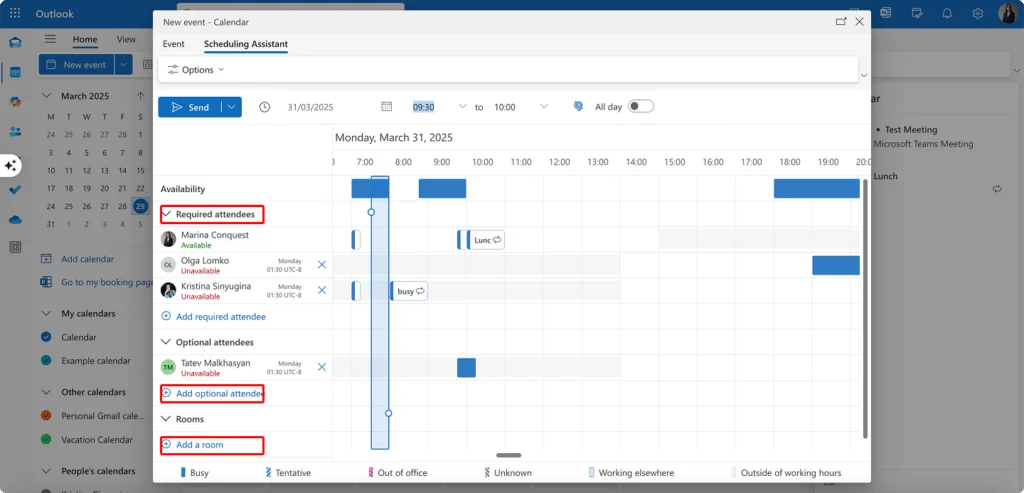
Pic. 5. Required attendees, optional attendees and a room, with availability shown per time slot.
Outlook for iOS and Android
Mobile has no grid. Instead, Outlook folds availability into the date picker: create an event, add attendees, then tap the date field and the app marks each candidate slot green where everyone is free and red where someone is not. Drag the meeting block onto a green band to move it.
It is a genuinely useful simplification for one-to-one meetings on the move, but it hides the detail — you cannot see who is blocking a slot or why. For anything with rooms, resources or more than a handful of people, wait until you are back at a desktop or web client.
How to read the availability grid
Most people read the grid top to bottom, one person at a time. That is the slow way. Read the combined row at the bottom first: it merges every required attendee and every resource into a single line, so the open columns in that row are the only candidates worth looking at.
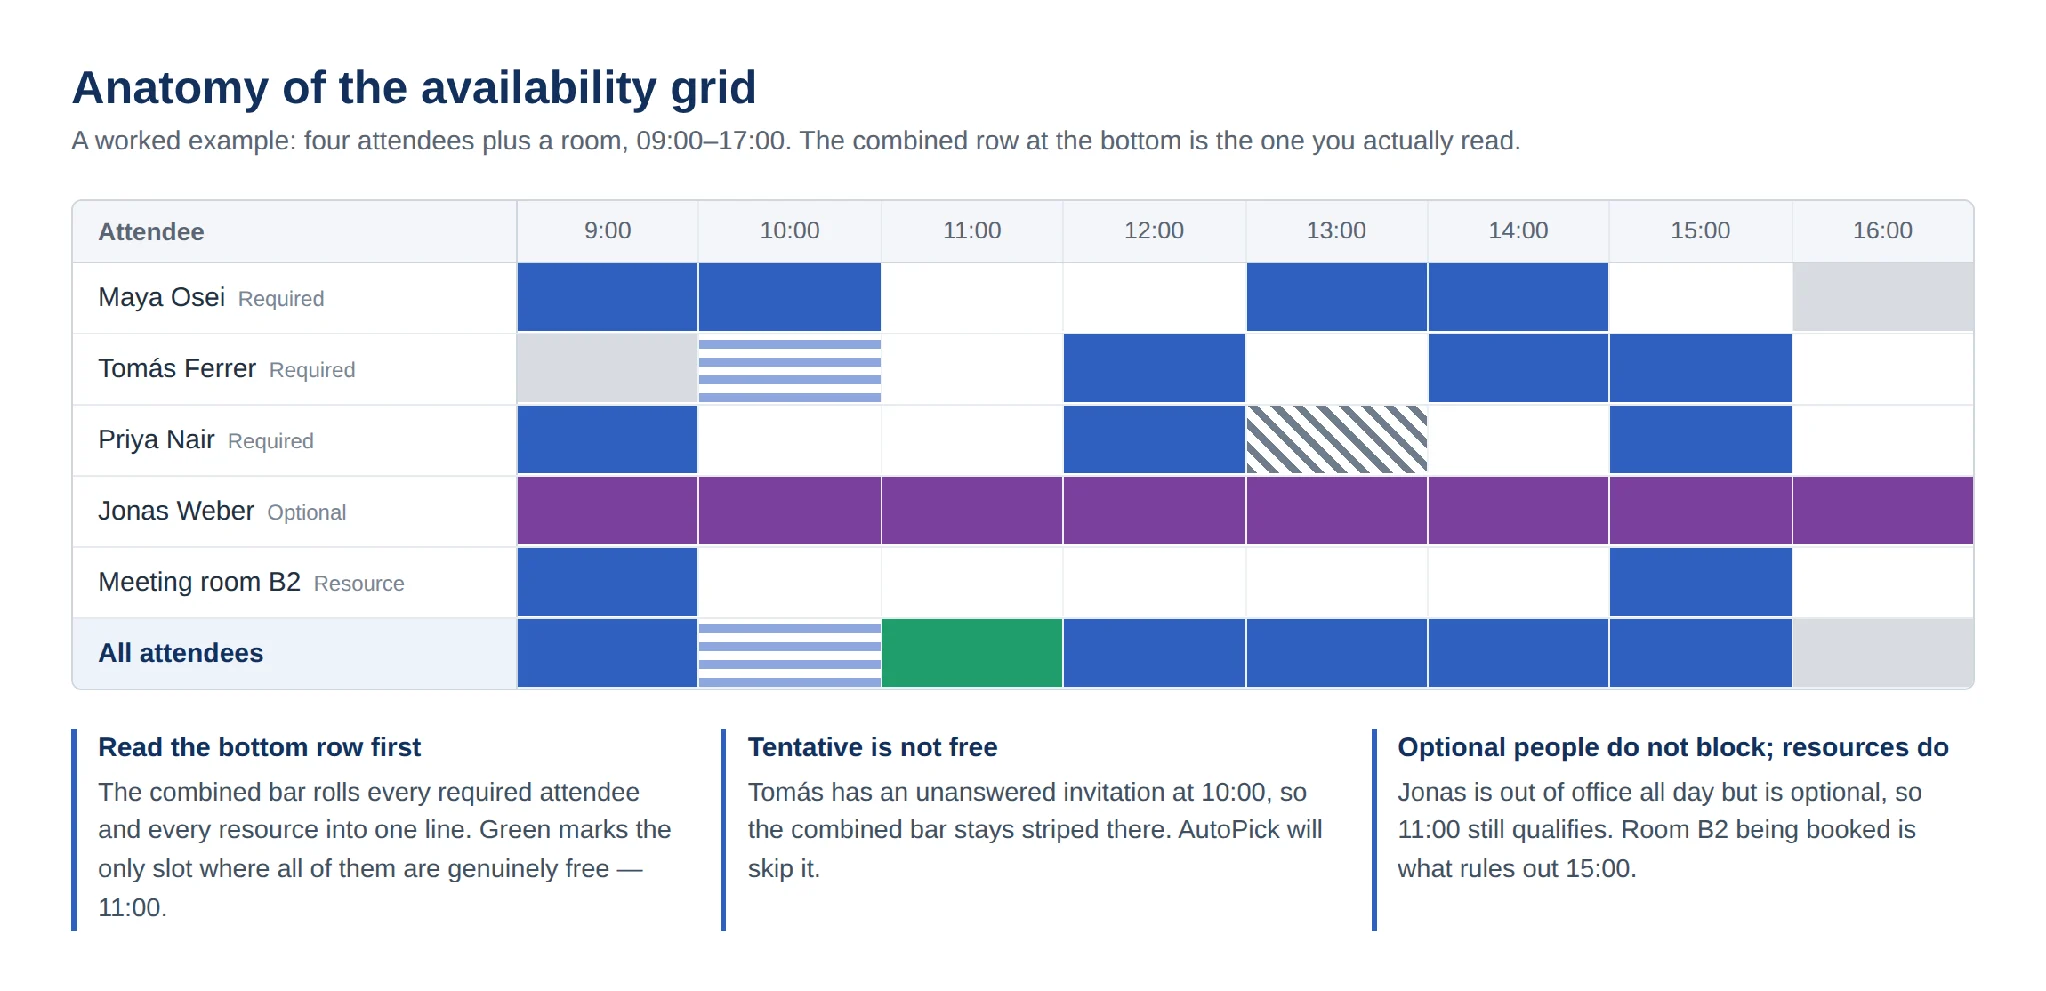
Fig. 3. How to read the availability grid: a worked example with four attendees and a room.
Two things trip people up. Tentative slots are not free — an unanswered invitation still blocks the combined bar and AutoPick will skip past it. And optional attendees never block a suggestion, so if someone important keeps getting scheduled over, check that they are marked Required.
How do I AutoPick in the Outlook Scheduling Assistant?
AutoPick moves the meeting to the earliest time that suits every required attendee and every resource you added. In classic Outlook it is the AutoPick button on the Scheduling Assistant ribbon; in new Outlook and on the web the same thing appears as Suggested times or Find a time.
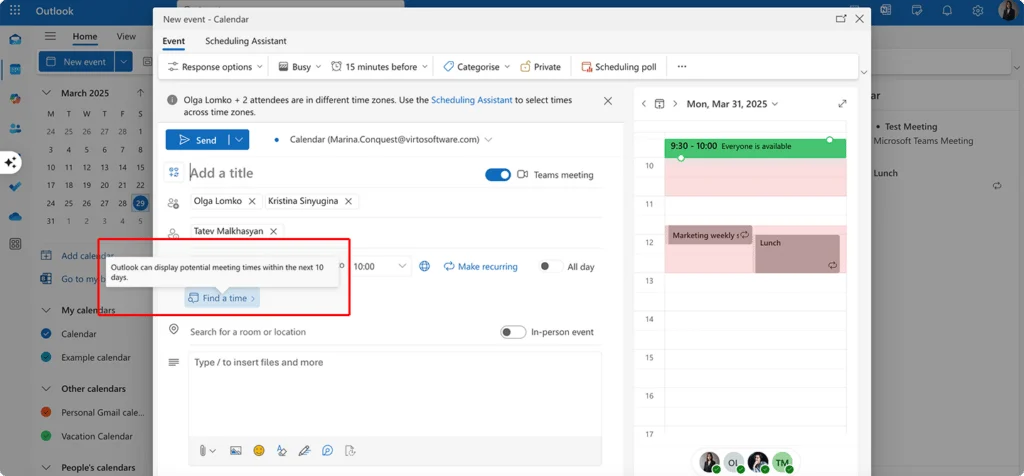
Pic. 6. Using “Find a time” to let Outlook pick the slot.
- Add every attendee first — AutoPick only considers people already on the invitation.
- Click AutoPick (or Suggested times) and let Outlook jump to the next viable slot.
- Click it again to step to the following option if the first one is awkward.
- If nothing works for everyone, Outlook offers the slot that suits the largest number of required attendees and tells you who would miss it.
To look further ahead, use the date navigator above the grid. The right arrow steps forward a day at a time and the calendar icon jumps to a specific date.
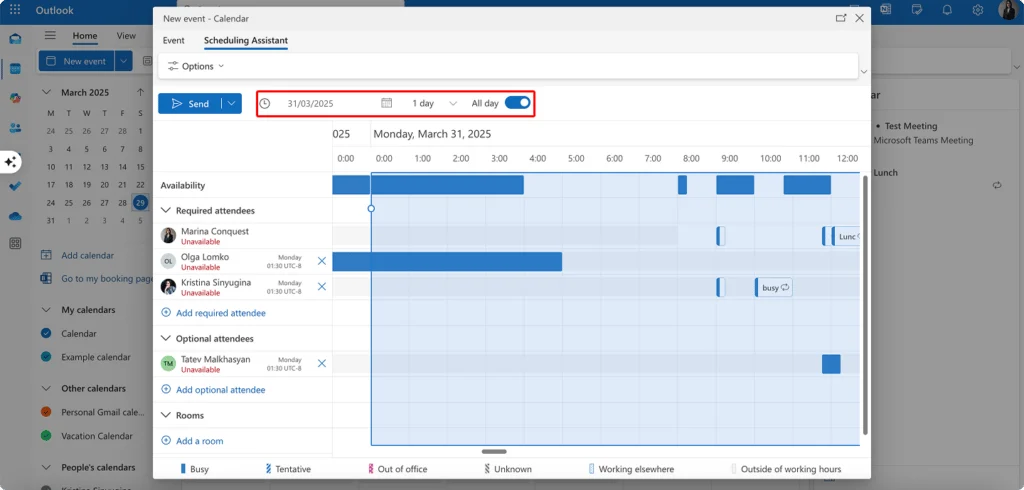
Pic. 7. Moving through dates with the date navigator inside the Scheduling Assistant.
How do I change the Scheduling Assistant view in Outlook?
- Show only working hours. Click Options on the Scheduling Assistant ribbon and toggle Show only my working hours. Turning it off exposes early mornings and evenings — useful for teams spread across time zones.
- Change the time scale. The time-scale dropdown sets the column width. For meetings shorter than the smallest preset, type the exact start and end times in the fields above the grid instead.
- Reorder attendees. Drag names in the attendee column so the people who matter most sit at the top of the grid.
- Filter large invitations. For meetings with dozens of people, the individual rows become unreadable. Work from the combined bar and use the Tracking tab after sending to follow individual responses.
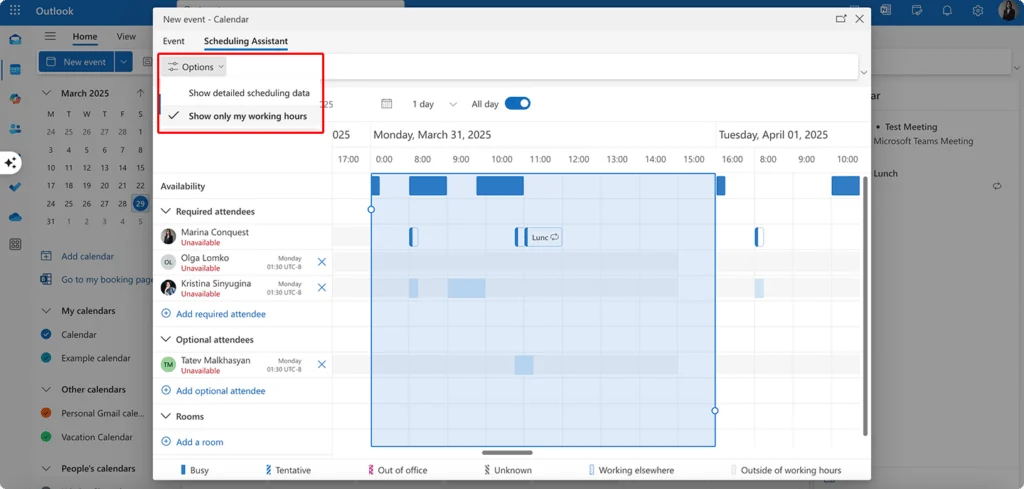
Pic. 8. Restricting the grid to working hours only.
Scheduling recurring meetings
Click Recurrence in the meeting form to set a daily, weekly or monthly pattern before you check availability. The Scheduling Assistant will show conflicts for the first occurrence, which is the important caveat: it does not check every future instance for you. For a long-running series, step through the first few dates with the date navigator to confirm the pattern actually holds.
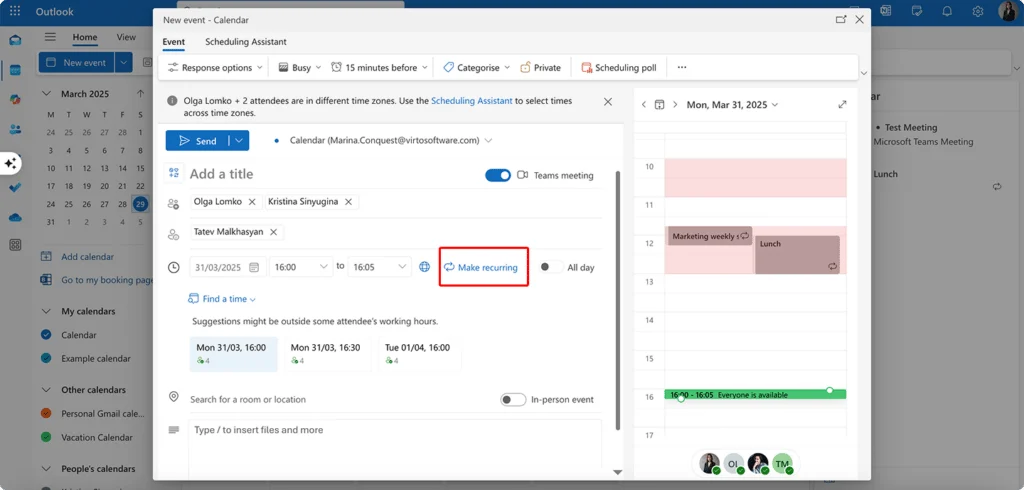
Pic. 9. Setting a recurrence pattern before checking availability.
Booking rooms and equipment
Room and equipment mailboxes behave exactly like attendees in the grid, which is what makes the Scheduling Assistant genuinely useful for hybrid meetings. In classic Outlook, click Rooms… beside the Location field or open the Room Finder pane to filter by building and capacity. In new Outlook and on the web, use Add a room.
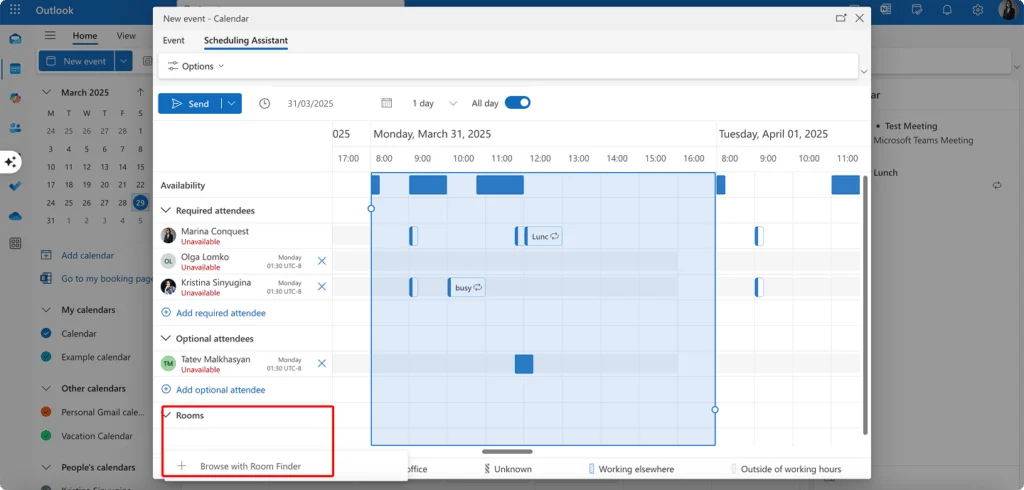
Pic. 10. Browsing available rooms with Room Finder.
Rooms only appear here if your administrator has created them as room mailboxes and given them a booking policy. A room that never shows up in the list is a configuration issue, not a client one.
What Changed in Outlook Scheduling in 2025 and 2026
The Scheduling Assistant itself is a mature feature and Microsoft has mostly been refining it rather than rebuilding it. The changes that matter for scheduling:
- A redesigned grid. The 2024 refresh added clearer grid lines, a consolidated availability bar across all attendees, and a Send button inside the scheduling view so you don’t have to switch tabs to finish. This is now standard everywhere.
- Quieter time zones. Time zone labels appear only for attendees who are in a different zone from the organizer, instead of on every row.
- Faster shared calendars. Changes to shared calendars now propagate immediately rather than on a sync interval, and shared calendars pre-load rather than fetching on click.
- Calendar notifications without Outlook running. Since early 2025 you can keep meeting reminders when the app is closed, via the Send notifications when Outlook is closed setting.
- Selective meeting updates. When you add or remove attendees, Outlook works out who actually needs the update rather than emailing everybody.
- Teammates’ calendars in the navigation pane. Rolling out through 2026, new Outlook shows peers, direct reports and managers directly in the left pane, so you can eyeball a colleague’s week without opening a meeting form.
- Automapped calendars carried over. Calendars automatically mapped in classic Outlook now follow you into new Outlook instead of disappearing on migration.
- Copilot scheduling. Chat Assisted Scheduling lets you ask Copilot in natural language — “find 30 minutes with Priya this week about the Q3 forecast” — and it proposes times from both calendars. It requires a Microsoft 365 Copilot license and is a complement to the Scheduling Assistant, not a replacement: Copilot handles the simple one-to-one cases, the grid still wins for anything with rooms, resources or a dozen people.
Classic Outlook for Windows is not going away imminently. Microsoft has pushed its retirement to at least April 2027, with support for perpetual-license builds running to 2029. If your organization is still on classic, the ribbon workflow above stays valid.
Troubleshooting the Outlook Scheduling Assistant
Why can’t I find the Scheduling Assistant in Outlook?
Almost always one of four things:
- You created an appointment, not a meeting. The Scheduling Assistant only exists on meetings. Add at least one attendee.
- Your account isn’t Exchange or Microsoft 365. IMAP, POP, Gmail and personal Outlook.com mailboxes do not publish free/busy data, so there is nothing to display.
- The ribbon is customized or simplified. Look under the More commands (…) button, or reset the ribbon via File → Options → Customize Ribbon → Reset.
- You’re in the wrong module. Start from Calendar, not Mail. In new Outlook, expand the compact composer with More options before looking for the tab.
Attendee availability is not showing
A row of blank white space does not mean the person is free — it usually means Outlook could not read their calendar. Work through the causes in order; the first one that fails is nearly always the answer.
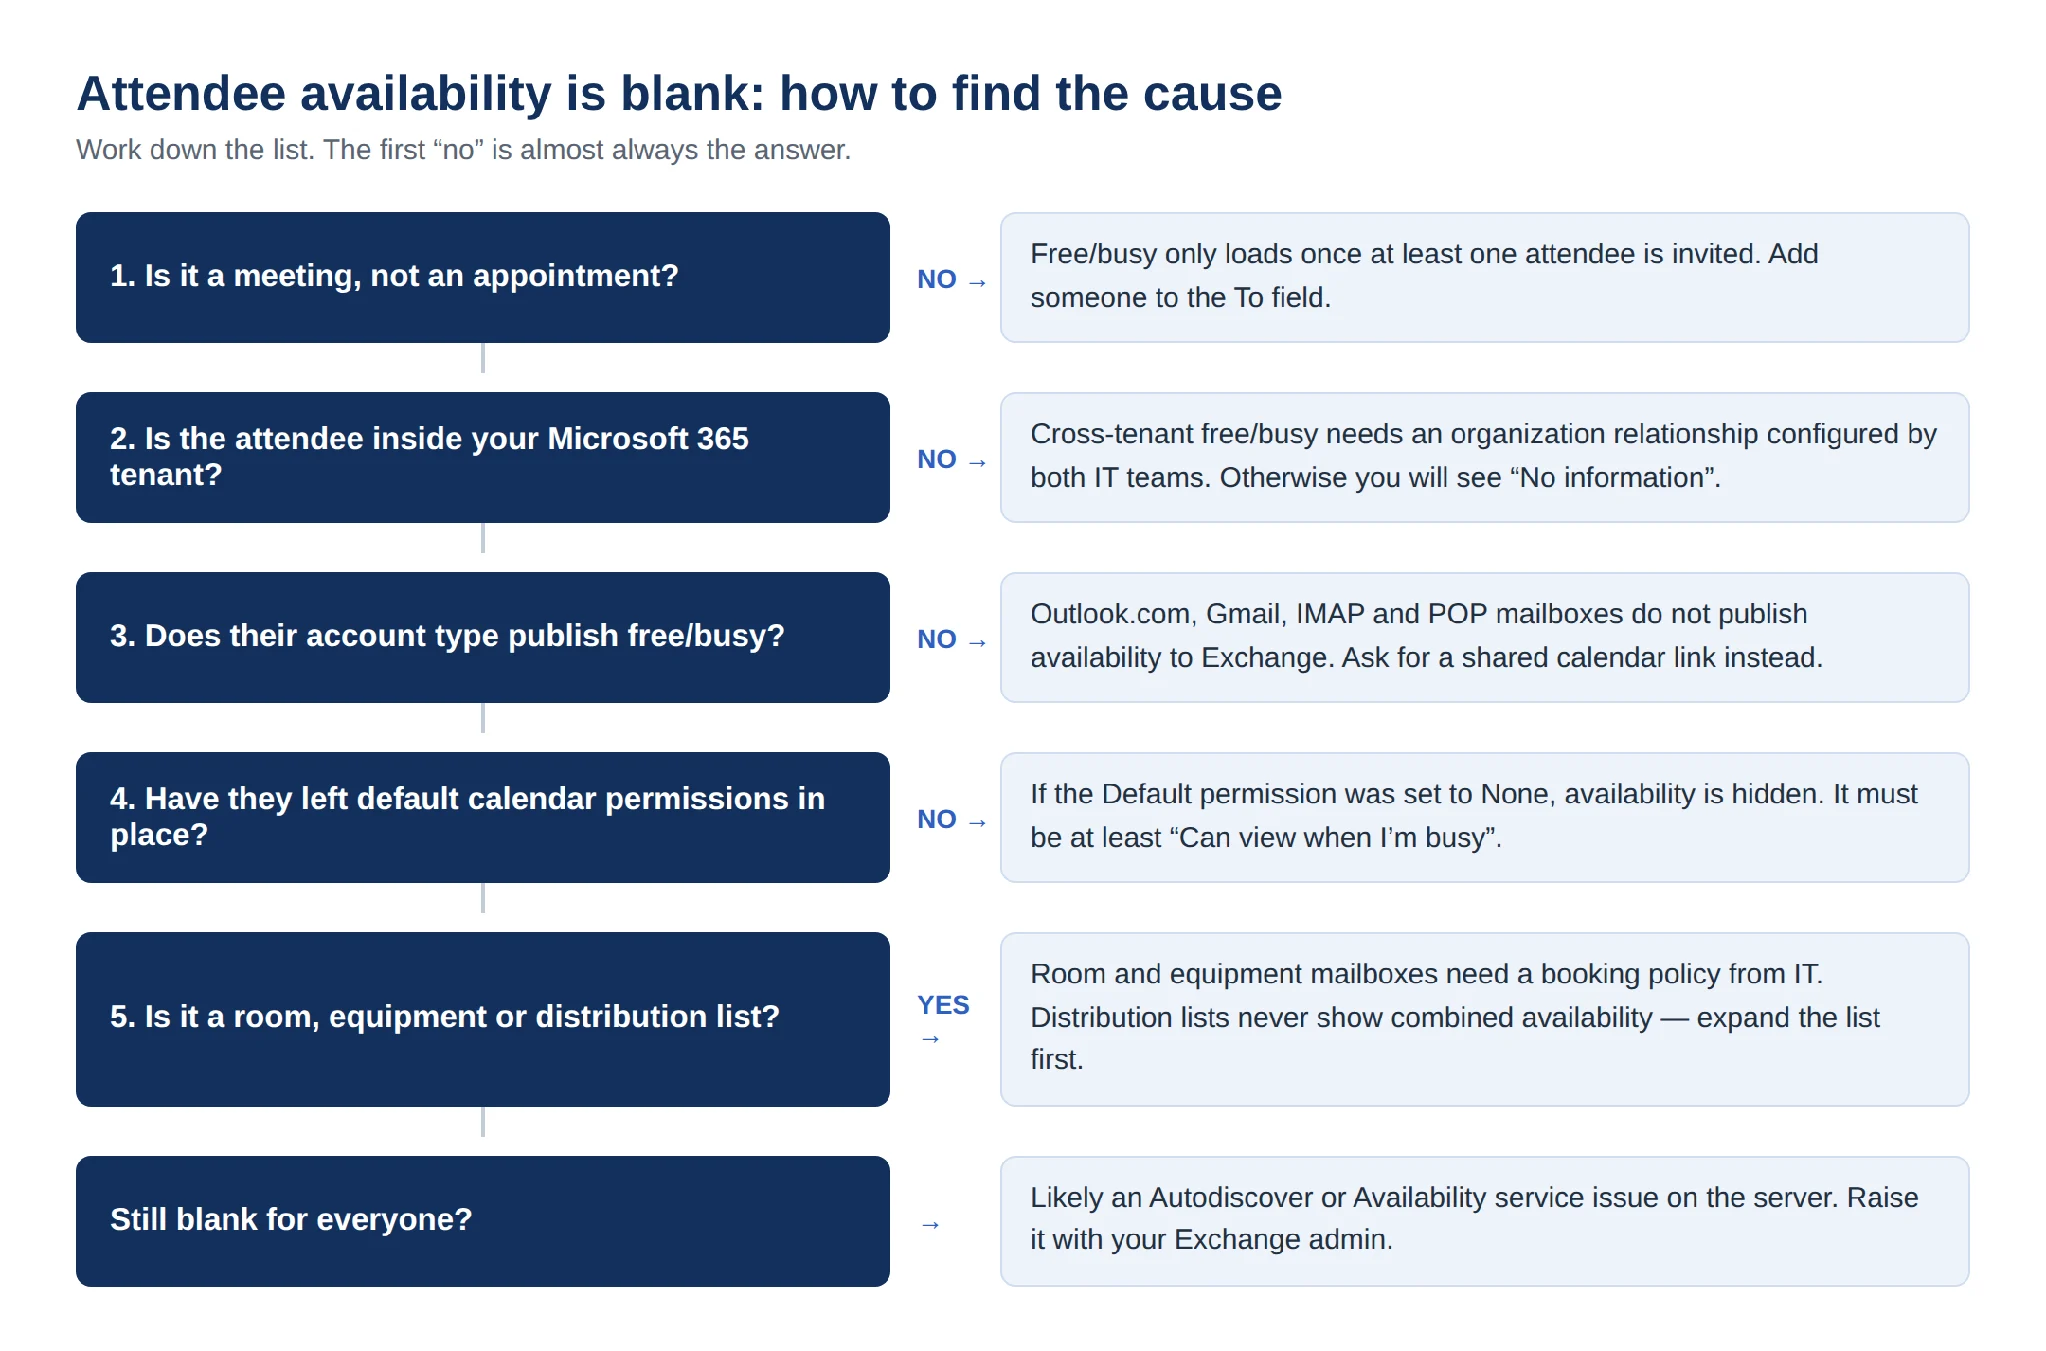
Fig. 4. Diagnosing blank attendee availability in the Scheduling Assistant.
The two most common fixes are on the attendee’s side, not yours. Ask them to check Calendar → Share Calendar → Permissions and confirm that the Default entry is at least Can view when I’m busy; if somebody set it to None, nobody in the organization can see their availability. For external people, cross-tenant free/busy requires an organization relationship configured by both IT teams — without it you will only ever see “No information”.
How to check availability in the Outlook Scheduling Assistant
- Add all attendees to the meeting.
- Switch to the Scheduling Assistant view.
- Look at the combined bar first, then individual rows for anyone you need to accommodate specifically.
- If a row is entirely white across the whole day, treat it as missing data rather than free time, and test with a colleague whose calendar you know is shared correctly.
The grid is slow, stale or half-loaded
If availability loads for some people and then stalls, or shows data you know is out of date, the usual causes are worth checking in this order:
- Too many attendees at once. Adding twenty people in a single paste makes Outlook issue twenty lookups simultaneously. Add them in smaller batches and let the grid settle.
- A distribution list in the To field. Lists do not return combined availability. Expand the list into individual names using the plus icon beside it.
- Cached mode with a stale offline copy. In classic Outlook, free/busy is fetched live, but a struggling connection falls back to cached data. Send/Receive → Update Folder forces a refresh.
- A room mailbox with no booking policy. Rooms configured without a delegate or auto-accept policy often return nothing and hold up the rest of the grid.
Can others see my Outlook calendar details in the Scheduling Assistant?
By default, no. Colleagues see your free/busy status — Free, Busy, Tentative, Out of Office — but not subjects, locations, attendees or notes. You control this under Calendar → Share Calendar → Permissions, where the levels run from Availability only through Limited details to Full details. Anything you mark Private stays hidden even at Full details.
The Scheduling Assistant suggests an inconvenient time
- Check time zones. Verify the meeting’s time zone in the form and your own under File → Options → Calendar → Time zones. Cross-zone confusion is the single most common cause of a bad suggestion.
- Look for invisible conflicts. All-day events, private appointments and unanswered invitations all influence the combined bar without looking like solid blocks.
- Check who’s marked Required. AutoPick ignores optional attendees entirely.
- Override it. Click the column you want, or drag the meeting block. The suggestion is a starting point, not a decision.
- Let attendees vote. Use Poll for time in Outlook on the web when you genuinely cannot find a slot. Note that Propose New Time is only available to invitees after an invitation has been sent — the organizer cannot use it.
Practical Tips for Better Meeting Scheduling
The Scheduling Assistant tells you when people are free. It cannot tell you whether the meeting is a good idea, or whether the slot you picked is one anybody wants. A few habits close that gap:
- Be honest about Required. Every name you mark Required narrows the search. If someone only needs the notes, mark them Optional and let AutoPick do its job.
- Set your own working hours accurately. The gray bands come from each person’s Outlook settings. If yours still say 9-to-5 after you moved to a four-day week, the whole organization is scheduling over your day off.
- Block focus time as Busy, not Free. Time marked Free is invisible to the Scheduling Assistant, which is why deep-work blocks get eaten first.
- Don’t book the first slot AutoPick offers by reflex. The earliest available time is often somebody’s only gap between two other meetings. Step forward once or twice and look for a slot with breathing room either side.
- Watch the edges of the day for distributed teams. Turn off Show only my working hours when scheduling across time zones so you can see who would be joining at 7 a.m. — then choose not to do that to them.
- Check the second occurrence of a recurring series. Availability is only verified for the first date. One click forward on the date navigator catches most recurring conflicts before they happen.
- Add the room before you settle the time. Rooms are usually scarcer than people. Booking the slot first and hunting for a room afterwards is the wrong order.
- Use the agenda field. A meeting with a stated purpose gets accepted faster, which keeps tentative blocks from clogging up everyone else’s grid.
Limitations of the Outlook Scheduling Assistant
The Scheduling Assistant is excellent at one job: finding a slot for a defined group of people inside one Microsoft tenant. Push it beyond that and the gaps show up quickly.
| Where it struggles | What actually happens |
|---|---|
| Large meetings | Past roughly a dozen attendees the individual rows stop being readable, and there is no way to group people by team or seniority. |
| External attendees | Free/busy across organizations needs a configured trust relationship. Without one, everyone outside shows as “No information”. |
| Non-Microsoft calendars | Google Calendar and iCloud have no native two-way sync. ICS subscriptions are read-only and refresh on a delay. |
| Recurring series | Availability is checked against the first occurrence only. Later instances can land on conflicts nobody sees until the invitation arrives. |
| Custom patterns | Standard daily, weekly and monthly recurrence only — no “first Monday and third Thursday”, no skipping holiday weeks. |
| Meeting templates | No native way to save a meeting type with predefined attendees, duration and resources. |
| Aggregate views | You can see individuals, but not a team’s combined workload, a department’s leave, or project deadlines alongside meetings. |
| Voting | The desktop grid has no polling. Time polls live in Outlook on the web and FindTime, separately. |
None of these are bugs. The Scheduling Assistant was built to answer one question — when is this specific group free — and it answers it well. Broader calendar visibility is a different problem that needs a different tool.
When You Need More Than Free/Busy: Virto Calendar App
If your scheduling problem is really a visibility problem — leave you cannot see, external calendars you cannot read, project deadlines that live somewhere else entirely — the fix is not a better meeting form. It is a calendar that shows all of those sources in one place.
The Virto Calendar App does that inside Microsoft 365, SharePoint Online and Microsoft Teams. It overlays unlimited calendars — Exchange and Outlook calendars, SharePoint lists, Planner tasks, Google Calendar, iCal and HTTP feeds — into a single color-coded view, so the context the Scheduling Assistant cannot reach sits next to the meetings it can.
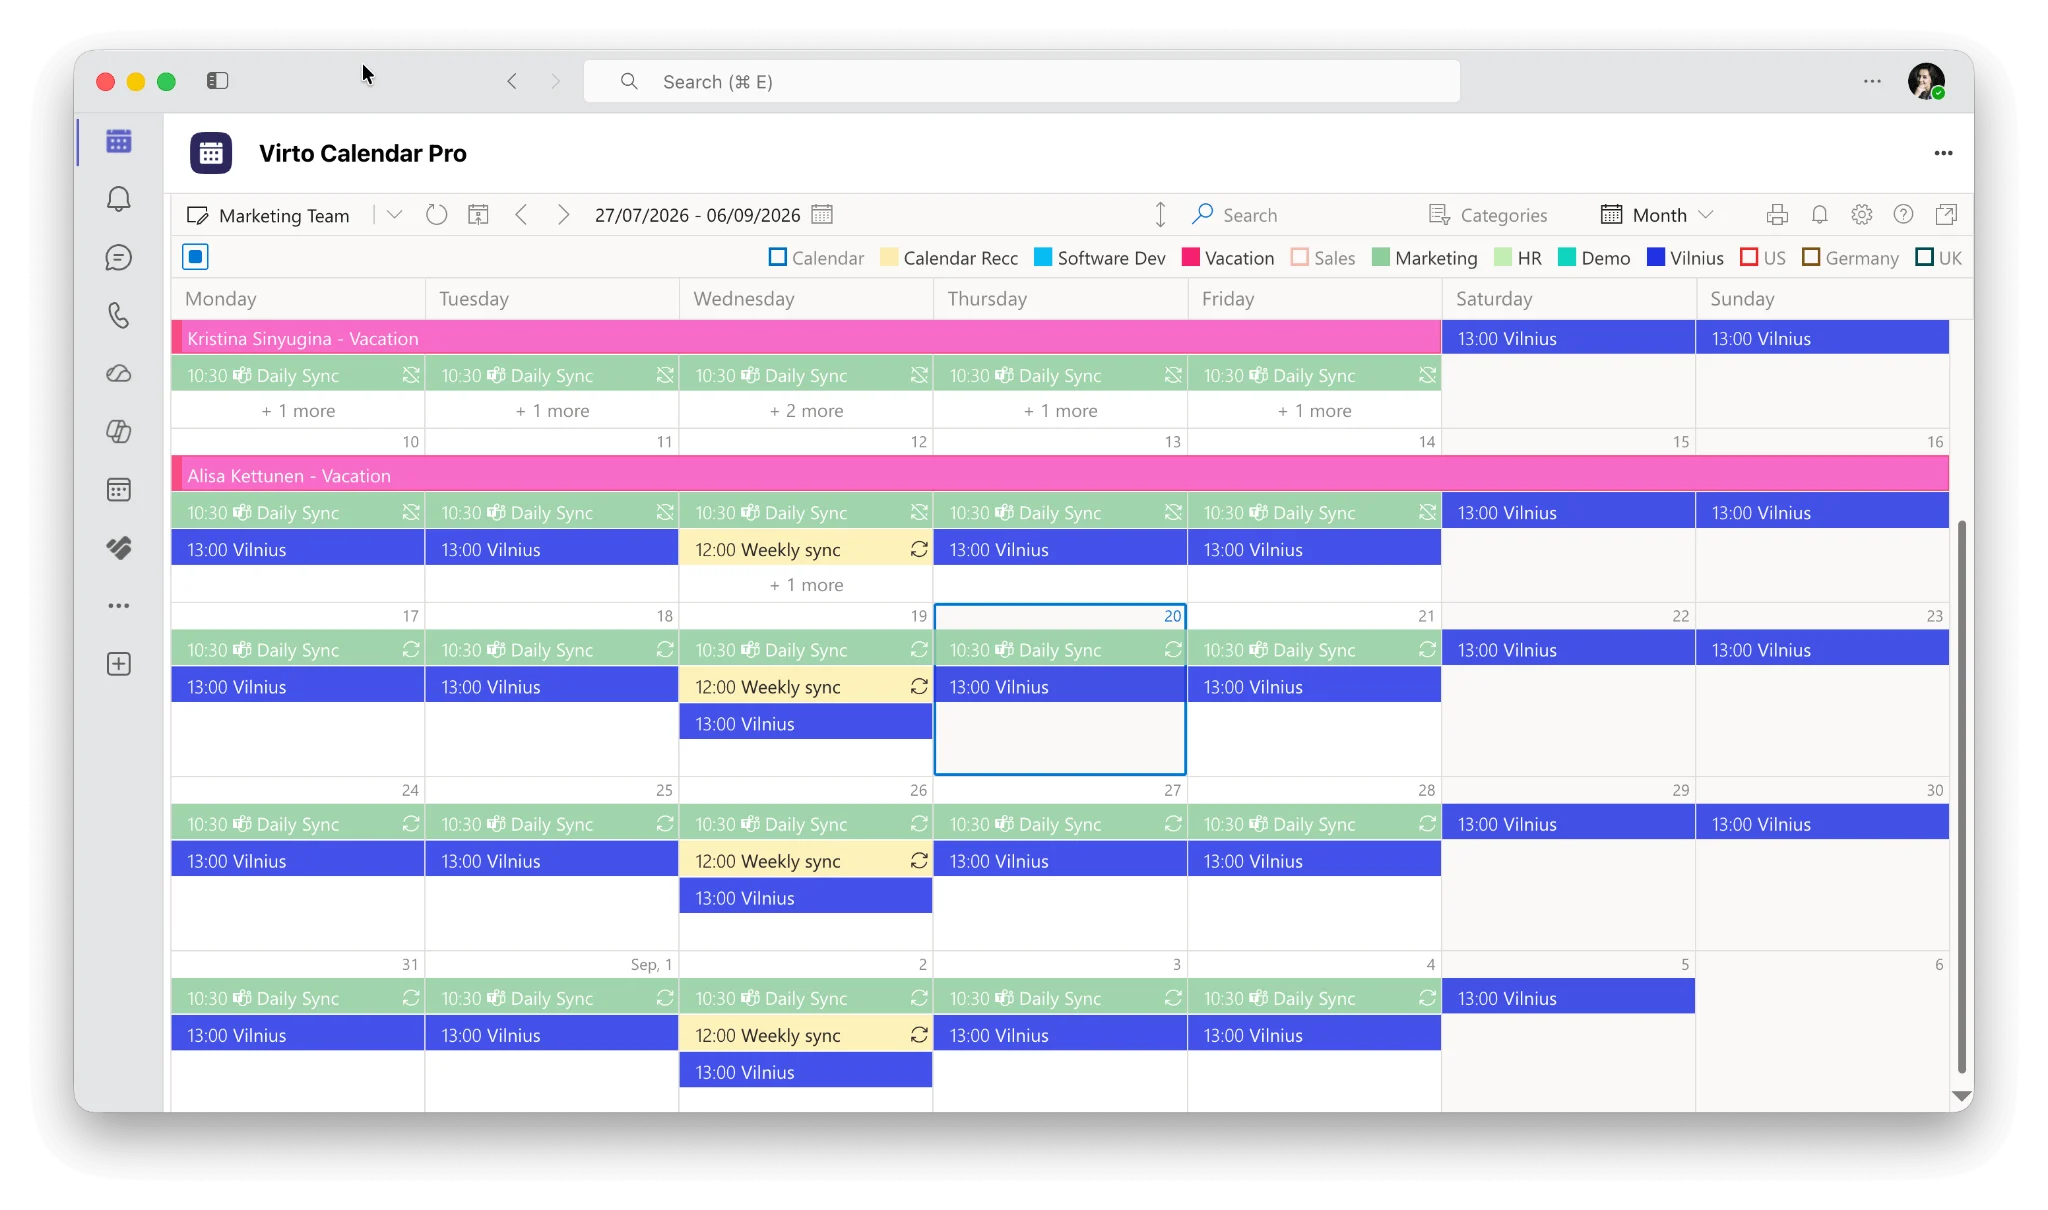
Pic. 11. Multiple sources overlaid in a single color-coded Virto Calendar view.
What it adds on top of the Scheduling Assistant
- One view across sources. Personal, team, department and project calendars in a single grid, each toggleable, across day, week, month, year, flat-year and agenda views.
- Calendars that aren’t Microsoft. Google Calendar, iCal and HTTP feeds come in as first-class sources rather than read-only subscriptions bolted on the side.
- Color coding and categories. Color by source, by category or by event attribute, so leave, deadlines, customer meetings and internal reviews are distinguishable at a glance.
- Team availability, not just free/busy. Approved time off, project milestones and workload sit in the same view as meetings — the aggregate picture Outlook cannot assemble.
- It lives wherever you already work. Install it once from Microsoft AppSource and add it as a personal app in Microsoft Teams, Outlook and the Microsoft 365 app, pin it as a tab in a Teams channel, or embed it as a web part on a SharePoint page. Same calendar, same settings, whichever surface you open it from.
- Role-based permissions. Control which calendars and which level of detail each group sees, including time-limited access for contractors.
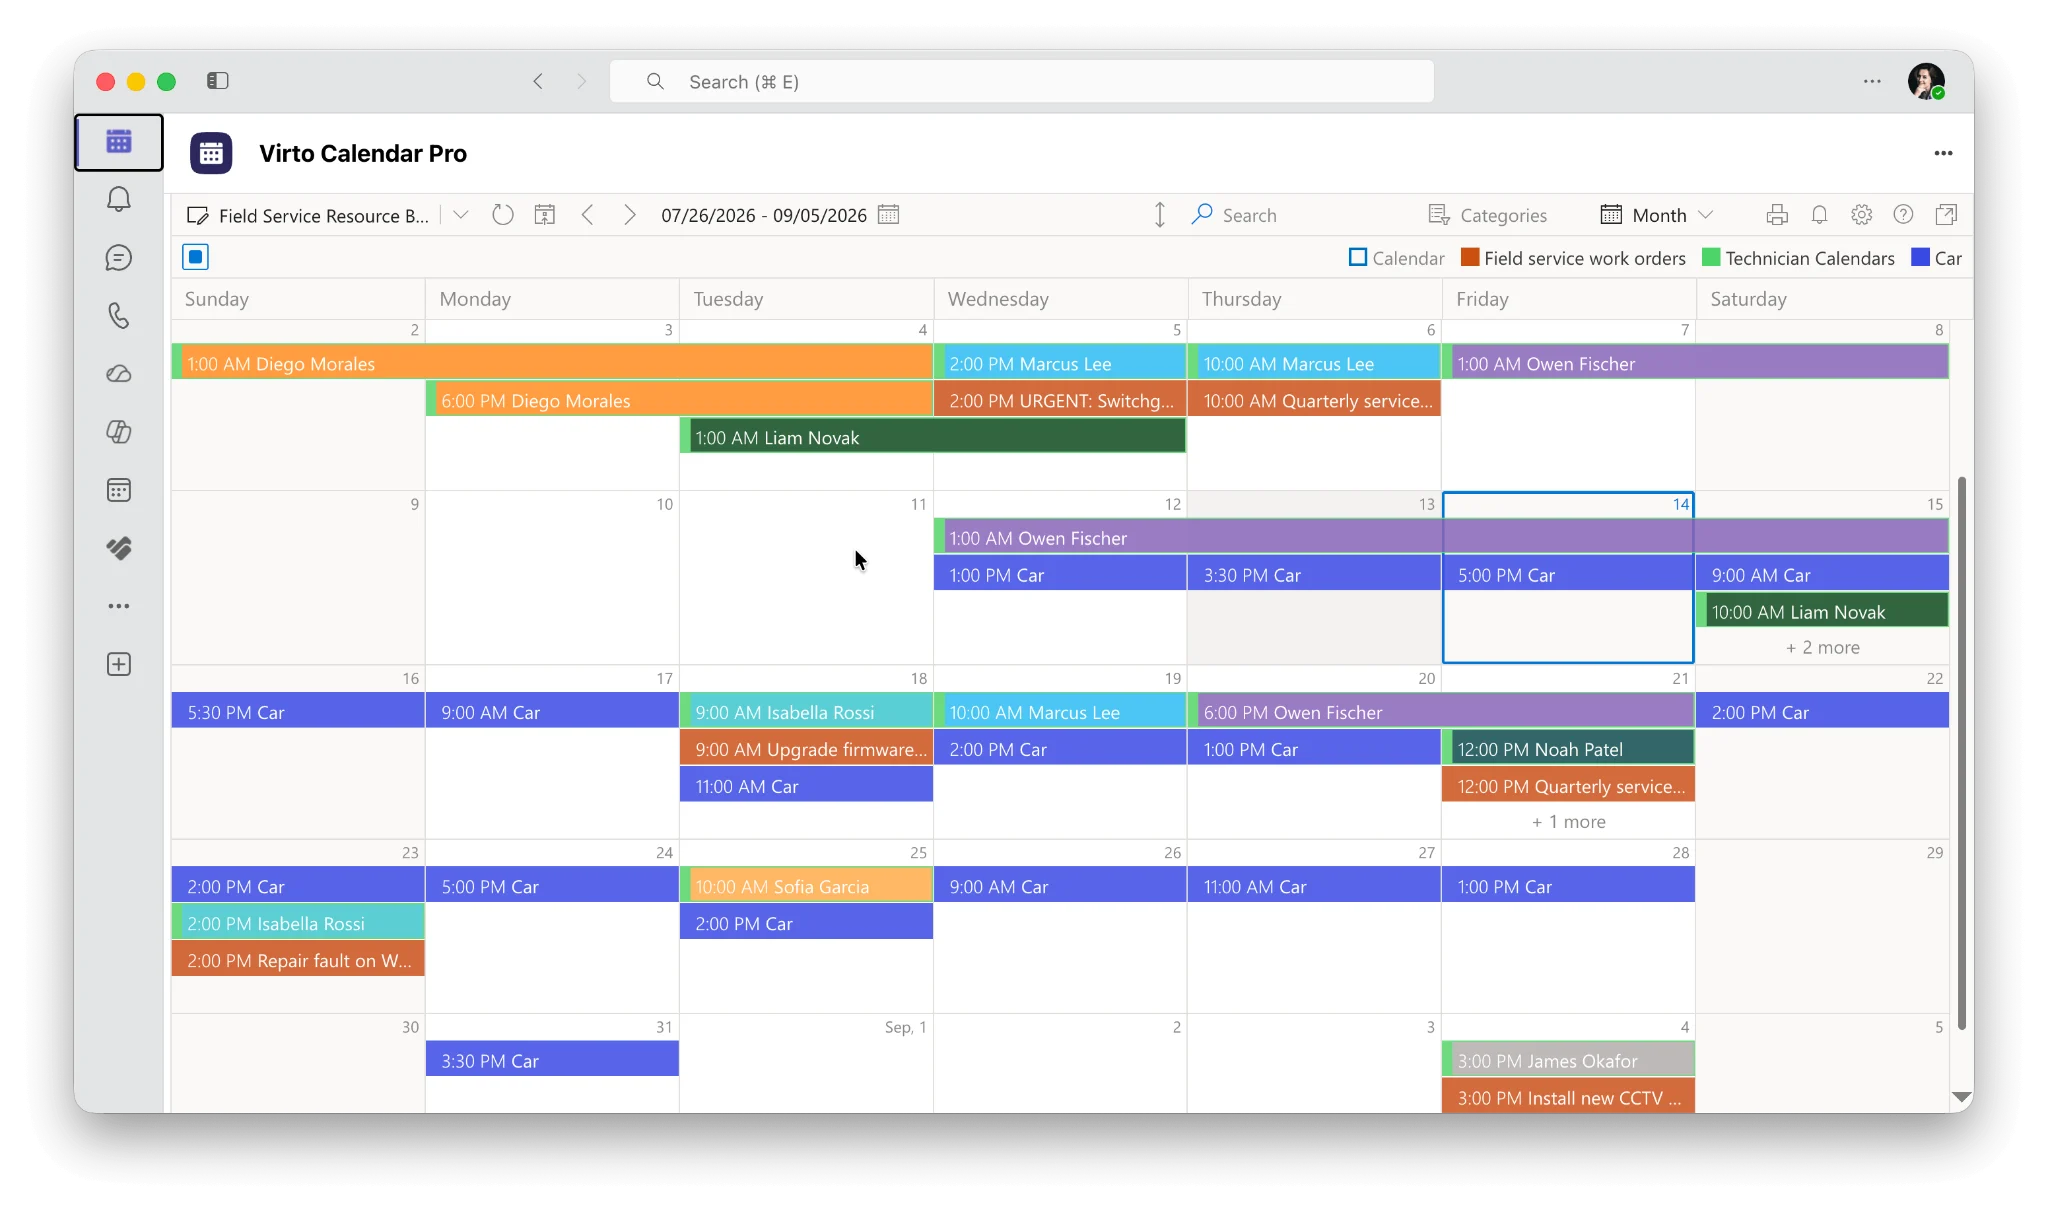
Pic. 12. Virto Calendar running inside Microsoft Teams.
Where you can add the Virto Calendar App
- As a personal app in Microsoft Teams. Pin it to the Teams sidebar and open your consolidated calendar without leaving Teams.
- As a tab in a Teams channel. Give a project or department its own shared calendar next to the conversation and files.
- In Outlook. Add it alongside your mailbox so the overlay sits next to the calendar you already schedule from.
- In the Microsoft 365 app. Reach the same calendar from the Microsoft 365 app launcher on any device.
- As a SharePoint web part. Drop it onto an intranet or team site page so anyone visiting the site sees the calendar in context.
It is the same app and the same configuration in every case — install it once from Microsoft AppSource and choose the surfaces that suit each team. People who live in Teams get it in Teams; people who live in Outlook get it in Outlook; the intranet gets it on a page.
A common setup is to keep both. Use the Scheduling Assistant for the mechanics of booking a slot, and Virto Calendar for the context around it: check the team’s leave and project deadlines in the overlay, confirm an external collaborator’s Google Calendar, then open the meeting form and let AutoPick do its job. Because the overlay is available as an app in Teams, Outlook and the Microsoft 365 app as well as on a SharePoint page, that context is one click away from wherever you happen to be scheduling — including inside Microsoft Teams, where it can sit in the channel the work is being discussed in.
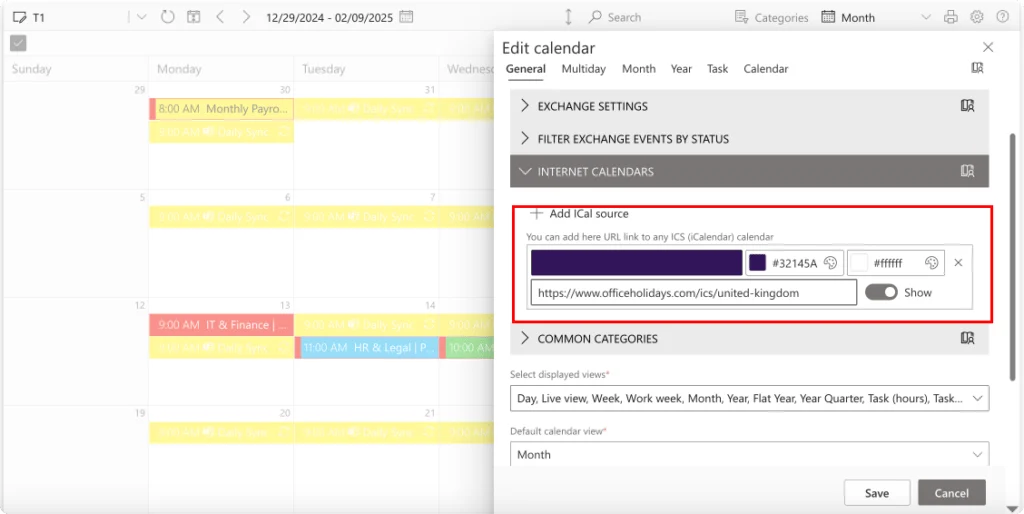
Pic. 13. Adding an external iCal feed as a calendar source.
Virto Calendar is available on Microsoft AppSource with a 30-day free trial, and every Virto app carries the same 30-day trial period.
Two scenarios where the combination pays off
Coordinating across organizations. A project manager needs a kickoff with four internal people and two partners on Google Workspace. The Scheduling Assistant covers the internal four but shows “No information” for the partners. With the partners’ calendars added to Virto Calendar as external feeds, the manager checks their week in the overlay, narrows it to two viable days, then uses AutoPick within those days to settle the internal side. The invitation goes out once instead of three times.
Scheduling around leave. An HR lead is booking interview panels for the next month. Approved time off lives in a SharePoint list, not in anyone’s Outlook calendar, so the Scheduling Assistant cannot see it and keeps proposing weeks when half the panel is away. Surfacing that list in Virto Calendar alongside the team’s Outlook calendars makes the gaps obvious before any invitation is drafted — and permissions keep the reason for each absence private while the dates stay visible.
Frequently Asked Questions
Does Outlook have a built-in meeting scheduler?
Yes. The Scheduling Assistant is included in every current version of Outlook — classic and new Outlook for Windows, Outlook for Mac, Outlook on the web, and in simplified form on iOS and Android. There is nothing to buy or install, but it requires an Exchange or Microsoft 365 account to read attendee availability.
Why is the Scheduling Assistant grayed out?
Either you are editing an appointment rather than a meeting, or your mailbox cannot query free/busy. Add at least one attendee to convert the item into a meeting. If it stays grayed out, check your account type: IMAP, POP, Gmail and personal Outlook.com mailboxes have no availability service to query.
Can the Scheduling Assistant see external attendees’ calendars?
Only if both organizations have configured a free/busy sharing relationship in Exchange or Microsoft 365. Without one, external attendees appear as “No information” regardless of how their own calendar is set up. Sending a time poll, or overlaying their published calendar in a tool that supports external feeds, is the practical workaround.
What is the difference between AutoPick and Suggested times?
They are the same feature under different names. Classic Outlook for Windows calls it AutoPick; new Outlook and Outlook on the web call it Suggested times or Find a time. All of them jump to the earliest slot where every required attendee and every resource is free.
Does the Scheduling Assistant check every date in a recurring series?
No. It validates availability against the first occurrence only. Later instances can land on conflicts that nobody sees until the invitation arrives. Step through the first few dates with the date navigator before sending a long-running series.
Can people see what my meetings are about?
Not by default. Colleagues see only your free/busy status. Subjects, locations and attendee lists stay private unless you raise your calendar sharing permission to Limited details or Full details, and anything marked Private stays hidden even then.
Does Copilot replace the Scheduling Assistant?
No — it sits alongside it. Copilot’s Chat Assisted Scheduling is quicker for simple requests like a one-to-one or a focus block, since you describe what you want in plain language. The grid remains the better tool whenever rooms, equipment, optional attendees or a large group are involved, because you can see the trade-offs rather than accepting a proposal.
Conclusion
The Outlook Scheduling Assistant is still the fastest way to answer one question: when is this group of people free? Open a meeting, add attendees, read the combined bar, click AutoPick. Two minutes of learning it saves an email thread every week.
Its limits are equally clear. It reads free/busy inside your tenant and little else — no external calendars, no aggregate team view, no leave, no deadlines, and no reliable check on a recurring series beyond its first date. Those are not things a meeting form was ever meant to do.
When you hit them, add a calendar layer rather than replacing the one you have. The Virto Calendar App consolidates Microsoft 365, SharePoint, Planner, Google and iCal sources into one color-coded view inside Teams and SharePoint, and it complements the Scheduling Assistant instead of competing with it. You can book a short demo or browse the apps and start a 30-day free trial.
Further reading
Official Microsoft documentation:
- Use the Scheduling Assistant and Room Finder for meetings in Outlook
- Schedule a meeting or event in Outlook
- How do I use the Scheduling Assistant to find meeting times?
- Schedule with Outlook on the web
- Schedule a meeting using Copilot
More from VirtoSoftware: