



Scheduling a meeting in Microsoft Teams is easier than ever—but are you using all the powerful features available to streamline collaboration and avoid common pitfalls? This guide covers everything you need to know.
Quick answer: to schedule a Teams meeting, open Teams > Calendar > New meeting, add a title, attendees and time, then Send — or schedule it from Outlook with the Teams add-in.
Microsoft Teams has become the go-to platform for video conferencing and collaboration, letting you schedule meetings, organize team events, and work seamlessly with other Microsoft 365 tools.
Teams makes online meetings straightforward, whether you’re connecting with colleagues down the hall or partners across the globe. The platform removes traditional barriers to virtual collaboration, letting you focus on your work rather than wrestling with technology.
This guide walks you through the complete process of creating, setting up, and managing Teams meetings from start to finish. We’ll cover everything from basic scheduling to advanced customization options, while providing solutions to common issues you might encounter along the way.
By the end of this article, you’ll know:
- how to schedule a meeting in Teams,
- how to set up a meeting in Teams,
- how to send Teams meeting invite,
- how to start a Teams meeting,
- how to resolve common issues with Teams meetings,
- how to use alternative solutions like Virto Calendar for better scheduling.
What Is Microsoft Teams and How Is It Used for Meetings & Scheduling?
Whether you need to have a quick check-in with a colleague or host a company-wide webinar, Teams provides the tools to make your meetings productive and accessible.
Overview of Microsoft Teams as a meeting platform
Microsoft Teams serves as a complete video calling and online meeting solution that goes far beyond basic text messaging. While many users initially experience Teams as a chat platform, its robust meeting capabilities form the backbone of remote and hybrid collaboration for organizations of all sizes.
With Teams, you have multiple options for connecting with colleagues and external partners. You can schedule meetings well in advance with detailed agendas, start impromptu discussions when urgent matters arise, or host structured webinars for larger audiences. The platform gives meeting organizers granular control over who can join, speak, present, and access meeting content.
Teams comes in both free and paid versions, with important differences in meeting functionality. The free version has limitations, while paid Microsoft 365 subscriptions remove time limits and expand participant capacity up to 300 participants. Paid versions also unlock advanced features like meeting recordings, transcription, breakout rooms, and enhanced security controls.
Benefits of using Microsoft Teams for meetings
Below are a few key benefits of the Microsoft Teams platform:
- Integration with Microsoft 365, Outlook, and OneDrive
Teams doesn’t exist in isolation—it’s built to work seamlessly with the entire Microsoft ecosystem. You can schedule meetings directly from Outlook, and any changes automatically sync between your Teams and Outlook calendars, eliminating scheduling confusion.
Meeting content stays organized without extra effort. Recordings are automatically saved to OneDrive or SharePoint, making them easily accessible to all participants. Any files shared during meetings are similarly stored in shared locations, creating a persistent record of your collaboration.
Meeting action items don’t have to live in scattered notes. With Microsoft Planner and To Do integration, you can create and assign tasks directly from meeting conversations, turning discussions into trackable work.
- Flexible scheduling—support for instant and scheduled meetings
Teams adapts to your workflow rather than forcing you into rigid meeting patterns:
For planned discussions, scheduled meetings allow you to set the agenda, invite participants, attach relevant documents, and establish recurring events that appear on everyone’s calendar.
When issues can’t wait, instant meetings let you transform a chat conversation into a face-to-face discussion with a single click—no calendar invites required.
- Connect from any device
The modern workplace doesn’t happen in just one place. Teams meetings are accessible from wherever you work:
Join from Windows, Mac, or Linux computers through the dedicated app
Connect via iOS and Android smartphones and tablets
Participate through any modern web browser without installing software
Call in from traditional phones when internet access isn’t available
Support for large events
Teams scales beyond small group meetings to support organizational communication needs:
Webinar capabilities support interactive sessions with up to 1,000 participants
Live events can reach audiences of up to 10,000 viewers
Advanced production tools help create professional broadcasts
Engagement features like Q&A, polls, and chat keep large audiences involved
Security features—manage access and privacy
Teams incorporates enterprise-grade security throughout the meeting experience:
- Meeting organizers can precisely control who can join, present, share screens, and access recordings
- Administrators can establish organization-wide policies for external guest access
- End-to-end encryption protects sensitive communications from eavesdropping
- The lobby feature lets you personally review and admit participants, preventing unwanted access
- Compliance frameworks ensure meetings meet GDPR, ISO 27001, HIPAA, and other regulatory requirements, making Teams suitable for even the most security-conscious industries
👉 For more information on Microsoft Teams, check out our dedicated guides:
- How to Use Microsoft Teams: A Beginner’s Guide
- Mastering Microsoft Teams Chat for Better Communication
- Microsoft Teams Channels: How to Create and Use Them Effectively
- How to Use and Manage Microsoft Teams Channel Calendar
- How to Set Out of Office in MS Teams: Guide, Troubleshooting & Tips
- Microsoft Teams Governance for Enhanced Collaboration and Security
- How to Create and Set Up a Teams Meeting in Outlook Easily
Microsoft Teams plans and pricing
Microsoft offers several Teams plans to accommodate different business needs and budgets. Understanding these options helps you select the right version for your organization’s meeting requirements:
Microsoft Teams Essentials
$4.00 user/month (annual subscription, auto-renews)
This entry-level paid plan focuses specifically on Teams functionality without the full Microsoft 365 suite:
- Group meetings for up to 30 hours with up to 300 participants
- 10 GB of cloud storage per user
- Real-time collaboration with file sharing, tasks, and polling capabilities
- Meeting recordings with transcripts and live captions (English)
- Standard security with data encryption for meetings, chats, calls, and files
- Microsoft 365 Copilot available as an add-on
Microsoft 365 Business Basic
$6.00 user/month (annual subscription, auto-renews)
This plan includes everything in Teams Essentials plus broader Microsoft 365 services:
- Identity, access, and user management for up to 300 employees
- Custom business email (you@yourbusiness.com)
- Web and mobile versions of Word, Excel, PowerPoint, and Outlook
- 1 TB of cloud storage per employee
- Additional business apps (Bookings, Planner, Microsoft Forms, etc.)
- Automatic spam and malware filtering
- Anytime phone and web support
- Microsoft 365 Copilot available as an add-on
Microsoft 365 Business Standard
$12.50 user/month (annual subscription, auto-renews)
This popular plan builds on Business Basic with desktop applications and expanded meeting capabilities:
- Everything in Microsoft 365 Business Basic
- Desktop versions of Word, Excel, PowerPoint, and Outlook
- Webinars with attendee registration and reporting features
- Collaborative workspaces with Microsoft Loop
- Video editing and design tools with Clipchamp
- Microsoft 365 Copilot available as an add-on
Microsoft 365 Business Premium
$22.00 user/month (annual subscription, auto-renews)
This comprehensive plan adds advanced security and compliance features:
- Everything in Microsoft 365 Business Standard
- Advanced security features
- Access and data control capabilities
- Enhanced cyberthreat protection
- Microsoft 365 Copilot available as an add-on
Each plan can be tested with a free one-month trial (except Teams Essentials), allowing you to evaluate the features before committing. For organizations needing AI capabilities, Microsoft 365 Copilot can be added to any of these plans for an additional fee.
👉 Always check Microsoft Teams plans page for the most up-to-date information.
Latest Scheduling Enhancements in Microsoft Teams (April 2025)
If you’ve noticed your Teams calendar looking different lately, you’re not imagining things. Microsoft has rolled out significant updates to Teams scheduling capabilities, with many users seeing these changes as we speak. Let’s break down what’s new and how these features can streamline your meeting planning.
The new unified calendar experience
In February 2025, Microsoft launched a completely revamped Teams Calendar that finally brings parity with Outlook’s robust scheduling tools. This isn’t just a visual refresh—it’s a fundamental integration between Teams and Outlook that eliminates the frustrating differences between the two platforms.
The most impactful new capabilities include:
- Delegate access for executive assistants and team coordinators who manage calendars on behalf of others
- Multiple time zone support for global teams coordinating across regions
- Intelligent time suggestions that analyze participant availability and recommend optimal meeting slots
- Enhanced filtering options to help you focus on specific meeting types or participants
- Print support for those who still prefer physical meeting schedules
- Expanded attachment capabilities for sharing documents directly from calendar events
If you’re not seeing these features yet, don’t worry—Microsoft began making this calendar the default for early release customers in early April 2025 (right now), with general availability scheduled for May 2025. During this transition period, you can toggle between the old and new calendar views, though Microsoft plans to eventually retire the older version.
iPad users get major scheduling upgrades
For the growing number of professionals who rely on iPads for mobile productivity, February 2025 brought welcome improvements to the Teams calendar experience on these devices.
The iPad-specific enhancements include:
- A default 5-day workweek view that takes advantage of the iPad’s screen size
- One-touch meeting joining directly from calendar events
- Drag-and-drop rescheduling for quick timeline adjustments
- Color synchronization with desktop calendar categories
These updates make the iPad a much more viable platform for managing your Teams meeting schedule on the go. The intuitive touch controls for rescheduling are particularly useful when plans change during travel or between meetings.
Scheduled message delivery comes to Teams
Beyond calendar improvements, Teams now allows you to schedule when your channel messages appear—a feature Outlook users have enjoyed for years. Starting in February 2025, you can compose a message in any Teams channel and set a specific future date and time for it to be published.
This feature proves invaluable for:
- Timing announcements to reach global teams during their working hours
- Preparing content in advance of planned events or deadlines
- Ensuring important updates don’t get buried in after-hours message traffic
The scheduling option appears directly in the message composition window and works across Windows, Mac, and web versions of Teams.
What this means for your workflow
These updates represent Microsoft’s ongoing commitment to unifying the experience across its productivity tools. For Teams users, this means fewer context switches between applications and less friction when coordinating meetings.
The timing is particularly relevant—as of April, 2025, many users are actively experiencing the transition to the new calendar interface. If your organization uses Teams for meeting coordination, now is the perfect time to explore these new features and incorporate them into your workflow before the full rollout completes in May.
With these updates, Microsoft continues to refine Teams as a central hub for workplace collaboration, making scheduling an integrated part of the overall communication experience rather than a separate task requiring different tools.
👉 What’s the difference between ‘how to create a Teams meeting’ and ‘how to schedule a Teams meeting’? Creating a Teams meeting refers to the technical process of generating a meeting with all its parameters (title, time, participants, settings), while scheduling a Teams meeting focuses specifically on setting the date and time while coordinating participants’ availability. In practice, these terms are often used interchangeably since the Teams interface combines both aspects into a single workflow. Creating emphasizes the setup of meeting content and configuration, while scheduling highlights the temporal arrangement and calendar integration. Both processes are handled through similar interfaces in Teams, with scheduling being one component of the overall creation process.
How Do I Schedule a Meeting in Microsoft Teams?
Scheduling meetings in Microsoft Teams can be done through multiple approaches, depending on your workflow and who you need to include. In this section, we’ll walk through the different methods for setting up meetings—from using the Teams calendar directly to starting impromptu conversations and inviting external participants. You’ll learn how to create well-organized meetings with the right participants, clear agendas, and appropriate settings for your specific needs.
Step-by-step guide to scheduling a meeting in Teams
Below are your step-by step instructions on how to schedule a Teams meeting:
Open the Teams calendar
- Launch Microsoft Teams and navigate to the left sidebar.
- Click on the Calendar tab (calendar icon).
- This opens your Teams calendar view, showing existing meetings and available time slots.
Click the New Meeting button
- In the upper-right corner of the calendar view, click +New to begin creating your meeting.
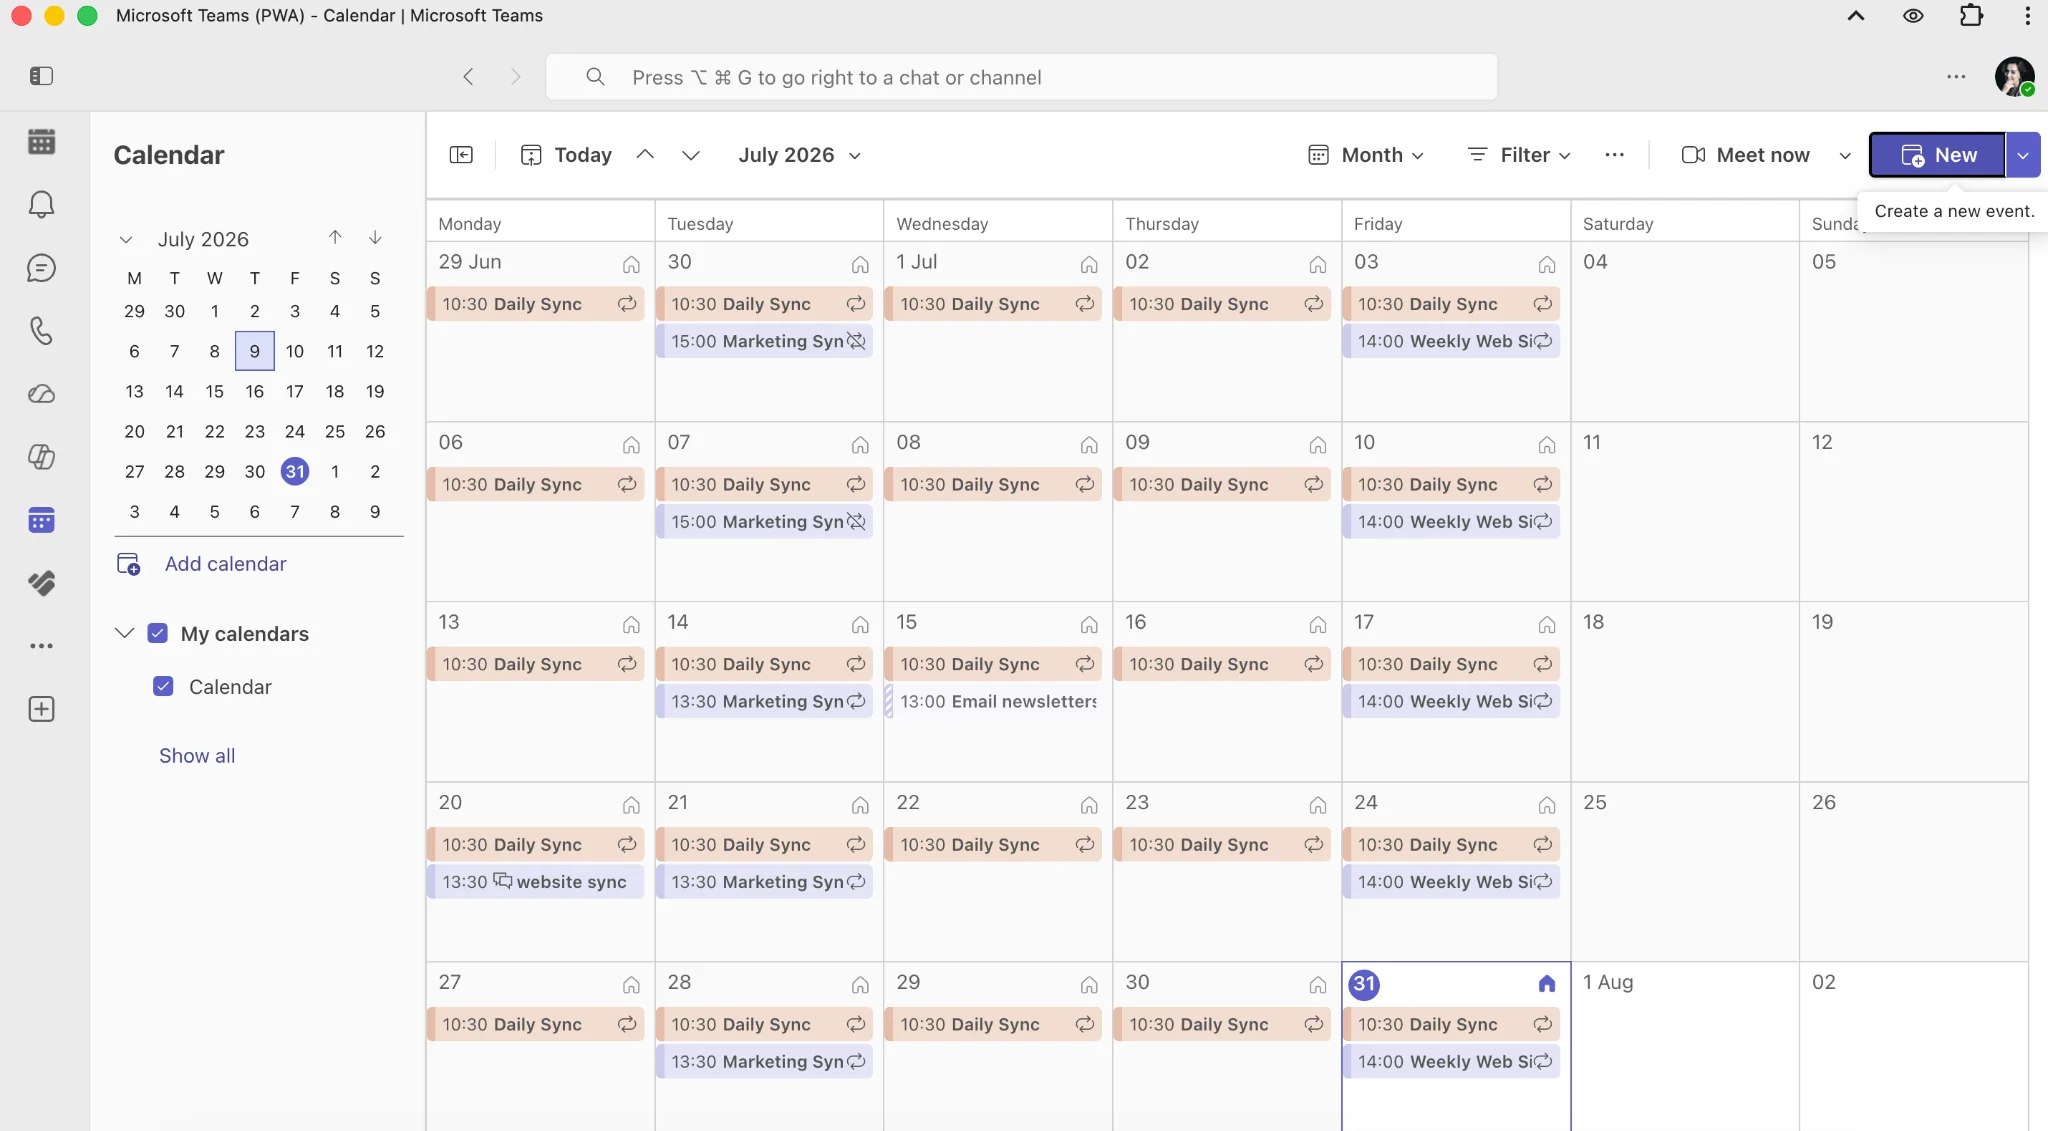
Pic. 1. Navigating to the “+New” button in Teams.
- Set up the meeting options: Fill in the essential meeting details:
- Add title: Enter a clear, descriptive name for your meeting.
- Required attendees: Type the names or email addresses of people who must attend. They will receive an automatic invitation.
- Optional attendees: Add people who are welcome but not required to attend.
- Date selection: Click on the date field to choose the meeting date from a calendar picker.
- Start and end time: Define the beginning and ending times for your meeting.
- Channel selection (optional): If the meeting relates to a specific team, you can associate it with a channel so it appears in the team’s calendar and conversation stream.
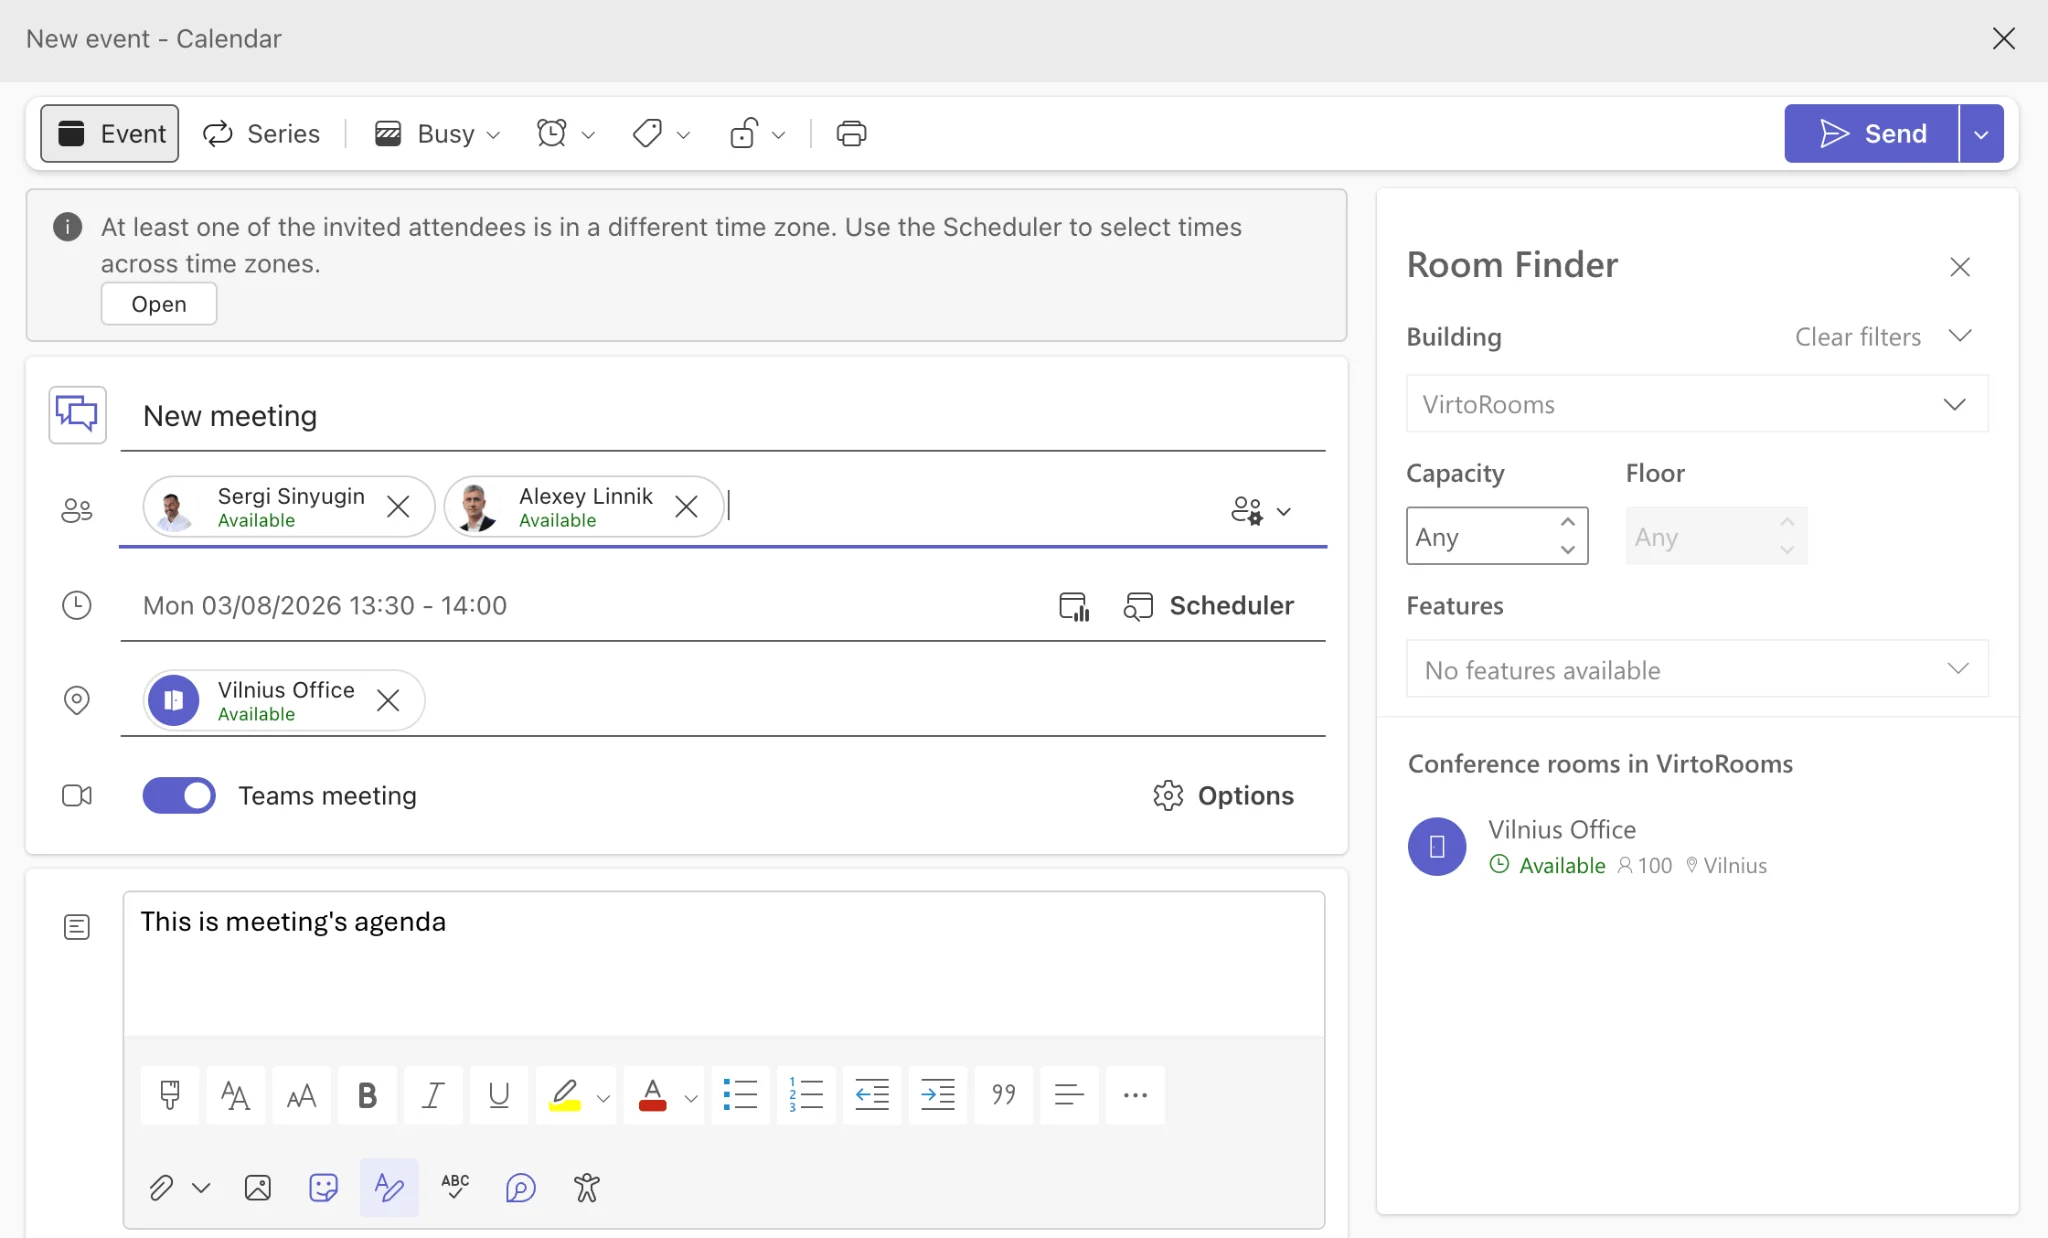
Pic. 2. Sample meeting details in Teams.
- Add additional options: Enhance your meeting setup with these fields:
- Recurrence: Use the dropdown menu to set the meeting as recurring (daily, weekly, monthly, etc.).
- Location: For hybrid meetings, specify a physical location in addition to the virtual Teams link.
- Description: Add an agenda, discussion points, or preparatory documents in the meeting description field.
- Meeting options: After saving the meeting, open it from your calendar and click the Options link to control who can present, whether attendees can unmute, enable recording permissions, and more. Note that some options may be restricted by your organization’s admin settings.
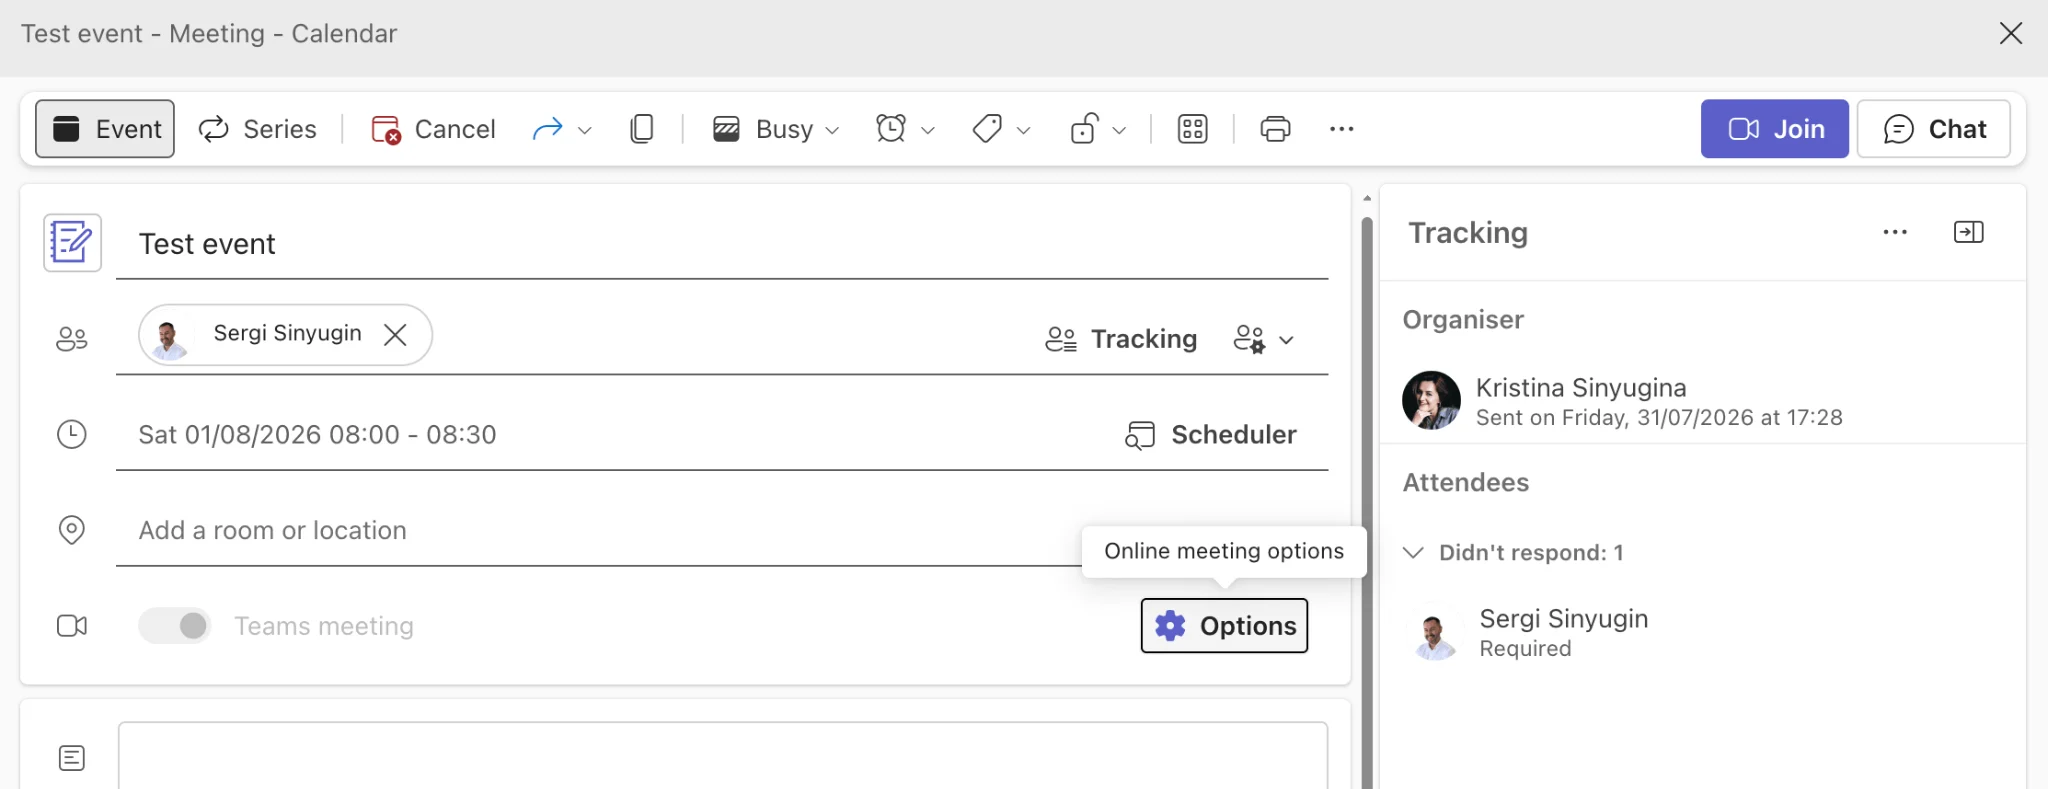
Pic. 3. Navigating to the “Online meeting options” in Teams.
- Send the invitation: Once you’ve completed the setup:
- Click Save. Teams will automatically:
- Send email invitations to all specified attendees.
- Add the meeting to both Teams and Outlook calendars.
- Create a Teams meeting link for virtual participation.
- Click Save. Teams will automatically:
How to schedule a meeting via Outlook with Teams integration
Many organizations rely on Outlook for calendar and meeting management. Microsoft has tightly integrated Teams functionality into both the Outlook desktop and web apps.
When creating a new meeting in Outlook Desktop:
- Click New Meeting in the ribbon.
- Fill in your meeting details: title, attendees, date, time, and location.
- Click the Teams Meeting button in the toolbar to include a Teams link.
- Send the invitation as you normally would.
In Outlook for Web:
- Click New Event.
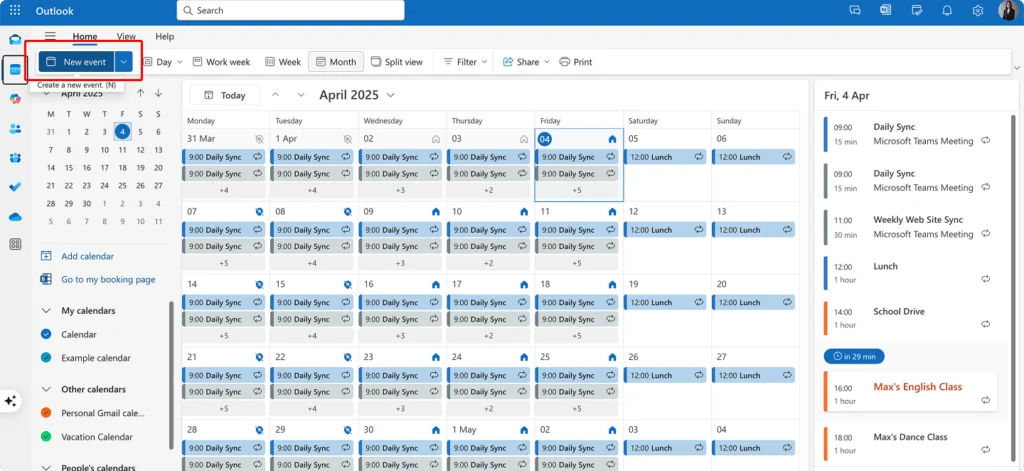
Pic. 4. Navigating to the “New event” in Outlook.
- Fill in your meeting details.
- Toggle on Teams Meeting or click the Teams icon to add the meeting link.
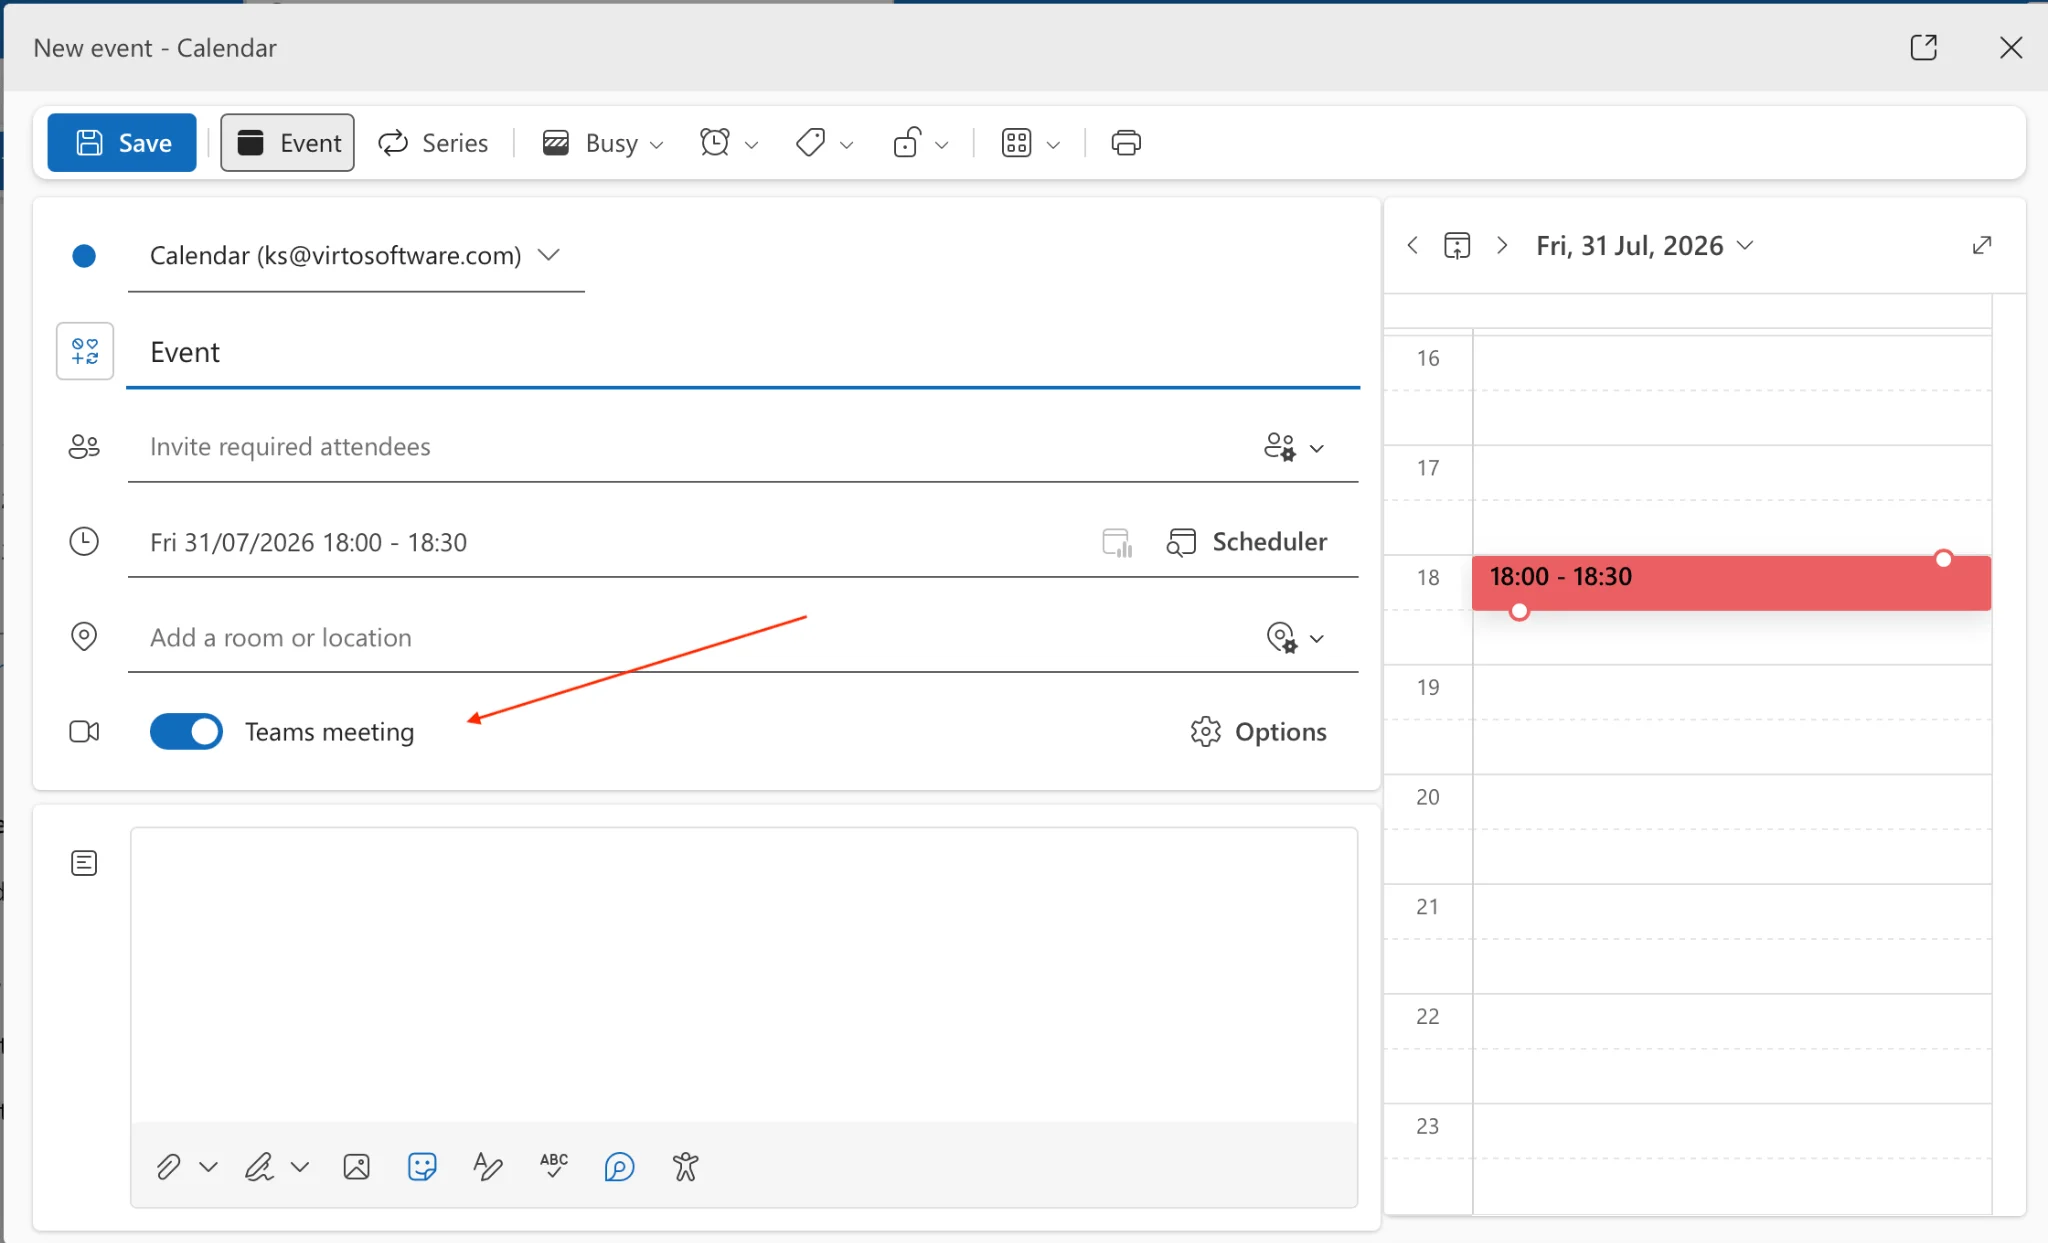
Pic. 5. Toggling the “Teams meeting” on.
- Send the invitation.
The meeting will appear in both Outlook and Teams calendars for all participants, with the join link prominently displayed.
How to create Teams meeting link for guests and external participants
Teams meetings aren’t limited to people within your organization. You can invite external guests, clients, or partners using a public meeting link.
Steps:
- Create your meeting in Teams or Outlook as described above.
- In the invitation body, you’ll see a Copy join link option.
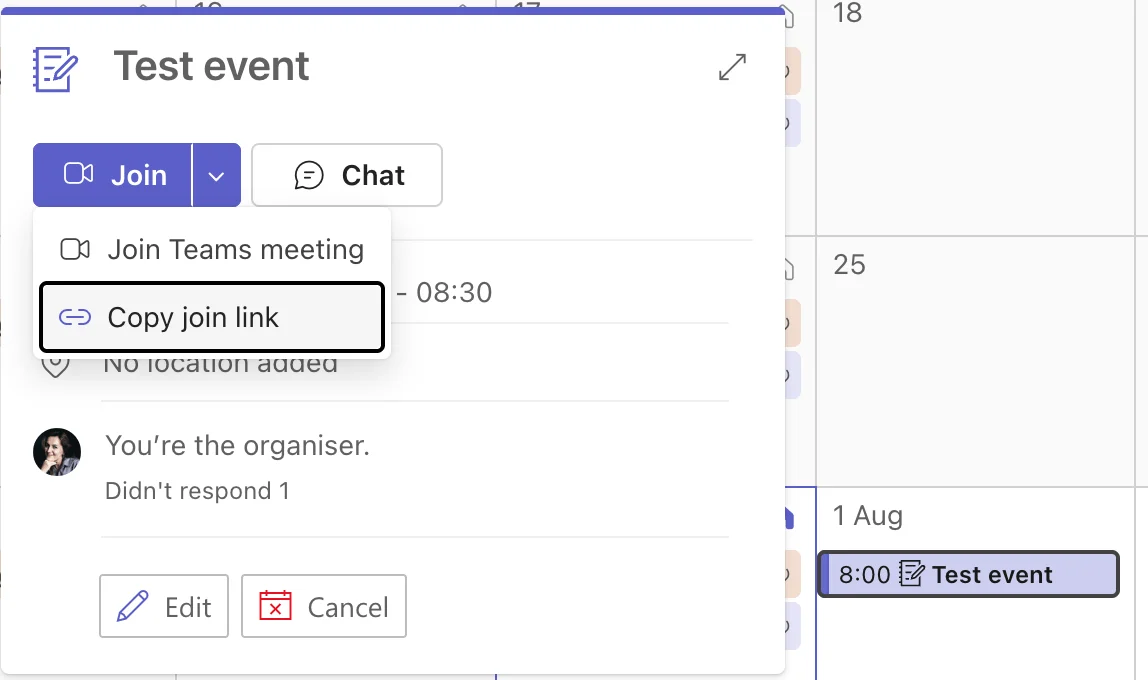
Pic. 6. Copying the meeting link.
- You may either:
- Send the invitation directly to external participants.
- Copy the link from the meeting details and share it via email, chat, or another platform.
Security and access controls:
To manage how external participants join:
- After saving the meeting, open it and click Meeting options (Pic. 3)
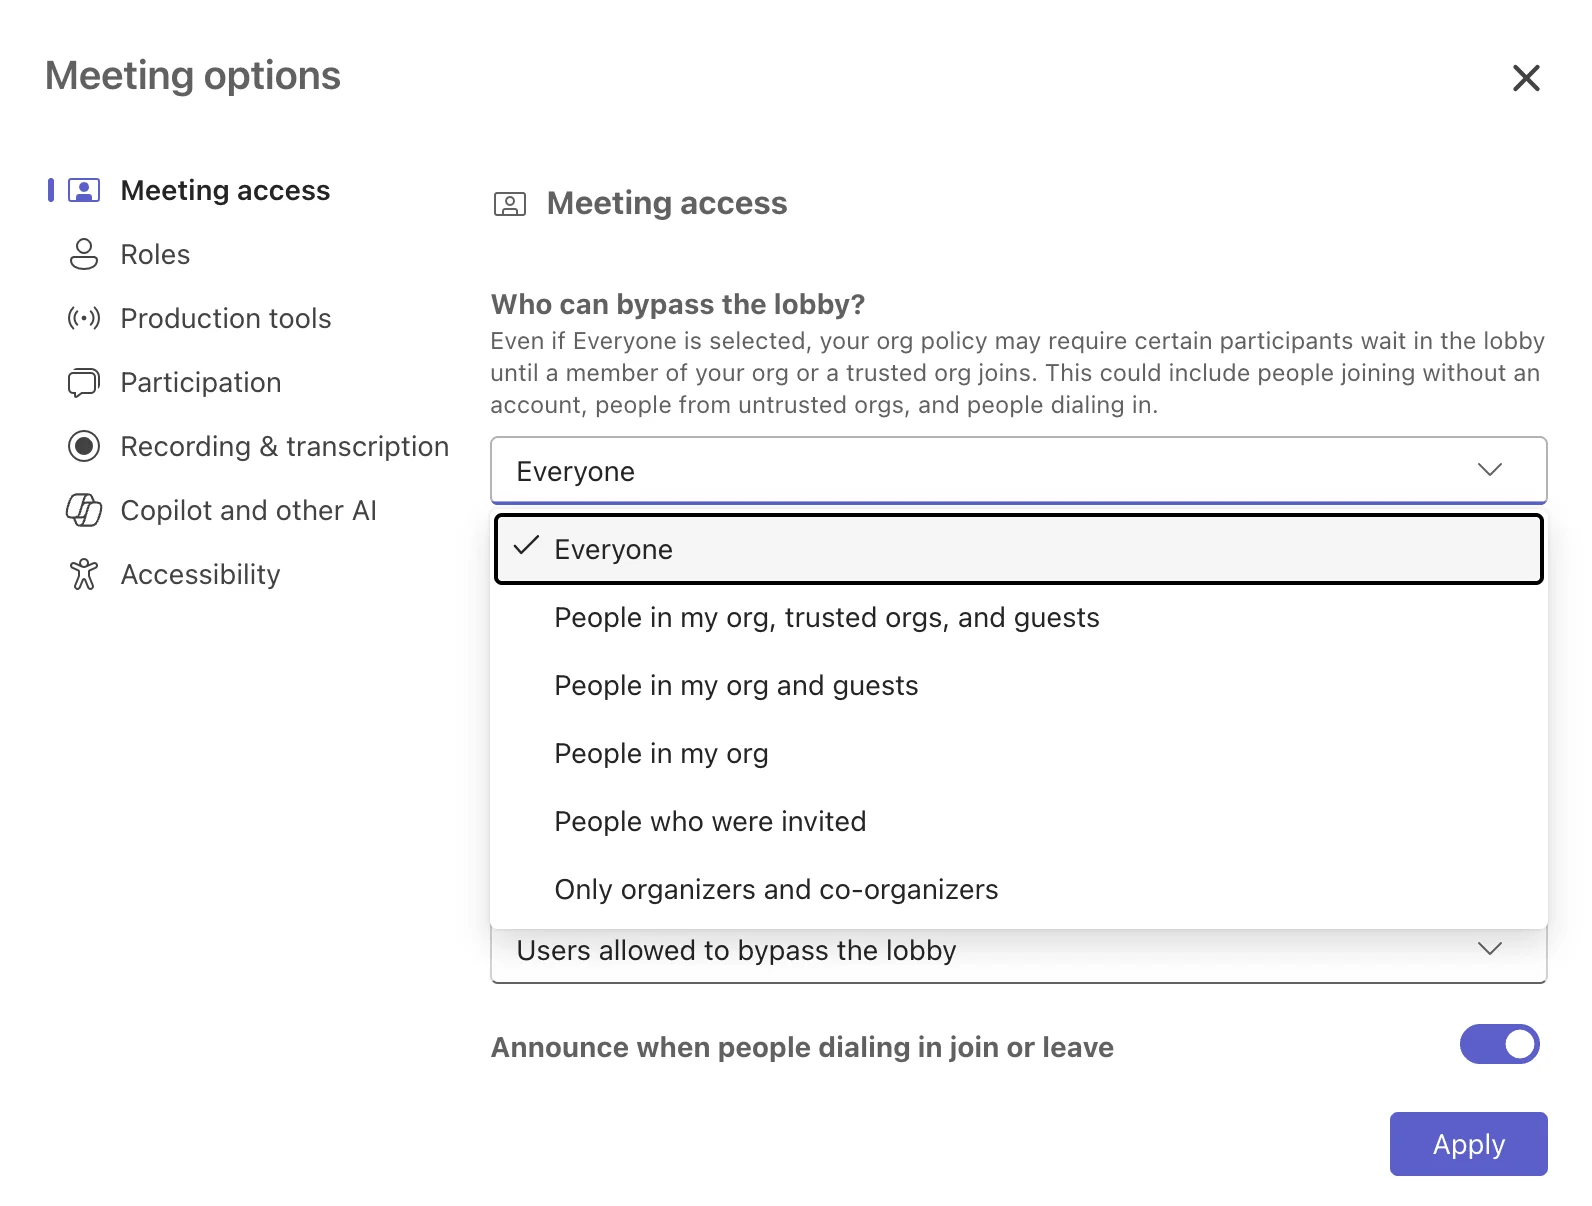
- Find the setting labeled Who can bypass the lobby?
- Choose from:
- Everyone (least restrictive)
- People in my organization
- People in my organization and guests
- Only me and co-organizers (most restrictive)
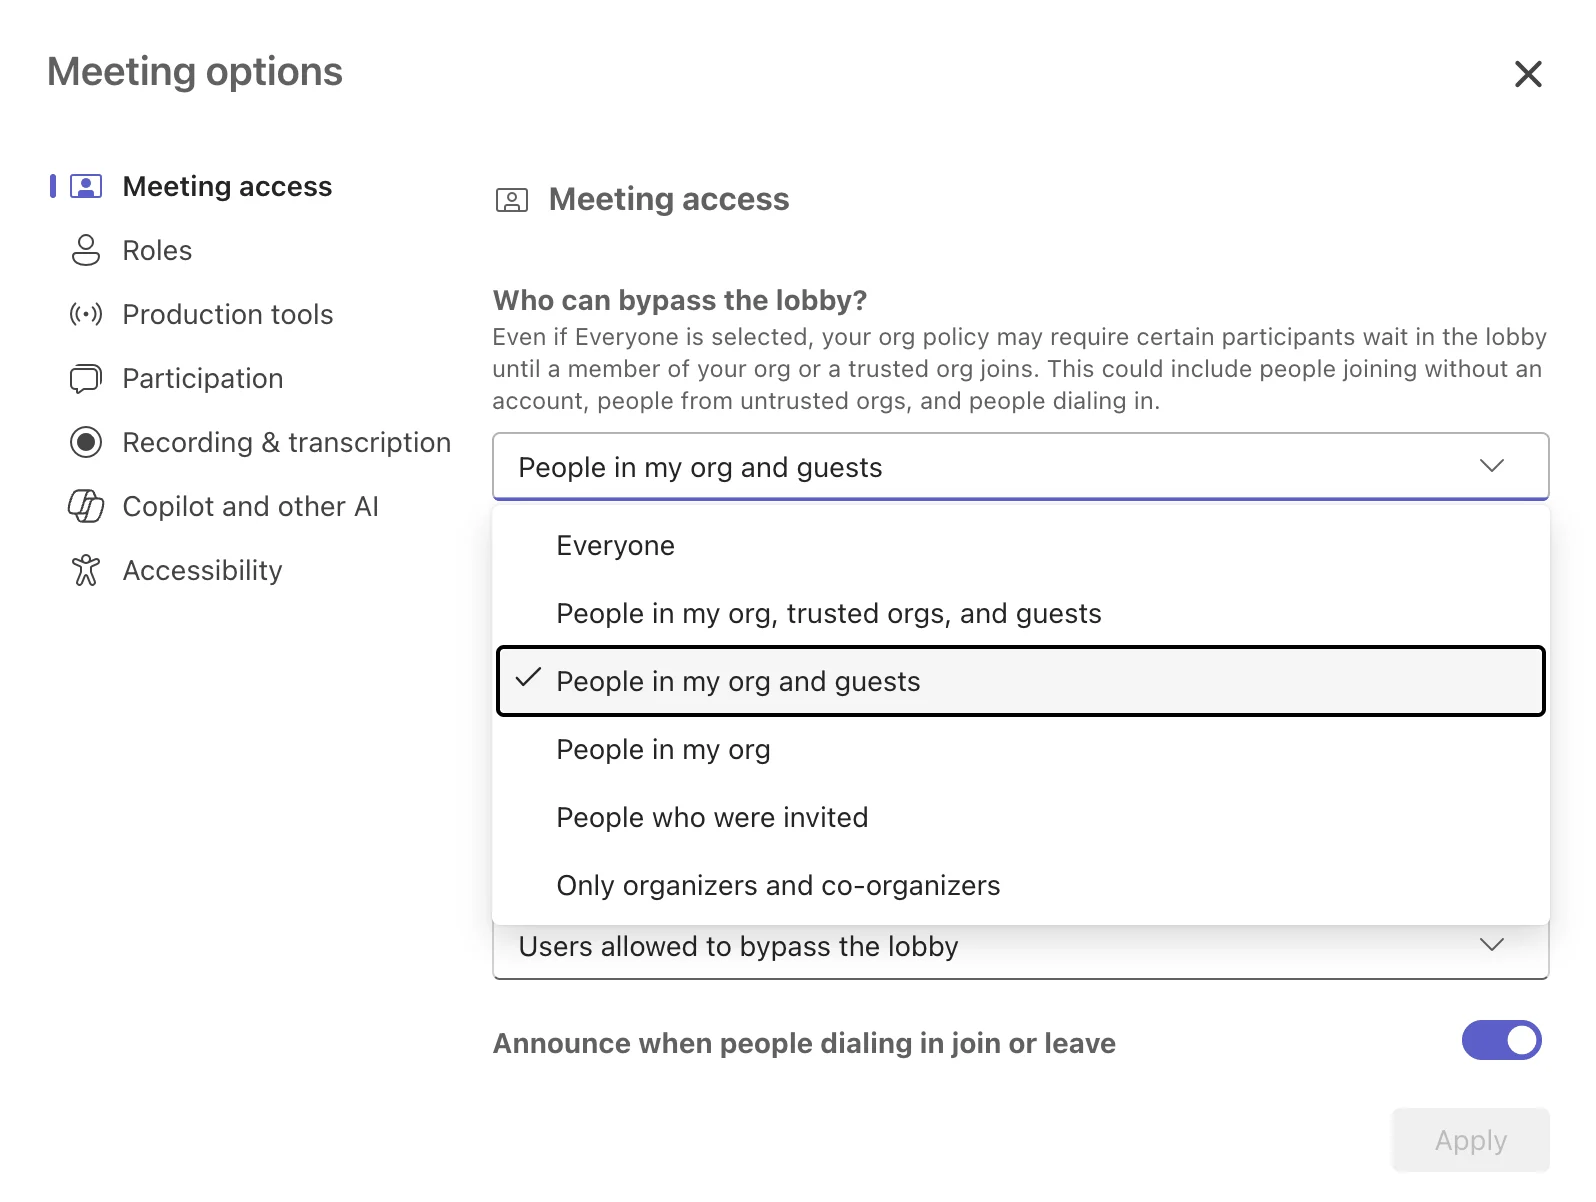
Pic. 7. Choosing who can bypass the lobby.
With lobby restrictions enabled, you’ll manually admit guests during the meeting, giving you full control over who joins.
👉 So, how to create Microsoft Teams meeting link for guest? To create a Microsoft Teams meeting link for guests, schedule a new meeting in Teams by clicking “Calendar” then “New meeting” and enter all meeting details. After adding guest email addresses in the “Required attendees” field, Teams will automatically generate a meeting link when you click “Send.” Alternatively, you can copy the meeting link by opening a scheduled meeting, clicking the three dots, selecting “Meeting options,” and copying the URL displayed under “Join link.” Guests don’t need a Teams account to join—they can access the meeting through a web browser by simply clicking the link they receive in their email invitation.
How to quickly start a meeting in Microsoft Teams without scheduling it in advance
Not every meeting needs to be scheduled ahead of time. For spontaneous conversations, Teams provides the Meet Now feature.
Steps:
- Go to the Calendar tab in Teams.
- Click the Meet now button in the upper-right corner.
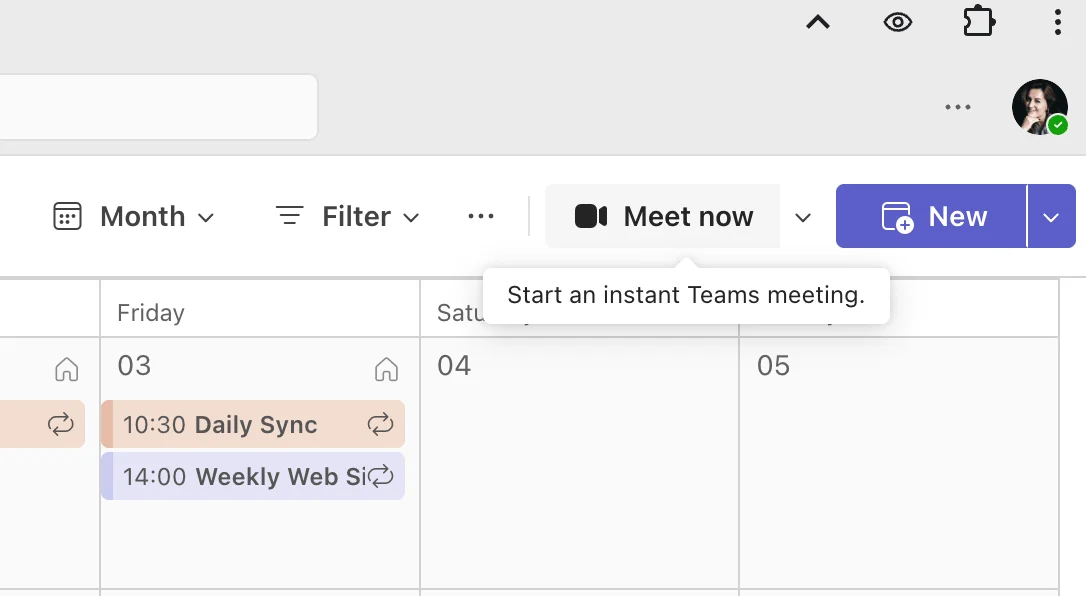
Pic. 8. Navigating to the “Meet now” option.
- On the preview screen, you can:
- Turn your camera on/off
- Mute/unmute your microphone
- Select audio devices
- Apply background effects
- Click Join now to start the meeting.
To add participants:
- Click the Participants button.
- Search for colleagues and add them.
- Or click Share invite to copy the meeting link and send it externally.
Instant meetings appear in your calendar after they start and remain visible as past events. They are ideal for urgent discussions, quick check-ins, or transitioning a chat into a live meeting without prior scheduling.
How to schedule a meeting in Teams directly from a Microsoft Teams chat
When you’re in a chat and decide a live discussion is more efficient, you can schedule a meeting directly from that conversation.
Steps:
- Open the chat with the individual or group.
- Click the calendar icon below the message box (where you type) or, alternatively, three dots at the top of the conversation (…) > Schedule meeting
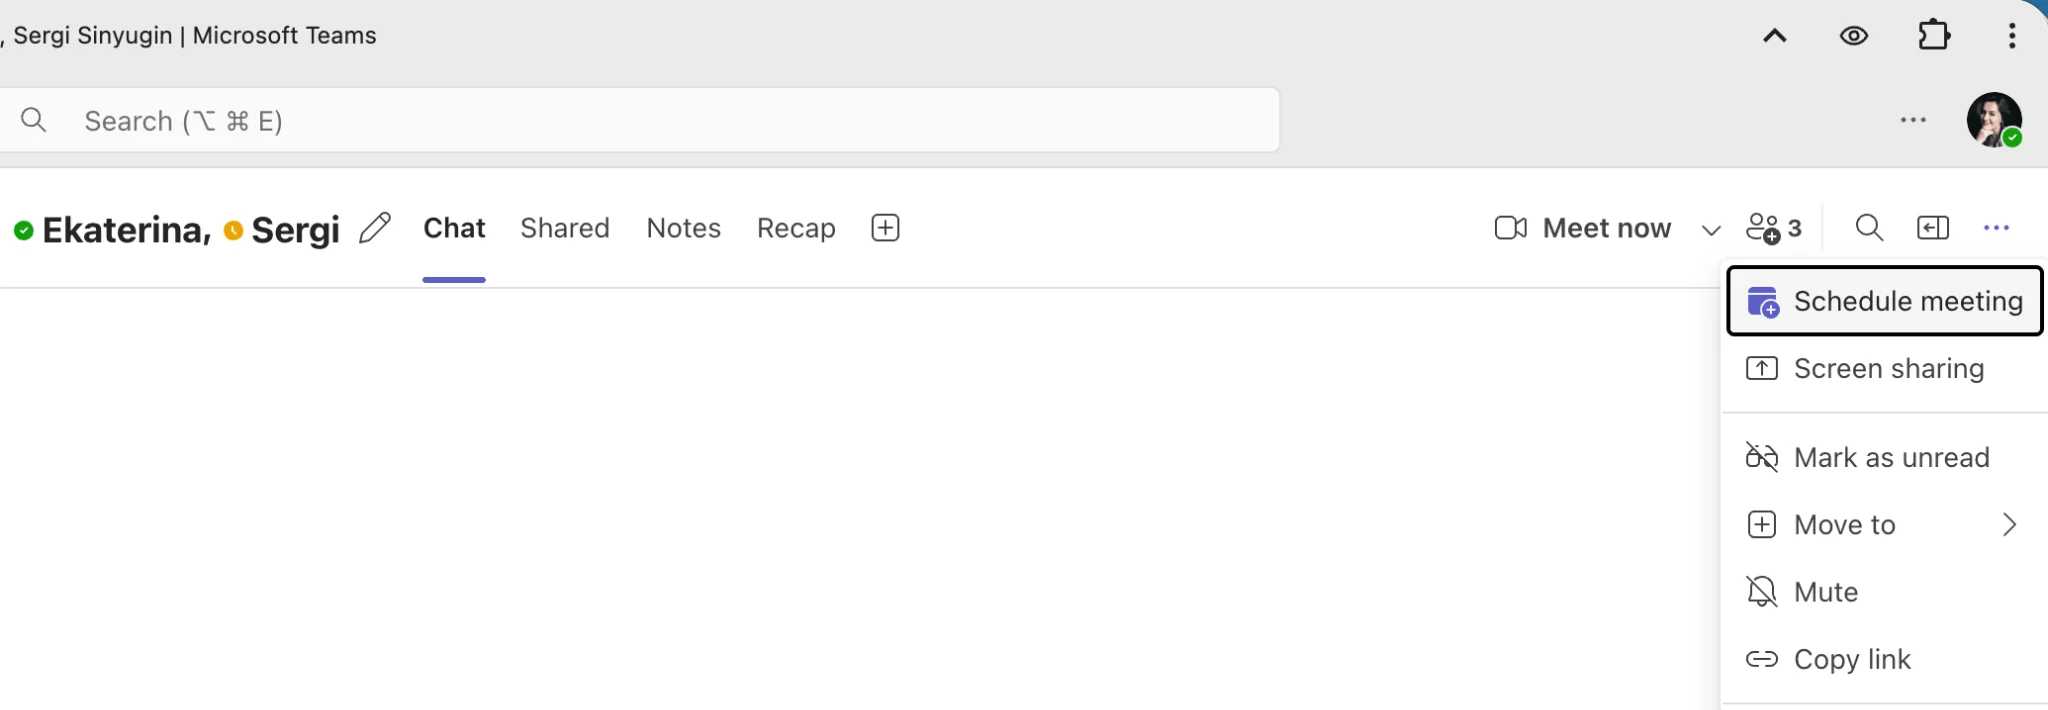
Pic. 9. Scheduling meeting from a chat.
- This opens the scheduling form with chat participants automatically included.
- Fill in the meeting title, date, time, and other details.
- Click Send.
The meeting will appear in the chat history and in the participants’ calendars. This method keeps the conversation context intact and is ideal for seamlessly escalating from text to voice or video.
👉 So, how to set up Teams meeting? To set up a Teams meeting, open Microsoft Teams and click the “Calendar” icon, then select “New meeting” and fill in essential details including title, date, time, and required participants. Add meeting options like recording preferences, who can present, and lobby settings by clicking the three dots next to the meeting details. Include a clear agenda in the description, attach any necessary files, and set reminders if needed. Once configured, click “Send” to notify all participants and add the meeting to their calendars. For recurring meetings, select the appropriate pattern before sending to establish a consistent schedule automatically managed by Teams.
Setting Up a Teams Meeting with Additional Details & Managing Meetings in Microsoft Teams
Once you’ve scheduled your meetings in Teams, effective management becomes crucial for productive collaboration. This section covers all aspects of meeting administration—from controlling access and security to recording sessions and following up afterward. You’ll learn how to leverage Teams’ powerful features to run smoother, more organized meetings with the right level of participation and documentation.
How to set up a Teams meeting for access and security
Security and access control are essential for maintaining appropriate meeting environments, especially when discussing sensitive information or including external participants.
Set participant roles and permissions
Microsoft Teams gives you granular control over what meeting participants can do:
- Open your scheduled meeting in the calendar.
- Click Meeting options (See Pic. 3)
- Set Who can present: Choose from “Everyone,” “People in my organization,” “Specific people,” or “Only me.”
Pic. 10. Choosing who can present.
- Teams does not currently allow restricting who can record directly in the UI. Anyone who can present can typically start/stop recordings unless restricted by admin policy.
Manage screen sharing permissions
- In Meeting options, or during the meeting under More actions (•••) > Settings, you can limit screen sharing to presenters only.
Control guest access
For meetings with external participants:
- In Meeting options, set Who can bypass the lobby to control access.
- You can allow anonymous users to join (without authentication) or require sign-in for added security.
- Use “Only me” or “People in my org and guests” to restrict access as needed.
Use the lobby feature
The lobby acts as a virtual waiting room:
- Set who can bypass the lobby in Meeting options.
- Options include: “Everyone,” “People in my organization,” “People in my org and guests,” or “Only me.”
- During the meeting, organizers and co-organizers see a notification when people are waiting and can admit or deny entry.
Manage participants during the meeting
Here’s how you can manage participants during the meeting:
Assign organizers and co-organizers
- Only the original meeting creator can assign co-organizers.
- Open the meeting in the calendar > Meeting options > Select Co-organizers from the attendee list.
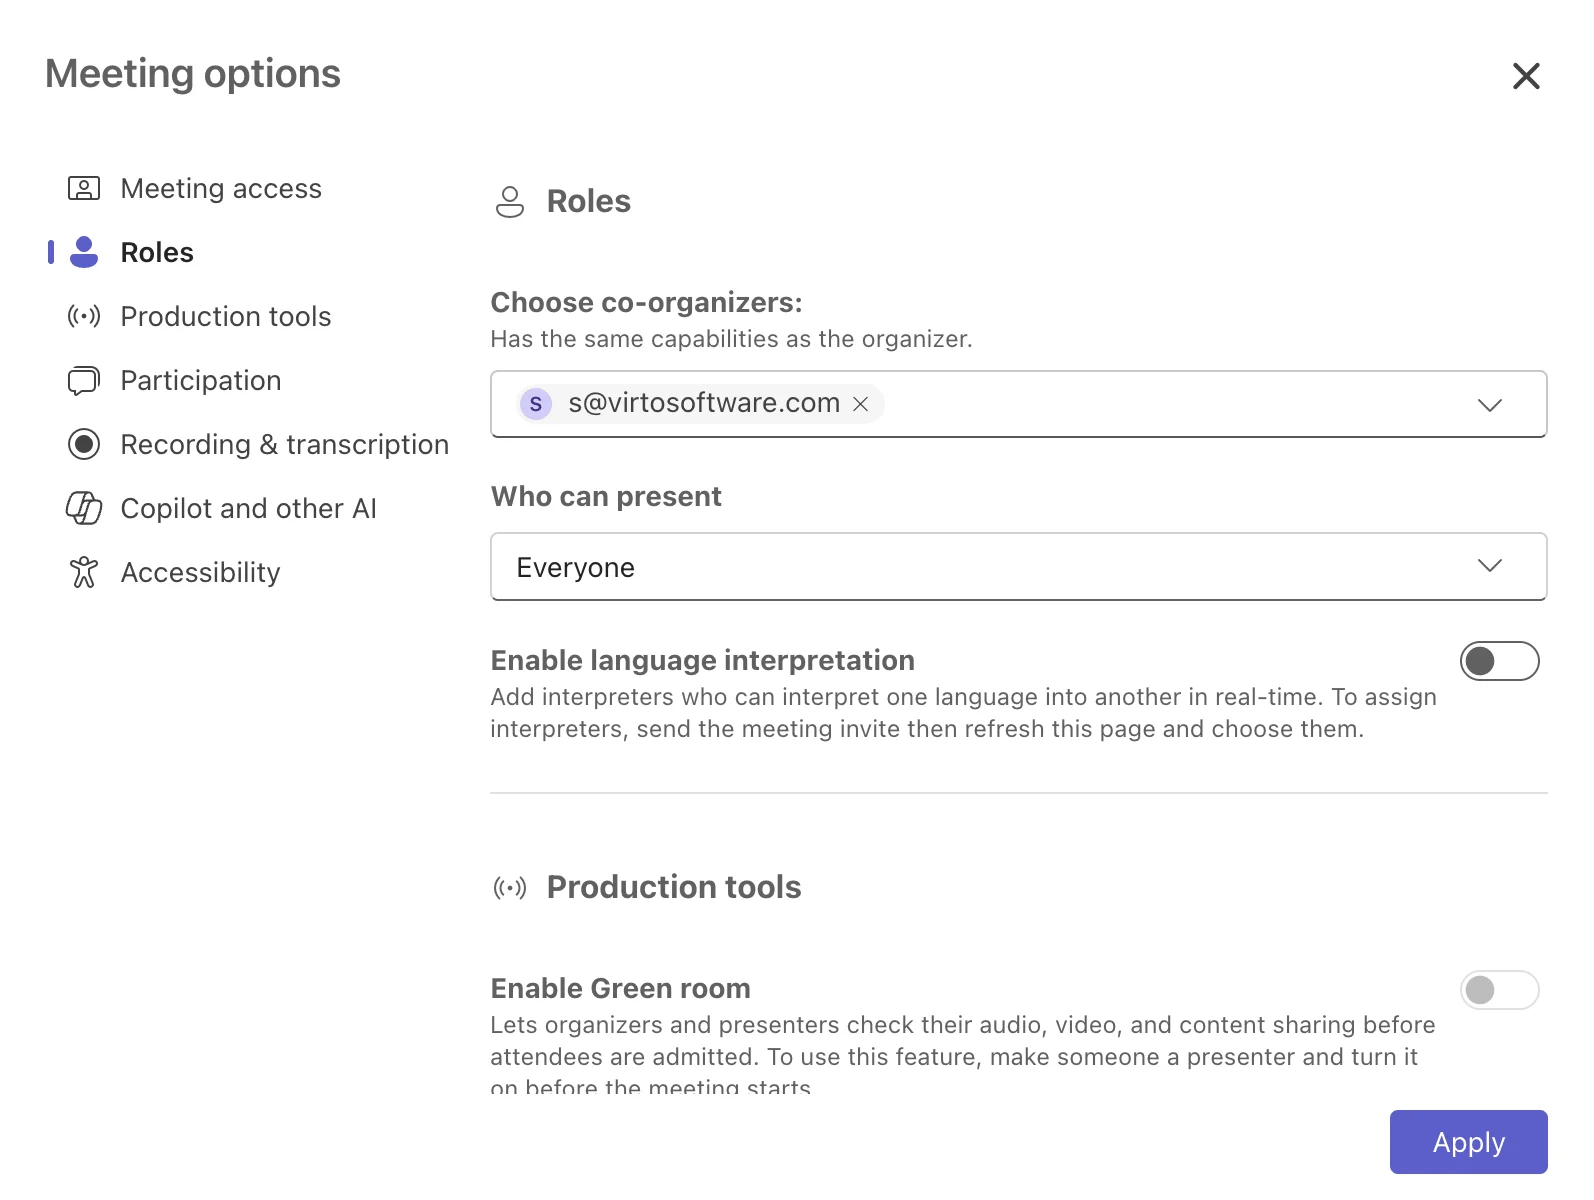
Pic. 11. Choosing co-organizers.
- Co-organizers can manage the meeting, admit participants, start recordings, and more.
Assign presenters and moderators
For larger meetings:
- During the meeting, open the Participants panel.
- Click the More options (•••) next to a participant’s name.
- Choose Make a presenter or Make an attendee to adjust roles.
Manage audio and video
- Mute individuals by clicking the microphone icon next to their name.
- Use Mute all in the Participants panel to silence everyone.
- Disable video by demoting participants to “attendee” role.
- Remove disruptive participants via the Remove option.
Manage chat permissions
- Go to More actions (•••) > Meeting options.
- Under Allow meeting chat, choose:
- Enabled
- Disabled
- Enabled for everyone except anonymous users
Change meeting settings
Here’s how to change meeting settings:
Edit date, time, and participants
- Open the meeting in your Teams calendar.
- Click Edit to change time, duration, or attendees.
- Click Send update to notify all participants of changes.
Update agenda and attach files
- Edit the meeting description to reflect the latest agenda.
- Use the Attach option to upload files.
- Files appear in the meeting chat and are stored in SharePoint (channel meetings) or OneDrive (private meetings).
👉 Important note: Once a meeting is associated with a channel, you cannot move it to another channel. You must cancel and recreate it if you need to change the team/channel.
Record and transcribe a meeting
Here’s how to record and transcribe a meeting:
Start and stop recording
- During the meeting, click More actions (•••) > Start recording.
- All participants are notified.
- Stop recording the same way.
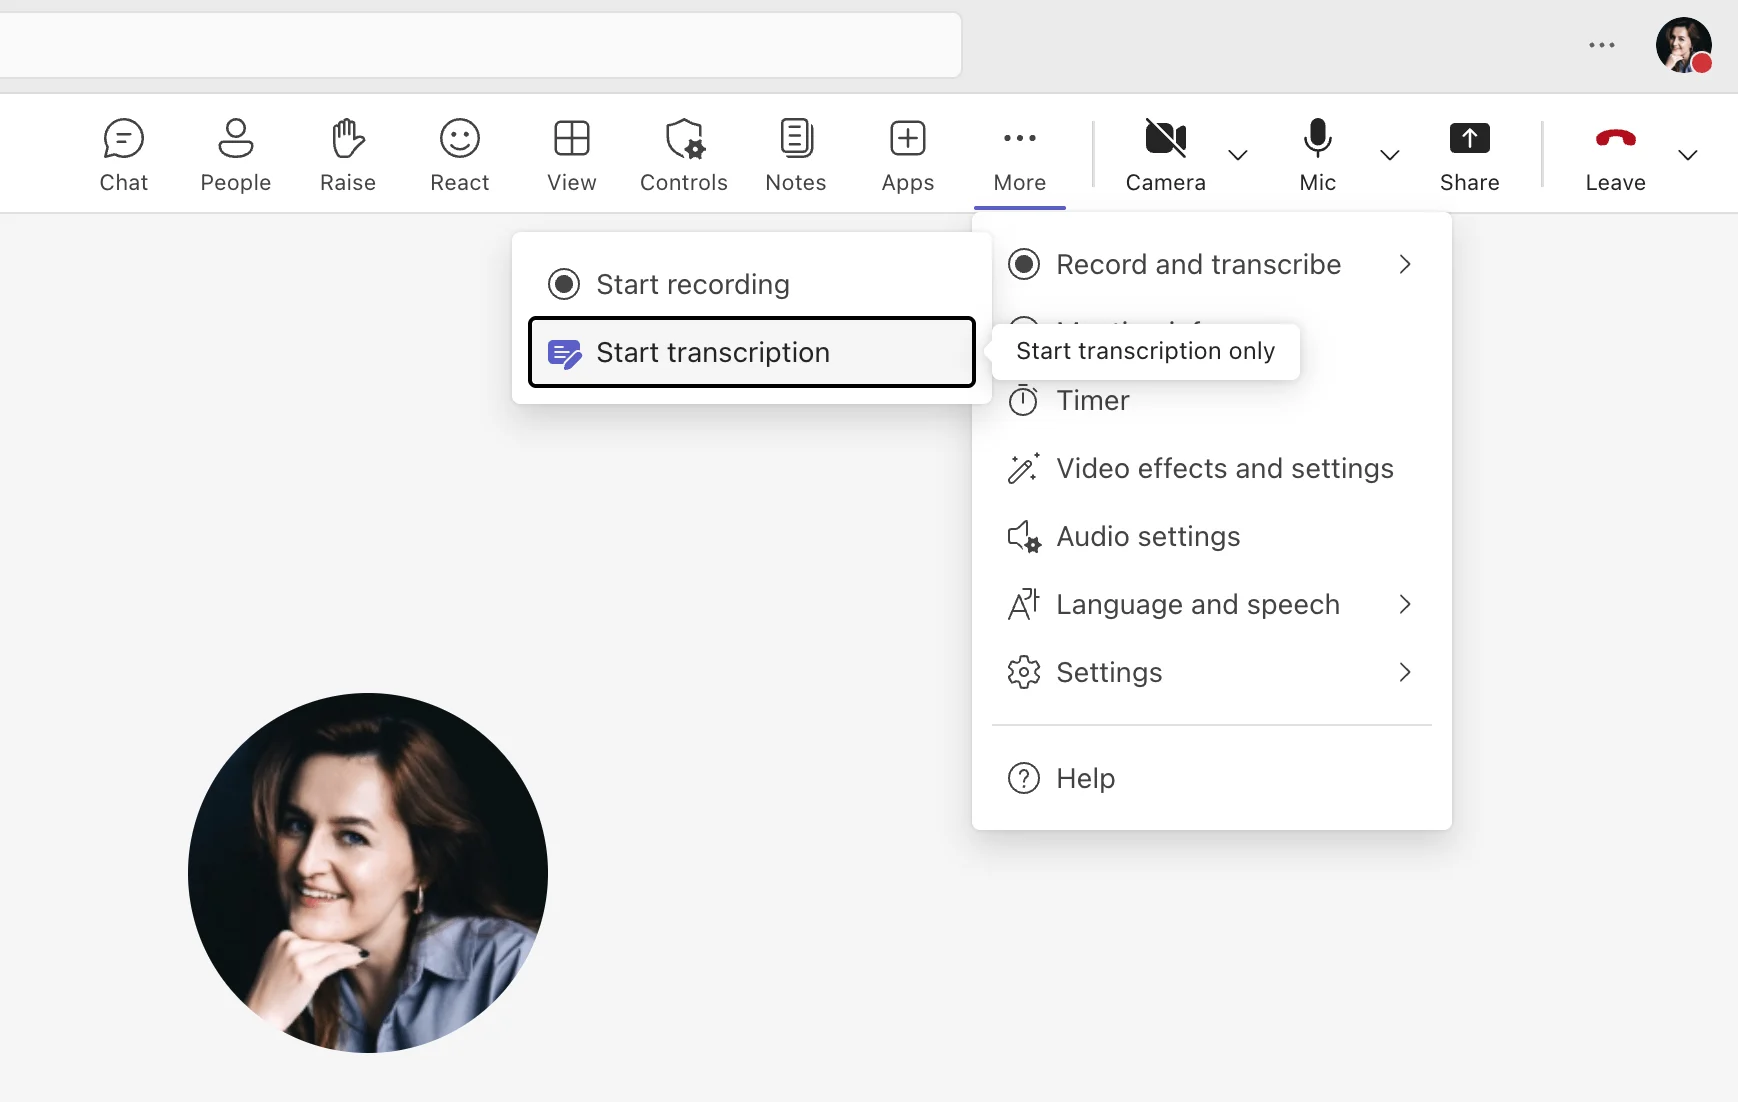
Pic. 12. Recording or transcribing a meeting.
Where recordings are stored
- Channel meetings: Recording saved in SharePoint.
- Private meetings (1:1 or scheduled): Saved in the organizer’s OneDrive.
- A link automatically appears in the meeting chat.
- The organizer also receives an email with the recording link.
Enable live captions and translation
- During the meeting, click More actions (•••) > Turn on live captions.
- Choose the desired language.
- If enabled by your admin, live translation can show captions in a translated language.
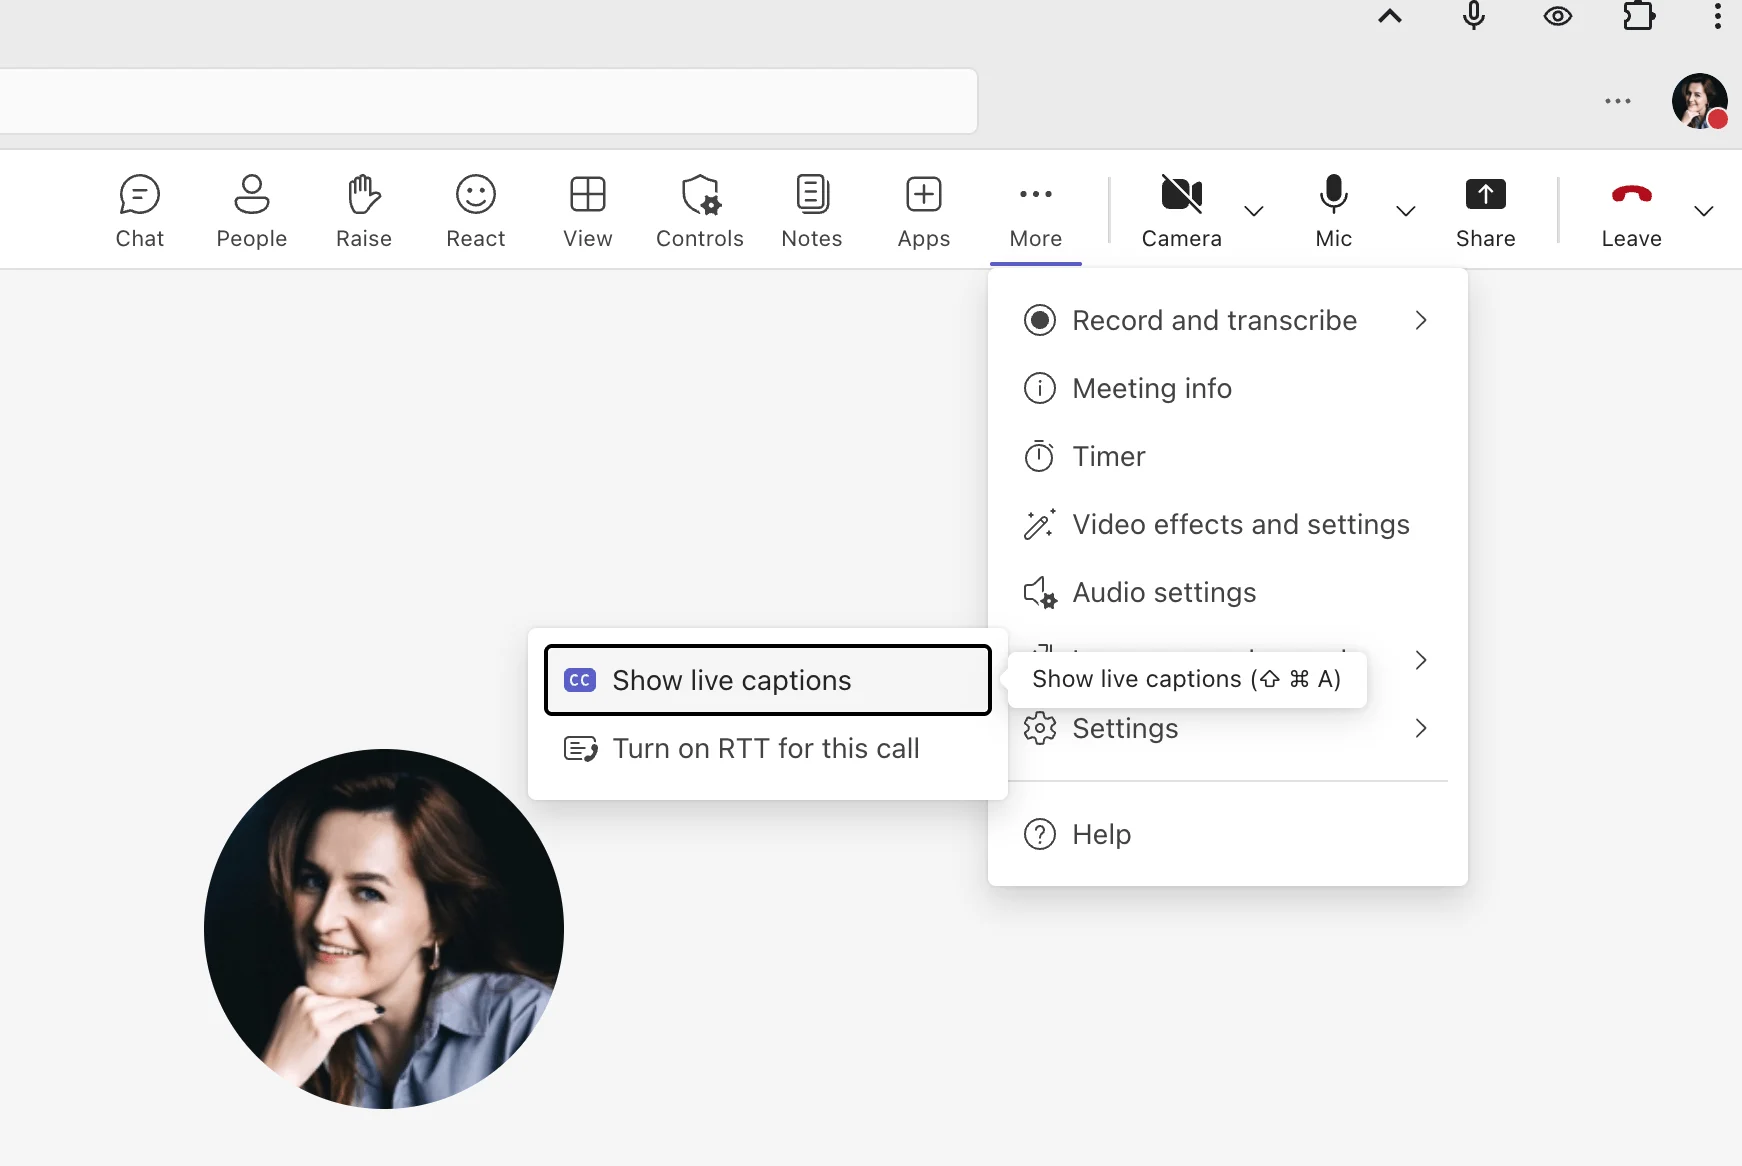
Pic. 13. Turning on live captions.
Export meeting transcript
- If transcription is enabled, a transcript is generated once the meeting ends.
- Access from the meeting chat or recording link.
- You can download it as a text or Word file.
- Transcripts are searchable and useful for reviewing decisions or action items.
👉 Note: Transcription and live captions must be enabled before the meeting or by policy. Some features require Teams Premium.
Recurring meetings and reminders: Create Teams meeting recurrence
Here’s how to create, edit, and manage recurring meetings and reminders in Microsoft Teams:
Create recurring meetings
- When scheduling a meeting, click the date and time of event to open recurrence options.
- Choose from daily, weekly, monthly, or custom patterns.
- All occurrences will appear on your calendar.
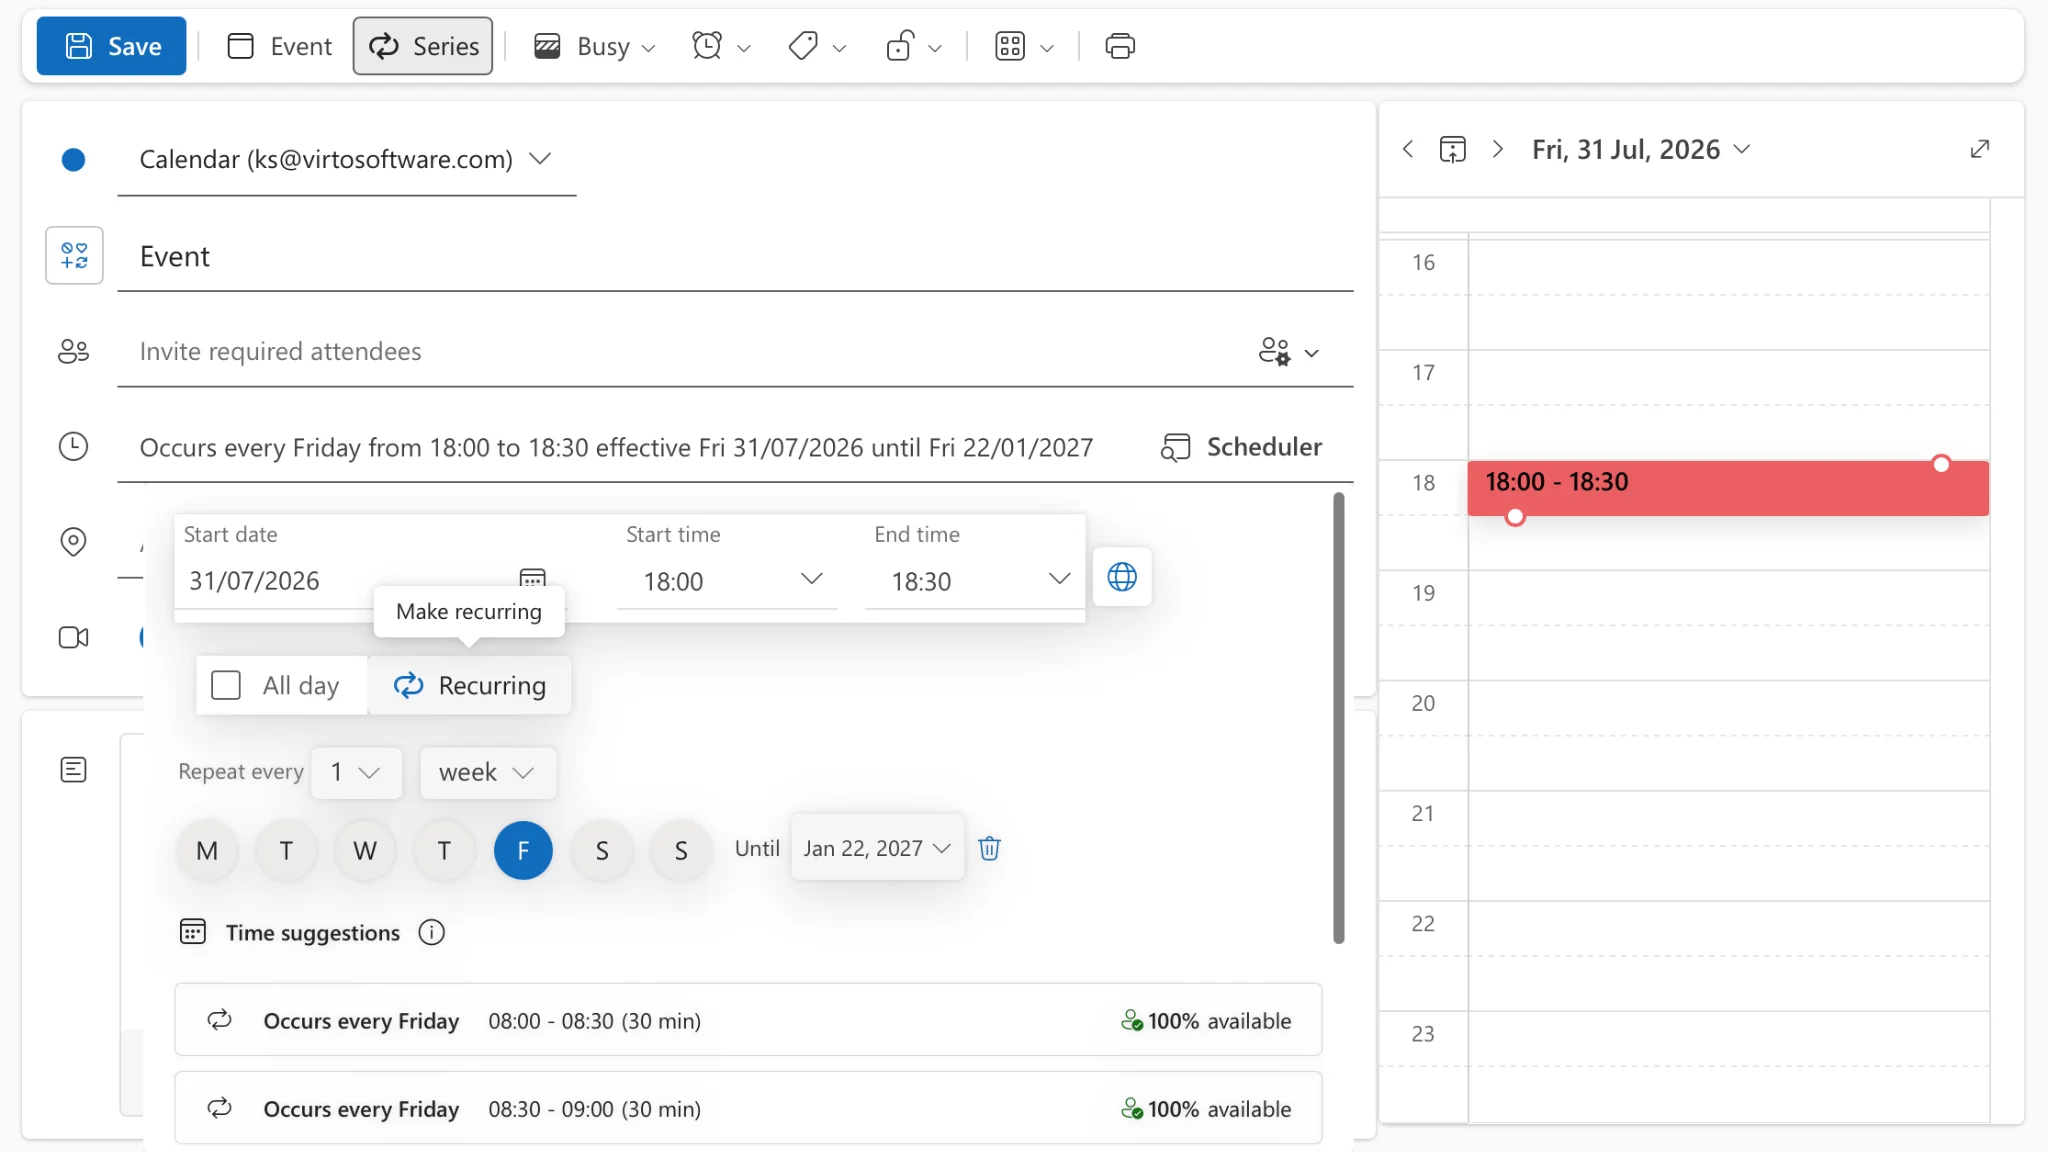
Pic. 14. Navigating to meeting recurrence options.
Edit recurring meetings
- Open the meeting series or a single instance.
- Choose Edit series to change all future meetings.
- Choose Edit occurrence to change just one.
👉 How do I send a Teams meeting invite? To send a Teams meeting invite, access the Calendar in Teams and click “New meeting” to open the scheduling form. Complete all necessary fields including title, time, date, and add participant email addresses in the “Required” or “Optional” attendee sections. Provide helpful context in the meeting description, adjust any specific meeting options you need, and click the “Send” button. The invite will automatically be delivered to all participants’ email inboxes and appear in their Teams calendars.
How to set up a Microsoft Teams meeting reminders and task integration
Effective meeting preparation goes beyond simply sending out calendar invites—it requires coordinated task management, timely reminders, and visibility across your team. Microsoft 365 now offers a deeply integrated ecosystem that enhances this workflow through Outlook, Planner, To Do, Teams, and the recently matured Microsoft Loop platform.
Here’s how you can now manage meeting prep more effectively with the latest tools:
Set reminders in Outlook
- Outlook continues to support event reminders, with a default of 15 minutes before the meeting.
- You can customize the reminder time per meeting or globally through Outlook settings.
- These reminders trigger desktop, mobile, or email notifications depending on your device setup.
Use Microsoft Planner, To Do, and Loop to assign and track meeting tasks
- As of late 2024, Microsoft has rolled out a new Planner app within Teams, combining:
- Planner (team tasks)
- To Do (personal tasks)
- Premium plans (the former Project for the Web, for advanced project planning)
- This unified interface enables:
- Timeline views, task dependencies, labels, and filtering
- Seamless syncing between tasks created in Planner, To Do, and Loop
- Microsoft To Do
- Still ideal for personal task tracking, including tasks flagged from Outlook emails or assigned via Loop or Planner.
- Users can view all meeting-related tasks under the “Assigned to me” list.
- Microsoft Loop integration
- Loop task lists can now be created in:
- Outlook emails
- Teams chats
- Loop pages
- These task lists:
- Sync automatically with Planner (as plans or buckets)
- Appear in To Do for assigned users
- Are collaborative and real-time, allowing multiple team members to contribute simultaneously
- This means you can draft your meeting preparation checklist collaboratively—even before the meeting invite is sent—and assignments will reflect across all Microsoft 365 apps.
- Loop task lists can now be created in:
- As of late 2024, Microsoft has rolled out a new Planner app within Teams, combining:
Link tasks to a Teams channel for visibility
- With the new Planner experience:
- All tasks—whether created in Loop, Planner, or To Do—can be tracked from within this unified interface.
- You can assign meeting prep tasks (e.g., “Prepare slides,” “Confirm venue,” “Draft agenda”) and make them visible to the entire team through the Planner tab in Teams.
- Loop + Teams channel workflow example:
- A user creates a Loop task list inside a Teams chat before the meeting.
- With the new Planner experience:
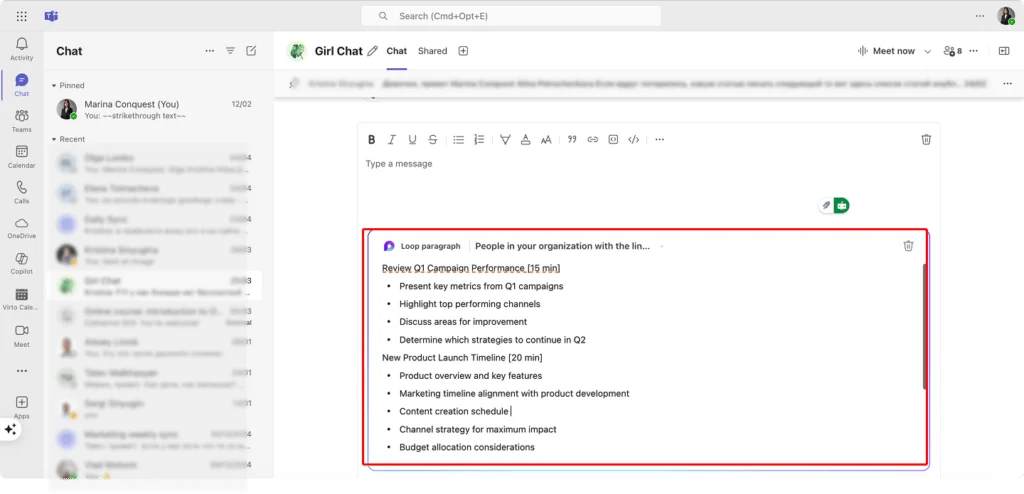
Pic. 15. Using a Loop component within a Teams chat.
- The tasks are automatically synced to Planner.
- The Planner plan is added as a tab in the relevant Teams channel for team visibility.
- Team members see due dates, assignments, and progress in one centralized place.
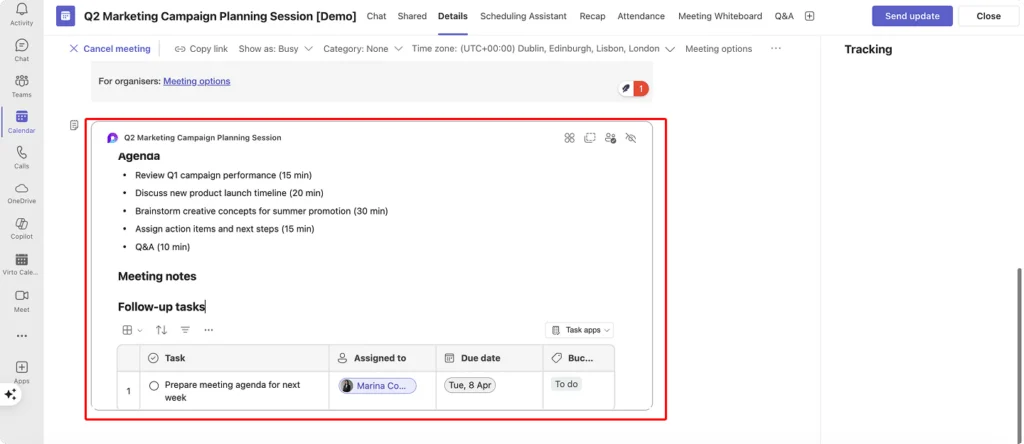
Pic. 16. Using a Loop component within a Teams meeting agenda.
End and follow up on a meeting
Here’s how to end and follow up on a meeting:
Organize files and recordings
- Files shared during the meeting remain in the chat.
- Move important files to channel tabs or folders for broader access.
- Add comments to recordings to highlight key moments.
- Create a folder structure in SharePoint or OneDrive to organize by topic or recurring series.
Summarize key points
- Post a summary in the meeting chat or channel including:
- Key decisions
- Action items
- Assigned responsibilities
- Deadlines
Generate attendance and activity reports
- After the meeting, open the Teams calendar entry.
- Click Attendance to download the report.
- Track join/leave times and engagement levels.
- Reports are available for scheduled meetings, not Meet Now sessions.
Follow up and continue the work
- Create a new thread in the team channel for continued discussion.
- Schedule a follow-up meeting for unresolved tasks.
- Use Microsoft Forms or Polls to gather feedback on the meeting’s effectiveness.
How do I set up a Microsoft Teams meeting?
Setting up a Microsoft Teams meeting involves several key steps:
- Open Teams and navigate to the Calendar tab.
- Click the New meeting button.
- Add essential details including title, required attendees, date, and time.
- Use Meeting options to control who can present or bypass the lobby.
- Include an agenda in the description to set expectations.
- Attach relevant files participants may need.
- Click Save to create the meeting and send invitations.
👉 For full setup instructions, refer to the previous section of this guide, which covers scheduling via Teams, Outlook integration, inviting external participants, and starting instant meetings.
Solve Common Problems When Scheduling Meetings in Microsoft Teams
Even with Microsoft Teams’ streamlined meeting functionality, you might occasionally encounter issues when scheduling or joining meetings. This section addresses the most common problems users face and provides practical solutions to get your meetings back on track. Whether you’re struggling with account permissions, integration issues, or technical difficulties, these troubleshooting steps will help you resolve the situation quickly.
Why can’t I schedule Teams meeting?
If you’re unable to schedule a meeting, it’s typically due to licensing restrictions or account configuration.
Possible solutions:
Verify your account type and permissions:
- Confirm you’re signed in with a Microsoft 365 account that includes Teams licensing (e.g., Business Standard, E3, etc.).
- Free or personal Teams accounts may not include calendar/scheduling capabilities.
- Education accounts may have limited features based on admin settings.
Check organizational policies:
- Your IT department may have restricted meeting creation to specific user groups.
- Contact your Teams administrator to confirm your permissions.
Troubleshoot the Teams app:
- Update Teams: Click your profile picture → Check for updates.
- Sign out and sign back in.
- Close Teams completely (including from system tray), then clear the cache:
- Go to
%appdata%\Microsoft\Teamsand delete all contents.
- Go to
- As a last resort, uninstall and reinstall the Teams desktop app.
👉 Learn more about clearing Teams cache here: Clearing Cache in “New” Teams & Clearing Cache in “New” Teams for Mac
- Try alternate scheduling methods:
- Use Outlook to schedule the meeting (desktop or web).
- Use Teams on the web (https://teams.microsoft.com) if the desktop app malfunctions.
👉 How do I set up a meeting in Teams and send a link? To set up a meeting in Teams and send a link, open Teams, click the Calendar icon, then select “New meeting” and fill in all meeting details. Add participants by entering their email addresses, include any agenda items in the description field, and click “Send” to generate and distribute the meeting link automatically. For sharing just the link, you can either open the scheduled meeting, click the three dots, select “Meeting options,” and copy the join URL, or simply forward the meeting invitation to additional participants who need access.
How do I enable Microsoft Teams Meeting in Outlook?
If the Teams Meeting button is missing from Outlook, the Teams add-in may be disabled or not loading properly.
Possible solutions:
Check if the add-in is enabled:
- Open Outlook.
- Go to File > Options > Add-ins.
- At the bottom, set Manage to COM Add-ins and click Go.
- Ensure Microsoft Teams Meeting Add-in for Microsoft Office is checked.
- Click OK to save.
Repair or restore the add-in:
- Go to Windows Settings > Apps.
- Find Microsoft 365 (or Office) > Modify > Repair (Quick or Online).
- Restart Outlook after running the repair.
Check for version compatibility:
- Make sure both Teams and Outlook are up to date.
- Outlook 2013 or older is not compatible with the Teams add-in.
Verify Group Policy or admin settings:
- In enterprise environments, admins may disable the add-in via Group Policy.
- Contact your administrator to confirm if the Teams add-in is allowed.
Why can’t participants join the meeting?
Join issues often involve authentication, link errors, or lobby restrictions.
Possible solutions:
Check lobby settings:
- Open the meeting in your calendar.
- Click Meeting options.
- Under Who can bypass the lobby, ensure it is not set to “Only me.”
Review authentication requirements:
- If anonymous join is disabled by your organization, external participants must sign in with a Microsoft account.
- Confirm that the full meeting link was shared, including the
teams.microsoft.com/l/meetup-join...portion.
Address network or device restrictions:
- Participants behind strict corporate firewalls may be blocked from accessing Teams.
- Suggest using a personal device or mobile hotspot if company networks restrict access.
- Recommend joining through the web client if the app isn’t working.
Check attendee limits:
- Standard Teams meetings support up to 1,000 interactive participants.
- For larger events, consider using Teams webinars or live events.
Why can’t I record a meeting in Microsoft Teams?
If the Start recording option is unavailable or greyed out, it’s likely due to policy or licensing constraints.
Possible solutions:
Verify organizational recording policies:
- Admins can disable meeting recording across the organization or for specific groups.
- Contact your IT department to confirm recording permissions.
Check your meeting role:
- Only organizers and presenters can start or stop recordings.
- Attendees cannot initiate recordings unless promoted.
Confirm your license supports recording:
- Recording is available in Microsoft 365 Business Standard, E3, E5, A3, A5, and equivalent licenses.
- Free or personal Teams accounts do not support recording.
Check storage availability:
- Recordings are stored in:
- OneDrive (for private or group meetings)
- SharePoint (for channel meetings)
- If your storage quota is exceeded, recording may fail.
- Recordings are stored in:
Use alternatives if needed:
- If Teams recording is unavailable, consider third-party screen recording tools.
- Always notify participants if using external tools to comply with privacy laws.
Why isn’t my audio or video working during a meeting?
Audio and video issues are common but usually easy to fix.
Possible solutions:
Check your device settings:
- Click More actions (•••) > Settings > Devices.
- Ensure the correct microphone, speakers, and camera are selected.
- Use the Test call feature to confirm device functionality.
Verify operating system permissions:
- On Windows: Go to Settings > Privacy & security > Camera/Microphone and allow access.
- On macOS: Go to System Settings > Privacy & Security > Enable Teams access to camera/mic.
Troubleshoot hardware:
- Disconnect and reconnect USB devices (headsets, webcams).
- Try different ports or test on another app.
Close conflicting software:
- Shut down apps that may be using your camera (Zoom, Skype, etc.).
- Temporarily disable antivirus software if it’s blocking audio/video.
Address network issues:
- Use a wired Ethernet connection if possible.
- Close other bandwidth-heavy applications.
- Turn off video to preserve audio quality on weak connections.
Why isn’t the meeting link working?
Meeting links should provide direct access, but issues may arise due to formatting or policy settings.
Possible solutions:
Confirm the link is intact:
- Use the Copy meeting invite or Share via Outlook option rather than copying from the address bar.
- Some email clients break long URLs—use plain text or hyperlinks if needed.
Check link validity:
- Teams meeting links don’t technically expire, but:
- Canceled or rescheduled recurring meetings may cause confusion.
- If in doubt, create a new single-instance meeting and share a fresh link.
- Teams meeting links don’t technically expire, but:
Verify external access settings:
- Ensure your organization allows guest access and/or anonymous join.
- Check Meeting options for lobby settings that may block external attendees.
Offer alternative join methods:
- Include the meeting ID and passcode, available in the calendar invite.
- Include dial-in phone numbers if your license supports Audio Conferencing.
👉 For persistent or organization-specific problems, always contact your IT support team. Many issues stem from tenant-level settings, security policies, or licensing constraints that only administrators can review or adjust.
How Virto Calendar App for Microsoft Teams Improves Meeting Scheduling
Effective scheduling is essential to keeping teams aligned and projects on track. While Microsoft Teams offers built-in calendar functionality, the Virto Calendar App enhances this experience by providing a more efficient, intuitive, and customizable way to manage meetings and calendars within Teams.
Whether you’re managing project timelines, coordinating with cross-functional teams, or planning company-wide events, Virto Calendar offers a centralized solution that simplifies the scheduling process and ensures no meeting falls through the cracks.
Simplifying scheduling with Virto Calendar
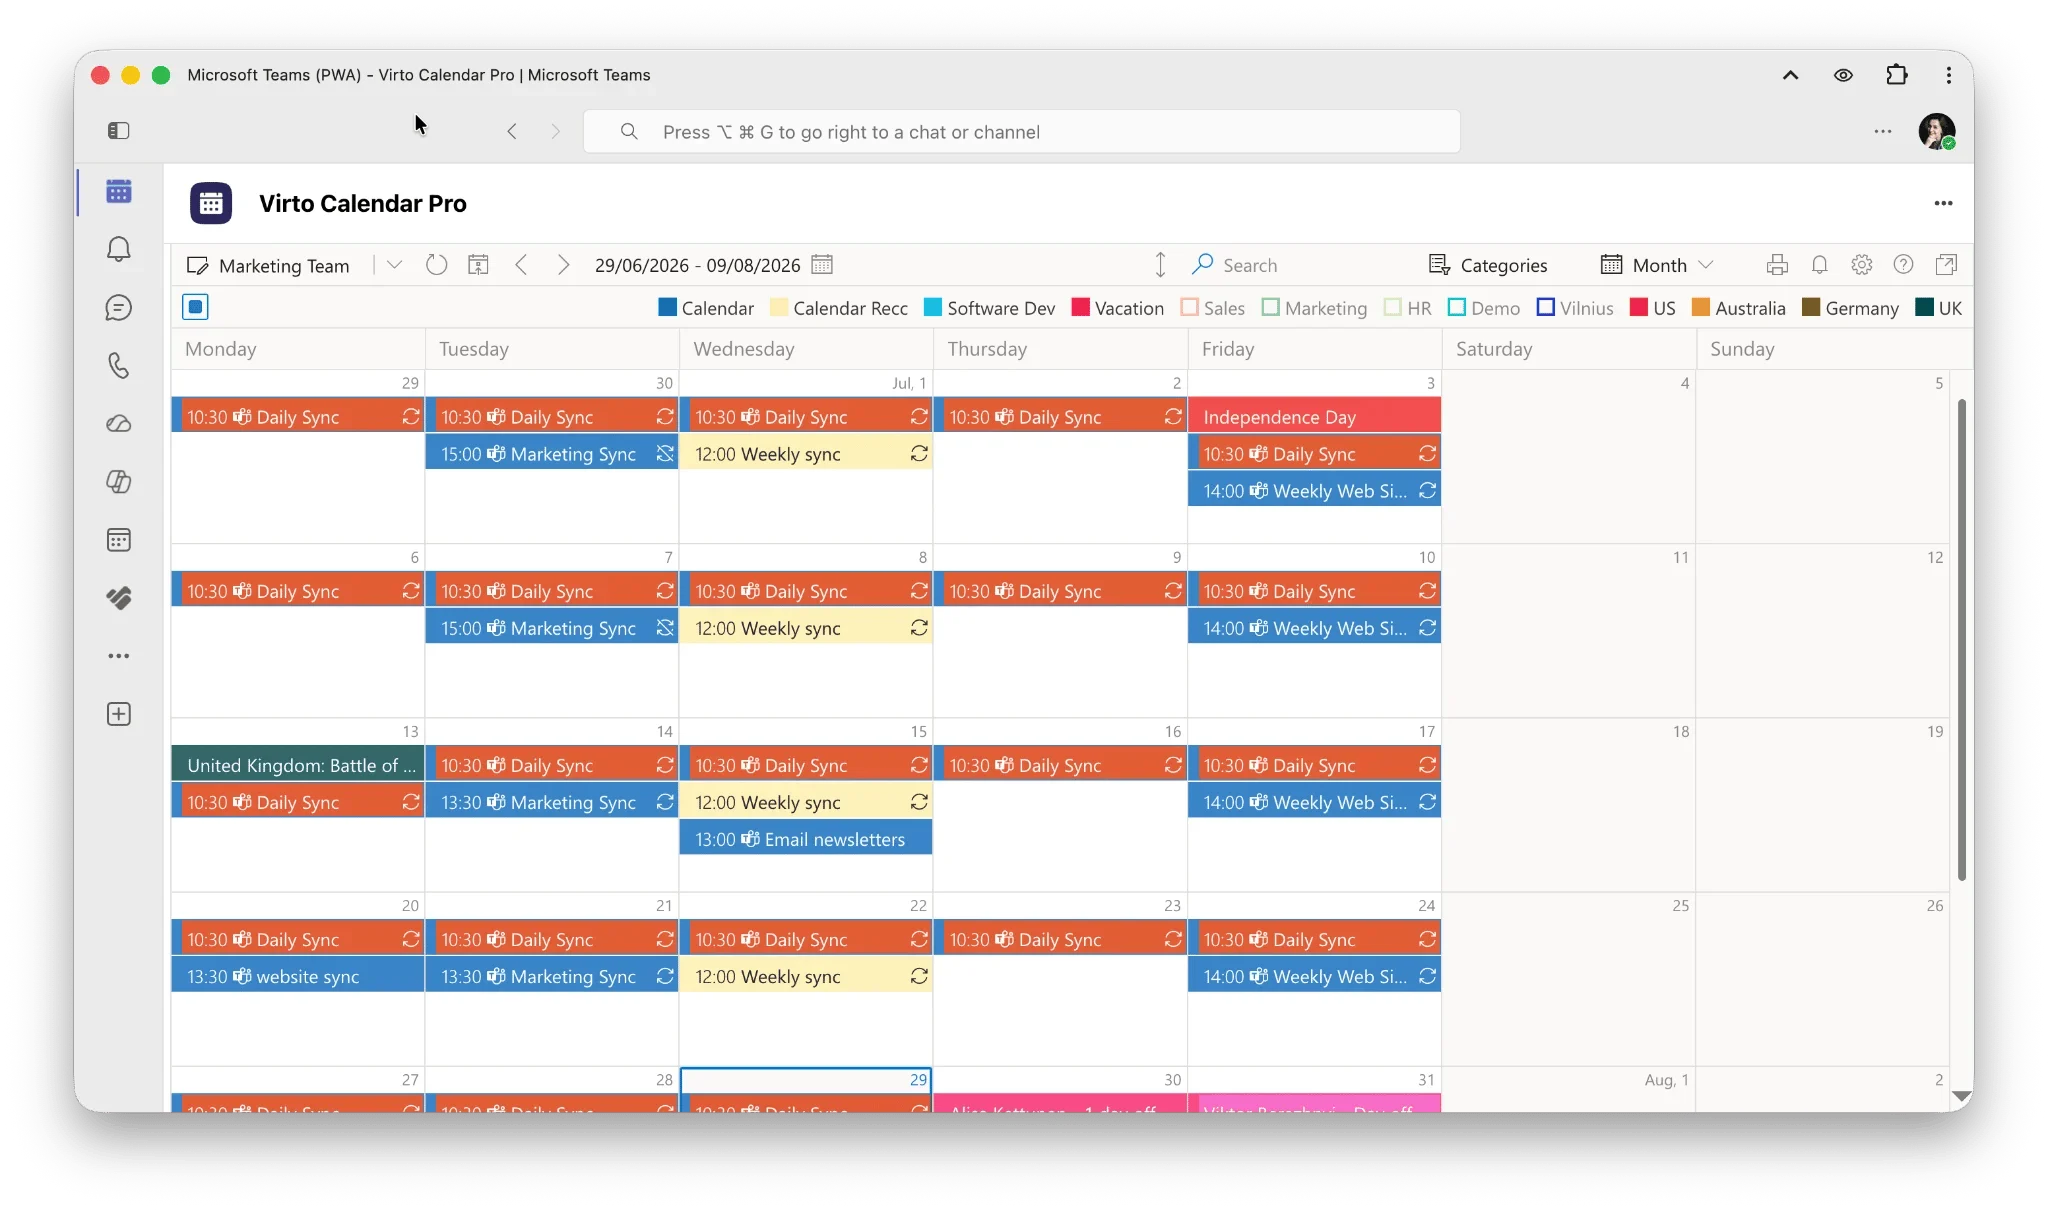
Pic. 17. Sample Virto Calendar within Teams.
The Virto Calendar App streamlines meeting scheduling in Microsoft Teams by offering powerful tools for visibility, planning, and automation. Here’s how it improves your scheduling workflow:
Seamless sync with Outlook and Teams: Virto Calendar integrates directly with Microsoft Teams and Outlook, allowing users to schedule meetings in one platform and see them reflected across both. This eliminates duplicate bookings and ensures consistent availability tracking.
Flexible calendar views: Users can choose from various calendar views—Day, Week, Month, Task, Year, and multi-source—to manage their schedules at a glance. This makes it easier to visualize overlapping events and better allocate time.
Automatic notifications: Built-in reminders and alerts notify team members of upcoming meetings, reducing the risk of missed appointments or late arrivals. Notifications can be customized for different user preferences.
Support for group and recurring meetings: Virto Calendar makes it easy to schedule meetings for multiple attendees or entire teams. Recurring meetings can be created with custom patterns, helping teams maintain regular syncs without repetitive manual scheduling.
Cross-platform access: With mobile responsiveness and browser-based access, users can manage and schedule meetings on the go, from any device—ensuring flexibility and continuity.
Add Virto Calendar as an app in Teams—not just a channel tab
Most teams first add Virto Calendar as a tab inside a specific channel, which is ideal for a shared, project-level calendar that everyone in the team can see. But you don’t have to open a channel every time you want to check your schedule. You can also pin Virto Calendar as an app in the Teams left sidebar, so your calendar—and the meetings on it—are always one click away, no matter which team or chat you happen to be in.
Pin it as an app: In Teams, open Apps, search for Virto Calendar Pro, then right-click its icon in the app bar and choose Pin. (If you don’t see it, an administrator may first need to approve the app in the Teams admin center under Manage apps.)
Open your calendar from anywhere: Once pinned, click the Virto Calendar icon in the sidebar to open your full calendar—with Day, Week, Month, and multi-source views—directly inside Teams, without navigating to any particular channel.
Open a meeting right from the app: Select any event on the calendar to view its details and join or open the meeting on the spot, letting you go straight from your schedule into a Teams call in a single place.
Because each Microsoft 365 host keeps its own app bar, pinning Virto Calendar in Teams doesn’t automatically pin it in Outlook or the Microsoft 365 app—you can add it in each place you work. Learn more about the Virto Calendar app for Teams, Outlook, and Microsoft 365.
Key features that enhance meeting scheduling
Let’s take a closer look at the core features of the Virto Calendar App that specifically improve meeting scheduling in Microsoft Teams:
- Centralized schedule management
All events, meetings, tasks, and appointments from connected Microsoft 365 and external calendars (like Google or iCal) are displayed in a unified interface, making it easy to coordinate across projects and departments.
- Outlook and Teams integration
Virto Calendar ensures seamless two-way synchronization with both Outlook and Microsoft Teams, so newly created events instantly appear in both calendars. This prevents scheduling conflicts and unifies your team’s workflows.
- Create and customize meetings
Users can quickly schedule meetings by adding participants, defining meeting details like agendas, and choosing meeting parameters such as time, recurrence, and location. The intuitive UI makes this process fast and user-friendly.
- Flexible calendar views
Switch between Day, Week, Month, or Task views depending on your planning needs. This flexibility allows users to zoom in on daily priorities or map out long-term scheduling with ease.
- Automated reminders and notifications
Customizable reminders are automatically sent to all participants before the meeting starts. This helps reduce no-shows and ensures team members are prepared.
- Team and channel collaboration
Schedule meetings directly for a specific Microsoft Teams channel or group, removing the need to manually add every participant. This ensures everyone in the team is automatically notified and the meeting appears in the shared calendar.
Example: Scheduling a project kickoff meeting with Virto Calendar
Imagine a project manager needing to organize a kickoff meeting for a new cross-functional initiative. Using Virto Calendar:
- The manager opens the Virto Calendar tab in the Teams channel dedicated to the project.
- They select a Week View to find available time slots across team members’ calendars.
- They click the desired time slot and create a new event titled “Project Alpha Kickoff”.
- The manager adds an agenda, specifies required attendees from various departments, and sets a recurrence for weekly follow-up meetings.
- A reminder is configured to notify all participants 15 minutes before the meeting.
- The event is saved, and it automatically appears in both Microsoft Teams and Outlook calendars for all invitees.
As a result, the kickoff meeting is clearly scheduled, communicated to all stakeholders, and tracked alongside other project milestones.
Conclusion on How to Schedule a Teams Meeting
As we’ve explored throughout this guide, Microsoft Teams offers powerful tools for scheduling, managing, and conducting effective meetings in today’s hybrid work environment. From basic scheduling to advanced calendar management with tools like Virto Calendar App, Teams provides the flexibility organizations need to coordinate their collaborative work.
The evolution of Teams’ meeting capabilities continues to accelerate, with the recent integration between Teams Calendar and Outlook in early 2025 representing a significant step forward. These improvements demonstrate Microsoft’s commitment to creating a seamless experience that eliminates the boundaries between different collaboration tools.
Effective meeting management in Teams extends beyond simply creating calendar events. By leveraging features like lobby controls, recording capabilities, and flexible participant management, meeting organizers can create secure, productive environments for discussion and decision-making. When issues arise, the troubleshooting approaches we’ve outlined can quickly resolve common problems and keep your meetings on track.
For organizations with more complex scheduling needs, third-party solutions like Virto Calendar App enhance Teams’ native capabilities with multi-calendar overlays, advanced visualization options, and deeper integration across the Microsoft ecosystem. These tools transform Teams from a communication platform into a comprehensive meeting management system that supports sophisticated workflows. We encourage you to schedule a quick demonstration now to see how the app works in action or go ahead and install a free trial of the app to experience these benefits firsthand.
Regardless of which approach you choose, the key to successful meetings lies in thoughtful planning, clear communication, and leveraging the right tools for your specific needs. By mastering the meeting capabilities in Microsoft Teams, you can reduce coordination overhead, minimize scheduling conflicts, and create more effective collaboration experiences for your entire organization.
To deepen your understanding of Microsoft Teams meeting capabilities and calendar management, explore these valuable resources:
Official Microsoft documentation:
- Schedule a meeting in Microsoft Teams Free
- Create a meeting in Microsoft Teams Free
- Schedule and join a meeting
- Teams meeting troubleshooting
Helpful blog resources: