A shared calendar lets one person open their personal Outlook calendar to chosen colleagues, clients, or partners — so others can see availability, coordinate meetings, and stay in sync without endless back-and-forth. This guide walks through exactly how to create and share a calendar in Office 365 / Microsoft 365 using Outlook, how to set the right permissions, where the native experience runs into limits, and how to overlay everything in one view with Virto.
Quick answer: how to create a shared calendar in Office 365
The shortest path in Outlook: Open Outlook on the web, go to Calendar, and select Add calendar → Create blank calendar. Name it and click Save. Then right-click the new calendar (or the three-dot menu), choose Sharing and permissions, enter the email addresses of the people you want to share with, set each person’s permission level (view-only or edit), and send. The calendar appears under Other calendars for everyone you shared it with.
Shared calendar vs group calendar (quick clarification)
Before you start, it’s worth being clear about which kind of calendar you actually need, because Microsoft 365 uses two similar-sounding terms for two different things:
- A shared calendar is a personal calendar that one owner chooses to share with specific people. The owner stays in control, and recipients get the access level the owner grants — typically view-only or edit. This is what you want when you simply need others to see or contribute to your schedule.
- A group calendar is created automatically when you set up a Microsoft 365 Group (or Team). It belongs to the group as a whole, and every member can view and add events to it. This is what you want for a standing team or project that needs a shared space owned by the group rather than one person.
This guide focuses on shared calendars. If you specifically need a group calendar tied to a Microsoft 365 Group, see our dedicated walkthrough: Microsoft 365 Group Calendar: Setup & Management Guide.
How to create & share a calendar in Outlook (step by step)
There are two places you’ll typically do this: Outlook on the web (the most common, and the simplest) and the Outlook desktop app. The steps are nearly identical.
Create a shared calendar in Outlook on the web
- Open the Calendar. Sign in to Outlook on the web and click the calendar icon in the left-hand navigation.
- Add a new calendar. Select “Add calendar,” then choose “Create blank calendar.”
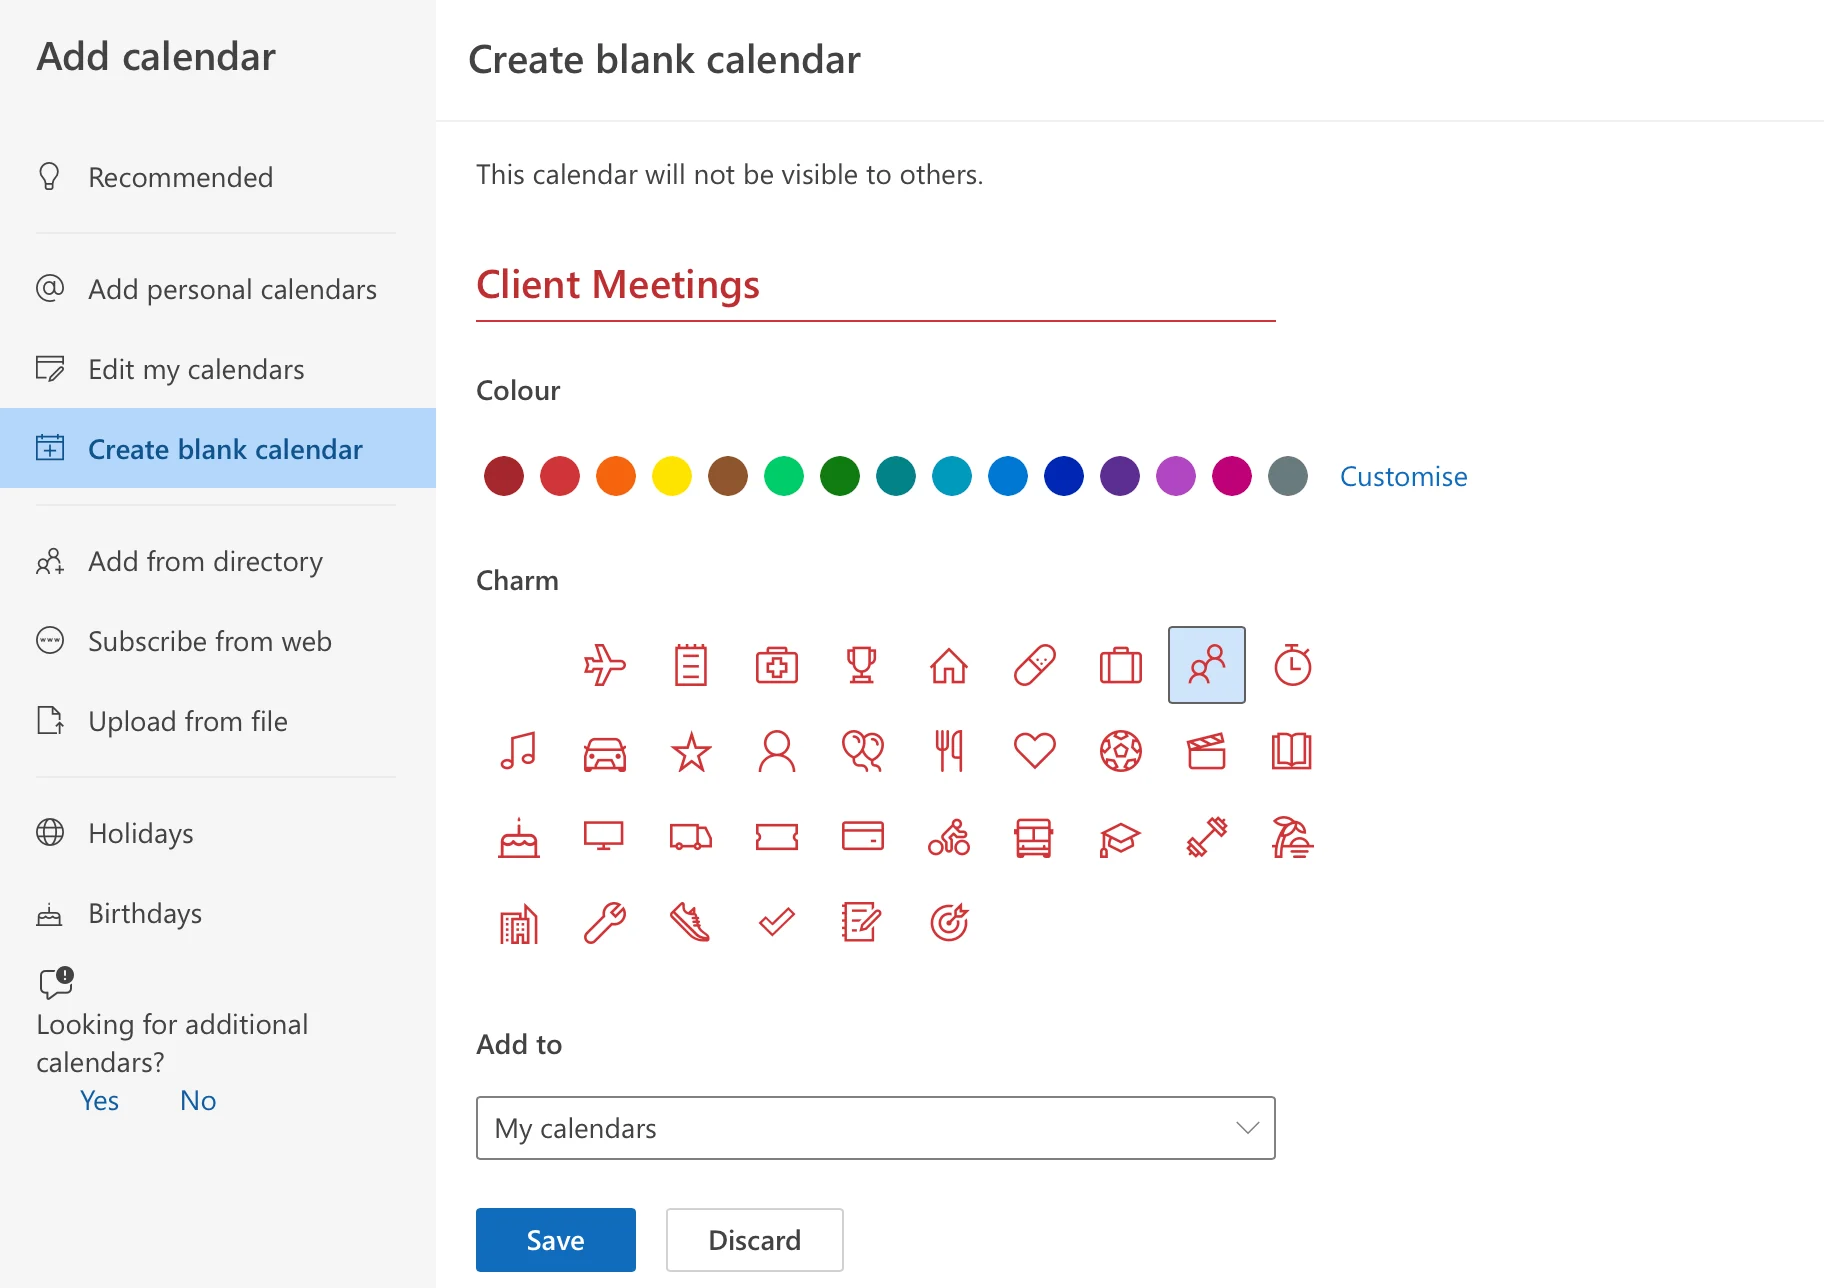
Pic. 1. Select “Create blank calendar” to start a new shared calendar from scratch.
- Name and save. Give the calendar a clear name (for example, “Marketing Team” or “Client Meetings”), pick a color if you like, and click “Save.”

Pic. 2. Name your new calendar and save it.
- Open sharing. Right-click the new calendar in the left pane (or click the three-dot menu next to it) and select “Sharing and permissions.”
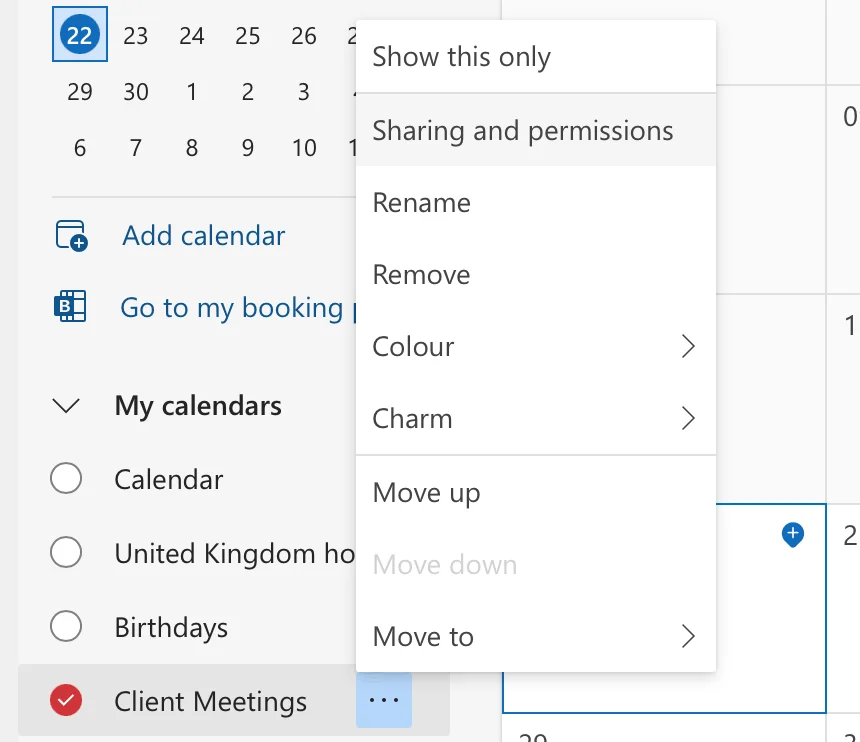
Pic. 3. Open “Sharing and permissions” to share the calendar with people.
- Add people and set access. Enter the names or email addresses of the people you want to share with, choose the permission level for each (see the next section), and send the invitation.
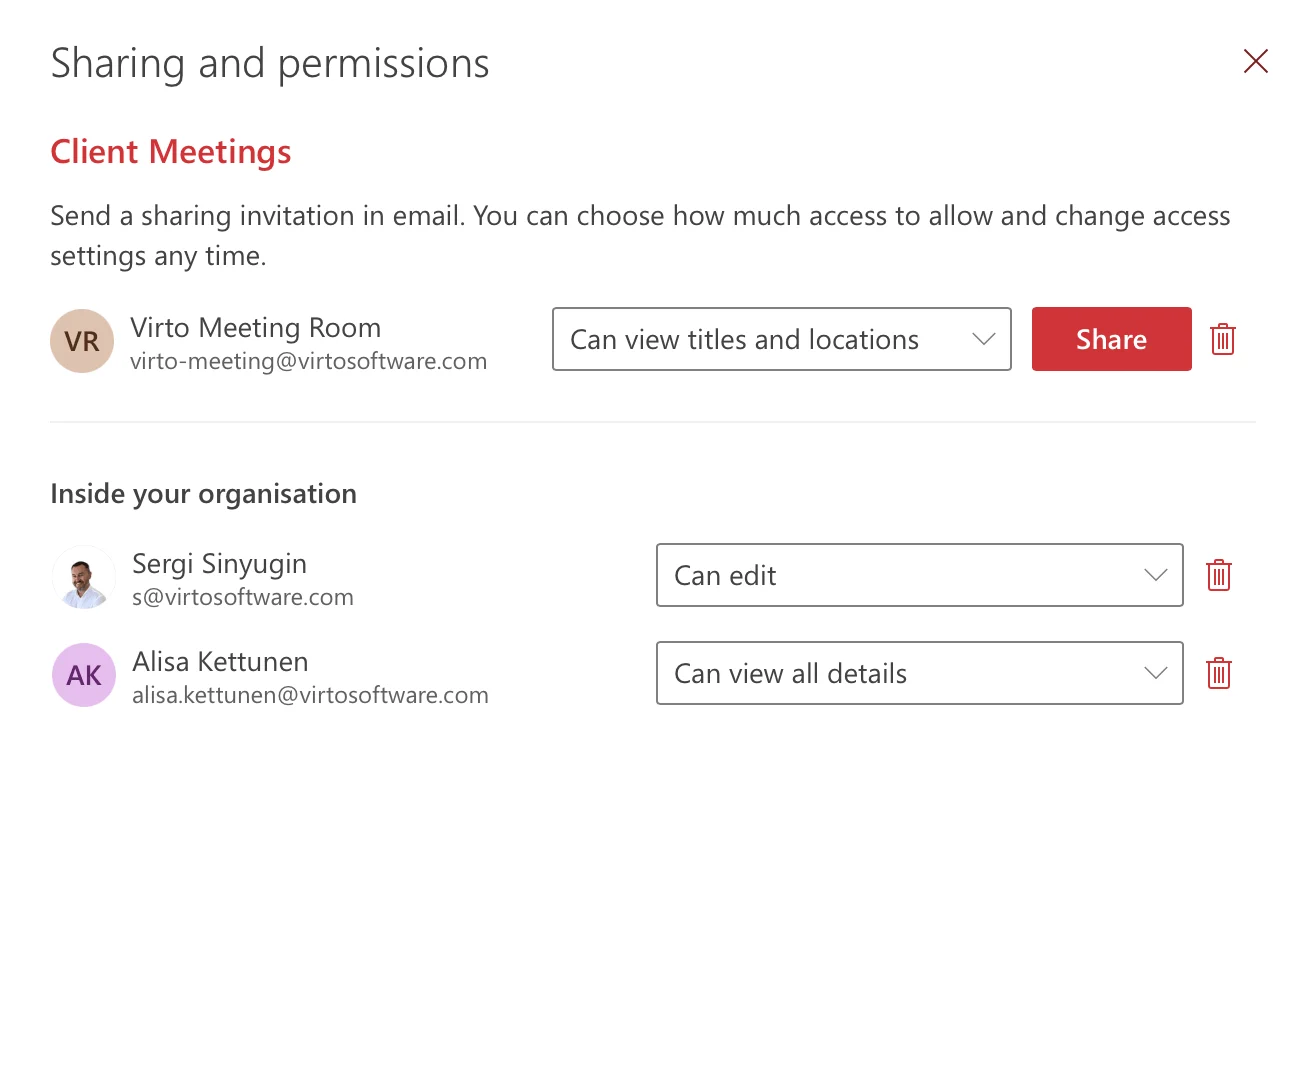
Pic. 4. Enter recipients and choose a permission level for each person.
Create a shared calendar in the Outlook desktop app
- Go to the Calendar view in the Outlook desktop app.
- Create the calendar. On the Folder tab, select “New Calendar,” name it, choose where it lives, and click “OK.”
- Share it. Right-click the new calendar and choose “Share” (or “Sharing Permissions”), then add recipients and set their access level just as you would on the web.
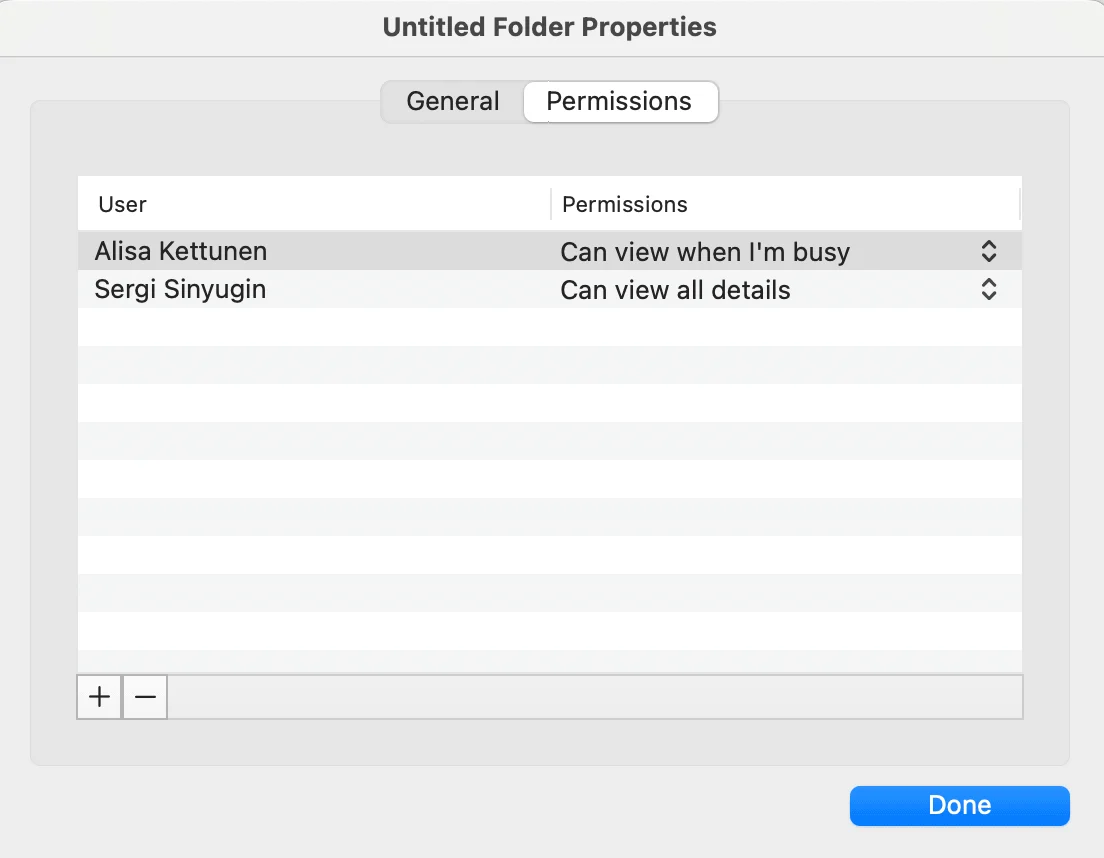
Pic. 5. Sharing a calendar from the Outlook desktop app.
👉 How do I create a shared calendar in Office 365? In Outlook, open the Calendar, select “Add calendar → Create blank calendar,” name it and save. Then right-click the calendar, choose “Sharing and permissions,” add the people you want, set each person’s permission level, and send. The shared calendar then appears under “Other calendars” for everyone you invited.
Set permissions & share externally
Permissions decide what the people you share with can actually see and do. Setting them deliberately is the single most important step for keeping a shared calendar both useful and safe.
Internal permission levels
- View only (availability): Recipients see whether you’re free or busy, with no event details. Best for broad, low-trust sharing.
- View titles and locations / limited details: Recipients see the subject and location of events but not full details. A practical middle ground.
- View all details: Recipients see everything in each event. Use for close collaborators only.
- Edit: Recipients can add and change events. Reserve this for people who genuinely co-manage the calendar.
- Delegate access: A delegate can manage the calendar on your behalf, including responding to meeting invitations. This goes beyond ordinary sharing — grant it only to trusted assistants or co-owners.
Share with people outside your organization
Microsoft 365 lets you share a calendar with external partners and clients, provided your administrator has enabled external sharing. The flow mirrors internal sharing:
- Open the calendar’s Sharing and permissions.
- Enter the external email address.
- Choose a conservative access level — availability only is usually the safest starting point for people outside your company.
- Send the invitation; the recipient accepts and the calendar appears alongside their own.

Pic. 6. Specify an external recipient and permission level.
Tips for safe external sharing
- Default to the least access that works. Start with availability-only and increase only if needed.
- Watch event titles and notes. Use generic titles for sensitive meetings, since titles can be visible even at limited-detail levels.
- Separate calendars by purpose. Keep a dedicated calendar for external coordination rather than exposing your full personal calendar.
- Review access periodically. Remove people who no longer need it and confirm permission levels still match the relationship.
For a deeper walkthrough of every Outlook sharing option, see our companion guide: Your Ultimate Guide to Sharing Outlook Calendars.
Limitations of Office 365 shared calendars
Native shared calendars cover the basics well, but teams that juggle several calendars at once tend to hit the same friction points:
- No true overlay. Outlook shows shared calendars side by side, but combining many calendars into one clean, color-coded view is clumsy once you go past a few.
- Limited cross-source visibility. Pulling together Exchange, SharePoint, group, and external calendars in a single place isn’t something native Outlook does gracefully.
- Permission management at scale. Setting and auditing permissions one calendar at a time gets tedious for larger teams.
- Sharing inconsistencies. External sharing behavior and detail levels can vary, requiring care to avoid over-exposing information.
If any of these sound familiar, a purpose-built overlay tool fills the gap.
Easier shared calendars with Virto (overlay + anonymous sharing)
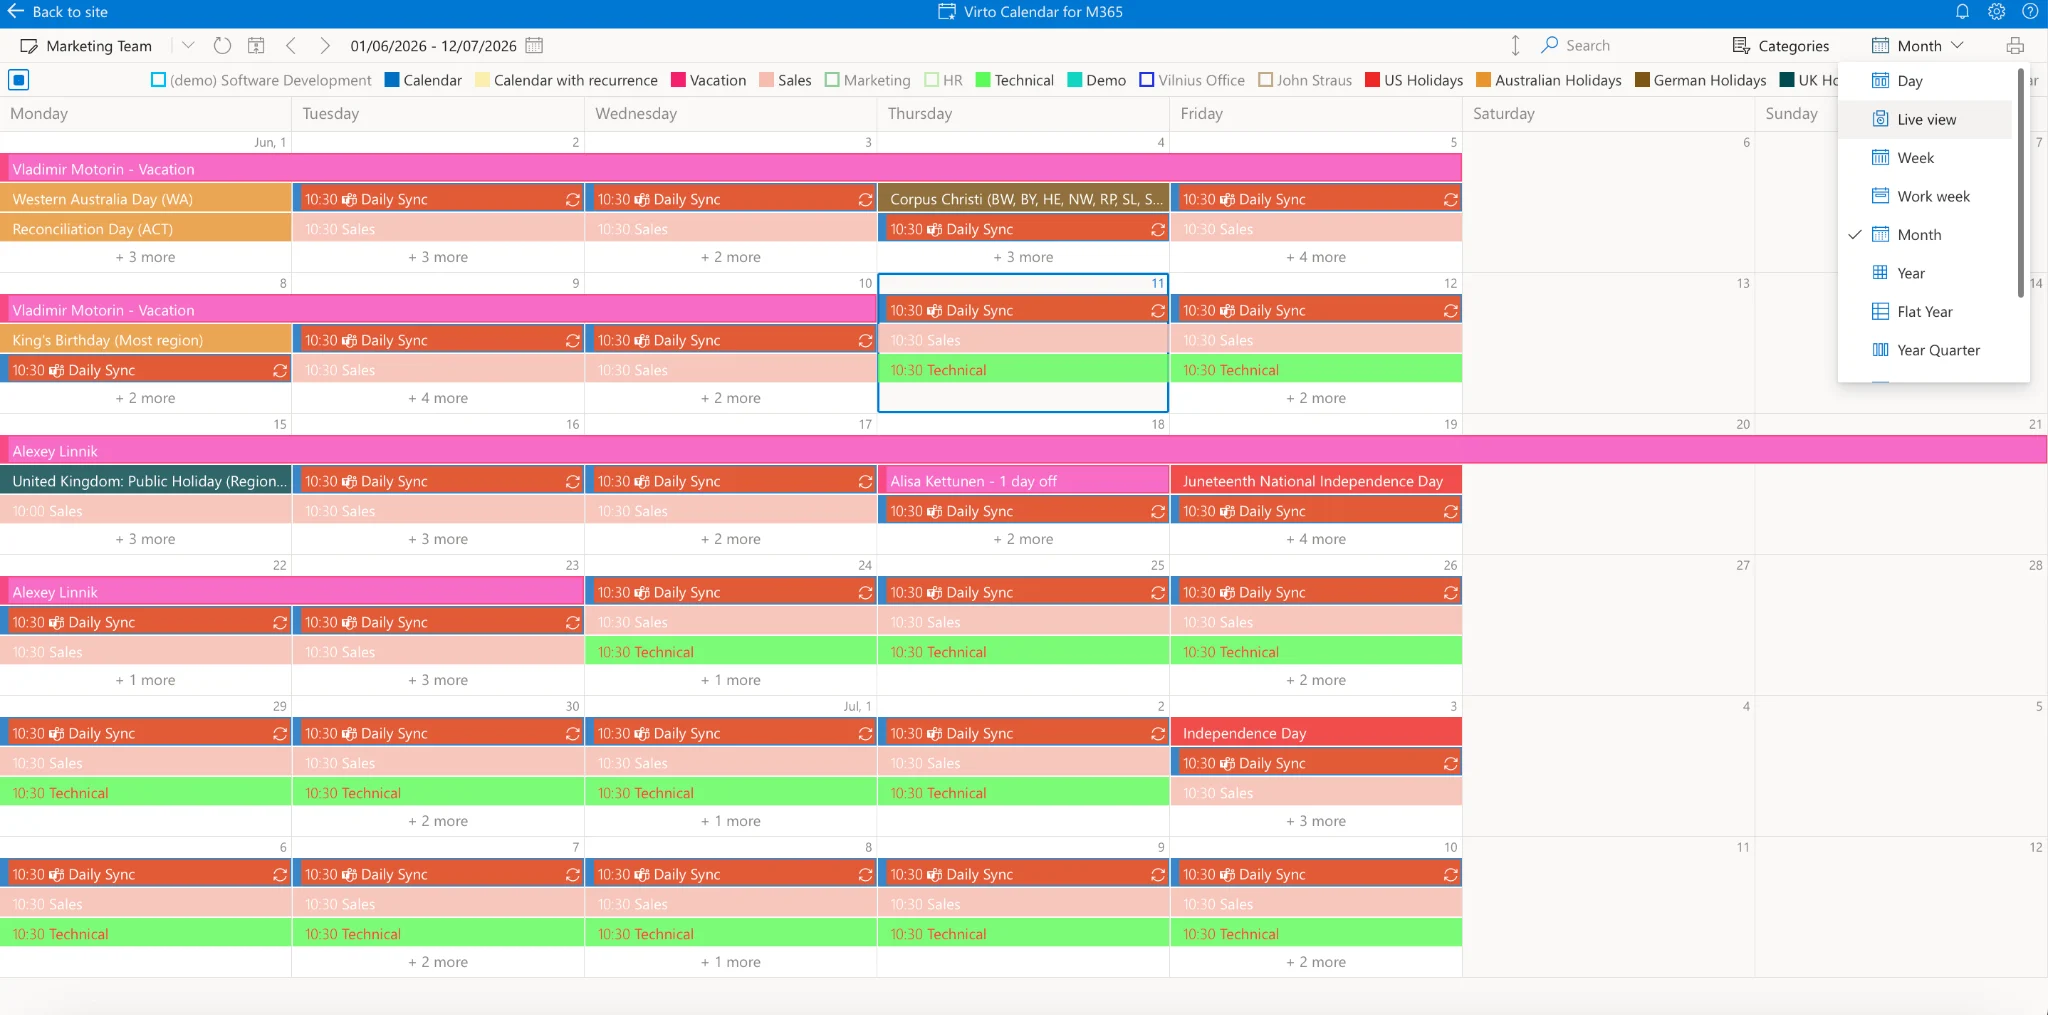
The Virto Calendar App for SharePoint Online & Microsoft 365 lets you overlay Outlook, SharePoint, group, and even external calendars in one view — so everything your team needs to see lives on a single, color-coded screen inside Teams or SharePoint.
Where native sharing stops, Virto adds:
- Unified overlay: Combine multiple calendars from Exchange Online, SharePoint, Google, and more into one view.
- Color-coding and custom views: Distinguish sources and event types at a glance, with day, week, month, and Gantt views.
- Anonymous and external sharing: Publish a calendar view to people who don’t have a Microsoft 365 account, without exposing your whole environment.
- Teams integration and mobile access: Real-time updates inside Teams channels and on the go.
- Stays in your cloud: Data remains within your Microsoft 365 environment, under your control.
Looking for a lightweight option instead? Virto Shared Calendar gives teams a simple shared team calendar in Microsoft Teams. You can try the Virto Calendar App for free or request a demo to see it in action.
FAQ
How do I create a shared calendar in Office 365?
Open Outlook, go to Calendar, and choose “Add calendar → Create blank calendar.” Name and save it, then right-click the calendar, select “Sharing and permissions,” add the people you want, set each person’s permission level, and send. The calendar then appears under “Other calendars” for everyone you shared it with.
What’s the difference between a shared calendar and a group calendar in Office 365?
A shared calendar is one person’s calendar opened to chosen people, with the owner controlling access. A group calendar belongs to a Microsoft 365 Group and is shared automatically among all its members. For the group-calendar route, see our Microsoft 365 Group Calendar guide.
Can I share an Office 365 calendar with someone outside my organization?
Yes, as long as your administrator has enabled external sharing. Use the same “Sharing and permissions” flow, enter the external email address, and choose a conservative access level such as availability-only to protect sensitive details.
Does Office 365 have a shareable calendar?
Yes. Microsoft 365 includes built-in calendar sharing through Outlook, and calendars can be shared with specific individuals, groups, or company-wide depending on the permissions the owner sets.
